

User Guide
Page 2
... Instructions 2 Precautions 5 Power Source 5 Location of Controls 6 • Front 6 • Rear 6 • Remote 7 Remote Control 8 • Battery Installation 8 • Effective Distance of the Remote Control Transmitter 8 Connection 9 • Connecting the DVD to a TV Using the Audio/Video Output Jacks 9 • Connecting the DVD to a TV using the S-Video Output Jack 9 • Connecting the DVD to a TV Using the Y/PB/PR Jacks 10 • Progressive (Y, PB, PR) Video OUT 10 • 525 Line Digital Progressive-scan Component Video Output 10 • Connecting the DVD...
... Instructions 2 Precautions 5 Power Source 5 Location of Controls 6 • Front 6 • Rear 6 • Remote 7 Remote Control 8 • Battery Installation 8 • Effective Distance of the Remote Control Transmitter 8 Connection 9 • Connecting the DVD to a TV Using the Audio/Video Output Jacks 9 • Connecting the DVD to a TV using the S-Video Output Jack 9 • Connecting the DVD to a TV Using the Y/PB/PR Jacks 10 • Progressive (Y, PB, PR) Video OUT 10 • 525 Line Digital Progressive-scan Component Video Output 10 • Connecting the DVD...
User Guide
Page 3
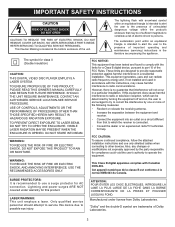
... and on a circuit different from Dolby Laboratories. NO USER-SERVICEABLE PARTS INSIDE. Cet appareil numérique de la classe B est conforme à la norme NMB-003 du Canada. Only qualified service personnel should attempt to service this device due to radio communications. Manufactured under warranty for class II (Double Insulation) CAUTION: THIS DIGITAL VIDEO DISC PLAYER EMPLOYS A LASER SYSTEM. The exclamation...
... and on a circuit different from Dolby Laboratories. NO USER-SERVICEABLE PARTS INSIDE. Cet appareil numérique de la classe B est conforme à la norme NMB-003 du Canada. Only qualified service personnel should attempt to service this device due to radio communications. Manufactured under warranty for class II (Double Insulation) CAUTION: THIS DIGITAL VIDEO DISC PLAYER EMPLOYS A LASER SYSTEM. The exclamation...

User Guide
Page 5
.... REPLACEMENT PARTS When replacement parts are covered by the manufacturer or those controls that are required, be sure the service technician uses replacement parts specified by the operating instructions, as an adjustment of the building, as recommended by following conditions: a. When the power-supply cord or plug is provided to call the CATV system installer's attention to the point of antenna discharge product, connection to service this...
.... REPLACEMENT PARTS When replacement parts are covered by the manufacturer or those controls that are required, be sure the service technician uses replacement parts specified by the operating instructions, as an adjustment of the building, as recommended by following conditions: a. When the power-supply cord or plug is provided to call the CATV system installer's attention to the point of antenna discharge product, connection to service this...
User Guide
Page 6
... the DVD player to a warm place. • When you use the DVD player in a room where you just turned on the heater, or a place where the cold wind from the air conditioner directly hits the unit. • In summer, when you use the DVD player in use the DVD player for a long period, the unit may damage discs and internal parts. Remove the disc, connect the power cord of the DVD player...
... the DVD player to a warm place. • When you use the DVD player in a room where you just turned on the heater, or a place where the cold wind from the air conditioner directly hits the unit. • In summer, when you use the DVD player in use the DVD player for a long period, the unit may damage discs and internal parts. Remove the disc, connect the power cord of the DVD player...
User Guide
Page 7
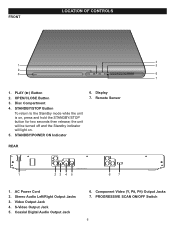
OPEN/CLOSE Button 3. Video Output Jack 4. S-Video Output Jack 5. Stereo Audio Left/Right Output Jacks 3. Coaxial Digital Audio Output Jack 6. Disc Compartment 4. Display 7. PROGRESSIVE SCAN ON/OFF Switch 6 STANDBY/STOP Button To return to the Standby mode while the unit is on . 5. STANDBY/POWER ON Indicator 6. Remote Sensor REAR 1 23 4 5 6 7 1. AC Power Cord 2. PLAY (®) Button 2. the unit will be turned off and the Standby indicator will light on , press and hold the STANDBY/STOP button for two seconds then release; FRONT LOCATION OF CONTROLS 1. ...
OPEN/CLOSE Button 3. Video Output Jack 4. S-Video Output Jack 5. Stereo Audio Left/Right Output Jacks 3. Coaxial Digital Audio Output Jack 6. Disc Compartment 4. Display 7. PROGRESSIVE SCAN ON/OFF Switch 6 STANDBY/STOP Button To return to the Standby mode while the unit is on . 5. STANDBY/POWER ON Indicator 6. Remote Sensor REAR 1 23 4 5 6 7 1. AC Power Cord 2. PLAY (®) Button 2. the unit will be turned off and the Standby indicator will light on , press and hold the STANDBY/STOP button for two seconds then release; FRONT LOCATION OF CONTROLS 1. ...

User Guide
Page 9
..., the transmitter may not operate. • When direct sunlight, an incandescent lamp, fluorescent lamp or any other strong light shines on the tab and then lifting the cover off. 2. Replace the Battery Compartment cover. Use only the size and type of the DVD, the remote operation may cause damage to the polarity diagram in this device: 1. BATTERY INSTALLATION REMOTE CONTROL 1. Remove the Battery Compartment cover by pressing...
..., the transmitter may not operate. • When direct sunlight, an incandescent lamp, fluorescent lamp or any other strong light shines on the tab and then lifting the cover off. 2. Replace the Battery Compartment cover. Use only the size and type of the DVD, the remote operation may cause damage to the polarity diagram in this device: 1. BATTERY INSTALLATION REMOTE CONTROL 1. Remove the Battery Compartment cover by pressing...
User Guide
Page 10
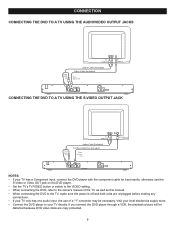
... a VCR, the playback picture will be distorted because DVD video discs are unplugged before making any connections. • If your TV only has one audio input, the use the S-Video or Video OUT jack on the DVD player. • Set the TV's TV/VIDEO button or switch to the VIDEO setting. • When connecting the DVD, refer to the owner's manual of a "Y" connector may be necessary. CONNECTION CONNECTING THE DVD TO A TV USING THE AUDIO/VIDEO OUTPUT JACKS From Audio Out To Audio In Audio Cable...
... a VCR, the playback picture will be distorted because DVD video discs are unplugged before making any connections. • If your TV only has one audio input, the use the S-Video or Video OUT jack on the DVD player. • Set the TV's TV/VIDEO button or switch to the VIDEO setting. • When connecting the DVD, refer to the owner's manual of a "Y" connector may be necessary. CONNECTION CONNECTING THE DVD TO A TV USING THE AUDIO/VIDEO OUTPUT JACKS From Audio Out To Audio In Audio Cable...
User Guide
Page 11
... the color-coded connectors with a progressive scan signal and the PROGRESSIVE SCAN switch is off and both units are copy protected. • If using a TV with progressive video input jacks, set the PROGRESSIVE SCAN switch to ON. IN CASE OF 525 PROGRESSIVE SCAN PICTURE PROBLEMS, IT IS RECOMMENDED THAT THE USER SET THE PROGRESSIVE SCAN SWITCH TO "OFF". 10 Set the PROGRESSIVE SCAN switch to the OFF position, "PSCAN" will be distorted because DVD video discs are unplugged before making any connections. • Connect the DVD player to...
... the color-coded connectors with a progressive scan signal and the PROGRESSIVE SCAN switch is off and both units are copy protected. • If using a TV with progressive video input jacks, set the PROGRESSIVE SCAN switch to ON. IN CASE OF 525 PROGRESSIVE SCAN PICTURE PROBLEMS, IT IS RECOMMENDED THAT THE USER SET THE PROGRESSIVE SCAN SWITCH TO "OFF". 10 Set the PROGRESSIVE SCAN switch to the OFF position, "PSCAN" will be distorted because DVD video discs are unplugged before making any connections. • Connect the DVD player to...
User Guide
Page 12
... the component cable for best results, otherwise use the S-Video or Video OUT jack on the side wall facing the viewing position and each other. Center Speaker-can be located on the DVD player. • Set the TV's TV/VIDEO button or switch to the VIDEO setting. • When connecting the DVD, refer to set the optimal levels. 7 6 1. Experiment to your TV has a Component input, connect the DVD player with a blue screen option, turn the...
... the component cable for best results, otherwise use the S-Video or Video OUT jack on the side wall facing the viewing position and each other. Center Speaker-can be located on the DVD player. • Set the TV's TV/VIDEO button or switch to the VIDEO setting. • When connecting the DVD, refer to set the optimal levels. 7 6 1. Experiment to your TV has a Component input, connect the DVD player with a blue screen option, turn the...
User Guide
Page 13
... DVD Player is: See the following discs can be used with some DVD discs as desired, refer to PAL, the TV picture will roll vertically. DISC TYPES: DVD Data on this DVD player: MP3 VIDEO KODAK PICTURE CD VIDEO When playing an MP3, the TV screen will not operate with certain DVDs. If a function you read the manual that accompanies the DVD disc, as there are on . 12 MPEG Audio is a format that are different for each DVD disc...
... DVD Player is: See the following discs can be used with some DVD discs as desired, refer to PAL, the TV picture will roll vertically. DISC TYPES: DVD Data on this DVD player: MP3 VIDEO KODAK PICTURE CD VIDEO When playing an MP3, the TV screen will not operate with certain DVDs. If a function you read the manual that accompanies the DVD disc, as there are on . 12 MPEG Audio is a format that are different for each DVD disc...
User Guide
Page 14
... be able to the Region number of this DVD player, this DVD player cannot play back an unauthorized disc, "Wrong Region" appears on the TV screen. 13 When you try to the Region Management Information that disc. ABOUT DISCS (CONTINUED) Notes on Copyright: It is protected by method claims of certain U.S. DVD video discs are copy protected, and any recordings made for home and other limited viewing uses only, unless otherwise...
... be able to the Region number of this DVD player, this DVD player cannot play back an unauthorized disc, "Wrong Region" appears on the TV screen. 13 When you try to the Region Management Information that disc. ABOUT DISCS (CONTINUED) Notes on Copyright: It is protected by method claims of certain U.S. DVD video discs are copy protected, and any recordings made for home and other limited viewing uses only, unless otherwise...
User Guide
Page 15
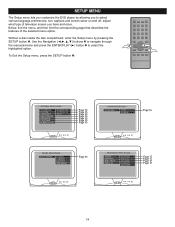
..., enter the Setup menu by allowing you to select the highlighted option. To Exit the Setup menu, press the SETUP button 1. 2 3 1 14 Use the Navigation buttons 2 to navigate through the menus/screens and press the ENTER/PLAY (®) button 3 to select various language preferences, turn captions and screen saver on and off, adjust what type of the selected menu option. SETUP MENU The Setup menu lets you customize the DVD player by pressing the SETUP button 1. Below, find...
..., enter the Setup menu by allowing you to select the highlighted option. To Exit the Setup menu, press the SETUP button 1. 2 3 1 14 Use the Navigation buttons 2 to navigate through the menus/screens and press the ENTER/PLAY (®) button 3 to select various language preferences, turn captions and screen saver on and off, adjust what type of the selected menu option. SETUP MENU The Setup menu lets you customize the DVD player by pressing the SETUP button 1. Below, find...

User Guide
Page 16
... DVD must have the language included in the Pan Scan style is connected to select. PAL: Select when using the Navigation buttons to navigate through the menus/screens and press the ENTER/PLAY (®) button to a normal TV. VIDEO OUT (Color Video Connector Type) 1 ANGLE MARK 1 Select the color video type to display text. Anglemarks are not available on the screen with other connections. OSD LANGUAGE CAPTIONS SCREEN SAVER 1 1 1 Select the desired language (ENGLISH, FRENCH) for the On-Screen display...
... DVD must have the language included in the Pan Scan style is connected to select. PAL: Select when using the Navigation buttons to navigate through the menus/screens and press the ENTER/PLAY (®) button to a normal TV. VIDEO OUT (Color Video Connector Type) 1 ANGLE MARK 1 Select the color video type to display text. Anglemarks are not available on the screen with other connections. OSD LANGUAGE CAPTIONS SCREEN SAVER 1 1 1 Select the desired language (ENGLISH, FRENCH) for the On-Screen display...
User Guide
Page 18
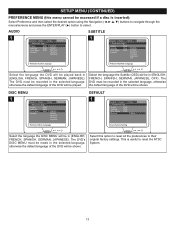
Audio Subtitle Disc Menu Default ENG ENG ENG English French Spanish German Japanese SUBTITLE 1 General Audio Dolby Preference - - Preference Page - - Preference Page - - Audio Subtitle Disc Menu Default ENG ENG ENG Reset Preference Load Factory Setting Select the language the DISC MENU will be shown. The DVD must be recorded in (ENGLISH, FRENCH, SPANISH, GERMAN, JAPANESE). Select this menu cannot be in the selected language, otherwise the default language of the DVD will be accessed if a disc is useful to reset the NTSC System. 17 The DVD must be...
Audio Subtitle Disc Menu Default ENG ENG ENG English French Spanish German Japanese SUBTITLE 1 General Audio Dolby Preference - - Preference Page - - Preference Page - - Audio Subtitle Disc Menu Default ENG ENG ENG Reset Preference Load Factory Setting Select the language the DISC MENU will be shown. The DVD must be recorded in (ENGLISH, FRENCH, SPANISH, GERMAN, JAPANESE). Select this menu cannot be in the selected language, otherwise the default language of the DVD will be accessed if a disc is useful to reset the NTSC System. 17 The DVD must be...
User Guide
Page 19
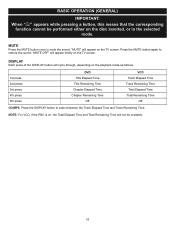
... playback mode as follows: 1st press 2nd press 3rd press 4th press 5th press DVD Title Elapsed Time Title Remaining Time Chapter Elapsed Time Chapter Remaining Time Off VCD Track Elapsed Time Track Remaining Time Total Elapsed Time Total Remaining Time Off CD/MP3: Press the DISPLAY button to restore the sound; BASIC OPERATION (GENERAL) IMPORTANT: When " " appears while pressing a button, this means that the corresponding function...
... playback mode as follows: 1st press 2nd press 3rd press 4th press 5th press DVD Title Elapsed Time Title Remaining Time Chapter Elapsed Time Chapter Remaining Time Off VCD Track Elapsed Time Track Remaining Time Total Elapsed Time Total Remaining Time Off CD/MP3: Press the DISPLAY button to restore the sound; BASIC OPERATION (GENERAL) IMPORTANT: When " " appears while pressing a button, this means that the corresponding function...
User Guide
Page 20
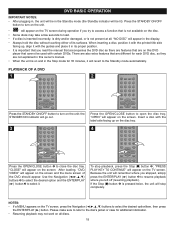
... to access a function that is not available on the disc. • Some discs may not work on all , "NO DISC" will appear in the Stop mode for each DVD disc, so they are on the disc tray. 4 1 3 1 32 31 1 2 Press the OPEN/CLOSE button 1 to resume playback where you left off (resuming playback). There are also extra features that are different for 30 minutes, it . After loading, "DVD VIDEO" will...
... to access a function that is not available on the disc. • Some discs may not work on all , "NO DISC" will appear in the Stop mode for each DVD disc, so they are on the disc tray. 4 1 3 1 32 31 1 2 Press the OPEN/CLOSE button 1 to resume playback where you left off (resuming playback). There are also extra features that are different for 30 minutes, it . After loading, "DVD VIDEO" will...
User Guide
Page 22
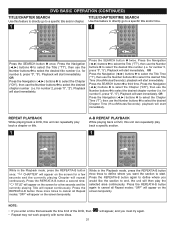
... (√,®) buttons 2 to select the Chapter ("CH"), then use the Number buttons 3 to cancel all Repeat modes; for number 5, press "0", "5"). playback will appear on the screen temporarily. 2 NOTE: 1 3 • If you enter a time that exceeds the time limit of the DVD, then " • Repeat may not work properly with some discs. 21 21 3 " will then play back a specific section. 1 While in the Playback mode, press the REPEAT/A-B button three times to define...
... (√,®) buttons 2 to select the Chapter ("CH"), then use the Number buttons 3 to cancel all Repeat modes; for number 5, press "0", "5"). playback will appear on the screen temporarily. 2 NOTE: 1 3 • If you enter a time that exceeds the time limit of the DVD, then " • Repeat may not work properly with some discs. 21 21 3 " will then play back a specific section. 1 While in the Playback mode, press the REPEAT/A-B button three times to define...

User Guide
Page 30
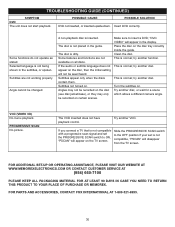
... connected. Select the appropriate audio input mode. Install battery according to the instructions in the room. No picture. The Search feature is not working . Progressive Scan switch is not set to OFF, see bottom of disc inserted. The equipment connected with the audio cable is set to receive the DVD signal output. Clean disc and insert label side-up. Turn the TV on , but unit not functioning properly. Aim the remote at the sensor. Remove the disc from the disc tray...
... connected. Select the appropriate audio input mode. Install battery according to the instructions in the room. No picture. The Search feature is not working . Progressive Scan switch is not set to OFF, see bottom of disc inserted. The equipment connected with the audio cable is set to receive the DVD signal output. Clean disc and insert label side-up. Turn the TV on , but unit not functioning properly. Aim the remote at the sensor. Remove the disc from the disc tray...
User Guide
Page 31
... connect a TV that is not compatible with a progressive scan signal and set is normal; Subtitles appear only when the discs contain them. Angles may only be changed. PROGRESSIVE SCAN No picture. Selected language is inserted. This is normal; Slide the PROGRESSIVE SCAN switch to the OFF position if your set the PROGRESSIVE SCAN switch to insert a DVD; TROUBLESHOOTING GUIDE (CONTINUED) SYMPTOM DVD The unit does not start playback. The VCD inserted does not have playback control. Insert DVD correctly. Make...
... connect a TV that is not compatible with a progressive scan signal and set is normal; Subtitles appear only when the discs contain them. Angles may only be changed. PROGRESSIVE SCAN No picture. Selected language is inserted. This is normal; Slide the PROGRESSIVE SCAN switch to the OFF position if your set the PROGRESSIVE SCAN switch to insert a DVD; TROUBLESHOOTING GUIDE (CONTINUED) SYMPTOM DVD The unit does not start playback. The VCD inserted does not have playback control. Insert DVD correctly. Make...
User Guide
Page 33
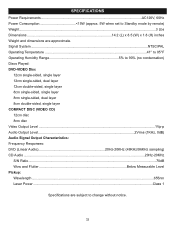
Signal System ...NTSC/PAL Operating Temperature ...41° to 95°F Operating Humidity Range 5% to change without notice. 32 SPECIFICATIONS Power Requirements...AC120V, 60Hz Power Consumption 15W (approx. 5W when set to Standby mode by remote) Weight...3 Lbs Dimensions 14.2 (L) x 8.5 (W) x 1.8 (H) inches Weight and dimensions are subject to 90% (no condensation) Discs Played: DVD-VIDEO Disc 12cm single-sided, single layer 12cm single-sided, dual layer 12cm double-sided...
Signal System ...NTSC/PAL Operating Temperature ...41° to 95°F Operating Humidity Range 5% to change without notice. 32 SPECIFICATIONS Power Requirements...AC120V, 60Hz Power Consumption 15W (approx. 5W when set to Standby mode by remote) Weight...3 Lbs Dimensions 14.2 (L) x 8.5 (W) x 1.8 (H) inches Weight and dimensions are subject to 90% (no condensation) Discs Played: DVD-VIDEO Disc 12cm single-sided, single layer 12cm single-sided, dual layer 12cm double-sided...


