
User Guide
Page 2
... with safety switches to constitute a risk of important operating and maintenance (servicing) instructions in the literature accompanying the appliance. ATTENTION: The exclamation point within the product's enclosure that may be of sufficient magnitude to avoid exposure when the CD door is intended to alert the user to the presence of electric shock to beam. Avoid direct exposure...
... with safety switches to constitute a risk of important operating and maintenance (servicing) instructions in the literature accompanying the appliance. ATTENTION: The exclamation point within the product's enclosure that may be of sufficient magnitude to avoid exposure when the CD door is intended to alert the user to the presence of electric shock to beam. Avoid direct exposure...

User Guide
Page 3
... a particular installation. Changes or modifications to this equipment does cause harmful interference to radio or television reception, which the receiver is encouraged to try to correct the interference by turning the equipment off and on, the user is connected. • Consult the dealer or an experienced radio/TV technician for a Class B digital device, pursuant to Part 15 of...
... a particular installation. Changes or modifications to this equipment does cause harmful interference to radio or television reception, which the receiver is encouraged to try to correct the interference by turning the equipment off and on, the user is connected. • Consult the dealer or an experienced radio/TV technician for a Class B digital device, pursuant to Part 15 of...

User Guide
Page 5
.... After all, we want you avoid prolonged exposure to your volume control at a safe level BEFORE your protection. 4 One that lets the sound come through loud and clear without annoying blaring or distortion and, most out of your musical enjoyment. Over time your new sound equipment will help to get the most importantly, without distortion. Once you listening...
.... After all, we want you avoid prolonged exposure to your volume control at a safe level BEFORE your protection. 4 One that lets the sound come through loud and clear without annoying blaring or distortion and, most out of your musical enjoyment. Over time your new sound equipment will help to get the most importantly, without distortion. Once you listening...
User Guide
Page 8
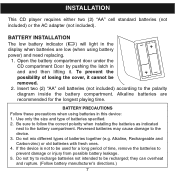
... damage to be used for the longest playing time. Alkaline, Rechargeable and Carbon-zinc) or old batteries with fresh ones. 4. To prevent the -+ possibility of time, remove the batteries to be recharged; Do not try to recharge batteries not intended to the device. 3. BATTERY PRECAUTIONS Follow these precautions when using battery power) and need replacing. 1. they can overheat and rupture. (Follow battery manufacturer's directions.) 7 INSTALLATION This CD player requires either two...
... damage to be used for the longest playing time. Alkaline, Rechargeable and Carbon-zinc) or old batteries with fresh ones. 4. To prevent the -+ possibility of time, remove the batteries to be recharged; Do not try to recharge batteries not intended to the device. 3. BATTERY PRECAUTIONS Follow these precautions when using battery power) and need replacing. 1. they can overheat and rupture. (Follow battery manufacturer's directions.) 7 INSTALLATION This CD player requires either two...
User Guide
Page 9
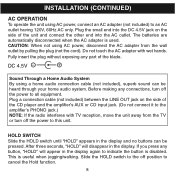
... press any connections, turn off position to cancel the Hold function. 8 CAUTION: When not using AC power, connect an AC adapter (not included) to an AC outlet having 120V, 60Hz AC only. DC 4.5V - + Sound Through a Home Audio System By using a home audio connection cable (not included), superb sound can be heard through your home audio system. Before making any button, "HOLD" will disappear in the display again to...
... press any connections, turn off position to cancel the Hold function. 8 CAUTION: When not using AC power, connect an AC adapter (not included) to an AC outlet having 120V, 60Hz AC only. DC 4.5V - + Sound Through a Home Audio System By using a home audio connection cable (not included), superb sound can be heard through your home audio system. Before making any button, "HOLD" will disappear in the display again to...

User Guide
Page 10
... VOLUME/Preset -/+ for one second; Press the Play/Pause ( )/Power On button ‚ to enter the FM Radio mode. CONTINUED ON THE NEXT PAGE 9 OPERATION TO LISTEN TO THE RADIO 1 2 21 Plug the headphones into the Headphones jack. If a CD is weak/noisy, select Mono, in the CD compartment, press the Stop (I)/Power Off button ƒ once to stop playback, otherwise continue to tune a station...
... VOLUME/Preset -/+ for one second; Press the Play/Pause ( )/Power On button ‚ to enter the FM Radio mode. CONTINUED ON THE NEXT PAGE 9 OPERATION TO LISTEN TO THE RADIO 1 2 21 Plug the headphones into the Headphones jack. If a CD is weak/noisy, select Mono, in the CD compartment, press the Stop (I)/Power Off button ƒ once to stop playback, otherwise continue to tune a station...

User Guide
Page 12
To receive a Memory Preset, press the VOLUME/Radio Preset -/+ buttons until the desired preset appears in the previous section. the memory number will blink and PROG indicator will appear. Within five seconds, repeatedly press and release the VOLUME/Radio Preset -/+ buttons to select a Memory Preset (up to 30 memories). 3 4 Press the PROG button again to confirm. Press the PROG button; OPERATION (CONTINUED) TO SET AND RECEIVE A STATION INTO MEMORY 1 2 Tune a desired station as described in the display. 11
To receive a Memory Preset, press the VOLUME/Radio Preset -/+ buttons until the desired preset appears in the previous section. the memory number will blink and PROG indicator will appear. Within five seconds, repeatedly press and release the VOLUME/Radio Preset -/+ buttons to select a Memory Preset (up to 30 memories). 3 4 Press the PROG button again to confirm. Press the PROG button; OPERATION (CONTINUED) TO SET AND RECEIVE A STATION INTO MEMORY 1 2 Tune a desired station as described in the display. 11

User Guide
Page 13
... button to cycle through VOLUME/Radio Preset -/+ buttons. Do not try to play all kinds of Audio Discs, WMA and MP3 CD ROMS, such as desired using MP3) will automatically start playing the CD; OPERATION (CONTINUED) TO INSERT AND PLAY A CD This CD player is designed to play CDI, CDV, DVD or computer CDs in this unit. 1 2 Open the CD compartment lid by sliding the CD Door OPEN switch. Press the Play/Pause ( )/Power On button to turn...
... button to cycle through VOLUME/Radio Preset -/+ buttons. Do not try to play all kinds of Audio Discs, WMA and MP3 CD ROMS, such as desired using MP3) will automatically start playing the CD; OPERATION (CONTINUED) TO INSERT AND PLAY A CD This CD player is designed to play CDI, CDV, DVD or computer CDs in this unit. 1 2 Open the CD compartment lid by sliding the CD Door OPEN switch. Press the Play/Pause ( )/Power On button to turn...

User Guide
Page 14
... CD and begin playback, depending on the number of playing standard CDs or 3" singles; Press the Stop (I)/Power Off button again to turn itself off . OPERATION (CONTINUED) 5 When the disc is capable of tracks burned on the CD. • The EQ function is only available for more information in the display. • If a disc is not recorded properly, a disc error will occur. • Playback...
... CD and begin playback, depending on the number of playing standard CDs or 3" singles; Press the Stop (I)/Power Off button again to turn itself off . OPERATION (CONTINUED) 5 When the disc is capable of tracks burned on the CD. • The EQ function is only available for more information in the display. • If a disc is not recorded properly, a disc error will occur. • Playback...

User Guide
Page 15
... Play/Pause ( )/Power On button again to pause the disc momentarily, press the Play/Pause ( )/Power On button. Press the Skip/Search button repeatedly to move the player back to the beginning of the currently playing track. Playback will stop but the disc continues to higher number tracks. The sound returns and the elapsed time in the display. Press the Skip/Search button repeatedly to advance the player...
... Play/Pause ( )/Power On button again to pause the disc momentarily, press the Play/Pause ( )/Power On button. Press the Skip/Search button repeatedly to move the player back to the beginning of the currently playing track. Playback will stop but the disc continues to higher number tracks. The sound returns and the elapsed time in the display. Press the Skip/Search button repeatedly to advance the player...

User Guide
Page 16
... locate a specific musical passage. OPERATION (CONTINUED) HIGH-SPEED MUSIC SEARCH 1 12 During playback, depress and hold either the Skip/Search ‚ or ƒ button to move forward or backward at high speed as long as the buttons are depressed. REPEAT PLAYBACK OF ONE TRACK 1 2 1 23 To repeat a single track, press the MODE button ‚ once while playing a CD; When you wish to repeat. The player will resume...
... locate a specific musical passage. OPERATION (CONTINUED) HIGH-SPEED MUSIC SEARCH 1 12 During playback, depress and hold either the Skip/Search ‚ or ƒ button to move forward or backward at high speed as long as the buttons are depressed. REPEAT PLAYBACK OF ONE TRACK 1 2 1 23 To repeat a single track, press the MODE button ‚ once while playing a CD; When you wish to repeat. The player will resume...
User Guide
Page 17
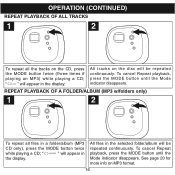
... times if playing an MP3) while playing a CD; " ALBUM " will appear in the selected folder/album will be repeated continuously. To cancel Repeat playback, press the MODE button until the Mode indicator disappears. OPERATION (CONTINUED) REPEAT PLAYBACK OF ALL TRACKS 1 2 To repeat all files in a folder/album (MP3 CD only), press the MODE button twice while playing a CD; To cancel Repeat playback, press the MODE button until the Mode indicator disappears. See page 20 for more info on...
... times if playing an MP3) while playing a CD; " ALBUM " will appear in the selected folder/album will be repeated continuously. To cancel Repeat playback, press the MODE button until the Mode indicator disappears. OPERATION (CONTINUED) REPEAT PLAYBACK OF ALL TRACKS 1 2 To repeat all files in a folder/album (MP3 CD only), press the MODE button twice while playing a CD; To cancel Repeat playback, press the MODE button until the Mode indicator disappears. See page 20 for more info on...
User Guide
Page 19
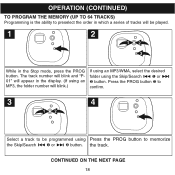
.... OPERATION (CONTINUED) TO PROGRAM THE MEMORY (UP TO 64 TRACKS) Programming is the ability to memorize the Skip/Search ‚ or ƒ button. The track number will blink and "P01" will appear in the display. (If using an MP3, the folder number will be played. 1 2 12 3 While in which a series of tracks will blink.) If using an MP3/WMA, select the desired folder using Press...
.... OPERATION (CONTINUED) TO PROGRAM THE MEMORY (UP TO 64 TRACKS) Programming is the ability to memorize the Skip/Search ‚ or ƒ button. The track number will blink and "P01" will appear in the display. (If using an MP3, the folder number will be played. 1 2 12 3 While in which a series of tracks will blink.) If using an MP3/WMA, select the desired folder using Press...

User Guide
Page 20
... Program mode or change the CD to clear the memory. • The program memory will be saved, even if the power is turned off or if the CD door is opened without changing the CD. • You can review the program by pressing the PROG button repeatedly while in the Stop mode. • To add a track to the program memory, simply press the PROG button, and the display will show the next available memory number...
... Program mode or change the CD to clear the memory. • The program memory will be saved, even if the power is turned off or if the CD door is opened without changing the CD. • You can review the program by pressing the PROG button repeatedly while in the Stop mode. • To add a track to the program memory, simply press the PROG button, and the display will show the next available memory number...

User Guide
Page 21
...volume level last selected when the unit is turned on a bumpy road. 20 You can . There will resume playback of the last track listened to change the CD. Can the unit read before playing an MP3 CD. Does the unit support packet write CD-RW? It appears like a PC hard drive. Frequently Asked Questions Please read regular music CDs...on a treadmill or drive on (and the same CD is that means for MP3 CD). Yes, it can add or delete MP3/WMA files without reformatting. Yes, it has an anti-shock buffer (45 seconds for standard CD and 120 seconds for the everyday user is still in ...
...volume level last selected when the unit is turned on a bumpy road. 20 You can . There will resume playback of the last track listened to change the CD. Can the unit read before playing an MP3 CD. Does the unit support packet write CD-RW? It appears like a PC hard drive. Frequently Asked Questions Please read regular music CDs...on a treadmill or drive on (and the same CD is that means for MP3 CD). Yes, it can add or delete MP3/WMA files without reformatting. Yes, it has an anti-shock buffer (45 seconds for standard CD and 120 seconds for the everyday user is still in ...

User Guide
Page 22
Yes, the unit can burn a new group of MP3 files until the CD is full. The album, title and artist (if set when MP3/WMA was recorded). 21 Does the unit support subdirectories (subfolders)? No, this may result in serious malfunction and harmful noise interference. If the MP3/WMA CD is not finalized, you can read music files from subfolders. Does the unit support multi-session CDRs? OPERATION (CONTINUED) Can I use the MP3 extension for non-audio data files? What appears on the display when playing back MP3 CDs?
Yes, the unit can burn a new group of MP3 files until the CD is full. The album, title and artist (if set when MP3/WMA was recorded). 21 Does the unit support subdirectories (subfolders)? No, this may result in serious malfunction and harmful noise interference. If the MP3/WMA CD is not finalized, you can read music files from subfolders. Does the unit support multi-session CDRs? OPERATION (CONTINUED) Can I use the MP3 extension for non-audio data files? What appears on the display when playing back MP3 CDs?
User Guide
Page 24
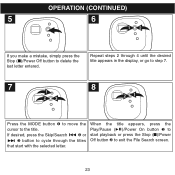
... title appears in the display, or go to step 7. 7 1 23 8 21 Press the MODE button ‚ to move the cursor to the title. OPERATION (CONTINUED) 5 6 12 If you make a mistake, simply press the Stop (I )/Power Off button ƒ to exit the File Search screen. 23 When the title appears, press the Play/Pause ( )/Power On button ‚ to start with the selected letter...
... title appears in the display, or go to step 7. 7 1 23 8 21 Press the MODE button ‚ to move the cursor to the title. OPERATION (CONTINUED) 5 6 12 If you make a mistake, simply press the Stop (I )/Power Off button ƒ to exit the File Search screen. 23 When the title appears, press the Play/Pause ( )/Power On button ‚ to start with the selected letter...

User Guide
Page 27
... cannot be detected nor played on this , the music can be downloaded at different times until the whole CD is burned on this layout, the first file will be "Blur01.mp3" and the last file will be "Twain15.mp3". • "Skipped" denotes a directory which contains non-audio files only, e.g. OPERATION (CONTINUED) MULTI SESSION The computer user does not need to finalize the...
... cannot be detected nor played on this , the music can be downloaded at different times until the whole CD is burned on this layout, the first file will be "Blur01.mp3" and the last file will be "Twain15.mp3". • "Skipped" denotes a directory which contains non-audio files only, e.g. OPERATION (CONTINUED) MULTI SESSION The computer user does not need to finalize the...

User Guide
Page 30
... AC adapter connection. Wipe disc with this unit, check the chart below before calling for service. Disc inserted incorrectly. Weak batteries. Dirty or defective disc. Try another disc. Try another disc. FM distorted. Erratic CD playback. CD compartment not closed. VOLUME control set to minimum. Station not tuned. 29 SOLUTION Replace batteries, and install properly. Reinsert headphone plug correctly. SYMPTOM Unit will not play. Replace batteries. TROUBLESHOOTING GUIDE If...
... AC adapter connection. Wipe disc with this unit, check the chart below before calling for service. Disc inserted incorrectly. Weak batteries. Dirty or defective disc. Try another disc. Try another disc. FM distorted. Erratic CD playback. CD compartment not closed. VOLUME control set to minimum. Station not tuned. 29 SOLUTION Replace batteries, and install properly. Reinsert headphone plug correctly. SYMPTOM Unit will not play. Replace batteries. TROUBLESHOOTING GUIDE If...
User Guide
Page 31
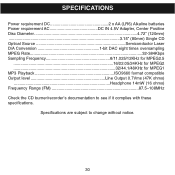
...) Alkaline batteries Power requirement AC DC IN 4.5V Adapter, Center Positive Disc Diameter 4.72" (120mm 3.15" (80mm) Single CD Optical Source Semiconductor Laser D/A Conversion 1-bit DAC eight times oversampling MPEG Rate 32-384Kbps Sampling Frequency 8/11.025/12KHz for MPEG2.5 16/22.05/24KHz for MPEG2 32/44.1/48KHz for MPEG1 MP3 Playback ISO9660 format compatible Output level...
...) Alkaline batteries Power requirement AC DC IN 4.5V Adapter, Center Positive Disc Diameter 4.72" (120mm 3.15" (80mm) Single CD Optical Source Semiconductor Laser D/A Conversion 1-bit DAC eight times oversampling MPEG Rate 32-384Kbps Sampling Frequency 8/11.025/12KHz for MPEG2.5 16/22.05/24KHz for MPEG2 32/44.1/48KHz for MPEG1 MP3 Playback ISO9660 format compatible Output level...


