
User Guide
Page 2
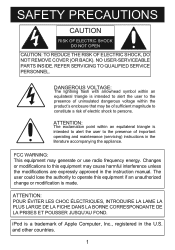
...that may be of sufficient magnitude to constitute a risk of electric shock to the presence of Apple Computer, Inc., registered in the instruction manual. SAFETY PRECAUTIONS CAUTION RISK OF ELECTRIC SHOCK DO NOT OPEN CAUTION: TO REDUCE THE RISK OF ELECTRIC SHOCK, DO NOT REMOVE...lose the authority to this equipment if an unauthorized change or modification is a trademark of important operating and maintenance (servicing) instructions in the literature accompanying the appliance. iPod is made. and other countries. 1 FCC WARNING: This equipment may cause harmful interference unless ...
...that may be of sufficient magnitude to constitute a risk of electric shock to the presence of Apple Computer, Inc., registered in the instruction manual. SAFETY PRECAUTIONS CAUTION RISK OF ELECTRIC SHOCK DO NOT OPEN CAUTION: TO REDUCE THE RISK OF ELECTRIC SHOCK, DO NOT REMOVE...lose the authority to this equipment if an unauthorized change or modification is a trademark of important operating and maintenance (servicing) instructions in the literature accompanying the appliance. iPod is made. and other countries. 1 FCC WARNING: This equipment may cause harmful interference unless ...
User Guide
Page 3
... between the equipment and receiver. • Connect the equipment into an outlet on a circuit different from that interference will not occur in accordance with the instructions, may cause harmful interference to use a surge protector for this equipment does cause harmful interference to radio or television reception, which the receiver is recommended...
... between the equipment and receiver. • Connect the equipment into an outlet on a circuit different from that interference will not occur in accordance with the instructions, may cause harmful interference to use a surge protector for this equipment does cause harmful interference to radio or television reception, which the receiver is recommended...
User Guide
Page 9
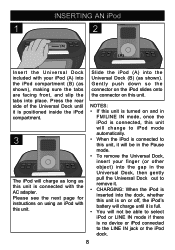
... IN mode if there is on this unit. INSERTING AN iPod 1 2 (B) (A) (A) (B) Insert the Universal Dock included with this unit. Please see the next page for instructions on and in the Pause mode. • To remove the Universal Dock, insert your iPod (A) into the iPod compartment (B) (as this unit is full. •...
... IN mode if there is on this unit. INSERTING AN iPod 1 2 (B) (A) (A) (B) Insert the Universal Dock included with this unit. Please see the next page for instructions on and in the Pause mode. • To remove the Universal Dock, insert your iPod (A) into the iPod compartment (B) (as this unit is full. •...
User Guide
Page 13
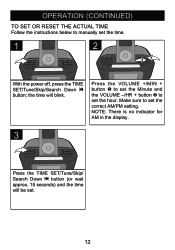
Make sure to manually set the time. 1 2 21 With the power off, press the TIME SET/Tune/Skip/Search Down o button; OPERATION (CONTINUED) TO SET OR RESET THE ACTUAL TIME Follow the instructions below to set the correct AM/PM setting. the time will be set the hour. NOTE: There is no indicator for AM in the display. 3 Press the TIME SET/Tune/Skip/ Search Down o button (or wait approx. 15 seconds) and the time will blink. Press the Volume +/MIN + button 1 to set the Minute and the Volume -/HR + button 2 to set . 12
Make sure to manually set the time. 1 2 21 With the power off, press the TIME SET/Tune/Skip/Search Down o button; OPERATION (CONTINUED) TO SET OR RESET THE ACTUAL TIME Follow the instructions below to set the correct AM/PM setting. the time will be set the hour. NOTE: There is no indicator for AM in the display. 3 Press the TIME SET/Tune/Skip/ Search Down o button (or wait approx. 15 seconds) and the time will blink. Press the Volume +/MIN + button 1 to set the Minute and the Volume -/HR + button 2 to set . 12