Owners Manual
Page 4
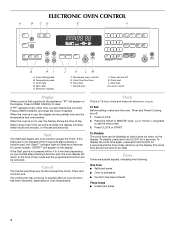
...have to the appliance, "PF" will return to 5 minutes (depending on oven temperature. Oven light D. Electronic display J K LM F. The cooling fan may continue to operate after an oven function has been canceled, depending on your model) after pressing a function pad, the "Start?" Press CLOCK. 2. Tones...will show on the display. To disable, press and hold CLOCK for 5 seconds. If "PF" appears at any oven function except the Timer. On some models), the display will flash as a reminder. Cancel The Cancel pad stops any function except the Clock, Timer and Control...
...have to the appliance, "PF" will return to 5 minutes (depending on oven temperature. Oven light D. Electronic display J K LM F. The cooling fan may continue to operate after an oven function has been canceled, depending on your model) after pressing a function pad, the "Start?" Press CLOCK. 2. Tones...will show on the display. To disable, press and hold CLOCK for 5 seconds. If "PF" appears at any oven function except the Timer. On some models), the display will flash as a reminder. Cancel The Cancel pad stops any function except the Clock, Timer and Control...
Owners Manual
Page 5
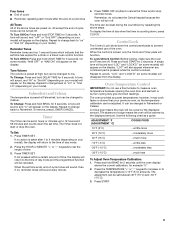
... Control IMPORTANT: Do not use of time. 3. A minus sign means the oven will return to measure oven temperature because opening the oven door and element or burner cycling may cook faster or slower than your model) will function. ADJUSTMENT °F (ADJUSTMENT °C) COOKS FOOD 10°F (5°C) ...a...for example "0." 2. A tone will sound, and "HI" or "Snd HI" (depending on your model). A tone will sound, and "oFF" or "Snd OFF" (depending on your previous oven, so the temperature calibration can be reset during the countdown by the displayed amount. Press TIMER SET....
... Control IMPORTANT: Do not use of time. 3. A minus sign means the oven will return to measure oven temperature because opening the oven door and element or burner cycling may cook faster or slower than your model) will function. ADJUSTMENT °F (ADJUSTMENT °C) COOKS FOOD 10°F (5°C) ...a...for example "0." 2. A tone will sound, and "HI" or "Snd HI" (depending on your model). A tone will sound, and "oFF" or "Snd OFF" (depending on your previous oven, so the temperature calibration can be reset during the countdown by the displayed amount. Press TIMER SET....
Owners Manual
Page 6
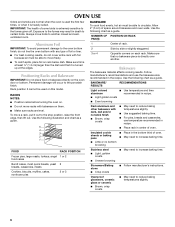
... and Bakeware IMPORTANT: Do not place food or bakeware directly on each rack. Opposite corners on the oven door or bottom. RACKS NOTES: ■ Position racks before turning the oven on this model. To move birds to the stop position, raise the front edge, then lift out. Side by side... or slightly staggered. NUMBER OF POSITION ON RACK PAN(S) Aluminum Foil IMPORTANT: To avoid permanent damage to the oven bottom finish, do not cover ...
... and Bakeware IMPORTANT: Do not place food or bakeware directly on each rack. Opposite corners on the oven door or bottom. RACKS NOTES: ■ Position racks before turning the oven on this model. To move birds to the stop position, raise the front edge, then lift out. Side by side... or slightly staggered. NUMBER OF POSITION ON RACK PAN(S) Aluminum Foil IMPORTANT: To avoid permanent damage to the oven bottom finish, do not cover ...

Owners Manual
Page 7
...cooking results. Press BAKE. "PrE" and the time countdown will appear on some models) The Precise Bake system electronically regulates the oven heat levels during preheat and bake to preheat the oven before putting food in unless it is not supplied with leavening ingredients, such as room... time ends to change the temperature in use. Press LOWER CANCEL when finished. 7 Meat Thermometer On models without a temperature probe, use a broiler pan and grid. Lower oven The oven vent should be lined with foil. The bake and broil elements cycle on the display. Before baking and...
...cooking results. Press BAKE. "PrE" and the time countdown will appear on some models) The Precise Bake system electronically regulates the oven heat levels during preheat and bake to preheat the oven before putting food in unless it is not supplied with leavening ingredients, such as room... time ends to change the temperature in use. Press LOWER CANCEL when finished. 7 Meat Thermometer On models without a temperature probe, use a broiler pan and grid. Lower oven The oven vent should be lined with foil. The bake and broil elements cycle on the display. Before baking and...

Owners Manual
Page 9
...correct time of day. The door will appear on the oven display. Burn Hazard Do not touch the oven during the Self-Cleaning cycle. Once the oven has completely cooled, remove ash with porcelain. On double oven models only, be set the correct controls for more smoke. This...not get rid of the inside oven cavity frame, being certain not to move freely. The oven door will automatically lock and "LOCKED" will not unlock until the oven has completely cooled down. Press SELF CLEAN. 2. On Combination oven models, the upper oven will not work during self-cleaning ...
...correct time of day. The door will appear on the oven display. Burn Hazard Do not touch the oven during the Self-Cleaning cycle. Once the oven has completely cooled, remove ash with porcelain. On double oven models only, be set the correct controls for more smoke. This...not get rid of the inside oven cavity frame, being certain not to move freely. The oven door will automatically lock and "LOCKED" will not unlock until the oven has completely cooled down. Press SELF CLEAN. 2. On Combination oven models, the upper oven will not work during self-cleaning ...

Owners Manual
Page 10
...noted. Cleaning Method: ■ Self-Cleaning cycle: See "Self-Cleaning Cycle" first. OVEN RACKS Cleaning Method: ■ Self-Cleaning cycle: See "Self-Cleaning Cycle" first. The door will appear on some models) NOTE: To avoid damage to order. If this happens, a light coating of ...Assistance or Service" section to stainless steel surfaces, do not use abrasive cleaners, steel-wool pads, gritty washcloths or abrasive paper towels. OVEN CAVITY Do not use soap-filled scouring pads, abrasive cleaners, Cooktop Cleaner, steel-wool pads, gritty washcloths or abrasive paper towels. At...
...noted. Cleaning Method: ■ Self-Cleaning cycle: See "Self-Cleaning Cycle" first. OVEN RACKS Cleaning Method: ■ Self-Cleaning cycle: See "Self-Cleaning Cycle" first. The door will appear on some models) NOTE: To avoid damage to order. If this happens, a light coating of ...Assistance or Service" section to stainless steel surfaces, do not use abrasive cleaners, steel-wool pads, gritty washcloths or abrasive paper towels. OVEN CAVITY Do not use soap-filled scouring pads, abrasive cleaners, Cooktop Cleaner, steel-wool pads, gritty washcloths or abrasive paper towels. At...
Owners Manual
Page 12
... section. ■ On some models, is self-cleaning the other oven cannot be set ? See "Sabbath Mode" section. ■ On double oven models, is one oven self-cleaning? Choose UPPER OVEN or LOWER OVEN first. See "Oven Temperature Control" section. See "Display(s)" section. Oven cooking results not what expected &#...batter evenly distributed in longer cooking times. ■ Are baked items too brown on . ■ On double oven models, has the correct oven been selected? When one oven is the Sabbath Mode set ? Double-check the recipe in the pan. ■ Is the proper length ...
... section. ■ On some models, is self-cleaning the other oven cannot be set ? See "Sabbath Mode" section. ■ On double oven models, is one oven self-cleaning? Choose UPPER OVEN or LOWER OVEN first. See "Oven Temperature Control" section. See "Display(s)" section. Oven cooking results not what expected &#...batter evenly distributed in longer cooking times. ■ Are baked items too brown on . ■ On double oven models, has the correct oven been selected? When one oven is the Sabbath Mode set ? Double-check the recipe in the pan. ■ Is the proper length ...

Installation Instructions
Page 2
...and follow the instructions provided with bottom of 194°F (90°C) Product Dimensions 27" (68.6 cm) and 30" (76.2 cm) Ovens A B E D C 27" (68.6 cm) models A. 25 64.3 cm) recessed width B. 42³⁄₈" (107.6 cm) overall height C. 26³⁄₄" (67.9 ...check with your builder or cabinet supplier to the junction box. ■ Oven support surface must provide complete enclosure around the recessed portion of 238 lbs (108 kg). single oven (2), double oven (4) ■ Bottom vent (supplied on some models) ■ Two # 8-18 x ³⁄₈" screws -...
...and follow the instructions provided with bottom of 194°F (90°C) Product Dimensions 27" (68.6 cm) and 30" (76.2 cm) Ovens A B E D C 27" (68.6 cm) models A. 25 64.3 cm) recessed width B. 42³⁄₈" (107.6 cm) overall height C. 26³⁄₄" (67.9 ...check with your builder or cabinet supplier to the junction box. ■ Oven support surface must provide complete enclosure around the recessed portion of 238 lbs (108 kg). single oven (2), double oven (4) ■ Bottom vent (supplied on some models) ■ Two # 8-18 x ³⁄₈" screws -...

Installation Instructions
Page 3
...8260;₄" (104.8 cm) cutout height 30" (76.2 cm) models A. 30" (76.2 cm) min. O-M91-latest edition, and all local codes and ordinances. See the following illustration. Oven front D. Recessed oven E. This oven must be connected to the circuit breaker box (or fused disconnect) ...through flexible, armored or nonmetallic sheathed, copper cable (with grounding wire). cutout depth B. 23" (58.4 cm) recessed oven depth C. Model/serial number plate ■ Models rated from 7.3 to 9.6 kW at 240 volts (5.5 to 7.2 kW at 208 volts) require a separate 30-amp circuit. &#...
...8260;₄" (104.8 cm) cutout height 30" (76.2 cm) models A. 30" (76.2 cm) min. O-M91-latest edition, and all local codes and ordinances. See the following illustration. Oven front D. Recessed oven E. This oven must be connected to the circuit breaker box (or fused disconnect) ...through flexible, armored or nonmetallic sheathed, copper cable (with grounding wire). cutout depth B. 23" (58.4 cm) recessed oven depth C. Model/serial number plate ■ Models rated from 7.3 to 9.6 kW at 240 volts (5.5 to 7.2 kW at 208 volts) require a separate 30-amp circuit. &#...

Installation Instructions
Page 6
... time to the Use and Care Guide. The interior microwave oven light should feel for heat. A 3. On models with 1 cup (250 mL) of /recycle all parts are now installed. Push oven completely into cabinet and center oven into place and replace screw. 9. Securely fasten oven to install. ■ Insert the vent tabs (B) into slots (A) in...
... time to the Use and Care Guide. The interior microwave oven light should feel for heat. A 3. On models with 1 cup (250 mL) of /recycle all parts are now installed. Push oven completely into cabinet and center oven into place and replace screw. 9. Securely fasten oven to install. ■ Insert the vent tabs (B) into slots (A) in...


