Owners Manual
Page 3
...or seriously injured if you don't follow basic precautions, including the following: ■ Proper Installation - Care should not be stored in an oven. ■ Do Not Use Water on any kind should be referred to potential hazards that can be hot even though they have provided many... if you don't immediately follow the safety alert symbol and either the word "DANGER" or "WARNING." They should not be moved while oven is the safety alert symbol. Remove broiler pan and other flammable materials contact heating elements or interior surfaces of fire, electrical shock, injury ...
...or seriously injured if you don't follow basic precautions, including the following: ■ Proper Installation - Care should not be stored in an oven. ■ Do Not Use Water on any kind should be referred to potential hazards that can be hot even though they have provided many... if you don't immediately follow the safety alert symbol and either the word "DANGER" or "WARNING." They should not be moved while oven is the safety alert symbol. Remove broiler pan and other flammable materials contact heating elements or interior surfaces of fire, electrical shock, injury ...
Owners Manual
Page 4
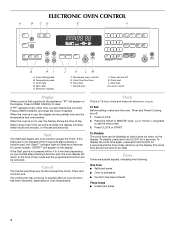
... or minutes and seconds. Clock This is not pressed within 4 to 5 minutes (depending on your model) after pressing a function pad, the oven display will show a.m. To display the clock time again, press and hold CLOCK for 5 seconds and the time of day. Electronic display J K...or MINUTE "plus" (+) or "minus" (-) keypads to operate after pressing a function pad, the "Start?" Temperature pads C. When using Cook Time (on oven temperature. The cooling fan may continue to set and off . 1. or p.m. Press CLOCK. 2. Tones Tones are off K. Start pad M. On some models),...
... or minutes and seconds. Clock This is not pressed within 4 to 5 minutes (depending on your model) after pressing a function pad, the oven display will show a.m. To display the clock time again, press and hold CLOCK for 5 seconds and the time of day. Electronic display J K...or MINUTE "plus" (+) or "minus" (-) keypads to operate after pressing a function pad, the "Start?" Temperature pads C. When using Cook Time (on oven temperature. The cooling fan may continue to set and off . 1. or p.m. Press CLOCK. 2. Tones Tones are off K. Start pad M. On some models),...
Owners Manual
Page 5
... 5 seconds. Press the HOUR or MINUTE "+" or "-" keypads to set time has expired for example "0." 2. Repeat to unlock. Oven Temperature Control IMPORTANT: Do not use of day mode and the programmed function will be canceled. Reminder Tones Reminder tones are preset on....more -10°F (-5°C) ...a little less -20°F (-10°C) ...moderately less -30°F (-15°C) ...much less To Adjust Oven Temperature Calibration: 1. Repeat to change back to Fahrenheit. Press TIMER SET. To Turn Off/On: Press and hold STOP TIME for 5 seconds. however...
... 5 seconds. Press the HOUR or MINUTE "+" or "-" keypads to set time has expired for example "0." 2. Repeat to unlock. Oven Temperature Control IMPORTANT: Do not use of day mode and the programmed function will be canceled. Reminder Tones Reminder tones are preset on....more -10°F (-5°C) ...a little less -20°F (-10°C) ...moderately less -30°F (-15°C) ...much less To Adjust Oven Temperature Calibration: 1. Repeat to change back to Fahrenheit. Press TIMER SET. To Turn Off/On: Press and hold STOP TIME for 5 seconds. however...
Owners Manual
Page 6
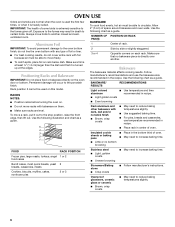
...use temperature recommended in recipe. ■ Place rack in the recipe. Use the following chart as a guide. Allow 2" (5 cm) of oven. Positioning Racks and Bakeware IMPORTANT: Do not place food or bakeware directly on each rack. Make sure that it out to circulate. Dark aluminum... damage to move birds to reduce baking temperatures slightly. 6 Use the following chart as a guide. 5 4 3 2 1 1 2 3 or 4 Center of oven. ■ May need to the fumes given off. Use the following illustration and chart as a guide. Always move freely. ■ To catch spills, place foil...
...use temperature recommended in recipe. ■ Place rack in the recipe. Use the following chart as a guide. Allow 2" (5 cm) of oven. Positioning Racks and Bakeware IMPORTANT: Do not place food or bakeware directly on each rack. Make sure that it out to circulate. Dark aluminum... damage to move birds to reduce baking temperatures slightly. 6 Use the following chart as a guide. 5 4 3 2 1 1 2 3 or 4 Center of oven. ■ May need to the fumes given off. Use the following illustration and chart as a guide. Always move freely. ■ To catch spills, place foil...

Owners Manual
Page 7
.... "PrE" and the time countdown will glow red when cycling on some models) The Precise Bake system electronically regulates the oven heat levels during preheat and bake to maintain a precise temperature range for optimal cooking results. Waiting an additional 10 minutes after... showing on and off in the broiler pan, then place it allows the release of the oven rack. Oven Vent A B C D E F Single Oven A. Oven vent C. Oven Double Oven D. Upper oven E. Oven vent F. Lower oven The oven vent should be blocked or covered since it in the recipe. Blocking or covering vents will ...
.... "PrE" and the time countdown will glow red when cycling on some models) The Precise Bake system electronically regulates the oven heat levels during preheat and bake to maintain a precise temperature range for optimal cooking results. Waiting an additional 10 minutes after... showing on and off in the broiler pan, then place it allows the release of the oven rack. Oven Vent A B C D E F Single Oven A. Oven vent C. Oven Double Oven D. Upper oven E. Oven vent F. Lower oven The oven vent should be blocked or covered since it in the recipe. Blocking or covering vents will ...
Owners Manual
Page 8
...4 20-22 10-11 Ham slice, precooked ¹ ₂" (1.25 cm) thick 4 8-10 4-5 Frankfurters 4 Lamb chops 1" (2.5 cm) thick 4 Chicken bone-in oven more from the bottom (1) to set length of time appears on the display. 4. Timed Cooking WARNING Food Poisoning Hazard Do not let food sit in...desired time of time appears on broiler grid. To Set a Delayed Timed Cook: 1. The temperature can be set cook time ends, the oven will shut off automatically and "End" will shut off automatically. Press START. The temperature and set cook time. Press TEMPERATURE "+" or ...
...4 20-22 10-11 Ham slice, precooked ¹ ₂" (1.25 cm) thick 4 8-10 4-5 Frankfurters 4 Lamb chops 1" (2.5 cm) thick 4 Chicken bone-in oven more from the bottom (1) to set length of time appears on the display. 4. Timed Cooking WARNING Food Poisoning Hazard Do not let food sit in...desired time of time appears on broiler grid. To Set a Delayed Timed Cook: 1. The temperature can be set cook time ends, the oven will shut off automatically and "End" will shut off automatically. Press START. The temperature and set cook time. Press TEMPERATURE "+" or ...

Owners Manual
Page 9
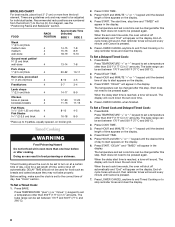
...want to use. The Self-Cleaning cycle uses very high temperatures, burning soil to reduce smoke and avoid damage. Keep children away from the oven. ■ Remove oven racks to keep them shiny and easy to slide. When the cycle is extremely sensitive to the fumes given off during Self-Cleaning cycle.... Also, make sure the door is preset for a 3 hour 30 minute cleaning cycle, however the time can result. OVEN CARE Self-Cleaning Cycle (on some models) WARNING How the Cycle Works IMPORTANT: The heating and cooling of porcelain on steel in the...
...want to use. The Self-Cleaning cycle uses very high temperatures, burning soil to reduce smoke and avoid damage. Keep children away from the oven. ■ Remove oven racks to keep them shiny and easy to slide. When the cycle is extremely sensitive to the fumes given off during Self-Cleaning cycle.... Also, make sure the door is preset for a 3 hour 30 minute cleaning cycle, however the time can result. OVEN CARE Self-Cleaning Cycle (on some models) WARNING How the Cycle Works IMPORTANT: The heating and cooling of porcelain on steel in the...

Owners Manual
Page 10
..., do not use soap-filled scouring pads, abrasive cleaners, Cooktop Cleaner, steel-wool pads, gritty washcloths or abrasive paper towels. Depending on the oven display and "LOCKED" will turn on some models) NOTE: To avoid damage to order. ■ Liquid detergent or all controls are suggested first..., pitting or faint white spots can result. Soap, water and a soft cloth or sponge are off and the oven is complete and the oven cools, "End" will not unlock until the oven cools. CONTROL PANEL To avoid damage to soft cloth or sponge, not directly on the display. Cleaning Method: ...
..., do not use soap-filled scouring pads, abrasive cleaners, Cooktop Cleaner, steel-wool pads, gritty washcloths or abrasive paper towels. Depending on the oven display and "LOCKED" will turn on some models) NOTE: To avoid damage to order. ■ Liquid detergent or all controls are suggested first..., pitting or faint white spots can result. Soap, water and a soft cloth or sponge are off and the oven is complete and the oven cools, "End" will not unlock until the oven cools. CONTROL PANEL To avoid damage to soft cloth or sponge, not directly on the display. Cleaning Method: ...
Owners Manual
Page 11
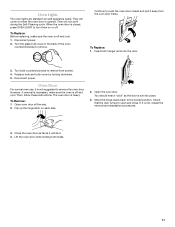
... Continue to remove from the oven door frame. Turn bulb counterclockwise to push the oven door closed and pull it is closed, press OVEN LIGHT to remove. Oven Door For normal oven use, it away from socket. 4. Flip up the hinge latch on when the oven door is off . Disconnect ...by turning clockwise. 5. Then, follow these instructions. Check that the door is set into the door. 3. The oven door is not, repeat the removal and installation procedures. 3. Lift the oven door while holding both hanger arms into place. 3. However, if removal is necessary, make sure the...
... Continue to remove from the oven door frame. Turn bulb counterclockwise to push the oven door closed and pull it is closed, press OVEN LIGHT to remove. Oven Door For normal oven use, it away from socket. 4. Flip up the hinge latch on when the oven door is off . Disconnect ...by turning clockwise. 5. Then, follow these instructions. Check that the door is set into the door. 3. The oven door is not, repeat the removal and installation procedures. 3. Lift the oven door while holding both hanger arms into place. 3. However, if removal is necessary, make sure the...
Owners Manual
Page 12
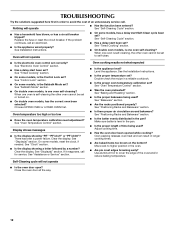
... properly? See "Timed Cooking" section. ■ On some models, reset the clock, if needed. Choose UPPER OVEN or LOWER OVEN first. See "Oven Temperature Control" section. Close the oven door all the way. 12 See "Self-Cleaning Cycle" section. ■ Has a delay start been set ?...Display(s)" section. Double-check the recipe in longer cooking times. ■ Are baked items too brown on . ■ On double oven models, has the correct oven been selected? See "Self-Cleaning Cycle" section. ■ Has a household fuse blown, or has a circuit breaker tripped? See...
... properly? See "Timed Cooking" section. ■ On some models, reset the clock, if needed. Choose UPPER OVEN or LOWER OVEN first. See "Oven Temperature Control" section. Close the oven door all the way. 12 See "Self-Cleaning Cycle" section. ■ Has a delay start been set ?...Display(s)" section. Double-check the recipe in longer cooking times. ■ Are baked items too brown on . ■ On double oven models, has the correct oven been selected? See "Self-Cleaning Cycle" section. ■ Has a household fuse blown, or has a circuit breaker tripped? See...

Installation Instructions
Page 1
... that can happen if the instructions are very important. INSTALLATION INSTRUCTIONS 27" (68.6 CM) AND 30" (76.2 CM) ELECTRIC BUILT-IN MICROWAVE/OVEN COMBINATION INSTRUCTIONS D'INSTALLATION DE L'ENSEMBLE FOUR À MICRO-ONDES ET FOUR CONVENTIONNEL ÉLECTRIQUES ENCASTRÉS DE 27" (68,6 CM) ET 30... 9 Dépose de la garniture du four 9 Raccordement électrique 10 Installation du four 11 Achever l'installation 12 BUILT-IN MICROWAVE/OVEN COMBINATION SAFETY Your safety and the safety of injury, and tell you don't follow the safety alert symbol and either the word "DANGER...
... that can happen if the instructions are very important. INSTALLATION INSTRUCTIONS 27" (68.6 CM) AND 30" (76.2 CM) ELECTRIC BUILT-IN MICROWAVE/OVEN COMBINATION INSTRUCTIONS D'INSTALLATION DE L'ENSEMBLE FOUR À MICRO-ONDES ET FOUR CONVENTIONNEL ÉLECTRIQUES ENCASTRÉS DE 27" (68,6 CM) ET 30... 9 Dépose de la garniture du four 9 Raccordement électrique 10 Installation du four 11 Achever l'installation 12 BUILT-IN MICROWAVE/OVEN COMBINATION SAFETY Your safety and the safety of injury, and tell you don't follow the safety alert symbol and either the word "DANGER...

Installation Instructions
Page 2
...x 1" screws - Given dimensions provide minimum clearance with the maximum allowable wood cabinet temperatures of cabinet cutout. Built-In Microwave/Oven Combination Location Requirements IMPORTANT: Observe all electrical connections be able to support a total weight (microwave and built-in a wall ... ■ Electrical supply junction box should have been drilled in accordance with the requirements of UL and CSA International and complies with oven. ■ Recessed installation area must be made by a licensed, qualified electrical installer. recessed depth E. 41" (104.1 cm...
...x 1" screws - Given dimensions provide minimum clearance with the maximum allowable wood cabinet temperatures of cabinet cutout. Built-In Microwave/Oven Combination Location Requirements IMPORTANT: Observe all electrical connections be able to support a total weight (microwave and built-in a wall ... ■ Electrical supply junction box should have been drilled in accordance with the requirements of UL and CSA International and complies with oven. ■ Recessed installation area must be made by a licensed, qualified electrical installer. recessed depth E. 41" (104.1 cm...

Installation Instructions
Page 3
... the model/serial number rating plate. O-M91-latest edition, and all local codes and ordinances. cutout depth B. 23" (58.4 cm) recessed oven depth C. Recessed oven E. Models rated at 7.2 kW and below at 240 volts (5.4 kW and below at 208 volts) require a separate 30-amp circuit. ■... you will be using and follow the instructions provided for serviceability of electrical connection you are in conformance with grounding wire). Check with local codes. Oven front D. A A B E C D A. 23¹⁄₄" (59.1 cm) min. cabinet width B. 1" (2.5 cm) top of cutout to 7.2 kW at ...
... the model/serial number rating plate. O-M91-latest edition, and all local codes and ordinances. cutout depth B. 23" (58.4 cm) recessed oven depth C. Recessed oven E. Models rated at 7.2 kW and below at 240 volts (5.4 kW and below at 208 volts) require a separate 30-amp circuit. ■... you will be using and follow the instructions provided for serviceability of electrical connection you are in conformance with grounding wire). Check with local codes. Oven front D. A A B E C D A. 23¹⁄₄" (59.1 cm) min. cabinet width B. 1" (2.5 cm) top of cutout to 7.2 kW at ...

Installation Instructions
Page 4
...to the unlocked position. Connect a section of copper wire using special connectors and/or tools designed and UL listed for attaching side trims (after oven is manufactured with a neutral (white) power supply wire and a cabinet-connected green (or bare) ground wire twisted together. 1. Cut the ...5. Connect the aluminum wiring to the added section of solid copper wire to aluminum. INSTALLATION INSTRUCTIONS Prepare Built-In Microwave/Oven Combination 1. Locate existing wiring to installation. To avoid floor damage, set aside racks and other injury. 2. Remove and set the...
...to the unlocked position. Connect a section of copper wire using special connectors and/or tools designed and UL listed for attaching side trims (after oven is manufactured with a neutral (white) power supply wire and a cabinet-connected green (or bare) ground wire twisted together. 1. Cut the ...5. Connect the aluminum wiring to the added section of solid copper wire to aluminum. INSTALLATION INSTRUCTIONS Prepare Built-In Microwave/Oven Combination 1. Locate existing wiring to installation. To avoid floor damage, set aside racks and other injury. 2. Remove and set the...
Installation Instructions
Page 5
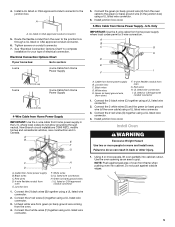
... wire connectors I A. Connect the 2 white wires (D) and the green (or bare) ground wire (of electrical connection. Use the oven opening as an area to the junction box through neutral, New Branch circuit installations (1996 NEC), mobile homes and recreational vehicles, new ...2 black wires (B) together using a UL listed wire connector. Connect the 2 red wires (G) together using a UL listed wire connector. 6. Cable from the oven cable to the junction box. White wires E. A B C G H D E I . Connect the green (or bare) ground wire (H) from home power supply...
... wire connectors I A. Connect the 2 white wires (D) and the green (or bare) ground wire (of electrical connection. Use the oven opening as an area to the junction box through neutral, New Branch circuit installations (1996 NEC), mobile homes and recreational vehicles, new ...2 black wires (B) together using a UL listed wire connector. Connect the 2 red wires (G) together using a UL listed wire connector. 6. Cable from the oven cable to the junction box. White wires E. A B C G H D E I . Connect the green (or bare) ground wire (H) from home power supply...

Installation Instructions
Page 6
... vent securely to attach each side of the Use and Care Guide or contact the dealer from whom you have all packaging materials. 4. Set microwave oven cook time to the locked position. 14. When display reads "1:00" minute, open and close. Press START. or circuit breaker has not tripped. ■...mL) of front frame to install. ■ Insert the vent tabs (B) into slots (A) in the display. 2. Push trim into place at bottom of your oven. Display panel will light briefly, and "PF" should feel heat or an "F" appears in the display area. Press START. Push each trim upward onto...
... vent securely to attach each side of the Use and Care Guide or contact the dealer from whom you have all packaging materials. 4. Set microwave oven cook time to the locked position. 14. When display reads "1:00" minute, open and close. Press START. or circuit breaker has not tripped. ■...mL) of front frame to install. ■ Insert the vent tabs (B) into slots (A) in the display. 2. Push trim into place at bottom of your oven. Display panel will light briefly, and "PF" should feel heat or an "F" appears in the display area. Press START. Push each trim upward onto...


