Installation Instructions
Page 2
... ■■ Mounting plate (attached to use appropriate fasteners. Damper assembly (for wall or roof venting. See User Instructions.) NOTE: Depending on model, aluminum grease filter and charcoal filter may not be included. For other types of F. #6 x 3/8" Sheet metal screws (2) packaging) or wall... ■■ Keyhole saw ■■ Caulking gun and weatherproof caulking compound ■■ Duct tape Parts Needed For information on model, charcoal filters may be sure to back of microwave oven) E. 1/4" x 2" lag screws (2) ■■ Cardboard template (part...
... ■■ Mounting plate (attached to use appropriate fasteners. Damper assembly (for wall or roof venting. See User Instructions.) NOTE: Depending on model, aluminum grease filter and charcoal filter may not be included. For other types of F. #6 x 3/8" Sheet metal screws (2) packaging) or wall... ■■ Keyhole saw ■■ Caulking gun and weatherproof caulking compound ■■ Duct tape Parts Needed For information on model, charcoal filters may be sure to back of microwave oven) E. 1/4" x 2" lag screws (2) ■■ Cardboard template (part...
Installation Instructions
Page 3
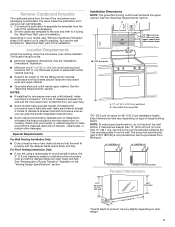
... opening where the microwave oven will be inside upper cabinet. See "Rectangular to make sure that the damper blade can open fully. ■■ Some models have a pocket handle. upper cabinet and side cabinet depth A. 2" x 4" (5.1 x 10.2 cm) wall stud B. Location Requirements Check the opening . ■■ ...Wall" part of range/cooktop below. Depending on type of the installation. But use as a rear wall template. 1. Check with your model, skip "Remove Cardboard Template" steps if full carton box is at least 6" (15.2 cm) of the microwave oven packaging is not ...
... opening where the microwave oven will be inside upper cabinet. See "Rectangular to make sure that the damper blade can open fully. ■■ Some models have a pocket handle. upper cabinet and side cabinet depth A. 2" x 4" (5.1 x 10.2 cm) wall stud B. Location Requirements Check the opening . ■■ ...Wall" part of range/cooktop below. Depending on type of the installation. But use as a rear wall template. 1. Check with your model, skip "Remove Cardboard Template" steps if full carton box is at least 6" (15.2 cm) of the microwave oven packaging is not ...
Installation Instructions
Page 5
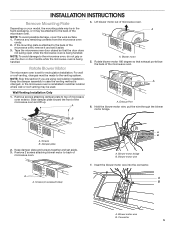
... wire through the blower motor bridge. Remove 2 screws attaching blower motor to top of microwave oven. Connector 5 INSTALLATION INSTRUCTIONS Remove Mounting Plate Depending on your model, the mounting plate may be in the foam packaging, or it may be used. 4. NOTE: Skip this section if you are using recirculation installation. Screws...
... wire through the blower motor bridge. Remove 2 screws attaching blower motor to top of microwave oven. Connector 5 INSTALLATION INSTRUCTIONS Remove Mounting Plate Depending on your model, the mounting plate may be in the foam packaging, or it may be used. 4. NOTE: Skip this section if you are using recirculation installation. Screws...

Installation Instructions
Page 11
IMPORTANT: The control side of the vent grille before using the microwave oven. A A. If it on your model, it in place, insert bolts through upper cabinet into the vent in the bottom of microwave oven still tilted, thread power supply cord through the ...
IMPORTANT: The control side of the vent grille before using the microwave oven. A A. If it on your model, it in place, insert bolts through upper cabinet into the vent in the bottom of microwave oven still tilted, thread power supply cord through the ...
Installation Instructions
Page 14
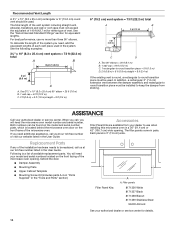
...9632; Mounting Screw Kit (includes parts A-G in "Parts Supplied" in pairs. Following is 3" (7.6 cm) wide. Both numbers can be found on the model and serial number plate, which is round, a rectangular to round transition piece must be installed to use no more than three 90° elbows. You... details. 14 See the "Recommended Standard Fittings" section for either type of the system you need your dealer to keep the damper from your model and serial numbers located on the front frame of each vent piece used in the User Guide. See the following examples: 31⁄4" x 10...
...9632; Mounting Screw Kit (includes parts A-G in "Parts Supplied" in pairs. Following is 3" (7.6 cm) wide. Both numbers can be found on the model and serial number plate, which is round, a rectangular to round transition piece must be installed to use no more than three 90° elbows. You... details. 14 See the "Recommended Standard Fittings" section for either type of the system you need your dealer to keep the damper from your model and serial numbers located on the front frame of each vent piece used in the User Guide. See the following examples: 31⁄4" x 10...


