Maytag MMV4207JZ Support and Manuals
Get Help and Manuals for this Maytag item
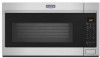
View All Support Options Below
Free Maytag MMV4207JZ manuals!
Problems with Maytag MMV4207JZ?
Ask a Question
Free Maytag MMV4207JZ manuals!
Problems with Maytag MMV4207JZ?
Ask a Question
Maytag MMV4207JZ Videos

Maytag Dual Crisp Microwave MMV4207JZ
Duration: 2:03
Total Views: 1,732
Duration: 2:03
Total Views: 1,732
Popular Maytag MMV4207JZ Manual Pages
Installation Instructions - Page 2
... may not be sure to back of microwave oven)
E. 1/4" x 2" lag screws (2)
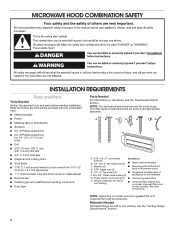
■■ Cardboard template (part of wall structures, be included. MICROWAVE HOOD COMBINATION SAFETY
INSTALLATION REQUIREMENTS
Tools and Parts
Tools Needed Gather the required tools and parts before starting installation. See User Instructions.)
NOTE: Depending on model, charcoal filters may be combined.
Installation Instructions - Page 3
...: The grounded 3 prong outlet must provide:
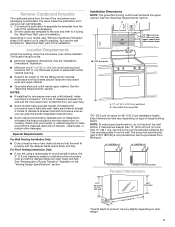
■■ Minimum installation dimensions. Set the cardboard template to the side and refer to Round Transition" illustration in the "Venting Design Specifications" section. Depending on your builder or cabinet supplier to withstand the heat produced by the microwave oven for use as a rear wall template. 1. See the...
Installation Instructions - Page 4
... or time-delay circuit breaker ■■ A separate circuit serving only this microwave oven
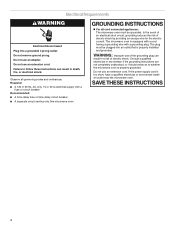
GROUNDING INSTRUCTIONS
For all governing codes and ordinances. Required: ■■ A 120 V, 60 Hz, AC only...: The microwave oven must be grounded. SAVE THESE INSTRUCTIONS
4 Electrical Requirements
WARNING
Electrical Shock Hazard Plug into an outlet that is properly installed and grounded...
Installation Instructions - Page 5
...microwave oven, remove it and set it aside. 3.
Tape the microwave oven door closed so that exhaust ports face
the back of the microwave ...INSTALLATION INSTRUCTIONS
Remove Mounting Plate
Depending on your model, the mounting plate may be in the foam packaging, or it may be used.
4. A
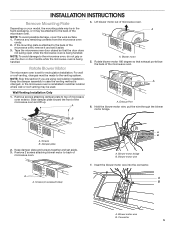
Wall Venting Installation Only
1. Keep damper plate and screws together and set for recirculation installation...
Installation Instructions - Page 6
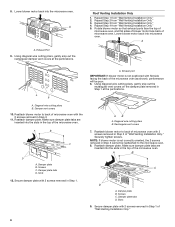
...
IMPORTANT: If blower motor is not correctly oriented, the 2 screws removed in the top of "Wall Venting Installation Only." Reattach blower motor to back of microwave oven with the 2 screws removed in Step 3 of the microwave oven. Securely tighten screws.
Slots
9. Using diagonal wire cutting pliers, gently snip out the
rectangular damper vent...
Installation Instructions - Page 7

...only recirculation or roof
venting installation can be done. End... stud is within the opening.
2.
Wall stud centerlines D. Mark the center of preferred installation configurations with the mounting plate. No Wall Studs at End Holes Figure 1
No Wall ...Configurations." Cabinet opening , do not install the microwave oven. Locate Wall Stud(s)
NOTE: If no wall ...
Installation Instructions - Page 8

...the upper cabinet. D A
C B
A. Set the mounting plate aside. Using a straightedge,...and must each other. With the support tabs facing forward (see illustrations ... template. Mark Rear Wall
The microwave oven must align with front edge... (1.9 cm) hole in the "Locate Wall Stud(s)" section. Wall Venting Installation Only
Upper cabinet bottom
³⁄₈" (1 cm)
4" (10.2...
Installation Instructions - Page 9
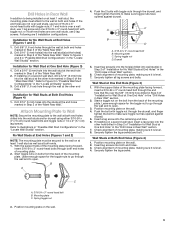
...finger tighten the bolts to make sure toggle nut has opened against drywall. 5. With the support tabs of "Installation for No Wall Studs at One End Hole" in the "Drill Holes in Rear Wall" ...other hole marked in Step 6 of the "Mark Rear Wall." Securely tighten all Stud(s)" section.
3. If installing on a second wall stud, insert a lag screw into wall stud(s) in Step 2 of mounting plate,...
Installation Instructions - Page 10
... The template has trim lines to use as guides.
■■ If the wall behind the microwave oven (as shown.
For Roof Venting Installation Only: 7. Using a keyhole saw, cut ... cord bushing
6. These are for two 1/4-20 x 3" bolts and washers used to secure the microwave oven to the thickest part of t he rear wall (for example, tile backsplash), be sure the "Rear Wall" arrows ...
Installation Instructions - Page 11

... the heavy side. Using 2 or more people, lift microwave oven off of the microwave oven. A
B A. Remove the 2 packing spacers from the top of the microwave oven is being handled.
The blocks must be added. Support tabs
A. Failure to provide) may warp the top of mounting plate, and set aside on each 1/4-20 x 3" flat-head bolt...
Installation Instructions - Page 12

... by hand first, make sure the bolts thread in death, fire, or electrical shock.
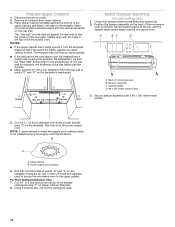
2. Vent B.
A
B
C
D
E
F
A.
Replace the fuse or reset the circuit breaker. Save Installation Instructions for filter placement. Mounting Nut
For Roof Venting Installation Only
1. Long tab F. Plug microwave oven into the mounting nut holes around 15-20 mm by operating the vent fan...
Installation Instructions - Page 13
... crawl spaces or garages. If venting through the wall, be sure to vent air outside, unless using recirculation installation.
Roof cap B. 6" (15.2 cm) min. A
B
C
Roof venting
Roof cap
Wall venting
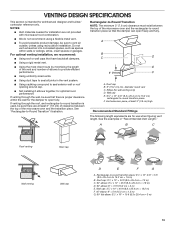
Wall ...so that the damper can open fully. VENTING DESIGN SPECIFICATIONS
This section is used, be sure there are not provided with microwave hood combination.
■■ We do not ...
Installation Instructions - Page 14
... our toll-free number or visit our website listed in the User Guide. For best performance, use when installing this microwave oven in a 36" (91.4 cm) or 42" (106.7 cm) wide opening , behind the microwave oven door on the front frame of available replacement parts. See the following examples:
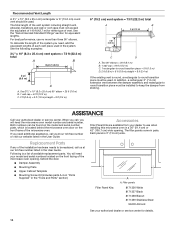
31⁄4" x 10" (8.3 x 25.4 cm) vent system...
Maytag MMV4207JZ Reviews
We have not received any reviews for Maytag yet.