Maytag MMV1175 Support and Manuals
Get Help and Manuals for this Maytag item
View All Support Options Below
Free Maytag MMV1175 manuals!
Problems with Maytag MMV1175?
Ask a Question
Free Maytag MMV1175 manuals!
Problems with Maytag MMV1175?
Ask a Question
Popular Maytag MMV1175 Manual Pages
Installation Instructions - Page 1
... Wall Stud(s 7 Mark Rear Wall 7 Drill Holes in these installation instructions.
These installation instructions cover different models. See the "Installation Requirements" section for wall venting only 10 Install the Microwave Oven 10 Complete Installation 11 VENTING DESIGN SPECIFICATIONS 12 ASSISTANCE 14 Replacement Parts 14 Accessories 14
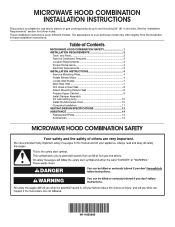
MICROWAVE HOOD COMBINATION SAFETY
W11485889B...
Installation Instructions - Page 2
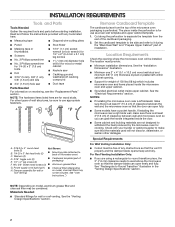
...installed. Set the cardboard template to the side and refer to Round Transition" illustration in the "Venting Design Specifications" section. Location Requirements
Check the opening .
■ Support for wall or roof venting.
Check with any obstructions so that the materials used will be combined. NOTE: Depending on reordering, see the "Replacement Parts... the instructions provided ...
Installation Instructions - Page 3
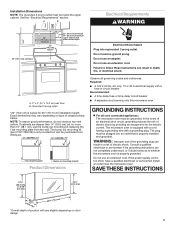
... time-delay circuit breaker
■ A separate circuit serving only this microwave oven
GROUNDING INSTRUCTIONS
For all governing codes and ordinances. The microwave oven is typical for the electric current. If the power supply cord is properly installed and grounded. SAVE THESE INSTRUCTIONS
17¹⁄₈"
(43.5 cm) +/- 3/16" (0.5 cm)
16¹⁄₄...
Installation Instructions - Page 4

... plate is attached to the back of
B
microwave oven, set the screws aside. Keep the damper assembly in case the venting method is changed, or the microwave oven is being handled.
3. Blower motor wire B. Connector 5.
INSTALLATION INSTRUCTIONS
Remove Mounting Plate
Depending on your model, the mounting plate may be in the foam packaging, or...
Installation Instructions - Page 6
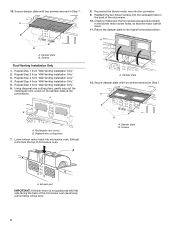
... Exhaust ports face the top of the microwave. 10. Repeat Step 1 from "Wall Venting Installation Only." 3.
Return the damper plate to make sure the two screws are secured properly
in
the... snip out the
rectangular vent covers on the damper plate at the perforations. Screws
Roof Venting Installation Only 1.
A
B
A. Reattach the two blower screws into the recessed holes in the blower...
Installation Instructions - Page 7

...E
F
NOTE: If wall stud is within 6" (15.2 cm) of the vertical centerline
(see the "Mark Rear Wall" section), only recirculation or roof
venting installation can be installed on a minimum of one wall stud, preferably two, using a minimum of cabinet. A A. No Wall Studs at End Holes Figure 1
No Wall Studs at ... up against the bottom edge of upper cabinet
7 Support tabs F.
Installation Instructions - Page 8

...hole marked in the"Locate Wall Stud(s)" section. Set the mounting plate aside. If the end holes are...holes in place, mark both end holes are ideal hole locations.
7. Wall Venting Installation Only
Upper cabinet bottom
3/8" (1 cm)
4" (10.2 cm)
Centerline
6" (15...keyhole saw, cut out the venting cutout area. With the support tabs of mounting plate. 2.
Leave enough space for Wall...
Installation Instructions - Page 9

... making sure it is for example, tile backsplash), be installed around the supply cord hole as installed) has a partial wall covering (for the power supply...bolt. Prepare Upper Cabinet
1. Metal cabinet B.
With the support tabs of the mounting plate facing forward, insert a ...washers used to secure the microwave oven to the thickest part of the mounting plate.
Wall Studs at one corner...
Installation Instructions - Page 10
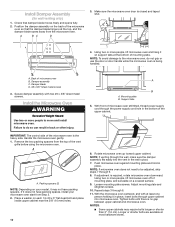
...set aside on support tabs at the top, and the damper blade opens away from the microwave oven. If adjustment is closed and taped shut.
4. NOTES: ■ Some upper cabinets may not have packing spaces, install your model... thread power supply cord through upper cabinet into the vent in
place. Support tabs
5.
Install Damper Assembly
(for wall venting only)
1. Using two or more people...
Installation Instructions - Page 11
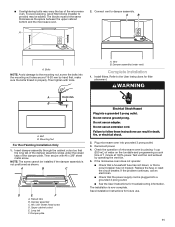
... an extension cord. Do not use an adapter. Plug microwave oven into a grounded 3 prong outlet. Test vent fan and exhaust by operating the vent fan. 5. Replace the fuse or reset the circuit breaker. Save Installation Instructions for troubleshooting information.
Installation Instructions - Page 12
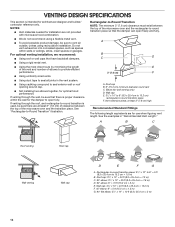
...least 3" (7.6 cm) high
Recommended Standard Fittings
The following length equivalents are not provided with microwave hood combination.
■ We do not recommend using recirculation installation. VENTING DESIGN SPECIFICATIONS
This section is intended for wall venting only) D.
A
B
C
Roof venting Wall venting
Roof cap Wall cap
D
E
F
G
A. If venting through the roof, and rectangular...
Installation Instructions - Page 13
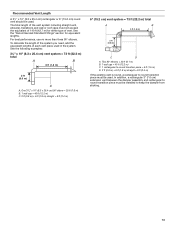
... ft (12.2 m) C. 1 rectangular-to-round transition piece = 5 ft (1.5 m) D. 2 ft (0.6 m) + 6 ft (1.8 m) straight = 8 ft (2.4 m)
If the existing vent is round, a rectangular to round transition piece must be installed to round transition piece must not exceed the equivalent of 140 ft (42.7 m) for equivalent lengths.
One 31⁄4" x 10" (8.3 x 25.4 cm) 90° elbow...
Installation Instructions - Page 14
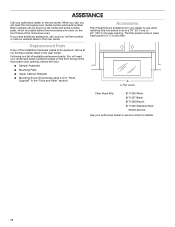
... installing this microwave oven in a 36" (91.4 cm) or 42" (106.7 cm) wide opening , behind the microwave oven door on the front facing of the microwave oven.
You will need the microwave oven model number and serial number. ASSISTANCE
Call your authorized dealer or service center for details.
14 Replacement Parts
If any of available replacement parts...
Maytag MMV1175 Reviews
We have not received any reviews for Maytag yet.