Maytag MMV1175J Support and Manuals
Get Help and Manuals for this Maytag item

View All Support Options Below
Free Maytag MMV1175J manuals!
Problems with Maytag MMV1175J?
Ask a Question
Free Maytag MMV1175J manuals!
Problems with Maytag MMV1175J?
Ask a Question
Popular Maytag MMV1175J Manual Pages
Installation Instructions - Page 1
... Upper Cabinet 9 Install Damper Assembly (for further notes. These installation instructions cover different models. Table of your particular model may differ slightly ...installation instructions.
See the "Installation Requirements" section for wall venting only 10 Install the Microwave Oven 10 Complete Installation 11 VENTING DESIGN SPECIFICATIONS 12 ASSISTANCE 14 Replacement Parts...
Installation Instructions - Page 2
... the "Electrical Requirements" section.
INSTALLATION REQUIREMENTS
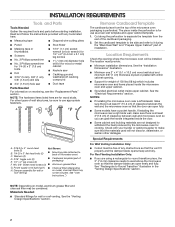
Tools and Parts
Tools Needed
Gather the required tools and parts before starting installation. Set the cardboard template to the side and refer to back of installation.
Materials Needed
■ Standard fittings for use appropriate fasteners. Read and follow the instructions provided with your builder or...
Installation Instructions - Page 3
...circuit breaker
■ A separate circuit serving only this microwave oven
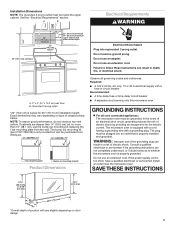
GROUNDING INSTRUCTIONS
For all governing codes and ordinances. NOTE: To ensure good performance, do not obstruct top...plug. The bump out mounting kit (part # W11185746) is too short, have a qualified electrician or serviceman install an outlet near the microwave oven. Installation Dimensions
NOTE: The grounded 3 prong outlet...
Installation Instructions - Page 4

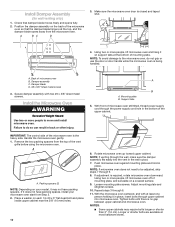
... screws attaching damper plate to the back of the microwave oven, remove it and set for recirculation installation. Connector 5. Damper plate B.
Disconnect the blower motor wire from the microwave oven cavity.
2. A
B
A. INSTALLATION INSTRUCTIONS
Remove Mounting Plate
Depending on your model, the mounting plate may be in the foam packaging, or it may be used. For...
Installation Instructions - Page 6
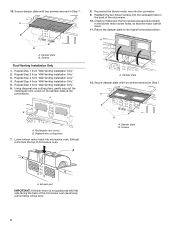
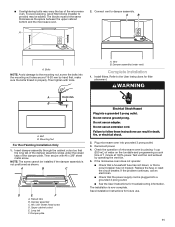
... the motor cannot move. 11. Exhaust ports face the top of the microwave oven (as shown), performance will be poor.
6 Repeat Step 4 from "Wall Venting Installation Only." 4. Reattach the two blower screws into microwave oven. Return the damper plate to make sure the two screws are secured properly
in
the back...
Installation Instructions - Page 7

... of one wall stud, preferably two, using a minimum of the vertical centerline
(see the "Mark Rear Wall" section), only recirculation or roof
venting installation can be installed on mounting plate)
B. Support tabs F. A. Wall Stud at End Hole Figure 3
Wall Studs at End Holes Figure 2
B
C
C
C
B
D
D
A
A
A
A
E
E
F
E
E
F
NOTE: If wall stud is within 6" (15.2 cm) of...
Installation Instructions - Page 8

...the wall stud(s) at Both End Holes (Figure 4)
1.
3. Set the mounting plate aside. Mark the centerline 3/8" (1 cm) down...one 3/16-24 x 3" round-head bolt with toggle nuts; With the support tabs of the "Mark Rear Wall."
2. B A
C
A. 3/16-24...horizontal line across the bottom edge of the"Mark Rear Wall."
Wall Venting Installation Only
Upper cabinet bottom
3/8" (1 cm)
4" (10.2 cm)
Centerline...
Installation Instructions - Page 9

...cm) dimension from the back of the mounting plate.
For Roof Venting Installation Only: 7. Push the two bolts with toggle nuts through the end...holes. 3.
Remove all lag screws and bolts.
With the support tabs of the tiles rather than the drywall).
4. Position ... sure the "Rear Wall" arrows align to the thickest part of the rear wall (for example, the thickness of ...
Installation Instructions - Page 10
... may not have packing spaces, install your model, it does not have packing spacers. Longer or shorter bolts are available at least one person holding it on support tabs at the top, and... D. #6 x 3/8" Sheet metal screws 3.
If adjustment is at the bottom of mounting plate, and set aside on the back of the microwave oven so that damper blade moves freely and opens fully.
2. Position...
Installation Instructions - Page 11
.... ■ See the User Instructions for troubleshooting information. Do not use .
11 Failure to damper assembly. Save Installation Instructions for filter placement. If the problem continues, call an electrician. &#... damper assembly through the cabinet cutout so that a
circuit breaker has not tripped. Replace the fuse or reset the circuit breaker. Bolts
NOTE: Avoid damage to provide) ...
Installation Instructions - Page 12
...
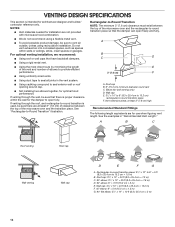
■ Using duct tape to seal all joints in "Recommended Vent Length." Elbow (for installation are for optimal hood performance. Rectangular-to-Round Transition NOTE: The minimum 3" (7.6 cm) clearance... = 25 ft (8.3 x 25.4 cm = 7.6 m) D. 90° elbow: 6" = 10 ft (15.2 cm = 3 m) E.
VENTING DESIGN SPECIFICATIONS
This section is intended for the damper to open freely and fully.
Installation Instructions - Page 13
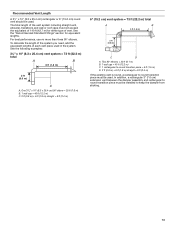
... ft (12.2 m) C. 1 rectangular-to-round transition piece = 5 ft (1.5 m) D. 2 ft (0.6 m) + 6 ft (1.8 m) straight = 8 ft (2.4 m)
If the existing vent is round, a rectangular to round transition piece must be installed to round transition piece must be used. In addition, a rectangular 3" (7.6 cm) extension vent between the damper assembly and rectangular to keep the damper from sticking...
Installation Instructions - Page 14
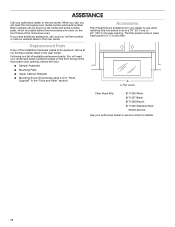
... the installation hardware needs to use when installing this microwave oven in the User Guide. Replacement Parts
If any of the microwave oven. When you will need the microwave oven model number and serial number. You will need your dealer to be found on the front facing of available replacement parts. ASSISTANCE
Call your authorized dealer or service center...
Maytag MMV1175J Reviews
We have not received any reviews for Maytag yet.