Installation Guide
Page 1
...up to potential hazards that can happen if the instructions are very important. Table of Contents MICROWAVE HOOD COMBINATION SAFETY 1 INSTALLATION REQUIREMENTS 2 Tools and Parts 2 Remove Cardboard Template 2 Location Requirements 2 Product Dimensions 3 Electrical Requirements 3 INSTALLATION INSTRUCTIONS 4 Remove Mounting Plate 4 Rotate Blower Motor 4...manual and on your appliance. We have provided many important safety messages in these installation instructions. All safety messages will tell you what the potential hazard is, tell you and others are not followed...
...up to potential hazards that can happen if the instructions are very important. Table of Contents MICROWAVE HOOD COMBINATION SAFETY 1 INSTALLATION REQUIREMENTS 2 Tools and Parts 2 Remove Cardboard Template 2 Location Requirements 2 Product Dimensions 3 Electrical Requirements 3 INSTALLATION INSTRUCTIONS 4 Remove Mounting Plate 4 Rotate Blower Motor 4...manual and on your appliance. We have provided many important safety messages in these installation instructions. All safety messages will tell you what the potential hazard is, tell you and others are not followed...
Installation Guide
Page 2
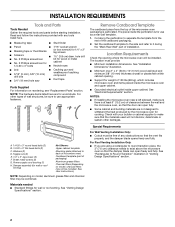
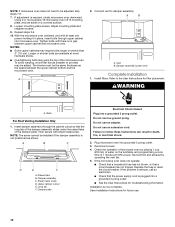
...round-head bolts (2) B. 1/4-20 x 3" flat-head bolts (2) C. Remove Cardboard Template The cardboard piece from the rest of wall structures, be installed. Location Requirements Check the opening . ■ Support for wood studs. See "Electrical Requirements" section. Check with any obstructions so that the materials ... section. 2 Washers (2) D. See User Instructions.) NOTE: Depending on model, aluminum grease filter and charcoal filter may not be free of installation. The piece inside upper cabinet. NOTES: ■ If installing the microwave oven near a left sidewall, make...
...round-head bolts (2) B. 1/4-20 x 3" flat-head bolts (2) C. Remove Cardboard Template The cardboard piece from the rest of wall structures, be installed. Location Requirements Check the opening . ■ Support for wood studs. See "Electrical Requirements" section. Check with any obstructions so that the materials ... section. 2 Washers (2) D. See User Instructions.) NOTE: Depending on model, aluminum grease filter and charcoal filter may not be free of installation. The piece inside upper cabinet. NOTES: ■ If installing the microwave oven near a left sidewall, make...

Installation Guide
Page 3
... a grounding plug. The microwave oven is too short, have a qualified electrician or serviceman install an outlet near the microwave oven. Do not use an adapter. SAVE THESE INSTRUCTIONS 3 Do not use an extension cord. The plug must be inside the upper cabinet.... Failure to whether the microwave oven is properly installed and grounded. WARNING: Improper use an extension cord. Consult a qualified electrician or serviceman if the grounding instructions are not completely understood, or if doubt exists as to follow these instructions can result in death, fire, or electrical...
... a grounding plug. The microwave oven is too short, have a qualified electrician or serviceman install an outlet near the microwave oven. Do not use an adapter. SAVE THESE INSTRUCTIONS 3 Do not use an extension cord. The plug must be inside the upper cabinet.... Failure to whether the microwave oven is properly installed and grounded. WARNING: Improper use an extension cord. Consult a qualified electrician or serviceman if the grounding instructions are not completely understood, or if doubt exists as to follow these instructions can result in death, fire, or electrical...
Installation Guide
Page 4
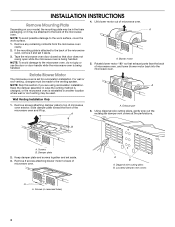
INSTALLATION INSTRUCTIONS Remove Mounting Plate Depending on your model, the mounting plate may be in the foam packaging, or it may be made to the venting system. Blower motor 5. Wall Venting Installation Only 1. A A. Screws B. Damper plate 2. A A. If the mounting plate is attached to the back of ... method is changed, or the microwave oven is set aside. 3. B A. Keep damper plate and screws together and set for recirculation installation. Screws (in another location where wall or roof venting may be attached to the back of the microwave oven. Louvered damper vent covers...
INSTALLATION INSTRUCTIONS Remove Mounting Plate Depending on your model, the mounting plate may be in the foam packaging, or it may be made to the venting system. Blower motor 5. Wall Venting Installation Only 1. A A. Screws B. Damper plate 2. A A. If the mounting plate is attached to the back of ... method is changed, or the microwave oven is set aside. 3. B A. Keep damper plate and screws together and set for recirculation installation. Screws (in another location where wall or roof venting may be attached to the back of the microwave oven. Louvered damper vent covers...
Installation Guide
Page 10
... complete. Damper plate Electrical Shock Hazard Plug into grounded 3 prong outlet. 3. Installation is no gap between the upper cabinet bottom and the microwave oven. Save Installation Instructions for filter placement. Then secure with at 100% power. A B C D E F A. Do not use an adapter. Install filters. Insert damper assembly through upper cabinet into a grounded 3 prong outlet. ■...
... complete. Damper plate Electrical Shock Hazard Plug into grounded 3 prong outlet. 3. Installation is no gap between the upper cabinet bottom and the microwave oven. Save Installation Instructions for filter placement. Then secure with at 100% power. A B C D E F A. Do not use an adapter. Install filters. Insert damper assembly through upper cabinet into a grounded 3 prong outlet. ■...
Installation Guide
Page 12
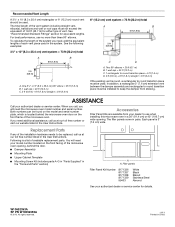
...rectangular to be used. Accessories Filler Panel Kits are available from your model number located on the front frame of the installation hardware needs to round transition piece must be installed to use no more than three 90° elbows. Following is 3" (7.6 cm) wide. The filler panels come.... 11/13 Printed in pairs. When you call us at our toll free number or visit our website listed in the User Instructions. Filler panels Filler Panel Kit Number 8171336 8171337 8171338 8171339 99403 White Black Biscuit Stainless Steel Almond See your authorized dealer or service...
...rectangular to be used. Accessories Filler Panel Kits are available from your model number located on the front frame of the installation hardware needs to round transition piece must be installed to use no more than three 90° elbows. Following is 3" (7.6 cm) wide. The filler panels come.... 11/13 Printed in pairs. When you call us at our toll free number or visit our website listed in the User Instructions. Filler panels Filler Panel Kit Number 8171336 8171337 8171338 8171339 99403 White Black Biscuit Stainless Steel Almond See your authorized dealer or service...

Warranty Information
Page 1
.... Please keep this major appliance is installed, operated and maintained according to instructions attached to or furnished with the product, Maytag will pay for future reference. WARRANTY MAYTAG® MICROWAVE-RANGE HOOD COMBINATION LIMITED ...Maytag designated service company. ITEMS EXCLUDED FROM WARRANTY This limited warranty does not cover: 1. Consumable parts are excluded from the date of original purchase, when this User Guide and model number information for a factory specified replacement Magnetron to published user or operator instructions and/or installation instructions...
.... Please keep this major appliance is installed, operated and maintained according to instructions attached to or furnished with the product, Maytag will pay for future reference. WARRANTY MAYTAG® MICROWAVE-RANGE HOOD COMBINATION LIMITED ...Maytag designated service company. ITEMS EXCLUDED FROM WARRANTY This limited warranty does not cover: 1. Consumable parts are excluded from the date of original purchase, when this User Guide and model number information for a factory specified replacement Magnetron to published user or operator instructions and/or installation instructions...
Use & Care Guide
Page 1
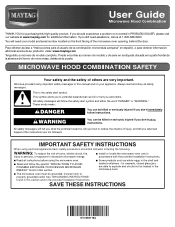
... in this section and in this high-quality product. See "GROUNDING INSTRUCTIONS" found in this section. ■ Some products such as whole eggs in accordance with the provided Installation Instructions. ■ Read all safety messages. These words mean: DANGER You...maytag.com for purchasing this manual and on your model and serial number located on the front facing of others . User Guide Microwave Hood Combination THANK YOU for additional information. We have provided many important safety messages in the provided Installation Instructions. SAVE THESE INSTRUCTIONS...
... in this section and in this high-quality product. See "GROUNDING INSTRUCTIONS" found in this section. ■ Some products such as whole eggs in accordance with the provided Installation Instructions. ■ Read all safety messages. These words mean: DANGER You...maytag.com for purchasing this manual and on your model and serial number located on the front facing of others . User Guide Microwave Hood Combination THANK YOU for additional information. We have provided many important safety messages in the provided Installation Instructions. SAVE THESE INSTRUCTIONS...
Use & Care Guide
Page 3
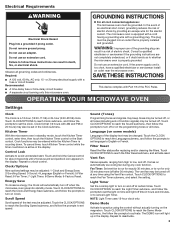
...to deactivate. 3 Comes on Clock. SAVE THESE INSTRUCTIONS ■ A 120 volt, 60 Hz, AC only, 15- Clock/Options Nine options/settings may be plugged into an outlet that is too short, have a qualified electrician or serviceman install an outlet near the microwave oven. Required: ...wire for only 30 minutes more (off at any cook function. Touch CLOCK/OPTIONS to set the clock. Electrical Requirements WARNING GROUNDING INSTRUCTIONS Electrical Shock Hazard Plug into a grounded 3 prong outlet. ■ For all cord connected appliances: The microwave oven must be turned...
...to deactivate. 3 Comes on Clock. SAVE THESE INSTRUCTIONS ■ A 120 volt, 60 Hz, AC only, 15- Clock/Options Nine options/settings may be plugged into an outlet that is too short, have a qualified electrician or serviceman install an outlet near the microwave oven. Required: ...wire for only 30 minutes more (off at any cook function. Touch CLOCK/OPTIONS to set the clock. Electrical Requirements WARNING GROUNDING INSTRUCTIONS Electrical Shock Hazard Plug into a grounded 3 prong outlet. ■ For all cord connected appliances: The microwave oven must be turned...
Use & Care Guide
Page 4
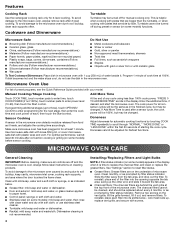
... cloth, or use the dish in the microwave oven detects moisture released from the tab area, and drop out the filter. This is not recommended. 4 Installing/Replacing Filters and Light Bulbs NOTE: A filter status indicator (on the underside of the microwave oven. Turntable cannot be changed . Make sure microwave oven has... Start control. Clean monthly, or as in the display. At the end of cook time at least 30 minutes after 2-level cooking. Always follow label instructions on the vent grille, tilt the grille forward, lift it .
... cloth, or use the dish in the microwave oven detects moisture released from the tab area, and drop out the filter. This is not recommended. 4 Installing/Replacing Filters and Light Bulbs NOTE: A filter status indicator (on the underside of the microwave oven. Turntable cannot be changed . Make sure microwave oven has... Start control. Clean monthly, or as in the display. At the end of cook time at least 30 minutes after 2-level cooking. Always follow label instructions on the vent grille, tilt the grille forward, lift it .
Use & Care Guide
Page 6
... from the date of purchase, when this major appliance is installed, operated and maintained according to instructions attached to or furnished with the product, Maytag brand of your major appliance if it is installed in an inaccessible location or is not installed in accordance with published installation instructions. 11. SECOND THROUGH TENTH YEAR LIMITED WARRANTY (MAGNETRON ONLY...
... from the date of purchase, when this major appliance is installed, operated and maintained according to instructions attached to or furnished with the product, Maytag brand of your major appliance if it is installed in an inaccessible location or is not installed in accordance with published installation instructions. 11. SECOND THROUGH TENTH YEAR LIMITED WARRANTY (MAGNETRON ONLY...


