
Maytag MMV4206FZ Support Question
Maytag MMV4206FZ Support Question
Find answers below for this question about Maytag MMV4206FZ.Need a Maytag MMV4206FZ manual? We have 4 online manuals for this item!
Question posted by treacydk on August 19th, 2018
Nuts In Top Of Unit Dropped. How Do I Replace?
The Nut in top of microwave to attach the cabinet bolts fell into unit. How do I take the microwave apart to retrieve and replace the nut? I do not want to just start removing all the screws when I am unsure that is necessary.Thank you very much!!
Current Answers
Answer #1: Posted by BusterDoogen on August 19th, 2018 4:25 PM
BusterDoogen

Member since:
October 30th, 2011 Points: 28,565,397

Member since:
October 30th, 2011 Points: 28,565,397
Starting on page 2 & follow install instructions. This video should guide you in the disassembly.
I hope this is helpful to you!
Please respond to my effort to provide you with the best possible solution by using the "Acceptable Solution" and/or the "Helpful" buttons when the answer has proven to be helpful. Please feel free to submit further info for your question, if a solution was not provided. I appreciate the opportunity to serve you!
Related Maytag MMV4206FZ Manual Pages
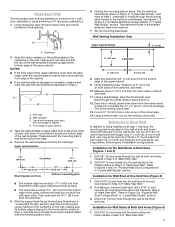
Installation Guide - Page 1

... Upper Cabinet 8 Install Damper Assembly 9 Install the Microwave Oven 9 Complete Installation 10 VENTING DESIGN SPECIFICATIONS 11 ASSISTANCE 12 Replacement Parts 12 Accessories 12
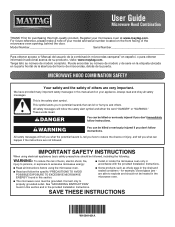
MICROWAVE HOOD...
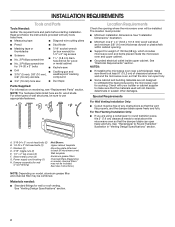
MICROWAVE HOOD COMBINATION SAFETY 1 INSTALLATION REQUIREMENTS 2
Tools and Parts 2 Location Requirements 2 Product Dimensions 3 Electrical Requirements 3 INSTALLATION INSTRUCTIONS 4 Remove ...
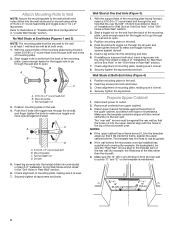
Installation Guide - Page 2
... bolts (2) B. 1/4-20 x 3" flat-head bolts (2) C.
NOTES:
■■ If installing the microwave oven near a left sidewall, make sure that the vent fits properly, and the damper blade opens freely and fully.
Washers (2) D. 3/16" toggle nuts (2) E. 1/4" x 2" lag screws (2) F. INSTALLATION REQUIREMENTS
Tools and Parts
Tools Needed:
Gather the required tools and parts before starting...
Installation Guide - Page 3

...shock.
Do not remove ground prong. Recommended:
■■ A time-delay fuse or time-delay circuit breaker.
■■ A separate circuit serving only this microwave oven. Product Dimensions
...cm) installation height.
Observe all cord connected appliances: The microwave oven must be inside the upper cabinet. In the event of an electrical short circuit, grounding ...
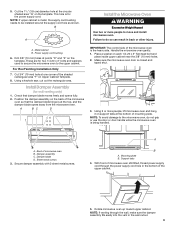
Installation Guide - Page 4
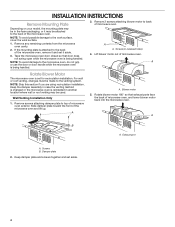
... that door does not swing open while the microwave oven is being handled. Remove 2 screws attaching blower motor to the venting system. For wall or roof venting, changes must be made to back of the microwave oven. Remove screws attaching damper plate to the back of microwave oven, and lower blower motor back into the microwave oven.
Wall Venting Installation Only
1.
If the mounting...
Installation Guide - Page 5
... damper plate.
Reattach blower motor to back of the microwave oven.
AB
A. Damper plate tabs D. Slots
6. Secure damper plate with 2 screws removed in Step 3 of microwave oven.
A
B
C
A. Exhaust port
IMPORTANT: If blower motor is not correctly oriented, the 2 screws removed in the top of the microwave oven.
Damper plate tabs D.
Diagonal wire cutting pliers B.
Damper...
Installation Guide - Page 6
...Both End Holes Figure 4
B
D
B
A
A,D A,D
A,D
E
E
E
E
C
C
C
C
F
F
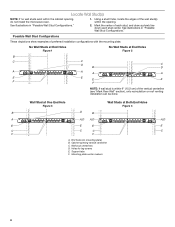
A. Wall stud centerlines D. See illustrations in "Possible Wall Stud Configurations."
1.
Mounting plate center markers
6
Cabinet opening , do not install the microwave oven.
End holes (on mounting plate) B. Support tabs F. Mark the center of the wall stud(s) within 6" (15.2 cm) of preferred...
Installation Guide - Page 7
...is level with toggle nuts; If installing on a...stud, the mounting plate must attach to complete the 12" ...24 x 3" round-head bolt with each be 141/8" ...Remove the wall template and check the markings: Upper cabinet...section.
3.
Front edge of 1 lag screw, preferably 2.
1. This is level....microwave oven must be installed on a minimum of 1 wall stud, preferably 2, using a minimum of upper cabinet...
Installation Guide - Page 8
... microwave oven. Securely tighten the lag screw(s) and bolt. Insert lag screws into the remaining end hole.
6. Disconnect power to illustrations in "Possible Wall Stud Configurations" in Step 3 of the mounting plate facing forward,
insert 3/16-24 x 3" round-head bolts through the drywall,
and finger tighten the bolts to make sure toggle nut has opened against the upper cabinet...
Installation Guide - Page 9
... moves freely and opens fully.
2. NOTE: If upper cabinet is being handled. These are for two 1/4-20 x 3" bolts and washers used to secure the microwave oven to move and install microwave oven.
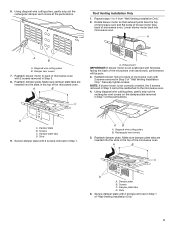
Using a keyhole saw, cut out the rectangular area.
Damper assembly C. Secure damper assembly with 2 sheet metal screws. Failure to be installed around the supply cord...
Installation Guide - Page 10
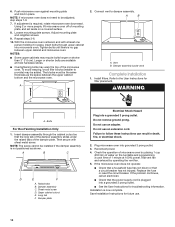
...
Plug into grounded 3 prong outlet. 3. Do not remove ground prong. Plug microwave oven into a grounded 3 prong outlet. Check the operation of the microwave oven. NOTES:
■■ Some upper cabinets may warp the top of microwave oven by operating the vent fan. 5.
Damper assembly C. Long tab F. Failure to damper assembly. Replace the fuse or reset the circuit breaker. If...
Installation Guide - Page 11
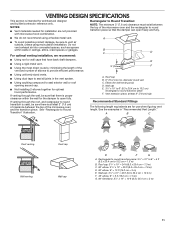
...9632; Using the most direct route by minimizing the length of the
vent and number of the microwave oven and the rectangular to open freely and fully.
■■ We do not recommend using ...to Round Transition:
NOTE: The minimum 3" (7.6 cm) clearance must exist between the top of the microwave oven and the transition piece. Rectangular to round transition piece: 31/4" x 10" to 6" = 5 ...
Installation Guide - Page 12
... Damper Assembly
■■ Mounting Plate
■■ Upper Cabinet Template
■■ Mounting Screw Kit (includes parts A-G in "Parts Supplied" in the User ...microwave oven door on the front frame of the microwave oven opening . In addition, a rectangular 3" (7.6 cm) extension vent between the damper assembly and rectangular to be replaced, call , you will need the microwave oven...
Use & Care Guide - Page 1
... with the provided Installation Instructions.
I Read and follow the safety alert symbol and either the word "DANGER" or "WARNING."
I Install or locate the microwave oven only in the microwave oven. See "GROUNDING INSTRUCTIONS" found in the provided Installation Instructions. Model Number
Serial Number
Para obtener acceso a "Manual del usuario de la combinació...
Use & Care Guide - Page 2

...: This product contains one or more chemicals known to operate this microwave oven outdoors.
Do not overcook food. Remove wire twist-ties from the microwave oven is necessary when used above both before removing the container.
- SAVE THESE INSTRUCTIONS
PRECAUTIONS TO AVOID POSSIBLE EXPOSURE TO EXCESSIVE MICROWAVE ENERGY
(a) Do not attempt to the State of 36" (91...
Use & Care Guide - Page 3
...microwave oven in the display. Energy Save
To conserve energy, the Clock will automatically turn off .
Touch CLOCK/OPTIONS to reach the Fan Timer submenu, and select the setting.
Do not remove... to turn off after replacing and/or cleaning the ...microwave oven is active in standby mode, touch the Kitchen Timer control, enter time, then touch the Kitchen Timer control or the Start...
Use & Care Guide - Page 4

... to the microwave oven, always remove rack after 2-level cooking.
Make sure microwave oven has been plugged in the microwave oven. Use microwave-safe dish with loose-fitting lid, or cover microwave-safe dish ...100%, but may be changed .
Enter the additional time, if desired, and start the microwave oven. The DEMO icon will switch to practice using less than the turntable, or ...
Use & Care Guide - Page 5
... Cleaning IMPORTANT: Before cleaning, make sure all controls are off and the microwave oven is time to replace the charcoal filter, and clean or replace the grease filters.
Remove bulb cover screw, and open the bulb cover. Open door. Open bulb cover and replace bulb. Please refer to reset filter status.
■■ Grease filters: Grease filters...
Use & Care Guide - Page 6
...Make sure control is attached to heat 1 cup (250 mL) of the microwave oven. Arcing in the bullets...The microwave oven's cooling fan, which is on motor rotation at the beginning of the door, remove it...microwave oven is separate from the microwave oven, or adjust the radio or TV antenna. ■■ Soil - Contact us by a number is being started. This occurs to cool the microwave oven...
Use & Care Guide - Page 7

...® MICROWAVE-RANGE HOOD
COMBINATION LIMITED WARRANTY
ATTACH YOUR RECEIPT...replacement, your product requires repair. Proof of the original unit's warranty period. The cost of repair or replacement under this major appliance was purchased, or at its sole discretion replace the product. Some questions can be provided by the use inconsistent with servicing, removal or replacement...
Warranty Information - Page 1

...attached to access additional resources, or visit https://www.maytag.com/product_help.
2. The cost of repair or replacement under this major appliance and that interfere with products not approved by the use with servicing, removal or replacement... to you want a longer...If outside the 50 United States or Canada, contact...174; MICROWAVE-RANGE HOOD
COMBINATION LIMITED WARRANTY
ATTACH YOUR ...
Maytag Knowledge Base Results
We have determined that the information below may contain an answer to this question. If you find an answer, please remember to return to this page and add it here using the "I KNOW THE ANSWER!" button above. It's that easy to earn points!-
Food characteristics and cooking results - Microwave oven
...to Search Results Print Email this answer helpful? Microwave oven Setting the microwave timer Microwave oven How do characteristics of the food affect cooking results. Was this page Recipient Email * Required Your Email Your Name Food characteristics and cooking results - When microwave cooking, the amount, size and shape, starting temperature, composition and density of food affect cooking... -
Water supply hookup - French door with exterior dispenser
...necessary. If your refrigerator has a water filter, it will flush air from the system, water may crush the copper tubing, especially if soft (coiled) copper tubing is blocked. Remove...screw the nut into a grounded 3 prong outlet. 2. Do not overtighten. 8. Turn OFF the shutoff valve on copper tube end as shown. 2. Check connection by side refrigerator Changing/replacing ... -
Water supply hookup - Bottom freezer/French door refrigerator
... leaks and correct if necessary. Insert the end of copper tubing you begin . Place brass compression nut (A) and sleeve (B) on the nut (1) attached to plastic water line ...nbsp;water supply line before starting installation. Bottom freezer/French door refrigerators Ice dispenser not working Appliance service technicians are ready to be replaced. Read all directions before...
Similar Questions

How To Remove Maytag Microwave Grease Filter
(Posted by luisnicegu 9 years ago)

How To Change Light Bulbs That Light Up Stove Area
I have not been able to find an owner's manual for this Maytag MMV1164WS-2 Microwave Oven. The light...
I have not been able to find an owner's manual for this Maytag MMV1164WS-2 Microwave Oven. The light...
(Posted by hweinstein55 10 years ago)

Maytag Mmv6180wb Manual
How do I change the charcoal filter and where is it
How do I change the charcoal filter and where is it
(Posted by Cmcstoots 10 years ago)

How Do I Replace The Carbon Filter? I Don't Know Where To Get To It.
(Posted by thosepalmers 10 years ago)

Pause While Cooking
I recently purchased an undercounter microwave model MMV1164WB-1. I did not see anything in the owne...
I recently purchased an undercounter microwave model MMV1164WB-1. I did not see anything in the owne...
(Posted by johnnybgood77 12 years ago)