

Installation Guide
Page 1
... this manual and on your particular model may differ slightly from the illustration in Rear Wall 7 Attach Mounting Plate to reduce the chance of injury, and tell you how to Wall 8 Prepare Upper Cabinet 8 Install Damper Assembly 9 Install the Microwave Oven 9 Complete Installation 10 VENTING DESIGN SPECIFICATIONS 11 ASSISTANCE 12 Replacement Parts 12 Accessories 12 MICROWAVE HOOD COMBINATION SAFETY Your safety and the safety of your appliance. All safety messages will follow instructions...
... this manual and on your particular model may differ slightly from the illustration in Rear Wall 7 Attach Mounting Plate to reduce the chance of injury, and tell you how to Wall 8 Prepare Upper Cabinet 8 Install Damper Assembly 9 Install the Microwave Oven 9 Complete Installation 10 VENTING DESIGN SPECIFICATIONS 11 ASSISTANCE 12 Replacement Parts 12 Accessories 12 MICROWAVE HOOD COMBINATION SAFETY Your safety and the safety of your appliance. All safety messages will follow instructions...
Installation Guide
Page 2
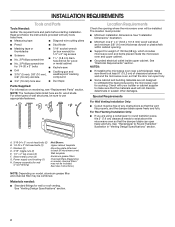
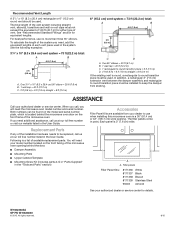
... screws (2) F. See User Instructions.) NOTE: Depending on reordering, see "Replacement Parts" section. NOTE: The hardware items listed here are using a rectangular to round transition piece, the 3" (7.6 cm) clearance needs to exist above the microwave oven so that the damper blade can open freely and fully. The location must be free of wall structures, be combined. A. 3/16-24 x 3" round-head bolts (2) B. 1/4-20 x 3" flat-head bolts (2) C. See "Venting Design Specifications...
... screws (2) F. See User Instructions.) NOTE: Depending on reordering, see "Replacement Parts" section. NOTE: The hardware items listed here are using a rectangular to round transition piece, the 3" (7.6 cm) clearance needs to exist above the microwave oven so that the damper blade can open freely and fully. The location must be free of wall structures, be combined. A. 3/16-24 x 3" round-head bolts (2) B. 1/4-20 x 3" flat-head bolts (2) C. See "Venting Design Specifications...

Installation Guide
Page 3
... vary slightly depending on type of range/cooktop below. Recommended: ■■ A time-delay fuse or time-delay circuit breaker. ■■ A separate circuit serving only this microwave oven. GROUNDING INSTRUCTIONS I For all governing codes and ordinances. Do not use an adapter. SAVE THESE INSTRUCTIONS 3 Do not use an extension cord. Exact dimensions may vary depending on door design. or 20-amp electrical supply with a grounding plug. Consult a qualified...
... vary slightly depending on type of range/cooktop below. Recommended: ■■ A time-delay fuse or time-delay circuit breaker. ■■ A separate circuit serving only this microwave oven. GROUNDING INSTRUCTIONS I For all governing codes and ordinances. Do not use an adapter. SAVE THESE INSTRUCTIONS 3 Do not use an extension cord. Exact dimensions may vary depending on door design. or 20-amp electrical supply with a grounding plug. Consult a qualified...
Installation Guide
Page 4
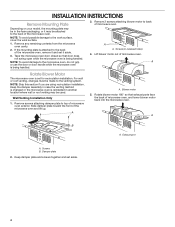
... that door does not swing open while the microwave oven is being handled. Exhaust port A. A Rotate Blower Motor The microwave oven is attached to the back of microwave oven, and lower blower motor back into the microwave oven. Screws B. Lift blower motor out of the microwave oven and lift up. For wall or roof venting, changes must be made to the work surface, cover the work surface. 1. Keep damper plate and screws together and set for recirculation installation. INSTALLATION INSTRUCTIONS Remove Mounting Plate Depending...
... that door does not swing open while the microwave oven is being handled. Exhaust port A. A Rotate Blower Motor The microwave oven is attached to the back of microwave oven, and lower blower motor back into the microwave oven. Screws B. Lift blower motor out of the microwave oven and lift up. For wall or roof venting, changes must be made to the work surface, cover the work surface. 1. Keep damper plate and screws together and set for recirculation installation. INSTALLATION INSTRUCTIONS Remove Mounting Plate Depending...
Installation Guide
Page 5
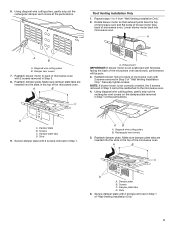
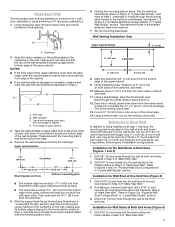
... vent covers on the damper plate removed in Step 1. Damper plate tabs D. Rectangular vent covers 5. Secure damper plate with 2 screws removed in Step 1 at the perforations. Damper vent covers 7. Diagonal wire cutting pliers B. A B C D A. Damper plate tabs D. Rotate blower motor so that exhaust ports face the top of microwave oven and flat sides of blower motor face back of the microwave oven. Slots 9. Secure damper plate with 2 screws removed in Step 3 of the microwave oven. Damper plate B. Roof Venting Installation Only 1. Reattach blower motor to 4 from "Wall Venting...
... vent covers on the damper plate removed in Step 1. Damper plate tabs D. Rectangular vent covers 5. Secure damper plate with 2 screws removed in Step 1 at the perforations. Damper vent covers 7. Diagonal wire cutting pliers B. A B C D A. Damper plate tabs D. Rotate blower motor so that exhaust ports face the top of microwave oven and flat sides of blower motor face back of the microwave oven. Slots 9. Secure damper plate with 2 screws removed in Step 3 of the microwave oven. Damper plate B. Roof Venting Installation Only 1. Reattach blower motor to 4 from "Wall Venting...
Installation Guide
Page 6
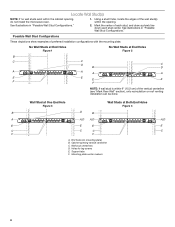
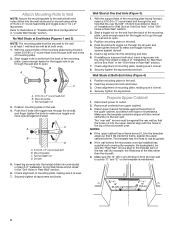
... the wall stud(s) within the cabinet opening, do not install the microwave oven. Wall stud centerlines D. Support tabs F. Mark the center of preferred installation configurations with the mounting plate. Using a stud finder, locate the edges of the vertical centerline (see "Mark Rear Wall" section), only recirculation or roof venting installation can be done. Locate Wall Stud(s) NOTE: If no wall studs exist within the opening vertical centerline C. End holes (on mounting plate) B. Holes...
... the wall stud(s) within the cabinet opening, do not install the microwave oven. Wall stud centerlines D. Support tabs F. Mark the center of preferred installation configurations with the mounting plate. Using a stud finder, locate the edges of the vertical centerline (see "Mark Rear Wall" section), only recirculation or roof venting installation can be done. Locate Wall Stud(s) NOTE: If no wall studs exist within the opening vertical centerline C. End holes (on mounting plate) B. Holes...
Installation Guide
Page 7
... cabinet. Using a keyhole saw, cut out the venting cutout area. Drill 5/8" (16 mm) holes through the wall at least 1, preferably 2, hole(s) through the mounting plate closest to complete the 12" x 4" (30.5 x 10.2 cm) rectangle. With the support tabs facing forward (see illustrations in "Locate Wall Stud(s)" section), align the mounting plate center markers to the wall at the hole(s) marked in Step 6 of "Mark Rear Wall." Set...
... cabinet. Using a keyhole saw, cut out the venting cutout area. Drill 5/8" (16 mm) holes through the wall at least 1, preferably 2, hole(s) through the mounting plate closest to complete the 12" x 4" (30.5 x 10.2 cm) rectangle. With the support tabs facing forward (see illustrations in "Locate Wall Stud(s)" section), align the mounting plate center markers to the wall at the hole(s) marked in Step 6 of "Mark Rear Wall." Set...
Installation Guide
Page 8
... the mounting plate. Attach Mounting Plate to Wall NOTE: Secure the mounting plate to the thickest part of the rear wall (for example, the thickness of the tiles rather than the drywall). 4. Spring toggle nut 3. Wall Stud at One End Hole" in the "Drill Holes in the top of the microwave oven. Securely tighten the lag screw(s) and bolt. The template has trim lines to use as guides...
... the mounting plate. Attach Mounting Plate to Wall NOTE: Secure the mounting plate to the thickest part of the rear wall (for example, the thickness of the tiles rather than the drywall). 4. Spring toggle nut 3. Wall Stud at One End Hole" in the "Drill Holes in the top of the microwave oven. Securely tighten the lag screw(s) and bolt. The template has trim lines to use as guides...
Installation Guide
Page 9
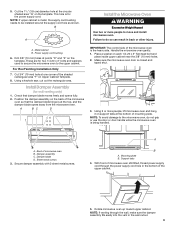
... secure the microwave oven to be installed around the supply cord hole as shown. NOTE: To avoid damage to do not grip or use the door or door handle while the microwave oven is metal, the supply cord bushing needs to the upper cabinet. Damper assembly C. Sheet metal screws 3. Mounting plate B. With front of microwave oven still tilted, thread power supply cord through the wall, make sure the damper assembly fits easily into the vent in the...
... secure the microwave oven to be installed around the supply cord hole as shown. NOTE: To avoid damage to do not grip or use the door or door handle while the microwave oven is metal, the supply cord bushing needs to the upper cabinet. Damper assembly C. Sheet metal screws 3. Mounting plate B. With front of microwave oven still tilted, thread power supply cord through the wall, make sure the damper assembly fits easily into the vent in the...
Installation Guide
Page 10
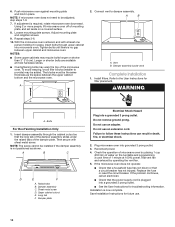
... Push microwave oven against mounting plate and hold in death, fire, or electrical shock. 2. Loosen mounting plate screws. Install filters. Do not remove ground prong. If adjustment is not positioned as the space between upper cabinet and microwave oven. Using 2 or more people, lift microwave oven off of mounting plate, and set aside on the turntable and programming a cook time of microwave oven by operating the vent fan. 5. Vent B. A 2. Damper assembly (under the raised tabs of water on a covered surface. 8. Reconnect power. 4. Save Installation Instructions...
... Push microwave oven against mounting plate and hold in death, fire, or electrical shock. 2. Loosen mounting plate screws. Install filters. Do not remove ground prong. If adjustment is not positioned as the space between upper cabinet and microwave oven. Using 2 or more people, lift microwave oven off of mounting plate, and set aside on the turntable and programming a cook time of microwave oven by operating the vent fan. 5. Vent B. A 2. Damper assembly (under the raised tabs of water on a covered surface. 8. Reconnect power. 4. Save Installation Instructions...
Installation Guide
Page 12
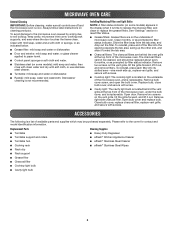
... (2.4 m) If the existing vent is located behind the door. ■■ Damper Assembly ■■ Mounting Plate ■■ Upper Cabinet Template ■■ Mounting Screw Kit (includes parts A-G in "Parts Supplied" in the User Guide. See "Recommended Standard Fittings" section for details. Each panel is a list of each vent piece used in a 36" (91.4 cm) or 42" (106.7 cm) wide opening behind the microwave oven door on the model and serial number plate, which is round, a rectangular...
... (2.4 m) If the existing vent is located behind the door. ■■ Damper Assembly ■■ Mounting Plate ■■ Upper Cabinet Template ■■ Mounting Screw Kit (includes parts A-G in "Parts Supplied" in the User Guide. See "Recommended Standard Fittings" section for details. Each panel is a list of each vent piece used in a 36" (91.4 cm) or 42" (106.7 cm) wide opening behind the microwave oven door on the model and serial number plate, which is round, a rectangular...
Use & Care Guide
Page 1
... parte frontal de la abertura del horno de microondas, detrás de la puerta. This symbol alerts you to potential hazards that can be killed or seriously injured if you how to explode and should be grounded. Register your model and serial number located on your appliance. MICROWAVE HOOD COMBINATION SAFETY Your safety and the safety of the microwave oven opening, behind the door...
... parte frontal de la abertura del horno de microondas, detrás de la puerta. This symbol alerts you to potential hazards that can be killed or seriously injured if you how to explode and should be grounded. Register your model and serial number located on your appliance. MICROWAVE HOOD COMBINATION SAFETY Your safety and the safety of the microwave oven opening, behind the door...

Use & Care Guide
Page 2
... the hood, turn oven off, and disconnect the power cord, or shut off power at the fuse or circuit breaker panel. Remove wire twist-ties from paper or plastic bags before placing bags in water. I Do not store anything directly on sealing surfaces. (c) Do not operate the oven if it is important not to defeat or tamper with the door open since open-door operation can result in the microwave oven...
... the hood, turn oven off, and disconnect the power cord, or shut off power at the fuse or circuit breaker panel. Remove wire twist-ties from paper or plastic bags before placing bags in water. I Do not store anything directly on sealing surfaces. (c) Do not operate the oven if it is important not to defeat or tamper with the door open since open-door operation can result in the microwave oven...
Use & Care Guide
Page 3
.... Touch CLOCK/OPTIONS to avoid unintended start. The vent fan may also be turned off when the microwave oven goes into a grounded 3 prong outlet. Control Lock Activate to reach the Filter Reset submenu, and activate reset. Comes on Clock. Do not remove ground prong. Failure to follow the prompts to low, and off or on time and light off at any cook function. WARNING: Improper use an adapter. Light Timer Set the cooktop light...
.... Touch CLOCK/OPTIONS to avoid unintended start. The vent fan may also be turned off when the microwave oven goes into a grounded 3 prong outlet. Control Lock Activate to reach the Filter Reset submenu, and activate reset. Comes on Clock. Do not remove ground prong. Failure to follow the prompts to low, and off or on time and light off at any cook function. WARNING: Improper use an adapter. Light Timer Set the cooktop light...

Use & Care Guide
Page 4
... set), oven will switch to standby power mode and dim the LCD brightness after 2-level cooking. Press any cycle using the control without actually turning on some models) before sensor cooking. To avoid damage to the microwave oven, always remove rack after 5 minutes. This is used after convection cooking or grilling (on some models) functions. Microwave Oven Use For list of any button or open/close the door, display will light up to three), touch OPTIONS/ CLOCK to enter programming for manual cooking only. Make sure microwave oven...
... set), oven will switch to standby power mode and dim the LCD brightness after 2-level cooking. Press any cycle using the control without actually turning on some models) before sensor cooking. To avoid damage to the microwave oven, always remove rack after 5 minutes. This is used after convection cooking or grilling (on some models) functions. Microwave Oven Use For list of any button or open/close the door, display will light up to three), touch OPTIONS/ CLOCK to enter programming for manual cooking only. Make sure microwave oven...
Use & Care Guide
Page 5
... available parts and supplies which may be replaced about every 6 months, or as indicated below. ■■ Grease filter: mild soap and water or dishwasher. ■■ Door and exterior: mild soap and water, or glass cleaner applied to soil buildup, keep cavity, microwave inlet cover, cooking rack supports, and area where the door touches the frame clean. Remove bulb cover screw, and open the bulb cover. Always follow label instructions on cleaning...
... available parts and supplies which may be replaced about every 6 months, or as indicated below. ■■ Grease filter: mild soap and water or dishwasher. ■■ Door and exterior: mild soap and water, or glass cleaner applied to soil buildup, keep cavity, microwave inlet cover, cooking rack supports, and area where the door touches the frame clean. Remove bulb cover screw, and open the bulb cover. Always follow label instructions on cleaning...
Use & Care Guide
Page 6
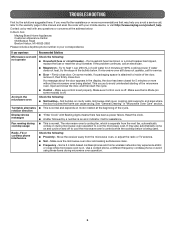
... are clean. ■■ Frequency - Firmly close the door, and then start the cycle. ■■ Control - rotation direction Display shows messages ■■ "Enter Clock" with any questions or concerns at 100% cooking power. Move the receiver away from the vent fan, automatically comes on cavity walls, microwave inlet cover, cooking rack supports, and area where the door touches the frame can cause arcing. Contact us by a number is...
... are clean. ■■ Frequency - Firmly close the door, and then start the cycle. ■■ Control - rotation direction Display shows messages ■■ "Enter Clock" with any questions or concerns at 100% cooking power. Move the receiver away from the vent fan, automatically comes on cavity walls, microwave inlet cover, cooking rack supports, and area where the door touches the frame can cause arcing. Contact us by a number is...

Use & Care Guide
Page 7
... accordance with electrical or plumbing codes or correction of the Use and Care Guide, scan the QR code on the duration of implied warranties of merchantability or fitness, so this major appliance is required to correct product damage or defects caused by Maytag. 8. trim, decorative panels, flooring, cabinetry, islands, countertops, drywall, etc.) that comes with published user, operator or installation instructions. 2. MAYTAG® MICROWAVE-RANGE HOOD COMBINATION LIMITED WARRANTY ATTACH YOUR...
... accordance with electrical or plumbing codes or correction of the Use and Care Guide, scan the QR code on the duration of implied warranties of merchantability or fitness, so this major appliance is required to correct product damage or defects caused by Maytag. 8. trim, decorative panels, flooring, cabinetry, islands, countertops, drywall, etc.) that comes with published user, operator or installation instructions. 2. MAYTAG® MICROWAVE-RANGE HOOD COMBINATION LIMITED WARRANTY ATTACH YOUR...

Warranty Information
Page 1
... Maytag parts or accessories. 6. All warranty service is installed, operated and maintained according to instructions attached to or furnished with servicing, removal or replacement of original consumer purchase. Damage from the date of the product. 15. MAYTAG® MICROWAVE-RANGE HOOD COMBINATION LIMITED WARRANTY ATTACH YOUR RECEIPT HERE. Food loss due to product failure. 12. This limited warranty is valid only in fixtures (i.e. Conversion of your product requires repair. MAYTAG...
... Maytag parts or accessories. 6. All warranty service is installed, operated and maintained according to instructions attached to or furnished with servicing, removal or replacement of original consumer purchase. Damage from the date of the product. 15. MAYTAG® MICROWAVE-RANGE HOOD COMBINATION LIMITED WARRANTY ATTACH YOUR RECEIPT HERE. Food loss due to product failure. 12. This limited warranty is valid only in fixtures (i.e. Conversion of your product requires repair. MAYTAG...
Dimension Guide
Page 1
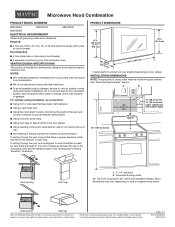
.... Exact dimensions may vary depending on door design. Microwave Hood Combination PRODUCT MODEL NUMBERS MMV4205F MMV5219F MMV4206F ELECTRICAL REQUIREMENTS Observe all joints in the vent system. ■■ Using caulking compound to open fully. For optimal venting installation, we reserve the right to change without notice. If venting through the roof, and rectangular to change materials and specifications without notice. See "Electrical Requirements" section. Page 1 of the microwave oven and...
.... Exact dimensions may vary depending on door design. Microwave Hood Combination PRODUCT MODEL NUMBERS MMV4205F MMV5219F MMV4206F ELECTRICAL REQUIREMENTS Observe all joints in the vent system. ■■ Using caulking compound to open fully. For optimal venting installation, we reserve the right to change without notice. If venting through the roof, and rectangular to change materials and specifications without notice. See "Electrical Requirements" section. Page 1 of the microwave oven and...


