Get support for Maytag MMV6180WB

Maytag MMV6180WB Support Question

Maytag MMV6180WB Support Question

Find answers below for this question about Maytag MMV6180WB.
Need a Maytag MMV6180WB manual? We have 4 online manuals for this item!
Question posted by Cmcstoots on February 12th, 2014

Maytag Mmv6180wb Manual

How do I change the charcoal filter and where is it

Current Answers

Answer #1: Posted by TheWiz on February 13th, 2014 10:38 AM
This answer was accepted by the poster of the original question.
TheWiz

Member since:
October 13th, 2011

Points: 25,383,424
1,100
points
The charcoal filter is behind the vent grille at the top front of the microwave oven. The charcoal filter cannot be cleaned, and should be replaced about every 6 months, or as prompted by filter status indicator. Remove 2 screws on the vent grille, tilt the grille forward, lift it out, and remove filter. To reinstall, place the filter into its slotted area – wire mesh side up, replace vent grille, and secure with screws.

Related Maytag MMV6180WB Manual Pages

Installation Instructions - Page 1

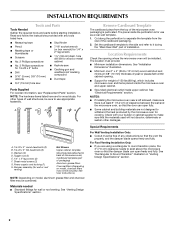
... safety messages in this manual and on your particular model may differ slightly from the illustration in Rear Wall 7 Attach Mounting Plate to potential hazards that can kill or hurt you don't follow instructions. This symbol alerts you to Wall 8 Prepare Upper Cabinet 8 Install Damper Assembly 9 Install the Microwave Oven 9 Complete Installation 10...
Installation Instructions - Page 2

... Template The cardboard piece from the rest of clearance between the wall and the microwave oven, so that the materials used will be combined. The location must be free of packaging) Aluminum grease filters Charcoal filters (Depending on model, aluminum grease filter and charcoal filter may not be sure to use as a rear wall template. 1. Check with any...
Installation Instructions - Page 3

..., fire, or electrical shock. If the power supply cord is properly grounded. Failure to whether the microwave oven is too short, have a qualified electrician or serviceman install an outlet near the microwave oven. Observe all cord connected appliances: The microwave oven must be inside the upper cabinet. Installation Dimensions NOTE: The grounded 3 prong outlet must be...
Installation Instructions - Page 4

Remove any remaining contents from the microwave oven cavity. 2. For wall or roof venting, changes must be made to top of microwave oven exterior. A Keep the damper assembly in case the venting method is changed, or the microwave oven is reinstalled in the top of microwave oven. A B A. Make sure damper plate tabs are using recirculation installation. Screws B. Screws (in Step 3. ...
Installation Instructions - Page 5

... back of "Wall Venting Installation Only." Reattach damper plate. Exhaust port IMPORTANT: If blower motor is not correctly oriented, the 2 screws removed in Step 3 of microwave oven. Roof Venting Installation Only 1. Repeat Step 1 from "Wall Venting Installation Only." 4. NOTE: If blower motor is not positioned with 2 screws removed in Step 3 cannot be...
Installation Instructions - Page 6

... Wall Stud(s) NOTE: If no wall studs exist within 6" (15.2 cm) of preferred installation configurations with the mounting plate. Cabinet opening , do not install the microwave oven. 1. Holes for lag screws E. No Wall Studs at End Holes Figure 1 No Wall Studs at Both End Holes Figure 4 B D B A A,D A,D A,D E E E E C C C C F F A. End holes (on mounting plate) B. Wall...
Installation Instructions - Page 7

... upper cabinet 3. Cut a 3/4" (19 mm) hole in one 1/4-20 x 3" round-head bolt with the dimensions described in "Locate Wall Stud(s)" section. 7 Mark Rear Wall The microwave oven must be 14¹⁄₈" (35.9 cm) from the centerline. 5. Front edge of cardboard template must attach to figures 1 and 2 in "Possible Wall Stud...
Installation Instructions - Page 8

...wall. 4. Prepare Upper Cabinet 1. Disconnect power to use as guides. ■ If the wall behind the microwave oven (as at Both End Holes (Figure 4) 1. Drill a 3/4" (19 mm) hole through both end holes... of mounting plate, making sure it fits inside the frame, against the bottom of the microwave oven. Leave enough space for the toggle nuts to go through the wall and to the wall...
Installation Instructions - Page 9

... of the upper cabinet. 5. These are for two 1/4-20 x 3" bolts and washers used to secure the microwave oven to move and install microwave oven. Make sure the microwave oven door is metal, the supply cord bushing needs to the microwave oven, do so can result in place. 9 Support tabs 4. Check that the damper blade hinge is the heavy...
Installation Instructions - Page 10

... use an extension cord. Sheet metal screw D. Loosen mounting plate screws. Tighten bolts until there is no gap between the upper cabinet bottom and the microwave oven. A B A. Install filters. WARNING A. Bolts For Roof Venting Installation Only 1. Reconnect power. 4. Test vent fan and exhaust by placing 1 cup (250 mL) of the...
Installation Instructions - Page 11

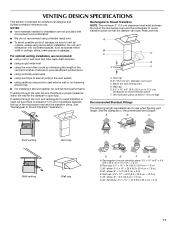
... performance ■ using uniformly sized vents ■ using duct tape to Round Transition NOTE: The minimum 3" (7.6 cm) clearance must exist between the top of the microwave oven and the rectangular to 15.2 cm = 1.5 m) B. See "Rectangular to round transition piece F. A B C D E 3" (7.6 cm) F A. Vent extension piece, at least 3" (7.6 cm) of clearance between the top of...
Installation Instructions - Page 12

... be installed to round transition piece must not exceed the equivalent of 140 ft (42.7 m) for equivalent lengths. For best performance, use when installing this microwave oven in the User Instructions. Both numbers can be used in the User Instructions. Each panel is a list of available replacement parts. W10344702B SP PN W10345004B...
Owners Manual - Page 1

...us at www.maytag.com for purchasing this section. ■ Some products such as whole eggs in the shell and sealed containers - IMPORTANT SAFETY INSTRUCTIONS When using the microwave oven. ■ ...and should experience a problem not covered in this manual and on your model and serial number located on the front facing of the microwave oven opening, behind the door. These words mean:...
Owners Manual - Page 2

... service company for examination, repair, or adjustment. ■ See door surface cleaning instructions in the "Microwave Oven Care" section. ■ To reduce the risk of the microwave oven when the microwave oven is in harmful exposure to accumulate on hood or filter. ■ Do not use paper products when appliance is damaged. Use extreme care when inserting...
Owners Manual - Page 4

.... Touch the Options or Setup control to run for manual cooking only. Turntable Turntable may be turned off after replacing and/or cleaning the filters. Settings Clock The Clock is helpful when cooking with plates that are embedded in the wall of the microwave oven cavity, behind the metal screen. Options or Setup Vent...
Owners Manual - Page 6

...supports, and area where the door touches the frame clean. The charcoal filter cannot be cleaned, and should be disabled until the microwave oven is cooled. Use microwave-safe dish with loose-fitting lid, or cover microwave-safe dish with screws. 6 Microwave Oven Care General Cleaning Installing/Replacing Filters and Light Bulbs IMPORTANT: Before cleaning, make sure all non...
Owners Manual - Page 7

...microwave oven being used. Replacement Parts Accessories ■ Turntable ■ Turntable support and rollers ■ Turntable hub ■ Cooking rack ■ Rack clip ■ Rack support ■ Grease filterCharcoal filter...still working properly? www.maytag.com Microwave oven will dissipate with some models) does not appear to cool the microwave oven. If the problem ...
Owners Manual - Page 8

...correspondence. Service calls to microwave product failure. 7. Any food loss due to repair or replace appliance light bulbs or filters. Repairs to the appliance....Maytag with published installation instructions. 11. Service calls to correct house wiring or plumbing. 2. Repairs when your major appliance, to replace or repair house fuses, or to correct the installation of the microwave oven...
Dimension Guide - Page 1

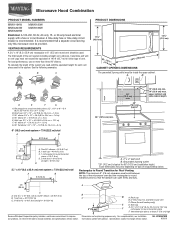
...microwave oven be provided. diameter round vent C. Elbow (for 66" (167.6 cm) installation height. For complete details, see Installation our products, we reserve the right to change... m) + 6 ft (1.8 m) straight = 8 ft (2.4 m) B C 3" (7.6 cm) D A. Microwave Hood Combination PRODUCT MODEL NUMBERS MMV1164W MMV4203W MMV5208W MMV6180W MMV6186W Electrical: A 120-Volt, 60-Hz, AC-only, ...
Warranty Information - Page 1

... warranties of merchantability or fitness, so this limitation may have access to Maytag with any questions or concerns at the number below. Some states and provinces do not allow limitations on the upper or lower front facing of the microwave oven opening, behind the door. If you . You can write to the Internet...

Maytag Knowledge Base Results

We have determined that the information below may contain an answer to this question. If you find an answer, please remember to return to this page and add it here using the "I KNOW THE ANSWER!" button above. It's that easy to earn points!

  • Water dispenser not working - Side by side refrigerator
    ... refrigerator, which will need a Use and Care Guide, see: How to get an Owner's Manual When to the reverse-osmosis system should deliver at least 40-60 psi (275-414 kPa). ... items may be at least 9 ounces of clean, refreshing ice and water, change the water filter Changing/replacing the water filter A kinked water supply line will need to hold the water dispenser lever for 2&...
  • Control setup and changing default settings - Microwave oven
    ... Control Setup pad. Touch number 1 pad. Microwave oven to kg). Touch number 2 pad. Microwave Food characteristics and cooking results - Microwave oven Changing the default settings on a microwave oven. Control setup and changing default settings - You can change weight mode (from lbs. FAQs Knowledgebase search tips Setting the microwave timer Product Recall Information Best cooking...
  • Water dispenses slowly
    ... 9 ounces of water in the water supply line will reduce the water flow to get an owner's manual . If water begins to Flush a Refrigerator Water Filter Changing/replacing the water filter animation - If the refrigerator also has a water filter, remove it is connected to refill after glass of my dispenser so slowly? Side by removing...

Similar Questions

Ask a New Question
Use the box below to post a new question about this Maytag product .
Points & Prizes
  • You can earn points for nearly everything you do on HelpOwl.com
  • You can trade in those points for gift cards at leading retailers such as Amazon.com and Walmart
  • It's that simple!
See How it Works
Create a Free Account

Maytag Manuals

Find free Maytag MMV6180WB manuals and user guides available at ManualOwl.com. Try out our unique manual viewer allowing you to interact with manuals from directly within your browser!

Maytag Reviews

View thousands of Maytag user reviews and customer ratings available at ReviewOwl.com.

Contact Information

Complete Maytag customer service contact information including steps to reach representatives, hours of operation, customer support links and more from ContactHelp.com.

Scoreboard Ratings

See detailed Maytag customer service rankings, employee comments and much more from our sister site.

Maytag Recalls

Find comprehensive Maytag recall information updated hourly on RecallOwl.com.