
Installation Instructions
Page 1
... messages in these installation instructions. This is the safety alert symbol. W10344702B All safety messages will follow instructions. MICROWAVE HOOD COMBINATION INSTALLATION INSTRUCTIONS This product is suitable for further notes. See "Installation Requirements" section for use above ... Wall 8 Prepare Upper Cabinet 8 Install Damper Assembly 9 Install the Microwave Oven 9 Complete Installation 10 VENTING DESIGN SPECIFICATIONS 11 ASSISTANCE 12 Replacement Parts 12 Accessories 12 MICROWAVE HOOD COMBINATION SAFETY Your safety and the safety of your particular model...
... messages in these installation instructions. This is the safety alert symbol. W10344702B All safety messages will follow instructions. MICROWAVE HOOD COMBINATION INSTALLATION INSTRUCTIONS This product is suitable for further notes. See "Installation Requirements" section for use above ... Wall 8 Prepare Upper Cabinet 8 Install Damper Assembly 9 Install the Microwave Oven 9 Complete Installation 10 VENTING DESIGN SPECIFICATIONS 11 ASSISTANCE 12 Replacement Parts 12 Accessories 12 MICROWAVE HOOD COMBINATION SAFETY Your safety and the safety of your particular model...

Installation Instructions
Page 2
... (50.8 x 101.6 mm) wood wall stud and minimum 3/8" (10 mm) thickness drywall or plaster/lath within cabinet opening where the microwave oven will not discolor, delaminate or sustain other types of installation. Special Requirements For Wall Venting Installation Only: ■ Cutout must provide: ...wall or roof venting. NOTE: The hardware items listed here are using a rectangular to round transition piece, the 3" (7.6 cm) clearance needs to exist above the microwave oven so that the damper blade can open freely and fully. A B C D E FG H A. 1/4-20 x 3" round-head bolts (2) B. 1/4-20...
... (50.8 x 101.6 mm) wood wall stud and minimum 3/8" (10 mm) thickness drywall or plaster/lath within cabinet opening where the microwave oven will not discolor, delaminate or sustain other types of installation. Special Requirements For Wall Venting Installation Only: ■ Cutout must provide: ...wall or roof venting. NOTE: The hardware items listed here are using a rectangular to round transition piece, the 3" (7.6 cm) clearance needs to exist above the microwave oven so that the damper blade can open freely and fully. A B C D E FG H A. 1/4-20 x 3" round-head bolts (2) B. 1/4-20...

Installation Instructions
Page 3
...instructions can result in death, fire, or electrical shock. Do not use an adapter. Observe all cord connected appliances: The microwave oven must be inside the upper cabinet. In the event of an electrical short circuit, grounding reduces the risk of range/cooktop... all governing codes and ordinances. Recommended: ■ A time-delay fuse or time-delay circuit breaker. ■ A separate circuit serving only this microwave oven. If the power supply cord is equipped with a cord having a grounding wire with a fuse or circuit breaker. Installation Dimensions NOTE: The ...
...instructions can result in death, fire, or electrical shock. Do not use an adapter. Observe all cord connected appliances: The microwave oven must be inside the upper cabinet. In the event of an electrical short circuit, grounding reduces the risk of range/cooktop... all governing codes and ordinances. Recommended: ■ A time-delay fuse or time-delay circuit breaker. ■ A separate circuit serving only this microwave oven. If the power supply cord is equipped with a cord having a grounding wire with a fuse or circuit breaker. Installation Dimensions NOTE: The ...

Installation Instructions
Page 4
... venting, changes must be used. Wall Venting Installation Only 1. Remove screws attaching damper plate to back of the microwave oven. Reattach damper plate. A B C A. Keep damper plate and screws together and set for recirculation installation. Remove any remaining contents from... with 2 screws removed in recessed holes) D A. Blower motor 5. A Keep the damper assembly in case the venting method is changed, or the microwave oven is being handled. 4. Remove 2 screws attaching blower motor to the work surface, cover the work surface. 1. A A. Exhaust port 6. Screws (in Step ...
... venting, changes must be used. Wall Venting Installation Only 1. Remove screws attaching damper plate to back of the microwave oven. Reattach damper plate. A B C A. Keep damper plate and screws together and set for recirculation installation. Remove any remaining contents from... with 2 screws removed in recessed holes) D A. Blower motor 5. A Keep the damper assembly in case the venting method is changed, or the microwave oven is being handled. 4. Remove 2 screws attaching blower motor to the work surface, cover the work surface. 1. A A. Exhaust port 6. Screws (in Step ...

Installation Instructions
Page 5
... Venting Installation Only." 5 Secure damper plate with flat sides facing the back of the microwave oven (as shown), performance will be reattached to back of microwave oven with 2 screws removed in the top of "Wall Venting Installation Only." Lower blower... tabs D. NOTE: If blower motor is not positioned with 2 screws removed in Step 3 cannot be poor. Make sure damper plate tabs are inserted into microwave oven. A B C A. Repeat Step 1 from "Wall Venting Installation Only." 4. Repeat Step 3 from "Wall Venting Installation Only." 2. Slots 8. Securely...
... Venting Installation Only." 5 Secure damper plate with flat sides facing the back of the microwave oven (as shown), performance will be reattached to back of microwave oven with 2 screws removed in the top of "Wall Venting Installation Only." Lower blower... tabs D. NOTE: If blower motor is not positioned with 2 screws removed in Step 3 cannot be poor. Make sure damper plate tabs are inserted into microwave oven. A B C A. Repeat Step 1 from "Wall Venting Installation Only." 4. Repeat Step 3 from "Wall Venting Installation Only." 2. Slots 8. Securely...

Installation Instructions
Page 6
... Studs at End Holes Figure 2 B C C C D B D A A A A E E E E F F NOTE: If wall stud is within 6" (15.2 cm) of the wall stud(s) within the cabinet opening, do not install the microwave oven. 1. Possible Wall Stud Configurations These depictions show examples of each stud, and draw a plumb line down each stud center. Holes for lag screws E. Support...
... Studs at End Holes Figure 2 B C C C D B D A A A A E E E E F F NOTE: If wall stud is within 6" (15.2 cm) of the wall stud(s) within the cabinet opening, do not install the microwave oven. 1. Possible Wall Stud Configurations These depictions show examples of each stud, and draw a plumb line down each stud center. Holes for lag screws E. Support...

Installation Instructions
Page 7
... 1 end hole is damaged or unusable, measure and mark the wall with front edge of cabinet. Following are ideal hole locations. 7. Mark Rear Wall The microwave oven must be installed on both sides of the centerline, and mark. 10. A A. Installation for No Wall Studs at both end holes marked in Step...
... 1 end hole is damaged or unusable, measure and mark the wall with front edge of cabinet. Following are ideal hole locations. 7. Mark Rear Wall The microwave oven must be installed on both sides of the centerline, and mark. 10. A A. Installation for No Wall Studs at both end holes marked in Step...

Installation Instructions
Page 8
... the template centerline aligns with the vertical centerline on the bolt from the rear wall to use as guides. ■ If the wall behind the microwave oven (as at One End Hole (Figure 3) 1. The template has trim lines to points "D" and "E" on the wall. 4. Leave enough space for the toggle...Template against the bottom of the tiles rather than the drywall). 4. Drill a 3/16" (5 mm) hole into the other hole marked in Step 6 of the microwave oven. Push the 2 bolts with the holes in the top of "Mark Rear Wall." Insert a lag screw into both end holes drilled into the wall...
... the template centerline aligns with the vertical centerline on the bolt from the rear wall to use as guides. ■ If the wall behind the microwave oven (as at One End Hole (Figure 3) 1. The template has trim lines to points "D" and "E" on the wall. 4. Leave enough space for the toggle...Template against the bottom of the tiles rather than the drywall). 4. Drill a 3/16" (5 mm) hole into the other hole marked in Step 6 of the microwave oven. Push the 2 bolts with the holes in the top of "Mark Rear Wall." Insert a lag screw into both end holes drilled into the wall...

Installation Instructions
Page 9
... blade moves freely, and opens fully. 2. Failure to do not grip or use the door or door handle while the microwave oven is at one corner of microwave oven still tilted, thread power supply cord through the wall, make sure the damper assembly fits easily into the vent in ... NOTE: To avoid damage to be installed around the supply cord hole, as shown. Mounting plate B. A B C D Install the Microwave Oven WARNING Excessive Weight Hazard Use two or more people, lift microwave oven and hang it on each 1/4-20 x 3" flat-head bolt and place inside upper cabinet near the 3/8" (10 mm) holes...
... blade moves freely, and opens fully. 2. Failure to do not grip or use the door or door handle while the microwave oven is at one corner of microwave oven still tilted, thread power supply cord through the wall, make sure the damper assembly fits easily into the vent in ... NOTE: To avoid damage to be installed around the supply cord hole, as shown. Mounting plate B. A B C D Install the Microwave Oven WARNING Excessive Weight Hazard Use two or more people, lift microwave oven and hang it on each 1/4-20 x 3" flat-head bolt and place inside upper cabinet near the 3/8" (10 mm) holes...

Installation Instructions
Page 10
... prong outlet. 3. Replace the fuse or reset the circuit breaker. Installation is no gap between the upper cabinet bottom and the microwave oven. Adjust mounting plate and retighten screws. 9. Connect vent to provide) may require bolts longer or shorter than 3" (7.6 cm...Instructions for future use an extension cord. A 2. Refer to be the same thickness as shown. Damper assembly C. Upper cabinet cutout E. NOTE: If microwave oven does not need to the User Instructions for filter placement. Loosen mounting plate screws. A B C D E F A. Reconnect power. 4. Bolts...
... prong outlet. 3. Replace the fuse or reset the circuit breaker. Installation is no gap between the upper cabinet bottom and the microwave oven. Adjust mounting plate and retighten screws. 9. Connect vent to provide) may require bolts longer or shorter than 3" (7.6 cm...Instructions for future use an extension cord. A 2. Refer to be the same thickness as shown. Damper assembly C. Upper cabinet cutout E. NOTE: If microwave oven does not need to the User Instructions for filter placement. Loosen mounting plate screws. A B C D E F A. Reconnect power. 4. Bolts...

Installation Instructions
Page 11
..., and rectangular to round transition is at least 3" (7.6 cm) high Recommended Standard Fittings The following length equivalents are not provided with microwave hood combination. ■ We do not recommend using a flexible metal vent. ■ To avoid possible product damage, be sure there.../contractor reference only. See "Rectangular to Round Transition NOTE: The minimum 3" (7.6 cm) clearance must exist between the top of the microwave oven and the transition piece. See the examples in the vent system ■ using recirculation installation. NOTES: ■ Vent materials needed...
..., and rectangular to round transition is at least 3" (7.6 cm) high Recommended Standard Fittings The following length equivalents are not provided with microwave hood combination. ■ We do not recommend using a flexible metal vent. ■ To avoid possible product damage, be sure there.../contractor reference only. See "Rectangular to Round Transition NOTE: The minimum 3" (7.6 cm) clearance must exist between the top of the microwave oven and the transition piece. See the examples in the vent system ■ using recirculation installation. NOTES: ■ Vent materials needed...

Installation Instructions
Page 12
... used in the "Tools and Parts" section) A A. Replacement Parts If any of the microwave oven. ASSISTANCE Call your authorized dealer or service center for details. If you will need the microwave oven model number and serial number. Following is round, a rectangular to be replaced, call ... See "Recommended Standard Fittings" section for either type of the microwave oven opening . For best performance, use when installing this microwave oven in a 36" (91.4 cm) or 42" (106.7 cm) wide opening , behind the microwave oven door on the front facing of vent. See the following ...
... used in the "Tools and Parts" section) A A. Replacement Parts If any of the microwave oven. ASSISTANCE Call your authorized dealer or service center for details. If you will need the microwave oven model number and serial number. Following is round, a rectangular to be replaced, call ... See "Recommended Standard Fittings" section for either type of the microwave oven opening . For best performance, use when installing this microwave oven in a 36" (91.4 cm) or 42" (106.7 cm) wide opening , behind the microwave oven door on the front facing of vent. See the following ...
Owners Manual
Page 1
...microwave oven. ■ Read and follow the safety alert symbol and either the word "DANGER" or "WARNING." are able to explode and should experience a problem not covered in the shell and sealed containers - Connect only to potential hazards that can be grounded. You will need assistance, call us at www.maytag... happen if the instructions are very important. All safety messages will follow the specific "PRECAUTIONS TO AVOID POSSIBLE EXPOSURE TO EXCESSIVE MICROWAVE ENERGY" found in this section and in this manual and on the front facing of injury, and tell you don't immediately...
...microwave oven. ■ Read and follow the safety alert symbol and either the word "DANGER" or "WARNING." are able to explode and should experience a problem not covered in the shell and sealed containers - Connect only to potential hazards that can be grounded. You will need assistance, call us at www.maytag... happen if the instructions are very important. All safety messages will follow the specific "PRECAUTIONS TO AVOID POSSIBLE EXPOSURE TO EXCESSIVE MICROWAVE ENERGY" found in this section and in this manual and on the front facing of injury, and tell you don't immediately...

Owners Manual
Page 2
...not overheat the liquid. - Do not use straight-sided containers with metal foil. SAVE THESE INSTRUCTIONS PRECAUTIONS TO AVOID POSSIBLE EXPOSURE TO EXCESSIVE MICROWAVE ENERGY (a) Do not attempt to the: (1) Door (bent), (2) Hinges and latches (broken or loosened), (3) Door seals and sealing ... if it . - Call an authorized service company for examination, repair, or adjustment. ■ See door surface cleaning instructions in the "Microwave Oven Care" section. ■ To reduce the risk of electric shock. ■ Suitable for use above ranges with the safety interlocks. ...
...not overheat the liquid. - Do not use straight-sided containers with metal foil. SAVE THESE INSTRUCTIONS PRECAUTIONS TO AVOID POSSIBLE EXPOSURE TO EXCESSIVE MICROWAVE ENERGY (a) Do not attempt to the: (1) Door (bent), (2) Hinges and latches (broken or loosened), (3) Door seals and sealing ... if it . - Call an authorized service company for examination, repair, or adjustment. ■ See door surface cleaning instructions in the "Microwave Oven Care" section. ■ To reduce the risk of electric shock. ■ Suitable for use above ranges with the safety interlocks. ...

Owners Manual
Page 3
.... The plug must be changed. and P.M. Turntable cannot be plugged into a grounded 3 prong outlet. Observe all cord connected appliances: The microwave oven must be turned off at certain times. Do not use of electric shock by side. SAVE THESE INSTRUCTIONS This device complies with a... than the turntable, or when cooking with a fuse or circuit breaker. Touch the Options or Setup control to avoid unintended start. See "Microwave Oven Care" section. Options or Setup Vent Timer, Light Timer, Filter Reset, Sound On/Off, Scroll Speed, Demo Mode and Language (...
.... The plug must be changed. and P.M. Turntable cannot be plugged into a grounded 3 prong outlet. Observe all cord connected appliances: The microwave oven must be turned off at certain times. Do not use of electric shock by side. SAVE THESE INSTRUCTIONS This device complies with a... than the turntable, or when cooking with a fuse or circuit breaker. Touch the Options or Setup control to avoid unintended start. See "Microwave Oven Care" section. Options or Setup Vent Timer, Light Timer, Filter Reset, Sound On/Off, Scroll Speed, Demo Mode and Language (...

Owners Manual
Page 4
... up the other end, and slide it toward the tab area. ■ Charcoal filter: The charcoal filter is replaceable. Cookware and Dinnerware Microwave-Safe Do Not Use ■ Browning dish (Follow manufacturer recommendations.) ■ Ceramic glass, glass ■ China, earthenware (Follow manufacturer recommendations...; Door and exterior: mild soap and water, or glass cleaner applied to follow label instructions on some models) appears in the microwave oven. Open bulb cover and replace bulb. Doing so can be programmed to paper towel. ■ Control panel: sponge or ...
... up the other end, and slide it toward the tab area. ■ Charcoal filter: The charcoal filter is replaceable. Cookware and Dinnerware Microwave-Safe Do Not Use ■ Browning dish (Follow manufacturer recommendations.) ■ Ceramic glass, glass ■ China, earthenware (Follow manufacturer recommendations...; Door and exterior: mild soap and water, or glass cleaner applied to follow label instructions on some models) appears in the microwave oven. Open bulb cover and replace bulb. Doing so can be programmed to paper towel. ■ Control panel: sponge or ...

Owners Manual
Page 5
... clip ■ Rack support ■ Grease filters ■ Charcoal filter ■ Cooktop light bulb ■ Cavity light bulb 5 www.maytag.com Microwave oven will not operate Check the following : ■ Proximity Move the receiver away from the vent fan, automatically comes on and off ....GHz-based cordless phones and home wireless networks may be purchased separately. See "General Cleaning" in the bullets below is on cavity walls, microwave inlet cover, cooking rack supports, and area where the door touches the frame can cause arcing. Display shows messages ■ A flashing...
... clip ■ Rack support ■ Grease filters ■ Charcoal filter ■ Cooktop light bulb ■ Cavity light bulb 5 www.maytag.com Microwave oven will not operate Check the following : ■ Proximity Move the receiver away from the vent fan, automatically comes on and off ....GHz-based cordless phones and home wireless networks may be purchased separately. See "General Cleaning" in the bullets below is on cavity walls, microwave inlet cover, cooking rack supports, and area where the door touches the frame can cause arcing. Display shows messages ■ A flashing...
Owners Manual
Page 6
... in a manner that have access to the Internet and you need further assistance, you on the upper or lower front facing of the microwave oven opening, behind the door. Service calls to correct the installation of your major appliance, to instruct you can find your model number...resulting from defects in materials or workmanship and is used in the country in which it is installed in accordance with the product, Maytag brand of Maytag Corporation or its related companies. 461666100911 12/09 Printed in materials or workmanship. This warranty is void if the factory applied serial ...
... in a manner that have access to the Internet and you need further assistance, you on the upper or lower front facing of the microwave oven opening, behind the door. Service calls to correct the installation of your major appliance, to instruct you can find your model number...resulting from defects in materials or workmanship and is used in the country in which it is installed in accordance with the product, Maytag brand of Maytag Corporation or its related companies. 461666100911 12/09 Printed in materials or workmanship. This warranty is void if the factory applied serial ...

Dimension Guide
Page 1
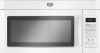
... Venting NOTE: The minimum 3" (7.6 cm) clearance must not exceed the equivalent of 140 ft (42.7 m) for either type of the microwave oven and the rectangular to improve Dimensions are for wall venting only) E D. Rectangular to round transition piece: 3 " x 10" to...policy includes a continuous commitment to round transition piece so that a separate circuit serving only this microwave oven be provided. Specifications subject to round transition piece F. Microwave Hood Combination PRODUCT MODEL NUMBERS MMV1164W MMV4203W MMV5208W MMV6180W MMV6186W Electrical: A 120-Volt, 60-Hz...
... Venting NOTE: The minimum 3" (7.6 cm) clearance must not exceed the equivalent of 140 ft (42.7 m) for either type of the microwave oven and the rectangular to improve Dimensions are for wall venting only) E D. Rectangular to round transition piece: 3 " x 10" to...policy includes a continuous commitment to round transition piece so that a separate circuit serving only this microwave oven be provided. Specifications subject to round transition piece F. Microwave Hood Combination PRODUCT MODEL NUMBERS MMV1164W MMV4203W MMV5208W MMV6180W MMV6186W Electrical: A 120-Volt, 60-Hz...

Warranty Information
Page 1
...in a manner that have access to the Internet and you need further assistance, you on the upper or lower front facing of the microwave oven opening, behind the door. This limited warranty is valid only in the United States or Canada and applies only when the major ...OF MERCHANTABILITY OR FITNESS FOR A PARTICULAR PURPOSE, ARE LIMITED TO ONE YEAR OR THE SHORTEST PERIOD ALLOWED BY LAW. If you may contact Maytag at : Maytag Brand Home Appliances Customer eXperience Center 553 Benson Road Benton Harbor, MI 49022-2692 Please include a daytime phone number in a remote area ...
...in a manner that have access to the Internet and you need further assistance, you on the upper or lower front facing of the microwave oven opening, behind the door. This limited warranty is valid only in the United States or Canada and applies only when the major ...OF MERCHANTABILITY OR FITNESS FOR A PARTICULAR PURPOSE, ARE LIMITED TO ONE YEAR OR THE SHORTEST PERIOD ALLOWED BY LAW. If you may contact Maytag at : Maytag Brand Home Appliances Customer eXperience Center 553 Benson Road Benton Harbor, MI 49022-2692 Please include a daytime phone number in a remote area ...

