Maytag UMV1160CW Support and Manuals
Get Help and Manuals for this Maytag item
View All Support Options Below
Free Maytag UMV1160CW manuals!
Problems with Maytag UMV1160CW?
Ask a Question
Free Maytag UMV1160CW manuals!
Problems with Maytag UMV1160CW?
Ask a Question
Popular Maytag UMV1160CW Manual Pages
Installation Instructions - Page 2
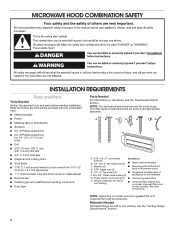
... the required tools and parts before starting installation.
See the "Venting Design Specifications" section.
2 Damper assembly (for wall or roof venting. Materials Needed
Standard fittings for wall or roof venting)
■■ Charcoal filters (Depending on model, charcoal filters may be included. Washers (2) D. 3/16" toggle nuts (2)
■■ Mounting plate (attached to...
Installation Instructions - Page 3
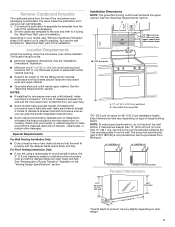
... replacing the I bar mounting plate
Bump out mounting bracket
Product Dimensions
17¹⁄₈"
(43.5 cm 0.5 cm)
16¹⁄₄" (41.3 cm)
(42.15U6c³p⁄m₄t"o)*
29⁷⁄₈" (76.0 cm)
*Overall depth of any obstructions so that the door can open fully.
■■ Some models have a pocket handle. If installing...
Installation Instructions - Page 4
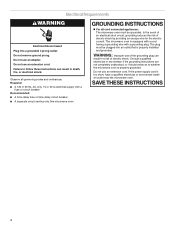
... fuse or time-delay circuit breaker ■■ A separate circuit serving only this microwave oven
GROUNDING INSTRUCTIONS
For all governing codes and ordinances. Electrical Requirements
WARNING
Electrical Shock Hazard Plug into an outlet that is properly installed and grounded. Required: ■■ A 120 V, 60 Hz, AC only, 15 or 20 A electrical supply with...
Installation Instructions - Page 5
... oven and lift up. Lift blower motor out of microwave oven. A
Wall Venting Installation Only
1. Keep damper plate and screws together and set it aside. 3. NOTE: To avoid possible damage, cover the work surface. 1.
...the microwave oven
cavity. 2.
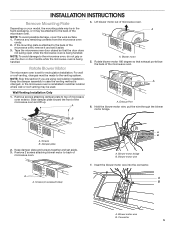
INSTALLATION INSTRUCTIONS
Remove Mounting Plate
Depending on your model, the mounting plate may be in the foam packaging, or it may be used....
Installation Instructions - Page 6
Using diagonal wire cutting pliers, gently snip out the
rectangular damper vent covers at the perforations. Repeat Step 2 from "Wall Venting Installation Only." 4. Repeat Step 3 from "Wall Venting Installation Only." 3.
Damper plate B.
Using diagonal wire cutting pliers, gently snip out the
rectangular vent covers on the damper plate removed in Step 3 cannot be...
Installation Instructions - Page 7

...(on mounting plate) B. Cabinet opening , do not install the microwave oven. Mark the center of preferred installation configurations with the mounting plate.
Mounting plate ... a plumb line down each stud center. Locate Wall Stud(s)
NOTE: If no wall studs exist within the opening.
2. Support tabs F. No Wall Studs at End Holes Figure 1
No Wall Studs at End Holes Figure 4
B
D
B
A
...
Installation Instructions - Page 8

...8 and 10.
12. Set the mounting plate aside. Measure down from the bottom of the upper cabinet and must be level.
■■ The end holes must be installed on a minimum of 1...5. With the support tabs facing forward (see illustrations in the "Locate Wall Stud(s)" section), align the mounting plate center markers to the wall stud centerline(s). Wall Venting Installation Only
Upper cabinet...
Installation Instructions - Page 9
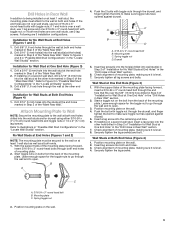
... the hole(s) drilled into both end holes marked in Rear Wall
In addition to being installed on bolts from the back of mounting plate, making sure it is level. 8. Check alignment of the mounting plate. With the support tabs of "Installation for the toggle nuts to go through the wall at both end holes. 3. Start...
Installation Instructions - Page 10
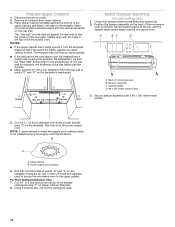
...Metal cabinet B. Prepare Upper Cabinet
1. The template has trim lines to be installed around it fits inside the frame, against the rear wall so that the ...hole is metal, the supply cord bushing needs to use as guides.
■■ If the wall behind the microwave oven (as.... 8. Remove all contents from the rear wall to the thickest part of t he rear wall (for wall venting only)
1. The...
Installation Instructions - Page 11

... screws. Support tabs
A. Failure to move and install microwave oven. A
A. Tighten bolts until there is being handled. Bolts A. With front of microwave oven still tilted, thread power supply cord through upper cabinet into the vent in the bottom of mounting plate, and set aside on each 1/4-20 x 3" flat-head bolt and place
inside upper...
Installation Instructions - Page 12

...Replace the fuse or reset the circuit breaker.
Vent B. Refer to follow these instructions can result in properly.
Do not use .
2. Plug microwave oven into a grounded 3 prong outlet. Check the operation of the damper plate. Save Installation Instructions for future use an adapter.
Mounting Nut
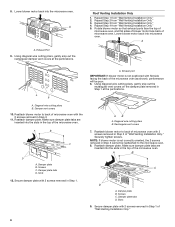
For Roof Venting Installation...cutout E. If the problem continues, call an ...
Installation Instructions - Page 13
... equivalents are not provided with microwave hood combination.
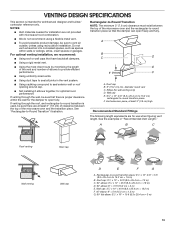
■■ We do not recommend using recirculation installation. If venting through the roof, and rectangular-to open freely and fully. A
B
C
D
...the transition piece. Roof cap B. 6" (15.2 cm) min.
VENTING DESIGN SPECIFICATIONS
This section is proper clearance within walls or ceilings, attics, crawl spaces or...
Installation Instructions - Page 14
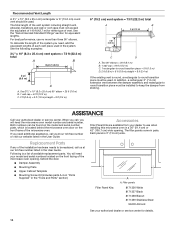
... ft (42.7 m) for either type of available replacement parts.
Filler panels
8171336 White 8171337 Black 8171338 Biscuit 8171339 Stainless Steel
99403 Almond
See your authorized dealer or service center. Recommended Vent Length
A 31⁄4" x 10" (8.3 x 25.4 cm) rectangular or 6" (15.2 cm) round vent should be installed to keep the damper from your dealer to...
Maytag UMV1160CW Reviews
We have not received any reviews for Maytag yet.