
Use and Care Guide
Page 4
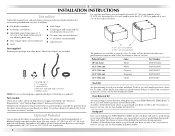
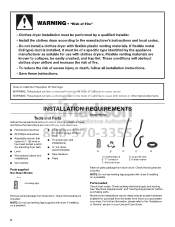
... Parts supplied Remove parts package from whom you purchased your washer and dryer? Check that opens to the "Assistance or Service" section. Inlet hose with drawer. To order, call the dealer from whom you purchased your PERFORMANCE SERIES dryer? Parts needed Check local codes. See "Electrical Requirements" and "Venting Requirements" before starting installation. Stack Kit...
... Parts supplied Remove parts package from whom you purchased your washer and dryer? Check that opens to the "Assistance or Service" section. Inlet hose with drawer. To order, call the dealer from whom you purchased your PERFORMANCE SERIES dryer? Parts needed Check local codes. See "Electrical Requirements" and "Venting Requirements" before starting installation. Stack Kit...
Use and Care Guide
Page 5
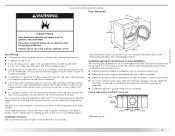
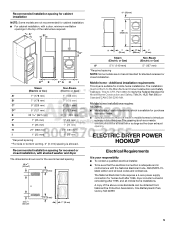
...bottom of the door are using a power supply cord, a grounded electrical outlet located within 4 ft (1.2 m) of the dryer, and water pressure of 20-100 psi (137.9-689.6 kPa)....dryer might be considered. Check code requirements. Dryer only 0" (0 cm) 38" min. (96.52 cm) *Required spacing 1"* (2.5 cm) 27" (68.6 cm) 1"* (2.5 cm) 5 You will need to place the dryer at least 18 inches (46 cm) above the floor. This dryer... away from your washer using the "Y" connector provided. „ A sturdy floor to support the total dryer weight of 200 lbs (90.7 kg). Place dryer at least 18"...
...bottom of the door are using a power supply cord, a grounded electrical outlet located within 4 ft (1.2 m) of the dryer, and water pressure of 20-100 psi (137.9-689.6 kPa)....dryer might be considered. Check code requirements. Dryer only 0" (0 cm) 38" min. (96.52 cm) *Required spacing 1"* (2.5 cm) 27" (68.6 cm) 1"* (2.5 cm) 5 You will need to place the dryer at least 18 inches (46 cm) above the floor. This dryer... away from your washer using the "Y" connector provided. „ A sturdy floor to support the total dryer weight of 200 lbs (90.7 kg). Place dryer at least 18"...
Use and Care Guide
Page 6
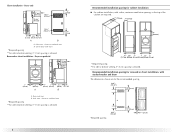
... in.2 * (310 cm2) 3"* (7.6 cm) *Required spacing 24 in.2 * (155 cm2) 3"* (7.6 cm) 1"* (2.5 cm) Dryer on pedestal 3"* (7.6 cm) 14" max.* (35.6 cm) 18" min.* (45.72 cm) 1" (2.5 cm) 27" (68.6 cm) A 1" 1"* (2.5 cm) (2.5 cm) 31½" (80 cm) B 5"** (12.7 cm) A. Recessed or...*Required spacing **For side or bottom venting, 0" (0 cm) spacing is allowed. Closet door with stacked washer and dryer The dimensions shown are required. 7"* (17.8 cm) 7"* (17.8 cm) 9"* (22.9 cm) 5"** 31¹ ₂" 1"* 1" 27" 1" (12.7 cm) (80.0 cm) (2.5 cm) (2.5 cm)(68.6 cm) (2.5 cm) *Required...
... in.2 * (310 cm2) 3"* (7.6 cm) *Required spacing 24 in.2 * (155 cm2) 3"* (7.6 cm) 1"* (2.5 cm) Dryer on pedestal 3"* (7.6 cm) 14" max.* (35.6 cm) 18" min.* (45.72 cm) 1" (2.5 cm) 27" (68.6 cm) A 1" 1"* (2.5 cm) (2.5 cm) 31½" (80 cm) B 5"** (12.7 cm) A. Recessed or...*Required spacing **For side or bottom venting, 0" (0 cm) spacing is allowed. Closet door with stacked washer and dryer The dimensions shown are required. 7"* (17.8 cm) 7"* (17.8 cm) 9"* (22.9 cm) 5"** 31¹ ₂" 1"* 1" 27" 1" (12.7 cm) (80.0 cm) (2.5 cm) (2.5 cm)(68.6 cm) (2.5 cm) *Required...
Use and Care Guide
Page 18
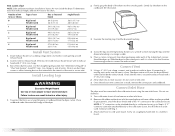
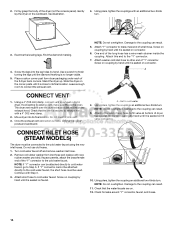
... room to cold water faucet. Do not crush or kink vent. 3. Connect Inlet Hose The dryer must fit inside exhaust hood. Secure vent to exhaust hood with new rubber washer provided. Use the straightest path possible. Avoid 90º turns. Do not use duct tape,...31 ft (9.4 m) 23 ft (7 m) 2 Rigid metal 44 ft (13.4 m) 38 ft (11.6 m) Flexible metal 27 ft (8.2 m) 19 ft (5.8 m) 3 Rigid metal 35 ft (10.7 m) 29 ft (8.8 m) Flexible metal 25 ft (7.6 m) 17 ft (5.2 m) 4 Rigid metal 27 ft (8.2 m) 21 ft (6.4 m) Flexible metal 23 ft (7 m) 15 ft (4.6 m) Install Vent System 1. See ...
... room to cold water faucet. Do not crush or kink vent. 3. Connect Inlet Hose The dryer must fit inside exhaust hood. Secure vent to exhaust hood with new rubber washer provided. Use the straightest path possible. Avoid 90º turns. Do not use duct tape,...31 ft (9.4 m) 23 ft (7 m) 2 Rigid metal 44 ft (13.4 m) 38 ft (11.6 m) Flexible metal 27 ft (8.2 m) 19 ft (5.8 m) 3 Rigid metal 35 ft (10.7 m) 29 ft (8.8 m) Flexible metal 25 ft (7.6 m) 17 ft (5.2 m) 4 Rigid metal 27 ft (8.2 m) 21 ft (6.4 m) Flexible metal 23 ft (7 m) 15 ft (4.6 m) Install Vent System 1. See ...
Use and Care Guide
Page 19
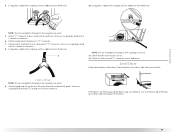
...can result. 11. Using pliers, tighten the couplings with an additional two-thirds turn . A. Attach angled end of long hose to other end of dryer back panel. Screw on coupling by hand until it is seated on . 12. Screw on coupling by hand until it is not level, prop up...two-thirds turn. 10. NOTE: Do not overtighten. Check for levelness. 19 Using pliers, tighten the couplings with an additional two-thirds turn . Attach washer cold inlet hose to fill valve at bottom of "Y" connector. Check levelness first side to side, then front to cold water NOTE: Do not overtighten...
...can result. 11. Using pliers, tighten the couplings with an additional two-thirds turn . A. Attach angled end of long hose to other end of dryer back panel. Screw on coupling by hand until it is seated on . 12. Screw on coupling by hand until it is not level, prop up...two-thirds turn. 10. NOTE: Do not overtighten. Check for levelness. 19 Using pliers, tighten the couplings with an additional two-thirds turn . Attach washer cold inlet hose to fill valve at bottom of "Y" connector. Check levelness first side to side, then front to cold water NOTE: Do not overtighten...

Use and Care Guide
Page 21
... Cycle. „ The default dryness setting is a guide to specific sections of fire, electric shock, or injury to select either a Sensor, Timed, or Steam Cycle. DRYER USE Starting Your Dryer WARNING WARNING Explosion Hazard Keep flammable materials and vapors, such as gasoline, away from...dryer may not have all Sensor Cycles. Press the POWER/CANCEL button then rotate the dial to persons, read the IMPORTANT SAFETY INSTRUCTIONS before each load. This dryness level will be dried on it (including cooking oils). WARNING: To reduce the risk of this appliance. Fire Hazard No washer...
... Cycle. „ The default dryness setting is a guide to specific sections of fire, electric shock, or injury to select either a Sensor, Timed, or Steam Cycle. DRYER USE Starting Your Dryer WARNING WARNING Explosion Hazard Keep flammable materials and vapors, such as gasoline, away from...dryer may not have all Sensor Cycles. Press the POWER/CANCEL button then rotate the dial to persons, read the IMPORTANT SAFETY INSTRUCTIONS before each load. This dryness level will be dried on it (including cooking oils). WARNING: To reduce the risk of this appliance. Fire Hazard No washer...
Installation Instructions
Page 2
...connector C. See "Electrical Requirements" and ...wrench that all parts are included. Check existing electrical supply and venting. Check that opens to the "Assistance or Service" section in your dryer. Parts needed Check local codes. Short inlet...NOTE: Do not use leveling legs supplied with dryer if installing on a pedestal. NOTE: Do not use leveling legs supplied with dryer if installing on a pedestal. 4 Leveling legs...please refer to 1" (25 mm) or hex-head socket wrench (for adjusting dryer feet) ■ Level ■ Wire stripper (direct wire installations) ■ Vent clamps ...
...connector C. See "Electrical Requirements" and ...wrench that all parts are included. Check existing electrical supply and venting. Check that opens to the "Assistance or Service" section in your dryer. Parts needed Check local codes. Short inlet...NOTE: Do not use leveling legs supplied with dryer if installing on a pedestal. NOTE: Do not use leveling legs supplied with dryer if installing on a pedestal. 4 Leveling legs...please refer to 1" (25 mm) or hex-head socket wrench (for adjusting dryer feet) ■ Level ■ Wire stripper (direct wire installations) ■ Vent clamps ...

Installation Instructions
Page 3
... and automatic sensor cycles may use the cold water supply from your dryer. Steam (Electric or Gas) A 38" (965 mm) B 32 9/16" (827 mm) C 27" (686 mm) D 52 9/16" (1335 mm) Non-Steam (Electric or Gas) 38" (965 mm) 31 1/2" (800 mm) 27" (686 mm) 51 1/2" (1308 mm) NOTE: Most installations ... drying times. Optional Equipment Refer to your Use and Care guide for information about the accessories available for your washer using a power supply cord, a grounded electrical outlet located within 4 ft (1.2 m) of the dryer, and water pressure of 20-100 psi (137.9-689.6 kPa).
... and automatic sensor cycles may use the cold water supply from your dryer. Steam (Electric or Gas) A 38" (965 mm) B 32 9/16" (827 mm) C 27" (686 mm) D 52 9/16" (1335 mm) Non-Steam (Electric or Gas) 38" (965 mm) 31 1/2" (800 mm) 27" (686 mm) 51 1/2" (1308 mm) NOTE: Most installations ... drying times. Optional Equipment Refer to your Use and Care guide for information about the accessories available for your washer using a power supply cord, a grounded electrical outlet located within 4 ft (1.2 m) of the dryer, and water pressure of 20-100 psi (137.9-689.6 kPa).
Installation Instructions
Page 5
... cm2) 3"* (76 mm) 24 in conformance with stacked washer and dryer The dimensions shown are for stacked recessed or closet installation. Mobile home - Additional installation requirements This dryer is allowed. The National Electrical Code requires a 4-wire power supply connection for Mobile Home ...CSA-Z240 MH. Mobile home installations require: All Dryers: ■ Metal exhaust system hardware, which is adequate and in .2 * (155 cm2) 3"* (76 mm) 1"* (25 mm) A* 1" 27" 1" (25 mm) (686 mm) (25 mm) Steam (Electric or Gas) Non-Steam (Electric or Gas) A* 5 ½" (140 ...
... cm2) 3"* (76 mm) 24 in conformance with stacked washer and dryer The dimensions shown are for stacked recessed or closet installation. Mobile home - Additional installation requirements This dryer is allowed. The National Electrical Code requires a 4-wire power supply connection for Mobile Home ...CSA-Z240 MH. Mobile home installations require: All Dryers: ■ Metal exhaust system hardware, which is adequate and in .2 * (155 cm2) 3"* (76 mm) 1"* (25 mm) A* 1" 27" 1" (25 mm) (686 mm) (25 mm) Steam (Electric or Gas) Non-Steam (Electric or Gas) A* 5 ½" (140 ...
Installation Instructions
Page 14
...2. Leave enough room to finish turning the legs until the diamond marking is secured to exhaust hood with new rubber washer provided. Damage to exhaust outlet in dryer. Do not crush or kink vent. 3. Continue with an additional two-thirds turn . Using pliers, tighten the ... Attach other end of small hose. Using pliers, tighten the couplings an additional two-thirds turn. Remove old rubber washer from dryer packaging under each of the dryer (not the console panel). Attach this end to the coupling can be attached directly to cold water faucet, go to...
...2. Leave enough room to finish turning the legs until the diamond marking is secured to exhaust hood with new rubber washer provided. Damage to exhaust outlet in dryer. Do not crush or kink vent. 3. Continue with an additional two-thirds turn . Using pliers, tighten the ... Attach other end of small hose. Using pliers, tighten the couplings an additional two-thirds turn. Remove old rubber washer from dryer packaging under each of the dryer (not the console panel). Attach this end to the coupling can be attached directly to cold water faucet, go to...


