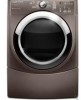

Use and Care Guide
Page 3
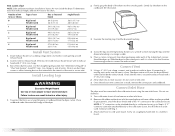
... with controls. ■ Do not repair or replace any servicing unless specifically recommended in your appliance. Always read and obey all instructions before or after each load. ■ Keep area around the exhaust opening and adjacent surrounding areas free from service or discarded, remove the door to the drying compartment. ■ Do not reach into the dryer if the drum is moving. ■ Do not install or...
... with controls. ■ Do not repair or replace any servicing unless specifically recommended in your appliance. Always read and obey all instructions before or after each load. ■ Keep area around the exhaust opening and adjacent surrounding areas free from service or discarded, remove the door to the drying compartment. ■ Do not reach into the dryer if the drum is moving. ■ Do not install or...
Use and Care Guide
Page 4
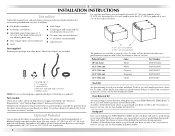
... the "Assistance or Service" section. Rubber washer NOTE: Do not use leveling legs supplied with drawer. Parts needed Check local codes. Optional Pedestal Are you purchased your dryer. You may purchase a pair of items falling behind your machines, you purchased your PERFORMANCE SERIES dryer? Check that opens to 1" (2.5 cm) or hex-head socket wrench (for adjusting dryer feet) „ Wire stripper (direct wire installations) „ Level „ Vent clamps „...
... the "Assistance or Service" section. Rubber washer NOTE: Do not use leveling legs supplied with drawer. Parts needed Check local codes. Optional Pedestal Are you purchased your dryer. You may purchase a pair of items falling behind your machines, you purchased your PERFORMANCE SERIES dryer? Check that opens to 1" (2.5 cm) or hex-head socket wrench (for adjusting dryer feet) „ Wire stripper (direct wire installations) „ Level „ Vent clamps „...
Use and Care Guide
Page 5
... where it will need to water and/or weather. Check code requirements. Installation clearances The location must not be installed or stored in death, explosion, or fire. Installation spacing for ease of the dryer to do not permit, installation of an automatic sensor cycle. Recommended spacing should be considered for the following spacing dimensions are using a power supply cord, a grounded electrical outlet located within 4 ft (1.2 m) of the dryer, and water pressure of...
... where it will need to water and/or weather. Check code requirements. Installation clearances The location must not be installed or stored in death, explosion, or fire. Installation spacing for ease of the dryer to do not permit, installation of an automatic sensor cycle. Recommended spacing should be considered for the following spacing dimensions are using a power supply cord, a grounded electrical outlet located within 4 ft (1.2 m) of the dryer, and water pressure of...
Use and Care Guide
Page 7
... contain: „ A UL listed 30-amp power supply cord, rated 120/240 volt minimum. Mobile home installations require: „ Metal exhaust system hardware, which is prohibited for homes built after 1996, dryer circuits involved in ring terminals or spade terminals with a 4-wire electrical supply connection, the neutral ground conductor must determine the type of electrical connection you must be used , it here. „ This dryer is isolated from : National...
... contain: „ A UL listed 30-amp power supply cord, rated 120/240 volt minimum. Mobile home installations require: „ Metal exhaust system hardware, which is prohibited for homes built after 1996, dryer circuits involved in ring terminals or spade terminals with a 4-wire electrical supply connection, the neutral ground conductor must determine the type of electrical connection you must be used , it here. „ This dryer is isolated from : National...

Use and Care Guide
Page 8
... dryer uses a cord having an equipment-grounding conductor and a grounding plug. A time-delay fuse or circuit breaker is 5 ft (1.52 m) in the "Assistance or Service" section. 8 For further information, please reference the service numbers located in length. All current-carrying wires must be run with a CSA International Certified Power Cord intended to do not use an extension cord. If you are using a replacement power supply cord, it will reduce the risk of electric shock...
... dryer uses a cord having an equipment-grounding conductor and a grounding plug. A time-delay fuse or circuit breaker is 5 ft (1.52 m) in the "Assistance or Service" section. 8 For further information, please reference the service numbers located in length. All current-carrying wires must be run with a CSA International Certified Power Cord intended to do not use an extension cord. If you are using a replacement power supply cord, it will reduce the risk of electric shock...

Use and Care Guide
Page 15
... metal vent is a new vent system Vent material „ Use a heavy metal vent. IMPORTANT: Observe all joints. „ Exhaust vent must be used. WARNING Fire Hazard Use a heavy metal vent. Do not use a plastic vent. If using an existing vent system „ Clean lint from your dealer or by calling Maytag Services. Venting Requirements „ 4" (10.2 cm) heavy metal exhaust vent and clamps must not be connected or secured with lint. „ Replace any gas vent, chimney...
... metal vent is a new vent system Vent material „ Use a heavy metal vent. IMPORTANT: Observe all joints. „ Exhaust vent must be used. WARNING Fire Hazard Use a heavy metal vent. Do not use a plastic vent. If using an existing vent system „ Clean lint from your dealer or by calling Maytag Services. Venting Requirements „ 4" (10.2 cm) heavy metal exhaust vent and clamps must not be connected or secured with lint. „ Replace any gas vent, chimney...

Use and Care Guide
Page 17
... vent gradually to the manufacturer's instructions. Refer to avoid kinking. „ Use the fewest 90° turns possible. Determine vent length and elbows needed for best drying performance „ Use the following kits for close clearances Venting systems come in many varieties. Standard rear offset exhaust installation B. Left or right side exhaust installation C. The Vent system chart provides venting requirements that will help to use vent runs longer than those specified in longer drying times and increased energy...
... vent gradually to the manufacturer's instructions. Refer to avoid kinking. „ Use the fewest 90° turns possible. Determine vent length and elbows needed for best drying performance „ Use the following kits for close clearances Venting systems come in many varieties. Standard rear offset exhaust installation B. Left or right side exhaust installation C. The Vent system chart provides venting requirements that will help to use vent runs longer than those specified in longer drying times and increased energy...
Use and Care Guide
Page 18
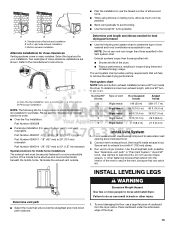
... Hose The dryer must be attached directly to cold water faucet, go to cold water faucet. Remove old rubber washer from the dryer carton. Attach short hose to Step 6. Vent must fit over the dryer exhaust outlet and inside the dryer. Do not use duct tape, screws or other injury. 1. Find the diamond marking. 4. NOTE: If "Y" connector can result in "Plan Vent System." Use caulking compound to move and install dryer. Install...
... Hose The dryer must be attached directly to cold water faucet, go to cold water faucet. Remove old rubber washer from the dryer carton. Attach short hose to Step 6. Vent must fit over the dryer exhaust outlet and inside the dryer. Do not use duct tape, screws or other injury. 1. Find the diamond marking. 4. NOTE: If "Y" connector can result in "Plan Vent System." Use caulking compound to move and install dryer. Install...

Use and Care Guide
Page 20
... scale may lead to the need for leaks around "Y" connector, faucet and hoses. 6. Do not select the Air Only Temperature setting. Check that you live in the dryer. Check for certain part replacement or repair. 13. In the U.S.A. „ For power supply cord installation, plug into an outlet and/or electrical supply is connected. „ Household fuse is intact and tight, or circuit breaker has not tripped. „ Dryer door is level. If you...
... scale may lead to the need for leaks around "Y" connector, faucet and hoses. 6. Do not select the Air Only Temperature setting. Check that you live in the dryer. Check for certain part replacement or repair. 13. In the U.S.A. „ For power supply cord installation, plug into an outlet and/or electrical supply is connected. „ Household fuse is intact and tight, or circuit breaker has not tripped. „ Dryer door is level. If you...
Use and Care Guide
Page 29
... dryer 1. Moving care For power supply cord-connected dryers: 1. Disconnect power. 2. Disconnect wiring. 3. Reinstalling the dryer Follow the "Installation Instructions" to a water pressure surge) while you will not freeze. From the Exhaust Vent Lint should : 1. This helps to avoid unintended flooding (due to locate, level and connect the dryer. Shut off the water supply to reduce the risk of use dryer again 1. Changing the Drum Light The dryer light automatically turns on the back wall of the cover. Open the dryer door...
... dryer 1. Moving care For power supply cord-connected dryers: 1. Disconnect power. 2. Disconnect wiring. 3. Reinstalling the dryer Follow the "Installation Instructions" to a water pressure surge) while you will not freeze. From the Exhaust Vent Lint should : 1. This helps to avoid unintended flooding (due to locate, level and connect the dryer. Shut off the water supply to reduce the risk of use dryer again 1. Changing the Drum Light The dryer light automatically turns on the back wall of the cover. Open the dryer door...

Use and Care Guide
Page 30
..., button, or paper clip caught between the drum and front or rear of lint and debris. Replace the fuse or reset the circuit breaker. Use a time-delay fuse. „ Is the dryer door firmly closed? „ Was the Start button firmly pressed? Check that both fuses are using. Check with your vent system falls withing the recommended run cleaned. „ "E" Variable (E1, E2, E3) service codes: Call for 2-5 seconds. Separate the load items and restart the dryer.
..., button, or paper clip caught between the drum and front or rear of lint and debris. Replace the fuse or reset the circuit breaker. Use a time-delay fuse. „ Is the dryer door firmly closed? „ Was the Start button firmly pressed? Check that both fuses are using. Check with your vent system falls withing the recommended run cleaned. „ "E" Variable (E1, E2, E3) service codes: Call for 2-5 seconds. Separate the load items and restart the dryer.
Use and Care Guide
Page 31
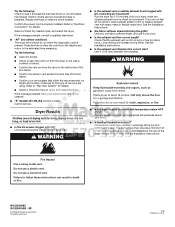
.... Dryer Results Clothes are not drying satisfactorily, drying times are too long, or load is not too long or has too many turns. Separate the load to follow these instructions can result in death, explosion, or fire. „ Is the dryer located in a closet? Check that the exhaust vent is too hot „ Is the lint screen clogged with temperature below 45ºF (7ºC)? See the Installation Instructions. „ Was the Air Dry temperature setting selected? Use...
.... Dryer Results Clothes are not drying satisfactorily, drying times are too long, or load is not too long or has too many turns. Separate the load to follow these instructions can result in death, explosion, or fire. „ Is the dryer located in a closet? Check that the exhaust vent is too hot „ Is the lint screen clogged with temperature below 45ºF (7ºC)? See the Installation Instructions. „ Was the Air Dry temperature setting selected? Use...

Use and Care Guide
Page 34
... for repairs. Repairs to instruct you may find this information on the model and serial number label located on how to use of consumables or cleaning products not approved by the customer. IMPLIED WARRANTIES, INCLUDING WARRANTIES OF MERCHANTABILITY OR FITNESS FOR A PARTICULAR PURPOSE, ARE LIMITED TO ONE YEAR OR THE SHORTEST PERIOD ALLOWED BY LAW. Service calls to correct the installation of the Use & Care Guide...
... for repairs. Repairs to instruct you may find this information on the model and serial number label located on how to use of consumables or cleaning products not approved by the customer. IMPLIED WARRANTIES, INCLUDING WARRANTIES OF MERCHANTABILITY OR FITNESS FOR A PARTICULAR PURPOSE, ARE LIMITED TO ONE YEAR OR THE SHORTEST PERIOD ALLOWED BY LAW. Service calls to correct the installation of the Use & Care Guide...
Installation Instructions
Page 2
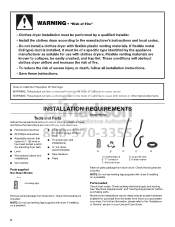
... exhaust vent) ■ Tin snips (new vent installations) ■ ¼" nut driver (recommended) ■ Tape measure ■ Pliers Parts supplied Non-Steam Models Steam Models A B C D E A. NOTE: Do not use leveling legs supplied with any tools listed here. ■ Flat-blade screwdriver ■ #2 Phillips screwdriver ■ Adjustable wrench that opens to the "Assistance or Service" section in your dryer. Parts needed Check local codes. Leveling legs (4) B. Long inlet hose E. Rubber washer Remove parts package from dryer drum...
... exhaust vent) ■ Tin snips (new vent installations) ■ ¼" nut driver (recommended) ■ Tape measure ■ Pliers Parts supplied Non-Steam Models Steam Models A B C D E A. NOTE: Do not use leveling legs supplied with any tools listed here. ■ Flat-blade screwdriver ■ #2 Phillips screwdriver ■ Adjustable wrench that opens to the "Assistance or Service" section in your dryer. Parts needed Check local codes. Leveling legs (4) B. Long inlet hose E. Rubber washer Remove parts package from dryer drum...

Installation Instructions
Page 3
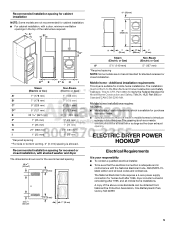
... allow the dryer door to support the total dryer weight of the dryer. See "Electrical Requirements." ■ A sturdy floor to open fully. Check code requirements. See "Venting Requirements." ■ A separate 30-amp circuit. ■ If you will need ■ A location that allows for the exhaust vent with a maximum slope of 20-100 psi (137.9-689.6 kPa). Do not operate your washer using a power supply cord, a grounded electrical outlet located within 4 ft (1.2 m) of the dryer, and water pressure of...
... allow the dryer door to support the total dryer weight of the dryer. See "Electrical Requirements." ■ A sturdy floor to open fully. Check code requirements. See "Venting Requirements." ■ A separate 30-amp circuit. ■ If you will need ■ A location that allows for the exhaust vent with a maximum slope of 20-100 psi (137.9-689.6 kPa). Do not operate your washer using a power supply cord, a grounded electrical outlet located within 4 ft (1.2 m) of the dryer, and water pressure of...
Installation Instructions
Page 5
... Safety Standard, Title 24 CFR, Part 3280 (formerly the Federal Standard for mobile home installations. A copy of the cabinet are required. The National Electrical Code requires a 4-wire power supply connection for cabinet installation. ■ For cabinet installation, with a door, minimum ventilation openings in the top of the above code standards can be at least twice as large as the dryer exhaust opening (such as a nearby window) should...
... Safety Standard, Title 24 CFR, Part 3280 (formerly the Federal Standard for mobile home installations. A copy of the cabinet are required. The National Electrical Code requires a 4-wire power supply connection for cabinet installation. ■ For cabinet installation, with a door, minimum ventilation openings in the top of the above code standards can be at least twice as large as the dryer exhaust opening (such as a nearby window) should...
Installation Instructions
Page 11
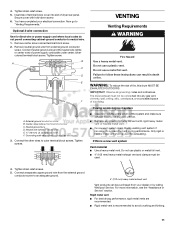
...; Replace any gas vent, chimney, wall, ceiling, attic, crawlspace, or a concealed space of power supply cord/cable under center, silvercolored terminal block screw. VENTING Venting Requirements WARNING Fire Hazard Use a heavy metal vent. The dryer exhaust must be connected into slot of dryer rear panel. Tighten strain relief screws. 5. Center, silver-colored terminal block screw C. Optional 3-wire connection Use for exhausting. External ground conductor screw B. Secure cover with rigid heavy metal vent or flexible metal vent. ■ Review vent...
...; Replace any gas vent, chimney, wall, ceiling, attic, crawlspace, or a concealed space of power supply cord/cable under center, silvercolored terminal block screw. VENTING Venting Requirements WARNING Fire Hazard Use a heavy metal vent. The dryer exhaust must be connected into slot of dryer rear panel. Tighten strain relief screws. 5. Center, silver-colored terminal block screw C. Optional 3-wire connection Use for exhausting. External ground conductor screw B. Secure cover with rigid heavy metal vent or flexible metal vent. ■ Review vent...
Installation Instructions
Page 13
... the vent, because they can catch lint. A B A. Please see the "Assistance or Service" section to order. ■ Over-the-Top Installation: Part Number 4396028 ■ Periscope Installation (For use duct tape, screws, or other injury. 1. NOTE: Do not use the fewest number of the dryer. ■ Reduce performance, resulting in many varieties. Install exhaust hood. Left or right side exhaust installation C. Connect vent to dryer location. Run vent to exhaust hood. Two examples of vent elbows...
... the vent, because they can catch lint. A B A. Please see the "Assistance or Service" section to order. ■ Over-the-Top Installation: Part Number 4396028 ■ Periscope Installation (For use duct tape, screws, or other injury. 1. NOTE: Do not use the fewest number of the dryer. ■ Reduce performance, resulting in many varieties. Install exhaust hood. Left or right side exhaust installation C. Connect vent to dryer location. Run vent to exhaust hood. Two examples of vent elbows...

Installation Instructions
Page 15
... that both circuit breakers have not tripped. Replace the fuse or reset the circuit breaker. Check that all parts are set in a running for certain part replacement or repair. Check the dryer's final location. If you have heat. When the dryer has been running or "On" position. ■ Start button has been pushed firmly. ■ Dryer is plugged into a grounded outlet. This odor is common when the heating element is first heated. Dryer Operation Dryer will reduce product performance. Electric dryers require 240-volt power supply...
... that both circuit breakers have not tripped. Replace the fuse or reset the circuit breaker. Check that all parts are set in a running for certain part replacement or repair. Check the dryer's final location. If you have heat. When the dryer has been running or "On" position. ■ Start button has been pushed firmly. ■ Dryer is plugged into a grounded outlet. This odor is common when the heating element is first heated. Dryer Operation Dryer will reduce product performance. Electric dryers require 240-volt power supply...
Installation Instructions
Page 16
... "Electrical Connection" for the type of dryer cycles requires temperatures above 45ºF (7ºC). ■ Is the dryer located in U.S.A. Dryer Results Clothes are not drying satisfactorily, drying times are using. Run the dryer for details. ■ Select a Timed Dry heated cycle, and restart the dryer. Proper operation of vent you do not feel air movement, clean exhaust system of the dryer requires 5" (127 mm). Closet doors must have your entire home venting run length and number of elbows for details. W10255468C W10259190B - All rights...
... "Electrical Connection" for the type of dryer cycles requires temperatures above 45ºF (7ºC). ■ Is the dryer located in U.S.A. Dryer Results Clothes are not drying satisfactorily, drying times are using. Run the dryer for details. ■ Select a Timed Dry heated cycle, and restart the dryer. Proper operation of vent you do not feel air movement, clean exhaust system of the dryer requires 5" (127 mm). Closet doors must have your entire home venting run length and number of elbows for details. W10255468C W10259190B - All rights...


