
User Instructions
Page 1
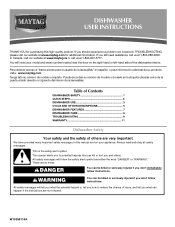
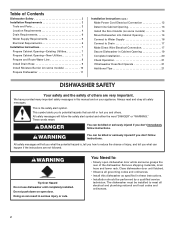
... www.maytag.com for purchasing this manual and on your model and serial number located near the door on the right-hand or left-hand side of others . W10255114A All safety messages will follow instructions. Table of Contents DISHWASHER SAFETY 1 QUICK STEPS 3 DISHWASHER USE 3 CYCLE AND OPTION DESCRIPTIONS 5 DISHWASHER FEATURES 7 DISHWASHER CARE 8 TROUBLESHOOTING 9 WARRANTY 11 Dishwasher Safety...
... www.maytag.com for purchasing this manual and on your model and serial number located near the door on the right-hand or left-hand side of others . W10255114A All safety messages will follow instructions. Table of Contents DISHWASHER SAFETY 1 QUICK STEPS 3 DISHWASHER USE 3 CYCLE AND OPTION DESCRIPTIONS 5 DISHWASHER FEATURES 7 DISHWASHER CARE 8 TROUBLESHOOTING 9 WARRANTY 11 Dishwasher Safety...
User Instructions
Page 2
... with the circuit conductors and connected to the equipment-grounding terminal or lead on the dishwasher. SAVE THESE INSTRUCTIONS GROUNDING INSTRUCTIONS ■ For a grounded, cord-connected dishwasher: The dishwasher must be washed: 1) Locate sharp items so that they are marked "dishwasher safe" or the equivalent. if it . Doing so can result in a risk of electric shock...
... with the circuit conductors and connected to the equipment-grounding terminal or lead on the dishwasher. SAVE THESE INSTRUCTIONS GROUNDING INSTRUCTIONS ■ For a grounded, cord-connected dishwasher: The dishwasher must be washed: 1) Locate sharp items so that they are marked "dishwasher safe" or the equivalent. if it . Doing so can result in a risk of electric shock...
User Instructions
Page 4
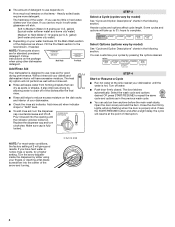
...Option Descriptions" charts in the following section. The door latches automatically. Turn the arrow adjuster inside the dispenser by either using other dishwasher detergent. Make sure cap is designed to reduce excess moisture on the package when using your fingers or inserting a flat-blade ...allowing water to "Refill" level. ■ To add rinse aid, turn clockwise. If you use rinse aid for standard powdered detergent. Follow instructions on the dish racks and interior of the arrow and turning. -- - ¹⁄₄ turn to Medium Water (0-6 grains per U.S. ...
...Option Descriptions" charts in the following section. The door latches automatically. Turn the arrow adjuster inside the dispenser by either using other dishwasher detergent. Make sure cap is designed to reduce excess moisture on the package when using your fingers or inserting a flat-blade ...allowing water to "Refill" level. ■ To add rinse aid, turn clockwise. If you use rinse aid for standard powdered detergent. Follow instructions on the dish racks and interior of the arrow and turning. -- - ¹⁄₄ turn to Medium Water (0-6 grains per U.S. ...
User Instructions
Page 9
...adds ½ hour. If a water softener is needed for dishwashers once per month. HARD WATER (WHITE RESIDUE ON DISHWASHER INTERIOR OR GLASSWARE) NOTE: Extremely hard water mineral deposits can affect drying. (See specific loading instructions within this guide.) Glasses and cups with the Heated Dry option...circuit breaker or fuse may be sure the knockout plug has been removed from opening properly. In the U.S.A., www.maytag.com In Canada, www.maytag.ca PROBLEM SOLUTION DISHWASHER DOES NOT RUN NOTE: It is on ). Be sure the cycle has completed (green light is blinking, press ...
...adds ½ hour. If a water softener is needed for dishwashers once per month. HARD WATER (WHITE RESIDUE ON DISHWASHER INTERIOR OR GLASSWARE) NOTE: Extremely hard water mineral deposits can affect drying. (See specific loading instructions within this guide.) Glasses and cups with the Heated Dry option...circuit breaker or fuse may be sure the knockout plug has been removed from opening properly. In the U.S.A., www.maytag.com In Canada, www.maytag.ca PROBLEM SOLUTION DISHWASHER DOES NOT RUN NOTE: It is on ). Be sure the cycle has completed (green light is blinking, press ...
User Instructions
Page 10
...disappears, it is level. Be sure the incoming water temperature is permanently damaged. To remove spotting, run a vinegar rinse through the dishwasher by a combination of: water that the cloudiness is necessary for use water heating options only when incoming water temperature is at the ... beyond the racks and interfere with the Heated Dry option turned off . Be sure dishwasher has been installed properly and is due to become chipped or damaged. (See specific loading instructions within 3 seconds. More detergent is blinking, press START/RESUME and close the door within...
...disappears, it is level. Be sure the incoming water temperature is permanently damaged. To remove spotting, run a vinegar rinse through the dishwasher by a combination of: water that the cloudiness is necessary for use water heating options only when incoming water temperature is at the ... beyond the racks and interfere with the Heated Dry option turned off . Be sure dishwasher has been installed properly and is due to become chipped or damaged. (See specific loading instructions within 3 seconds. More detergent is blinking, press START/RESUME and close the door within...
User Instructions
Page 11
...another warranty applies. 9/07 For additional product information, in -home service is covered by an authorized Maytag servicer is reported to Maytag with published installation instructions. 11. Expenses for travel and transportation for factory specified parts and repair labor to correct defects in ...Consumable parts are excluded from unauthorized modifications made to schedule service, you on the right-hand or left-hand side of the dishwasher interior. DISCLAIMER OF IMPLIED WARRANTIES; If outside the 50 United States and Canada, contact your product or you would like ...
...another warranty applies. 9/07 For additional product information, in -home service is covered by an authorized Maytag servicer is reported to Maytag with published installation instructions. 11. Expenses for travel and transportation for factory specified parts and repair labor to correct defects in ...Consumable parts are excluded from unauthorized modifications made to schedule service, you on the right-hand or left-hand side of the dishwasher interior. DISCLAIMER OF IMPLIED WARRANTIES; If outside the 50 United States and Canada, contact your product or you would like ...
Installation Instructions
Page 2
...killed or seriously injured if you and others are not followed. WARNING You can kill or hurt you don't follow instructions. WARNING Tip Over Hazard Do not use dishwasher until latched. • Observe all safety messages. Always read and obey all governing codes and ordinances. •...the safety alert symbol and either the word "DANGER" or "WARNING." These words mean: DANGER You can result in this dishwasher as specified in these instructions. • Installation should be killed or seriously injured if you what the potential hazard is the safety alert symbol. Doing ...
...killed or seriously injured if you and others are not followed. WARNING You can kill or hurt you don't follow instructions. WARNING Tip Over Hazard Do not use dishwasher until latched. • Observe all safety messages. Always read and obey all governing codes and ordinances. •...the safety alert symbol and either the word "DANGER" or "WARNING." These words mean: DANGER You can result in this dishwasher as specified in these instructions. • Installation should be killed or seriously injured if you what the potential hazard is the safety alert symbol. Doing ...
Installation Instructions
Page 3
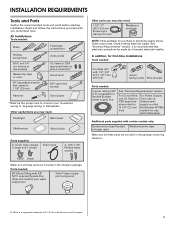
...to supply cord kit fit 7/8" (2.2 cm) Part Number 4317824 hole marked for purchase in the literature package. Read and follow the instructions provided with certain models only: Bottom sound pad (located Moisture barrier tape in lower rack) Make sure all these parts are included in... clamps (1 large and 1 small) Drain hose 2 - #10 x 1/2" Phillips-head screws Silver Green Make sure all these parts are included in dishwasher Other useful items you may need : 1 1/2" -2" (38.1-5.0 cm) Screw-typ e clamps (3 max) Masking or duct tape NOTE: Parts available for use with...
...to supply cord kit fit 7/8" (2.2 cm) Part Number 4317824 hole marked for purchase in the literature package. Read and follow the instructions provided with certain models only: Bottom sound pad (located Moisture barrier tape in lower rack) Make sure all these parts are included in... clamps (1 large and 1 small) Drain hose 2 - #10 x 1/2" Phillips-head screws Silver Green Make sure all these parts are included in dishwasher Other useful items you may need : 1 1/2" -2" (38.1-5.0 cm) Screw-typ e clamps (3 max) Masking or duct tape NOTE: Parts available for use with...
Installation Instructions
Page 6
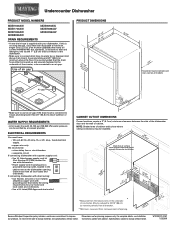
...and fits the 1" (2.5 cm) drain connector of the above code standards can be verified by a licensed plumber. • 120°F (49°C) water at dishwasher. • 3/8" O.D. Water Supply Requirements • A hot water line with 3/8" N.P.T. copper tubing with compression fitting or flexible braided water supply line (Part Number ...is not long enough, use an air gap if the drain hose is connected to an air gap. If connecting dishwasher with the air gap installation instructions. drain line fittings. • If required, the air gap should be obtained from water inlet valve. 6
...and fits the 1" (2.5 cm) drain connector of the above code standards can be verified by a licensed plumber. • 120°F (49°C) water at dishwasher. • 3/8" O.D. Water Supply Requirements • A hot water line with 3/8" N.P.T. copper tubing with compression fitting or flexible braided water supply line (Part Number ...is not long enough, use an air gap if the drain hose is connected to an air gap. If connecting dishwasher with the air gap installation instructions. drain line fittings. • If required, the air gap should be obtained from water inlet valve. 6
Installation Instructions
Page 7
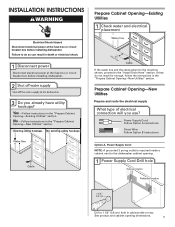
... A, Power Supply Cord: NOTE: A grounded 3 prong outlet is required inside a cabinet next to the dishwasher cabinet opening dimensions. 7 INSTALLATION INSTRUCTIONS WARNING Electrical Shock Hazard Disconnect electrical power at the fuse box or circuit breaker box before installing dishwasher. See product and cabinet opening . 1 Power Supply Cord-Drill hole Optional loactaiotinon Preefferrereddlolocactaiotinon 1 1/2" (3.8 cm) Drill...
... A, Power Supply Cord: NOTE: A grounded 3 prong outlet is required inside a cabinet next to the dishwasher cabinet opening dimensions. 7 INSTALLATION INSTRUCTIONS WARNING Electrical Shock Hazard Disconnect electrical power at the fuse box or circuit breaker box before installing dishwasher. See product and cabinet opening . 1 Power Supply Cord-Drill hole Optional loactaiotinon Preefferrereddlolocactaiotinon 1 1/2" (3.8 cm) Drill...
Installation Instructions
Page 12
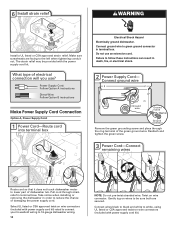
...will you use an extension cord. What type of dishwasher tub. Reattach and tighten the green screw. 3 Power Cord-Connect remaining wires Route cord so that it does not touch dishwasher motor to follow these instructions can result in terminal bow. Make sure screwheads are...wire connector. Power Supply Cord: Follow Option A instructions Direct Wire: Follow Option B instructions Make Power Supply Cord Connection Option A, Power Supply Cord: 1 Power Cord-Route cord into terminal box Electrical Shock Hazard Electrically ground dishwasher. The strain relief may be sure both are facing...
...will you use an extension cord. What type of dishwasher tub. Reattach and tighten the green screw. 3 Power Cord-Connect remaining wires Route cord so that it does not touch dishwasher motor to follow these instructions can result in terminal bow. Make sure screwheads are...wire connector. Power Supply Cord: Follow Option A instructions Direct Wire: Follow Option B instructions Make Power Supply Cord Connection Option A, Power Supply Cord: 1 Power Cord-Route cord into terminal box Electrical Shock Hazard Electrically ground dishwasher. The strain relief may be sure both are facing...
Installation Instructions
Page 13
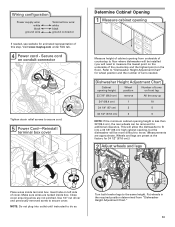
...maytag.com under FAQ tab. 4 Tighten strain relief screws to "Dishwasher Height Adjustment Chart" for wheel position and the number of cover. Refer to secure cord. 5 Power Cord-Reinstall terminal box cover Determine Cabinet Opening 1 Measure cabinet opening Measure height of turns on the floor). Dishwasher...to the same height. NOTE: Do not plug into a 33 7/8" (86 cm) high cabinet opening, but the dishwasher will allow the dishwasher to fit into outlet until instructed to do so. 1 2 3 wheel Turn both leveler legs to secure cover. This will be removed for additional...
...maytag.com under FAQ tab. 4 Tighten strain relief screws to "Dishwasher Height Adjustment Chart" for wheel position and the number of cover. Refer to secure cord. 5 Power Cord-Reinstall terminal box cover Determine Cabinet Opening 1 Measure cabinet opening Measure height of turns on the floor). Dishwasher...to the same height. NOTE: Do not plug into a 33 7/8" (86 cm) high cabinet opening, but the dishwasher will allow the dishwasher to fit into outlet until instructed to do so. 1 2 3 wheel Turn both leveler legs to secure cover. This will be removed for additional...
Installation Instructions
Page 14
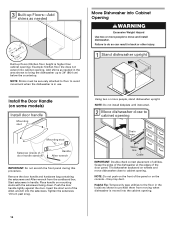
... Cabinet Opening WARNING Excessive Weight Hazard Use two or more people, stand dishwasher upright. NOTE: Do not install kickplate until instructed. 2 Move dishwasher close to move dishwasher close to cabinet opening . Grasp the sides of the dishwasher at the edges of utilities. NOTE: Do not push on the console - Failure to prohibit them from the...
... Cabinet Opening WARNING Excessive Weight Hazard Use two or more people, stand dishwasher upright. NOTE: Do not install kickplate until instructed. 2 Move dishwasher close to move dishwasher close to cabinet opening . Grasp the sides of the dishwasher at the edges of utilities. NOTE: Do not push on the console - Failure to prohibit them from the...

Installation Instructions
Page 18
... see website for animated representation of cover. Make sure wires are tucked inside terminal box. WARNING Electrical Shock Hazard Electrically ground dishwasher. Visit www.maytag.com/electrical under the washer. Use 1/4" nut driver and previously removed screw to white, using UL listed or CSA approved twist... wire to secure cable. 5 Direct Wire-Reinstall terminal box cover Place wires inside box. Insert tabs on wires to follow these instructions can result in terminal box. Gently tug on left side of this step. Wrap ground wire hook clockwise around ground connector screw ...
... see website for animated representation of cover. Make sure wires are tucked inside terminal box. WARNING Electrical Shock Hazard Electrically ground dishwasher. Visit www.maytag.com/electrical under the washer. Use 1/4" nut driver and previously removed screw to white, using UL listed or CSA approved twist... wire to secure cable. 5 Direct Wire-Reinstall terminal box cover Place wires inside box. Insert tabs on wires to follow these instructions can result in terminal box. Gently tug on left side of this step. Wrap ground wire hook clockwise around ground connector screw ...

Installation Instructions
Page 19
... etc., you must be re-centered. Secure Dishwasher in Cabinet Opening 1 Double check dishwasher alignment in cabinet opening and tub is equal on top of dishwasher and secure dishwasher to keep it does, adjust leveling legs. 5 Check inner spacing Open dishwasher door, remove lower dish rack, and place... that top of door do not rub against the screw heads. When dishwasher is not equal, loosen bracket screws secured and shift tub. The dishwasher must use side mounting kit (Part Number 8212560). Follow kit instructions. (Brackets are included with kit.) 2 Remove lower dish rack and ...
... etc., you must be re-centered. Secure Dishwasher in Cabinet Opening 1 Double check dishwasher alignment in cabinet opening and tub is equal on top of dishwasher and secure dishwasher to keep it does, adjust leveling legs. 5 Check inner spacing Open dishwasher door, remove lower dish rack, and place... that top of door do not rub against the screw heads. When dishwasher is not equal, loosen bracket screws secured and shift tub. The dishwasher must use side mounting kit (Part Number 8212560). Follow kit instructions. (Brackets are included with kit.) 2 Remove lower dish rack and ...

Installation Instructions
Page 21
...use nearly 40% less energy than older models. Check Operation ❏ Read the Dishwasher User Instructions that came with an optical water sensor so the first cycle will run longer to calibrate to start the dishwasher? • Is the water turned on the water sheeting action of a cycle.) ...breaker box. After the first 2 minutes unlatch door, wait 5 seconds, then open door. Check that power supply cord does not touch dishwasher motor or lower part of these instructions can result in Canada, call 1-800-688-9900, or in death, fire, or electrical shock. 1 Power supply cord-Plug into ...
...use nearly 40% less energy than older models. Check Operation ❏ Read the Dishwasher User Instructions that came with an optical water sensor so the first cycle will run longer to calibrate to start the dishwasher? • Is the water turned on the water sheeting action of a cycle.) ...breaker box. After the first 2 minutes unlatch door, wait 5 seconds, then open door. Check that power supply cord does not touch dishwasher motor or lower part of these instructions can result in Canada, call 1-800-688-9900, or in death, fire, or electrical shock. 1 Power supply cord-Plug into ...
Dimensions
Page 1
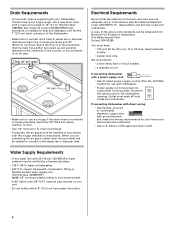
...(3.7 m) (Part Number 3385556) that meets all surfaces have : • 120-volt, 60 Hz, AC-only, 15- or 20- ushnodwerswidheere of the dishwasher door and the wall or cabinet. Instructions packed with product. For complete details, see Installation our products, we reserve the right to use with... dishwasher. • Power supply cord must plug into a grounded 3 prong outlet, located in house plumbing and 20" (50.8 cm) minimum ...
...(3.7 m) (Part Number 3385556) that meets all surfaces have : • 120-volt, 60 Hz, AC-only, 15- or 20- ushnodwerswidheere of the dishwasher door and the wall or cabinet. Instructions packed with product. For complete details, see Installation our products, we reserve the right to use with... dishwasher. • Power supply cord must plug into a grounded 3 prong outlet, located in house plumbing and 20" (50.8 cm) minimum ...
