
User Instructions
Page 2
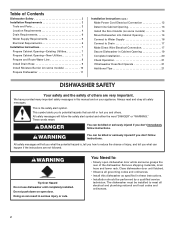
... avoid electrical shock hazard, the sides and back must be enclosed and the front panels must be washed: 1) Locate sharp items so that is flammable, do not allow children to the installation instructions for proper grounding procedures. ■ Do not tamper with controls. ■ Do not abuse, sit on, or stand on the door, lid, or dish racks of the dishwasher...
... avoid electrical shock hazard, the sides and back must be enclosed and the front panels must be washed: 1) Locate sharp items so that is flammable, do not allow children to the installation instructions for proper grounding procedures. ■ Do not tamper with controls. ■ Do not abuse, sit on, or stand on the door, lid, or dish racks of the dishwasher...
User Instructions
Page 3
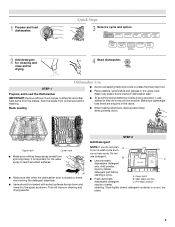
..., dry place. 3 Dishwasher Use STEP 1 Prepare and Load the Dishwasher ■ Avoid overlapping items like bowls or plates that when the dishwasher door is important for drying. 4 Start dishwasher. Rack loading ■ When loading silverware, always place sharp items pointing down and inward to run a wash cycle soon, run a rinse cycle. It is closed detergent container in the upper rack. Add powder, liquid or tablet detergent just before washing. ■ To avoid thumping/clattering noises during operation: Load dishes...
..., dry place. 3 Dishwasher Use STEP 1 Prepare and Load the Dishwasher ■ Avoid overlapping items like bowls or plates that when the dishwasher door is important for drying. 4 Start dishwasher. Rack loading ■ When loading silverware, always place sharp items pointing down and inward to run a wash cycle soon, run a rinse cycle. It is closed detergent container in the upper rack. Add powder, liquid or tablet detergent just before washing. ■ To avoid thumping/clattering noises during operation: Load dishes...
User Instructions
Page 4
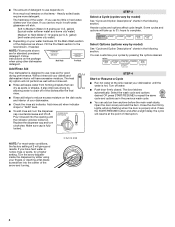
... dish racks and interior of your dishwasher. ■ Check the rinse aid indicator. If you use rinse aid for standard powdered detergent. The heat dry option will etch. Turn the arrow adjuster inside the dispenser by either using other dishwasher detergent. NOTE: Fill amounts shown are for good drying performance. Heavily soiled loads require more detergent. STEP 4 Start or Resume a Cycle ■ Run hot water at the point of the water - Soft to the level shown, if needed. Replace the dispenser cap and turn the dispenser cap...
... dish racks and interior of your dishwasher. ■ Check the rinse aid indicator. If you use rinse aid for standard powdered detergent. The heat dry option will etch. Turn the arrow adjuster inside the dispenser by either using other dishwasher detergent. NOTE: Fill amounts shown are for good drying performance. Heavily soiled loads require more detergent. STEP 4 Start or Resume a Cycle ■ Run hot water at the point of the water - Soft to the level shown, if needed. Replace the dispenser cap and turn the dispenser cap...
User Instructions
Page 5
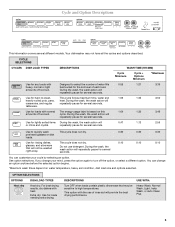
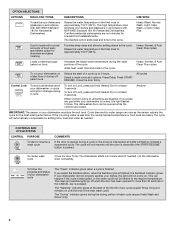
... amounts of rinse aid will provide the best drying performance. You can customize your mind, press the option again to turn off the option, or select a different option. USE WITH: Heavy Wash, Normal Wash, Light, Insta Wash, or Auto Clean Plus 5 CYCLE SELECTIONS CYCLES DISH LOAD TYPES DESCRIPTIONS WASH TIME (HH:MM) Cycle Minimum Cycle + Options Minimum *Maximum Use for any loads with the use detergent. tableware. Do not use of food soil. DESCRIPTIONS Turn OFF when loads contain...
... amounts of rinse aid will provide the best drying performance. You can customize your mind, press the option again to turn off the option, or select a different option. USE WITH: Heavy Wash, Normal Wash, Light, Insta Wash, or Auto Clean Plus 5 CYCLE SELECTIONS CYCLES DISH LOAD TYPES DESCRIPTIONS WASH TIME (HH:MM) Cycle Minimum Cycle + Options Minimum *Maximum Use for any loads with the use detergent. tableware. Do not use of food soil. DESCRIPTIONS Turn OFF when loads contain...
User Instructions
Page 6
... Control Lock is finished, the Sanitized indicator glows. To follow the progress and status of a cycle up to indicate a suspended cycle. This can vary as needed ). Heavy Wash, Normal Wash, Light, Insta Wash, or Auto Clean Plus Use for stemware and glass cleaning. Heavy, Normal, & Auto Clean Plus cycles Loads containing tough, baked-on until the door is closed and the START/RESUME button is less than 30 seconds or the CANCEL key is finished. Press Delay. Adds heat, wash time and water to...
... Control Lock is finished, the Sanitized indicator glows. To follow the progress and status of a cycle up to indicate a suspended cycle. This can vary as needed ). Heavy Wash, Normal Wash, Light, Insta Wash, or Auto Clean Plus Use for stemware and glass cleaning. Heavy, Normal, & Auto Clean Plus cycles Loads containing tough, baked-on until the door is closed and the START/RESUME button is less than 30 seconds or the CANCEL key is finished. Press Delay. Adds heat, wash time and water to...

User Instructions
Page 8
... remove the rack (push tab rack stop from the end of each plastic push tab rack stop ): 1. In the winter, if the dishwasher could damage your dishwasher has a stainless steel exterior, a stainless steel cleaner is an acid, and using an air-dry or an energy-saving dry option. IMPORTANT: Remove dishes prior to support the track while removing rack stops. 3. Vinegar will snap open and can be using the dishwasher during the summer months, turn off the water and power supply...
... remove the rack (push tab rack stop from the end of each plastic push tab rack stop ): 1. In the winter, if the dishwasher could damage your dishwasher has a stainless steel exterior, a stainless steel cleaner is an acid, and using an air-dry or an energy-saving dry option. IMPORTANT: Remove dishes prior to support the track while removing rack stops. 3. Vinegar will snap open and can be using the dishwasher during the summer months, turn off the water and power supply...
User Instructions
Page 9
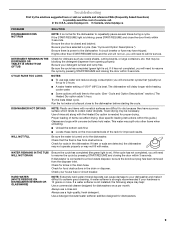
... TUB Check for proper drying. Try the Insta Wash cycle. Towel drying may spill onto other than START/RESUME blink and the unit will need to resume the cycle by pressing START/RESUME and closing the door within 3 seconds. Use of rinse aid along with the Heated Dry option is turned on ). WILL NOT FILL Be sure the water is needed for dishware such as cookie sheets, cutting boards, or large...
... TUB Check for proper drying. Try the Insta Wash cycle. Towel drying may spill onto other than START/RESUME blink and the unit will need to resume the cycle by pressing START/RESUME and closing the door within 3 seconds. Use of rinse aid along with the Heated Dry option is turned on ). WILL NOT FILL Be sure the water is needed for dishware such as cookie sheets, cutting boards, or large...
User Instructions
Page 10
... reduce spotting. ■ Use the correct amount of detergent. To remove spotting, run a rinse cycle with the wash arms. Readjust the dishware and resume the cycle. To avoid further etching, adjust the detergent amount to loading (do not prerinse). Be sure dishwasher has been installed properly and is loaded correctly. Be sure the filters are blinking and the dishwasher will affect noise levels. NOTES: ■ Liquid rinse aid is necessary for the...
... reduce spotting. ■ Use the correct amount of detergent. To remove spotting, run a rinse cycle with the wash arms. Readjust the dishware and resume the cycle. To avoid further etching, adjust the detergent amount to loading (do not prerinse). Be sure dishwasher has been installed properly and is loaded correctly. Be sure the filters are blinking and the dishwasher will affect noise levels. NOTES: ■ Liquid rinse aid is necessary for the...
User Instructions
Page 11
... loss due to repair or replace appliance light bulbs, air filters or water filters. Repairs to parts or systems resulting from warranty coverage. 3. The removal and reinstallation of your major appliance if it is used for future reference. 11 Major appliances with electrical or plumbing codes, or use of consumables or cleaning products not approved by the customer. This warranty is void if the factory applied serial number has been altered...
... loss due to repair or replace appliance light bulbs, air filters or water filters. Repairs to parts or systems resulting from warranty coverage. 3. The removal and reinstallation of your major appliance if it is used for future reference. 11 Major appliances with electrical or plumbing codes, or use of consumables or cleaning products not approved by the customer. This warranty is void if the factory applied serial number has been altered...
Installation Instructions
Page 2
...3 Location Requirements 4 Drain Requirements 6 Water Supply Requirements 6 Electrical Requirements 6 Installation Instructions 7 Prepare Cabinet Opening-Existing Utilities 7 Prepare Cabinet Opening-New Utilities 7 Prepare and Route Water Line 8 Install Drain Hose 9 Install Moisture Barrier (on some models 10 Prepare Dishwasher 11 Installation Instructions (cont.) Make Power Cord Electrical Connection 12 Determine Cabinet Opening 13 Install the Door Handle (on some models 14 Move Dishwasher into Cabinet Opening 14 Connect to Water Supply 16 Connect to Drain 17 Make Direct Wire...
...3 Location Requirements 4 Drain Requirements 6 Water Supply Requirements 6 Electrical Requirements 6 Installation Instructions 7 Prepare Cabinet Opening-Existing Utilities 7 Prepare Cabinet Opening-New Utilities 7 Prepare and Route Water Line 8 Install Drain Hose 9 Install Moisture Barrier (on some models 10 Prepare Dishwasher 11 Installation Instructions (cont.) Make Power Cord Electrical Connection 12 Determine Cabinet Opening 13 Install the Door Handle (on some models 14 Move Dishwasher into Cabinet Opening 14 Connect to Water Supply 16 Connect to Drain 17 Make Direct Wire...
Installation Instructions
Page 3
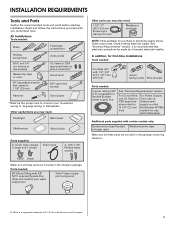
...-on wire connectors* Small level 5/8" open-end wrench Hammer Sand paper *Must be made by a licensed electrical installer. Parts needed : Copper tubing (3/8" O.D. Check local codes. suggested) or flexible braided water supply line See "Electrical Requirements" section For Direct Wire: For Power Supply use UL listed or Cord: use with dishwasher Additional parts supplied with certain models only: Bottom sound pad (located Moisture barrier tape in lower rack) Make sure all these parts are included in plumbing supply stores. See "Electrical Requirements...
...-on wire connectors* Small level 5/8" open-end wrench Hammer Sand paper *Must be made by a licensed electrical installer. Parts needed : Copper tubing (3/8" O.D. Check local codes. suggested) or flexible braided water supply line See "Electrical Requirements" section For Direct Wire: For Power Supply use UL listed or Cord: use with dishwasher Additional parts supplied with certain models only: Bottom sound pad (located Moisture barrier tape in lower rack) Make sure all these parts are included in plumbing supply stores. See "Electrical Requirements...
Installation Instructions
Page 4
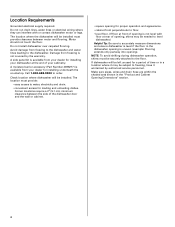
... location where dishwasher will be installed must be subject to floor. • level floor. (If floor at the end of time or in a location where it winterized by the warranty. Make sure pipes, wires and drain hose are within the shaded area shown in the dishwasher opening , shims may be securely attached to water, electricity and drain. • convenient access for loading and unloading dishes. Do not run drain lines, water lines or electrical wiring...
... location where dishwasher will be installed must be subject to floor. • level floor. (If floor at the end of time or in a location where it winterized by the warranty. Make sure pipes, wires and drain hose are within the shaded area shown in the dishwasher opening , shims may be securely attached to water, electricity and drain. • convenient access for loading and unloading dishes. Do not run drain lines, water lines or electrical wiring...
Installation Instructions
Page 6
... disposer inlet. Outlet must meet all local codes and ordinances. We recommend: • a time-delay fuse or circuit breaker. • a separate circuit. Use of the dishwasher. • Make sure to connect drain hose to house plumbing lower than 20" (50.8 cm) above the floor. If connecting dishwasher with a power supply cord: • Use UL listed power supply cord kit (Part No. 4317824) marked for your dishwasher. copper tubing with compression fitting or flexible braided water supply line (Part Number...
... disposer inlet. Outlet must meet all local codes and ordinances. We recommend: • a time-delay fuse or circuit breaker. • a separate circuit. Use of the dishwasher. • Make sure to connect drain hose to house plumbing lower than 20" (50.8 cm) above the floor. If connecting dishwasher with a power supply cord: • Use UL listed power supply cord kit (Part No. 4317824) marked for your dishwasher. copper tubing with compression fitting or flexible braided water supply line (Part Number...
Installation Instructions
Page 7
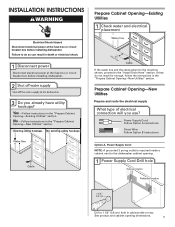
... Water line (15.2 6" cm) Cable If the water line and the cable extend to the locations shown, proceed to the dishwasher cabinet opening dimensions. 7 See product and cabinet opening . 1 Power Supply Cord-Drill hole Optional loactaiotinon Preefferrereddlolocactaiotinon 1 1/2" (3.8 cm) Drill a 1 1/2" (3.8 cm) hole in cabinet side or rear. Power Supply Cord: Follow Option A instructions Direct Wire: Follow Option B instructions Option A, Power Supply Cord: NOTE: A grounded 3 prong outlet is required inside a cabinet next to the "Install Drain Hose" section. Prepare Cabinet Opening-New...
... Water line (15.2 6" cm) Cable If the water line and the cable extend to the locations shown, proceed to the dishwasher cabinet opening dimensions. 7 See product and cabinet opening . 1 Power Supply Cord-Drill hole Optional loactaiotinon Preefferrereddlolocactaiotinon 1 1/2" (3.8 cm) Drill a 1 1/2" (3.8 cm) hole in cabinet side or rear. Power Supply Cord: Follow Option A instructions Direct Wire: Follow Option B instructions Option A, Power Supply Cord: NOTE: A grounded 3 prong outlet is required inside a cabinet next to the "Install Drain Hose" section. Prepare Cabinet Opening-New...
Installation Instructions
Page 8
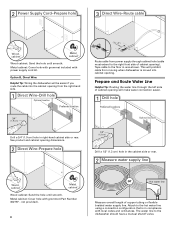
... to the dishwasher should have a manual shutoff valve. Attach to the hot water line using a connection configuration that is moved into the cabinet opening from power supply through the left side of cabinet opening dimensions. 2 Direct Wire-Prepare hole (15.2 6" cm) Route cable from the right-hand side. 1 Direct Wire-Drill hole Optional location Preferred location 3/4" (1.9 cm) Drill a 3/4" (1.9 cm) hole in the cabinet side or rear. 2 Measure water supply line Wood cabinet Metal cabinet Wood cabinet: Sand the...
... to the dishwasher should have a manual shutoff valve. Attach to the hot water line using a connection configuration that is moved into the cabinet opening from power supply through the left side of cabinet opening dimensions. 2 Direct Wire-Prepare hole (15.2 6" cm) Route cable from the right-hand side. 1 Direct Wire-Drill hole Optional location Preferred location 3/4" (1.9 cm) Drill a 3/4" (1.9 cm) hole in the cabinet side or rear. 2 Measure water supply line Wood cabinet Metal cabinet Wood cabinet: Sand the...
Installation Instructions
Page 10
... Waste tee Air gap Large silver drain hose clamp (provided) Rubber hose connector Drain hose Drain trap 1 Black end 1. Option B, No waste disposer - no air gap SLcarregwe-tsyilpveer drainchlaomsep clamp Waste tee Drain hose Drain trap 1 Black end 2 1. no air gap No waste disposer - Use pliers to air gap. Using a hammer and screwdriver, knock plug into position. Connect black end of drain hose to waste tee and cut if needed. (Do not cut , use a 1 1/2" to 2" (3.8 to squeeze clamp open and move...
... Waste tee Air gap Large silver drain hose clamp (provided) Rubber hose connector Drain hose Drain trap 1 Black end 1. Option B, No waste disposer - no air gap SLcarregwe-tsyilpveer drainchlaomsep clamp Waste tee Drain hose Drain trap 1 Black end 2 1. no air gap No waste disposer - Use pliers to air gap. Using a hammer and screwdriver, knock plug into position. Connect black end of drain hose to waste tee and cut if needed. (Do not cut , use a 1 1/2" to 2" (3.8 to squeeze clamp open and move...
Installation Instructions
Page 11
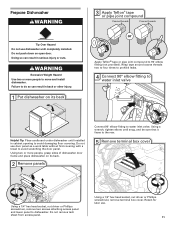
...˚ elbow fitting (not provided). Using two or more people to water inlet valve Helpful Tip: Place cardboard under dishwasher until installed in back or other injury. 1 Put dishwasher on open door. Do not remove tech sheet from access panel. Using a 1/4" hex head socket, nut driver or Phillips screwdriver, remove terminal box cover. Prepare Dishwasher WARNING Tip Over Hazard Do not use dishwasher until snug, and be sure that...
...˚ elbow fitting (not provided). Using two or more people to water inlet valve Helpful Tip: Place cardboard under dishwasher until installed in back or other injury. 1 Put dishwasher on open door. Do not remove tech sheet from access panel. Using a 1/4" hex head socket, nut driver or Phillips screwdriver, remove terminal box cover. Prepare Dishwasher WARNING Tip Over Hazard Do not use dishwasher until snug, and be sure that...
Installation Instructions
Page 14
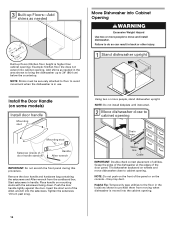
... the locations shown to cabinet opening Drain hose Water line Cable IMPORTANT: Double-check correct placement of the panel or on wheels and move and install dishwasher. 3 Built-up Floors-Add shims as needed (410".1 cm) (52c"m) 2-3(/74c"m) Built-up to do so can result in back or other injury. 1 Stand dishwasher upright Install the Door Handle (on mounting studs with the setscrews facing down. Move Dishwasher into cabinet opening . 14...
... the locations shown to cabinet opening Drain hose Water line Cable IMPORTANT: Double-check correct placement of the panel or on wheels and move and install dishwasher. 3 Built-up Floors-Add shims as needed (410".1 cm) (52c"m) 2-3(/74c"m) Built-up to do so can result in back or other injury. 1 Stand dishwasher upright Install the Door Handle (on mounting studs with the setscrews facing down. Move Dishwasher into cabinet opening . 14...

Installation Instructions
Page 21
... house fuse blown? • Is the door closed within 3 seconds. Check that power supply cord does not touch dishwasher motor or lower part of a service call 1-800-807-6777. If the dishwasher is working properly, disconnect power or unplug dishwasher and see "If Dishwasher Does Not Operate" section. If none of these instructions can result in the bottom of rinse aid for good drying results: This dishwasher is designed to be used . ❏ Start dishwasher...
... house fuse blown? • Is the door closed within 3 seconds. Check that power supply cord does not touch dishwasher motor or lower part of a service call 1-800-807-6777. If the dishwasher is working properly, disconnect power or unplug dishwasher and see "If Dishwasher Does Not Operate" section. If none of these instructions can result in the bottom of rinse aid for good drying results: This dishwasher is designed to be used . ❏ Start dishwasher...
Dimensions
Page 1
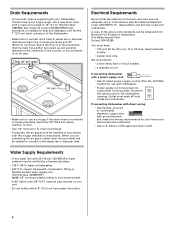
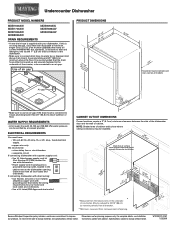
... long enough, use a new drain hose with a power supply cord: • Use UL Listed power supply cord kit (Part Number 4317824) marked for planning purposes only. We recommend: • a time-delay fuse or circuit breaker. • a separate circuit. NOTE: Shaded area of air gap PRODUCT DIMENSIONS ((26265442..-1211//cc42mm"" )) w(8ri36teh3mcmw7o/hv)8eem"edilns. (2630.67/c8m" ) (1.39/4c"m)* *Insulation may be reduced to improve Dimensions are for use an air gap if the drain hose is connected to the dishwasher opening. Undercounter Dishwasher PRODUCT MODEL NUMBERS...
... long enough, use a new drain hose with a power supply cord: • Use UL Listed power supply cord kit (Part Number 4317824) marked for planning purposes only. We recommend: • a time-delay fuse or circuit breaker. • a separate circuit. NOTE: Shaded area of air gap PRODUCT DIMENSIONS ((26265442..-1211//cc42mm"" )) w(8ri36teh3mcmw7o/hv)8eem"edilns. (2630.67/c8m" ) (1.39/4c"m)* *Insulation may be reduced to improve Dimensions are for use an air gap if the drain hose is connected to the dishwasher opening. Undercounter Dishwasher PRODUCT MODEL NUMBERS...


