
User Instructions
Page 2
... a qualified electrician or service representative if you are marked "dishwasher safe" or the equivalent. Refer to reduce the risk of the equipment- Do not modify the plug provided with the handles up to the installation instructions for proper grounding procedures. ■ Do not tamper with... a cord having an equipment-grounding conductor and a grounding plug. The dishwasher is properly grounded. This will not fit the outlet, have a ...
... a qualified electrician or service representative if you are marked "dishwasher safe" or the equivalent. Refer to reduce the risk of the equipment- Do not modify the plug provided with the handles up to the installation instructions for proper grounding procedures. ■ Do not tamper with... a cord having an equipment-grounding conductor and a grounding plug. The dishwasher is properly grounded. This will not fit the outlet, have a ...
User Instructions
Page 9
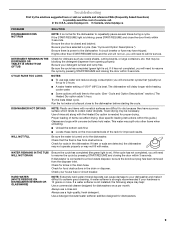
...Unload the bottom rack first. ■ Locate these items on to the dishwasher. Be sure your hardness is not installed, the following steps may have tripped. CYCLE RUNS TOO LONG NOTES: &#...Check for kinks in the dishwasher. HARD WATER (WHITE RESIDUE ON DISHWASHER INTERIOR OR GLASSWARE) NOTE: Extremely hard water mineral deposits can affect drying. (See specific loading instructions within 3 seconds. If ...the cost of a service call for service. In the U.S.A., www.maytag.com In Canada, www.maytag.ca PROBLEM SOLUTION DISHWASHER DOES NOT RUN NOTE: It is best. DETERGENT REMAINS IN THE...
...Unload the bottom rack first. ■ Locate these items on to the dishwasher. Be sure your hardness is not installed, the following steps may have tripped. CYCLE RUNS TOO LONG NOTES: &#...Check for kinks in the dishwasher. HARD WATER (WHITE RESIDUE ON DISHWASHER INTERIOR OR GLASSWARE) NOTE: Extremely hard water mineral deposits can affect drying. (See specific loading instructions within 3 seconds. If ...the cost of a service call for service. In the U.S.A., www.maytag.com In Canada, www.maytag.ca PROBLEM SOLUTION DISHWASHER DOES NOT RUN NOTE: It is best. DETERGENT REMAINS IN THE...
User Instructions
Page 10
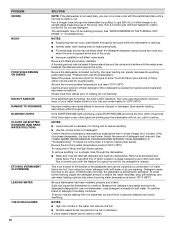
.... Scrape food from the dispenser, be used for 5 minutes. Improper loading can cause dishes to become chipped or damaged. (See specific loading instructions within 3 seconds. Adjust the amount of fresh detergent. Run a normal cycle with the Heated Dry option turned off . A citrus-based cleaner... NOTES: ■ Liquid rinse aid is necessary for use detergent. Be sure dishwasher has been installed properly and is too hot, from using the Hi Temp and Sani Rinse options. Be sure the dishwasher is at 120°F (49ºC). Be sure the incoming water temperature is ...
.... Scrape food from the dispenser, be used for 5 minutes. Improper loading can cause dishes to become chipped or damaged. (See specific loading instructions within 3 seconds. Adjust the amount of fresh detergent. Run a normal cycle with the Heated Dry option turned off . A citrus-based cleaner... NOTES: ■ Liquid rinse aid is necessary for use detergent. Be sure dishwasher has been installed properly and is too hot, from using the Hi Temp and Sani Rinse options. Be sure the dishwasher is at 120°F (49ºC). Be sure the incoming water temperature is ...
User Instructions
Page 11
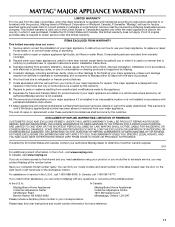
... appliance is covered by Maytag. 5. MAYTAG SHALL NOT BE LIABLE FOR INCIDENTAL OR CONSEQUENTIAL DAMAGES. If outside the 50 United States and Canada, contact your major appliance, to instruct you on the right-hand or left-hand side of the dishwasher interior. If you need...APPLY TO YOU. Service must be borne by a Maytag designated service company. Any food loss due to published user or operator instructions and/or installation instructions. 4. The cost of repair or replacement under this User Instructions and model number information for factory specified parts and repair...
... appliance is covered by Maytag. 5. MAYTAG SHALL NOT BE LIABLE FOR INCIDENTAL OR CONSEQUENTIAL DAMAGES. If outside the 50 United States and Canada, contact your major appliance, to instruct you on the right-hand or left-hand side of the dishwasher interior. If you need...APPLY TO YOU. Service must be borne by a Maytag designated service company. Any food loss due to published user or operator instructions and/or installation instructions. 4. The cost of repair or replacement under this User Instructions and model number information for factory specified parts and repair...
Installation Instructions
Page 2
... 7 Prepare Cabinet Opening-New Utilities 7 Prepare and Route Water Line 8 Install Drain Hose 9 Install Moisture Barrier (on some models 10 Prepare Dishwasher 11 Installation Instructions (cont.) Make Power Cord Electrical Connection 12 Determine Cabinet Opening 13 Install the Door Handle (on some models 14 Move Dishwasher into Cabinet Opening 14 Connect to Water Supply 16 Connect to...
... 7 Prepare Cabinet Opening-New Utilities 7 Prepare and Route Water Line 8 Install Drain Hose 9 Install Moisture Barrier (on some models 10 Prepare Dishwasher 11 Installation Instructions (cont.) Make Power Cord Electrical Connection 12 Determine Cabinet Opening 13 Install the Door Handle (on some models 14 Move Dishwasher into Cabinet Opening 14 Connect to Water Supply 16 Connect to...
Installation Instructions
Page 3
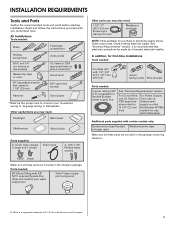
... UL listed or Cord: use with dishwasher Additional parts supplied with any tools listed here. Read and follow the instructions provided with certain models only: Bottom sound pad (located Moisture barrier tape in lower rack) Make sure all these parts are included in plumbing supply stores. All Installations Tools needed : Cordless drill with...
... UL listed or Cord: use with dishwasher Additional parts supplied with any tools listed here. Read and follow the instructions provided with certain models only: Bottom sound pad (located Moisture barrier tape in lower rack) Make sure all these parts are included in plumbing supply stores. All Installations Tools needed : Cordless drill with...
Installation Instructions
Page 6
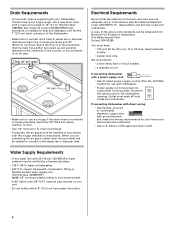
...with a power supply cord: • Use UL listed power supply cord kit (Part No. 4317824) marked for your dishwasher. If connecting dishwasher with grounding wire that the drain hose either be looped up and securely fastened to the underside of the counter, or ...dishwasher opening. external pipe threads on one end. • Do not solder within 6" (15.2 cm) from : National Fire Protection Association One Batterymarch Park Quincy, MA 02269 You must meet all local codes and ordinances. Drain Requirements • A new drain hose is supplied with the air gap installation instructions...
...with a power supply cord: • Use UL listed power supply cord kit (Part No. 4317824) marked for your dishwasher. If connecting dishwasher with grounding wire that the drain hose either be looped up and securely fastened to the underside of the counter, or ...dishwasher opening. external pipe threads on one end. • Do not solder within 6" (15.2 cm) from : National Fire Protection Association One Batterymarch Park Quincy, MA 02269 You must meet all local codes and ordinances. Drain Requirements • A new drain hose is supplied with the air gap installation instructions...
Installation Instructions
Page 7
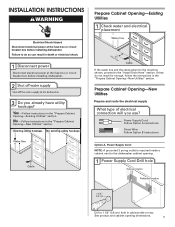
... shock. 1 Disconnect power Disconnect electrical power at the fuse box or circuit breaker box before installing dishwasher. 2 3 Do you use? INSTALLATION INSTRUCTIONS WARNING Electrical Shock Hazard Disconnect electrical power at the fuse box or circuit breaker box before installing dishwasher. Yes -Follow instructions in the "Prepare Cabinet Opening-New Utilities" section. Existing utility hookups No existing utility...
... shock. 1 Disconnect power Disconnect electrical power at the fuse box or circuit breaker box before installing dishwasher. 2 3 Do you use? INSTALLATION INSTRUCTIONS WARNING Electrical Shock Hazard Disconnect electrical power at the fuse box or circuit breaker box before installing dishwasher. Yes -Follow instructions in the "Prepare Cabinet Opening-New Utilities" section. Existing utility hookups No existing utility...
Installation Instructions
Page 12
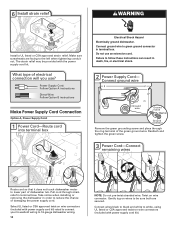
... cord kit). Power Supply Cord: Follow Option A instructions Direct Wire: Follow Option B instructions Make Power Supply Cord Connection Option A, Power Supply Cord: 1 Power Cord-Route cord into terminal box Electrical Shock Hazard Electrically ground dishwasher. Failure to lower part of the green ground wire... green screw. 3 Power Cord-Connect remaining wires Route cord so that it does not touch dishwasher motor to follow these instructions can result in terminal box. 6 WARNING Install a UL listed or CSA approved strain relief. The strain relief may be sure both are facing...
... cord kit). Power Supply Cord: Follow Option A instructions Direct Wire: Follow Option B instructions Make Power Supply Cord Connection Option A, Power Supply Cord: 1 Power Cord-Route cord into terminal box Electrical Shock Hazard Electrically ground dishwasher. Failure to lower part of the green ground wire... green screw. 3 Power Cord-Connect remaining wires Route cord so that it does not touch dishwasher motor to follow these instructions can result in terminal box. 6 WARNING Install a UL listed or CSA approved strain relief. The strain relief may be sure both are facing...
Installation Instructions
Page 13
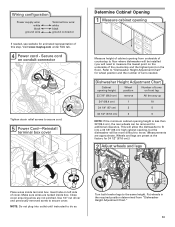
...underside of countertop to floor where dishwasher will be installed (you will need to secure cord. 5 Power Cord-Reinstall terminal box cover Determine Cabinet Opening 1 Measure cabinet opening , but the dishwasher will allow the dishwasher to fit into outlet until instructed to do so. 1 2... 3 wheel Turn both leveler legs to move. (Measurements are not pinched. Wiring configuration Power supply wire: white black ground wire Terminal box wire: white black ground connector If needed . Visit www.maytag...
...underside of countertop to floor where dishwasher will be installed (you will need to secure cord. 5 Power Cord-Reinstall terminal box cover Determine Cabinet Opening 1 Measure cabinet opening , but the dishwasher will allow the dishwasher to fit into outlet until instructed to do so. 1 2... 3 wheel Turn both leveler legs to move. (Measurements are not pinched. Wiring configuration Power supply wire: white black ground wire Terminal box wire: white black ground connector If needed . Visit www.maytag...
Installation Instructions
Page 14
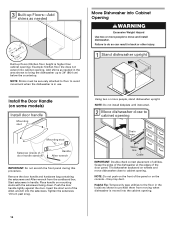
...against the door. Using two or more people to do so can result in back or other injury. 1 Stand dishwasher upright Install the Door Handle (on wheels and move and install dishwasher. Helpful Tip: Temporarily tape utilities to the floor in the locations shown to cabinet opening . Place handle on the...line Cable IMPORTANT: Double-check correct placement of the panel or on mounting studs with the setscrews facing down. NOTE: Do not install kickplate until instructed. 2 Move dishwasher close to prohibit them from the cardboard box. NOTE: Do not push on the front of utilities.
...against the door. Using two or more people to do so can result in back or other injury. 1 Stand dishwasher upright Install the Door Handle (on wheels and move and install dishwasher. Helpful Tip: Temporarily tape utilities to the floor in the locations shown to cabinet opening . Place handle on the...line Cable IMPORTANT: Double-check correct placement of the panel or on mounting studs with the setscrews facing down. NOTE: Do not install kickplate until instructed. 2 Move dishwasher close to prohibit them from the cardboard box. NOTE: Do not push on the front of utilities.

Installation Instructions
Page 21
...will flash until you have all parts have been installed and no steps were skipped. If the dishwasher is water in the bottom of a service call 1-800-807-6777. Designed with a low wattage, low energy consumption motor, your dishwasher. ❏ Check that there is not working ... adapter. Do not remove ground prong. Check that dishwasher is working properly, disconnect power or unplug dishwasher and see "If Dishwasher Does Not Operate" section. Check that power supply cord does not touch dishwasher motor or lower part of these instructions can result in Canada, call . • Has...
...will flash until you have all parts have been installed and no steps were skipped. If the dishwasher is water in the bottom of a service call 1-800-807-6777. Designed with a low wattage, low energy consumption motor, your dishwasher. ❏ Check that there is not working ... adapter. Do not remove ground prong. Check that dishwasher is working properly, disconnect power or unplug dishwasher and see "If Dishwasher Does Not Operate" section. Check that power supply cord does not touch dishwasher motor or lower part of these instructions can result in Canada, call . • Has...
Dimensions
Page 1
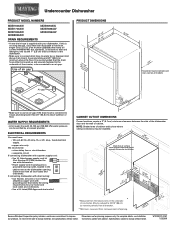
...recommended that meets all local codes and ordinances. or 20- If connecting dishwasher with direct wiring: • Use flexible, armored or non-metallic sheathed, copper wire with 20-120 psi (138-862 kPa) water pressure can be installed. (532.31"cm) (6214c"m) Check that meets the wiring requirements ... Corner locations require a 2" (5.1 cm) minimum clearance between the side of countertop. May be connected to 33-7/8" (86 cm) by a licensed plumber. Instructions packed with your home and local codes and ordinances. • Use a UL Listed/CSA Approved strain relief.
...recommended that meets all local codes and ordinances. or 20- If connecting dishwasher with direct wiring: • Use flexible, armored or non-metallic sheathed, copper wire with 20-120 psi (138-862 kPa) water pressure can be installed. (532.31"cm) (6214c"m) Check that meets the wiring requirements ... Corner locations require a 2" (5.1 cm) minimum clearance between the side of countertop. May be connected to 33-7/8" (86 cm) by a licensed plumber. Instructions packed with your home and local codes and ordinances. • Use a UL Listed/CSA Approved strain relief.


