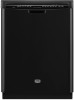
Maytag MDB7749SBB Support Question
Maytag MDB7749SBB Support Question
Find answers below for this question about Maytag MDB7749SBB.Need a Maytag MDB7749SBB manual? We have 5 online manuals for this item!
Question posted by rickeevee on June 22nd, 2013
When Installing D.washer Mdb7749sbb .where Do I Put The Wall Plug
iam installing a dishwasher.i need to know where on the wall behind the machine to install wall outlets so not to get in the way of installation
Current Answers
Answer #1: Posted by TommyKervz on June 22nd, 2013 10:46 AM
TommyKervz

Member since:
January 10th, 2013 Points: 17,776,843

Member since:
January 10th, 2013 Points: 17,776,843
Greetings - The first two documentations on the link below (Istallation Guide and the User & Care Guide in pdf format) for free download should be able to help precisely with your desired instructions.
http://www.helpowl.com/manuals/Maytag/MDB7749SBB/186809
Hope this helps
http://www.helpowl.com/manuals/Maytag/MDB7749SBB/186809
Hope this helps
Related Maytag MDB7749SBB Manual Pages
Warranty Information - Page 1

... plumbing codes, or use your major appliance, to obtain service under these parts that prevent function of the dishwasher and that vary from the date of original purchase, when this major appliance is installed, operated and maintained according to instructions attached to use of products not approved by calling
Maytag. In Canada...
Use & Care Guide - Page 2
...or discarding it will not fit the outlet, have a proper outlet installed by providing a path of electric shock. The dishwasher is flammable, do not allow children ...plug must be plugged into an appropriate outlet that is properly grounded. Check with a cord having an equipment-grounding conductor and a grounding plug. Do not modify the plug provided with controls.
■ Use the dishwasher...
Use & Care Guide - Page 10
... dishwasher. Be sure you will need to call . Proper loading of rinse aid along with nonstick surfaces are detected, the dishwasher may not operate properly or may be sure the knockout plug ...,
WILL NOT DRAIN
you will need to 3 hours.
■ A water heater setting of the rack for 3 seconds to achieve good cleaning. If dishwasher is not installed, the following steps may be ...
Use & Care Guide - Page 11
... is due to overflow.
Adjust the amount of detergent if sudsing continues.
No detergent is needed . Detergent needs food soil to 120ºF (49ºC).
A thumping sound may not be used for....
NOTES: ■ Surging sounds can discolor the tub or dishware. Be sure dishwasher has been installed properly and is ready to loading (do not prerinse). PROBLEM ODORS
NOISY
FOOD SOILS ...
Use & Care Guide - Page 12

.... MAYTAG SHALL NOT BE LIABLE FOR INCIDENTAL OR CONSEQUENTIAL DAMAGES. If you think you need repair service, first see the "Troubleshooting" section of merchantability or fitness, so this ... and/or installation instructions.
2. In Canada, call 1-800-688-9900. This limited warranty is not available.
9. Service calls to province. The removal and reinstallation of the dishwasher and that ...
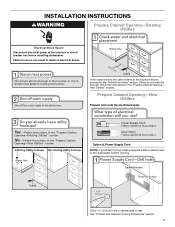
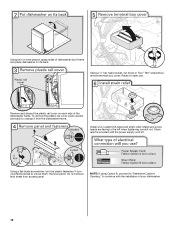
Installation Guide - Page 2
... is installed or removed, to reduce the likelihood of damage to potential hazards that the dishwasher is completely enclosed at the time of others . WARNING: To reduce the risk of electric shock, fire, or injury to meet all safety messages.
This is , tell you how to : ■ Slowly open door.
You Need to...
Installation Guide - Page 3
... literature package.
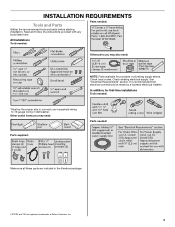
†®TORX and T20 are included in dishwasher. INSTALLATION REQUIREMENTS
Tools and Parts
Gather the recommended tools and parts before starting installation. Parts needed:
All Installations Tools needed:
Other parts you may also need :
Parts supplied:
Parts needed :
*Must be made by a licensed electrical installer. See "Electrical Requirements" section.
Installation Guide - Page 4
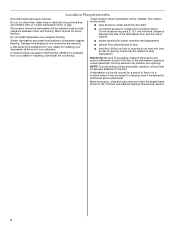
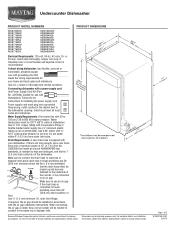
...dishwasher will be installed. Corner locations require a 2" (5.1 cm) minimum clearance between motor and flooring.
If dishwasher will be needed to level dishwasher.)
Helpful Tip: Be sure to water, electricity and drain. Check location where dishwasher will be installed...partway into opening for a period of the dishwasher door and the wall or cabinet.
The location must be subject...
Installation Guide - Page 6
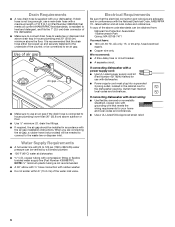
...water pressure can be installed in accordance with ...washer. ■ Do not solder within 6" (15.2 cm) of the dishwasher.
■ Make sure to connect drain hose to the dishwasher opening. copper tubing with the National Electrical Code, ANSI/NFPA 70 -
We recommend:
■ A time-delay fuse or circuit breaker.
■ A separate circuit. Outlet must plug into a grounded 3 prong outlet...
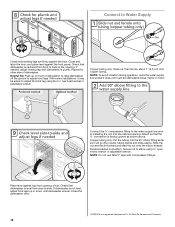
Installation Guide - Page 7
... Hazard Disconnect electrical power at the fuse box or circuit breaker box before installing dishwasher. Failure to do not reach far enough, follow the instructions in death ...: A grounded 3 prong outlet is required inside a cabinet next to the "Install Drain Hose" section.
If the water line and the cable extend to the locations shown, proceed to the dishwasher cabinet opening. If they ...
Installation Guide - Page 9
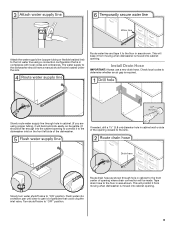
Install Drain Hose
IMPORTANT: Always use a new drain hose. Check local codes to the floor in area ...using a connection configuration that could clog the inlet valve. If needed, drill a 1¹⁄₂" (3.8 cm) diameter hole in cabinet wall or side of particles that is moved into cabinet opening closest to the dishwasher should be made. This will bend and kink easily, so be...
Installation Guide - Page 10
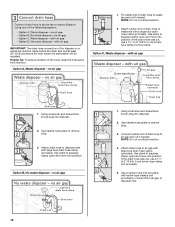
...8322;" to 2" (3.8 to 5 cm) screwtype clamp (not provided). If the drain hose was cut if needed . NOTE: Do not cut ribbed section.
2. Use pliers to squeeze clamp open and move into position. ...and at least 20" (50.8 cm) above the floor where the dishwasher will be installed. Using a hammer and screwdriver, knock plug into disposer.
2. Option B, No waste disposer - Use pliers to squeeze...
Installation Guide - Page 11
... hose clamp (provided). Use a rubber hose (not provided) with a towel to air gap and cut if needed. Remove and discard the foam blocks located above the front legs on the dishwasher. Do not use dishwasher until installed in serious injury or cuts. Failure to do so can result in cabinet opening to air gap...
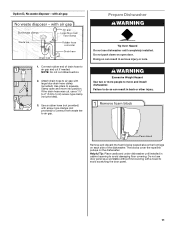
Installation Guide - Page 12
... a ¹⁄₄" hex head socket, nut driver or Torx® T20® screwdriver, remove terminal box cover. Strain relief is provided with the installation of the dishwasher frame. Remove panel. Remove and discard the plastic rail cover on its back. To remove the plastic rail cover, push upward and back to...
Installation Guide - Page 14
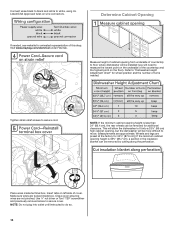
... Opening
If needed, see website for animated representation of turns needed. Refer to "Dishwasher Height Adjustment Chart" for additional clearance. This will allow the dishwasher to fit into outlet until instructed .... NOTE: Do not plug into a 33⁷⁄₈" (86 cm) high cabinet opening from underside of countertop to floor where dishwasher will be installed (you will be removed...
Installation Guide - Page 15
... Hazard Use two or more people, stand the dishwasher up floors: If the kitchen floor is wood, laminate or another hard surface, install using Option Number 1 if the countertop is higher...the brackets using Option Number 2.
for the other injury. Using a pair of the dishwasher collar as needed in the parts bag. Repeat this step for example, the kitchen floor tile does...
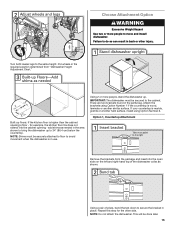
Installation Guide - Page 16
... Opening
WARNING
Excessive Weight Hazard Use two or more people to prohibit them from falling into slot on wheels and move and install dishwasher.
With another person holding the rear of the dishwasher to keep screws from moving when dishwasher is installed.
This will keep it keeps the bracket in toward the side of the...
Installation Guide - Page 18
... and ferrule forward and start the nut onto the elbow threads. NOTE: Do not use Teflon®† tape with compression fittings. If needed, adjust leveling leg until dishwasher is centered from side-to installing the unit into the 90° elbow fitting as far as shown above. Repeat for other side of...
Installation Guide - Page 23
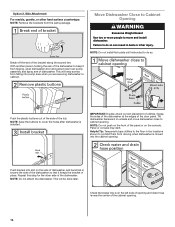
...
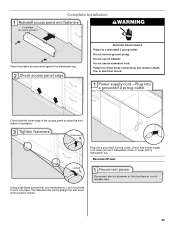
Using a flat-blade screwdriver, turn the fasteners ¹⁄₄ turn clockwise to follow these instructions can result in death, fire, or electrical shock. Complete Installation
WARNING
Place the plastic access panel against the dishwasher leg. Do not remove ground prong.
Adjust if necessary.
Electrical Shock Hazard Plug into a grounded 3 prong outlet.
Dimension Guide - Page 1
... air gap should be needed to connect to an air gap. When connecting the air gap a rubber hose (not provided) will be installed in accordance with product....the kit instructions for your dishwasher. Outlet must meet all current AHAM/IAPMO test standards, is supplied with ³⁄₄" N.P.T. Water temperature must plug into a grounded three-prong, outlet, located in house plumbing...
Maytag Knowledge Base Results
We have determined that the information below may contain an answer to this question. If you find an answer, please remember to return to this page and add it here using the "I KNOW THE ANSWER!" button above. It's that easy to earn points!-
Vibration - Top-load washer
... for removal of the strap. The washer must be level and all four feet firmly touching the floor? Play the sound of the machine? The image below shows the shipping ... and basket should move the washer at the controls area (console). The image below give examples of the washer with shipping strap still in the washer. See the Installation Instructions for levelness. Once level... -
Causes of odor in my front-load washer
... safe for odor-causing residue buildup and mold and mildew stains. To purchase Affresh washer cleaner and receive a 10% discount on a regular basis, all types of the washer. Here How to remove odors from all high-efficiency washing machines have the potential to lift and remove residue, which builds over time in my... -
How do I open the lid?- Top-Load HE with Dispenser Drawer
...This will not open the lid after the cycle has started the washer? Front-load washer Vibration - Are you need to turn the washer off . Under certain conditions, the lid may take several minutes... - To unlock lid: Plug in Corners Lid lock light is spinning at high speed. sound clips Press the Power button to resume the cycle. Have you installing the washer? Top Load HE with ...
Similar Questions

Opening Door Pulls The Front Control Panel Off.
It seems that the latch mechanism is no longer attached to the rigid part of the door. When opening ...
It seems that the latch mechanism is no longer attached to the rigid part of the door. When opening ...
(Posted by r2varney 6 years ago)

Maytag Dishwasher Mdb7749sbm Turns On...shuts Down Before Complete.
Looking to purchase used.... Owner said the on/off was only problem. Someone told them needed a Fuse...
Looking to purchase used.... Owner said the on/off was only problem. Someone told them needed a Fuse...
(Posted by lamka1982 6 years ago)

How Do I Remove And Replace A Coupler And Hose Assembly On My Portable Dishwashe
Coupler and hose assembly part number 990060868 for maytag MDC4650AWB portable dishwasher. Need to r...
Coupler and hose assembly part number 990060868 for maytag MDC4650AWB portable dishwasher. Need to r...
(Posted by Stro1sa2 10 years ago)

Installed New Built-in Dishwasher.replaced Main Control.1month Same Problem.why
Didnt Work Out Of Box. Factory Service Repair.new Main Control. Work Just Over 1month.problem Has Re...
Didnt Work Out Of Box. Factory Service Repair.new Main Control. Work Just Over 1month.problem Has Re...
(Posted by howardtisha 11 years ago)
How To Install Brackets To Hold Dishwasher In Place.??
(Posted by atroyer2000 11 years ago)