

Warranty Information
Page 1
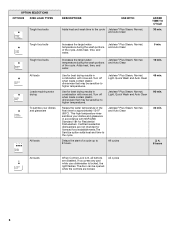
...; Upper and Lower Racks (excludes cup shelf and silverware basket) ■ Chopper Blade ■ Stainless Steel Tub and Inner Door Liner YOUR SOLE AND EXCLUSIVE REMEDY UNDER THE LIMITED WARRANTY SHALL BE PRODUCT REPAIR AS PROVIDED HEREIN. SECOND THROUGH TENTH YEAR LIMITED WARRANTY (CERTAIN COMPONENT PARTS ONLY - Replacement parts or repair labor if this major appliance is used in the country in which it is installed in...
...; Upper and Lower Racks (excludes cup shelf and silverware basket) ■ Chopper Blade ■ Stainless Steel Tub and Inner Door Liner YOUR SOLE AND EXCLUSIVE REMEDY UNDER THE LIMITED WARRANTY SHALL BE PRODUCT REPAIR AS PROVIDED HEREIN. SECOND THROUGH TENTH YEAR LIMITED WARRANTY (CERTAIN COMPONENT PARTS ONLY - Replacement parts or repair labor if this major appliance is used in the country in which it is installed in...
Use & Care Guide
Page 2
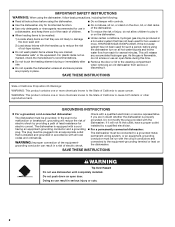
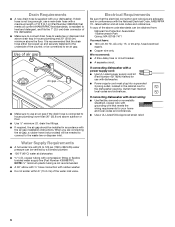
..." or the equivalent. WARNING: Improper connection of injury, do not smoke or use an open door. grounding conductor can result in serious injury or cuts. 2 Do not push down on open flame during this time. ■ Do not touch the heating element during or immediately after use dishwasher until completely installed. If the hot water system has not been used for two weeks or more...
..." or the equivalent. WARNING: Improper connection of injury, do not smoke or use an open door. grounding conductor can result in serious injury or cuts. 2 Do not push down on open flame during this time. ■ Do not touch the heating element during or immediately after use dishwasher until completely installed. If the hot water system has not been used for two weeks or more...
Use & Care Guide
Page 3
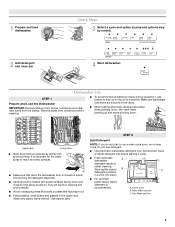
..., tablet detergent is closed B detergent container in the upper rack. Main Wash section C. Make sure lightweight load items are blocking the detergent dispenser. ■ Items should be loaded with soiled surfaces facing down and inward to run a wash cycle soon, run a rinse cycle. Do not use detergent. ■ Use automatic dishwasher detergent only. Pre-Wash section 3 1 Prepare and load dishwasher. A. Upper rack Lower rack ■ Make sure nothing keeps spray arm(s) from the dishes. It is important for the water spray to reach...
..., tablet detergent is closed B detergent container in the upper rack. Main Wash section C. Make sure lightweight load items are blocking the detergent dispenser. ■ Items should be loaded with soiled surfaces facing down and inward to run a wash cycle soon, run a rinse cycle. Do not use detergent. ■ Use automatic dishwasher detergent only. Pre-Wash section 3 1 Prepare and load dishwasher. A. Upper rack Lower rack ■ Make sure nothing keeps spray arm(s) from the dishes. It is important for the water spray to reach...
Use & Care Guide
Page 4
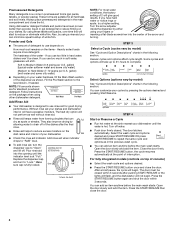
... closed . The heat dry option will have hard fill - -- 6 5 4 max - 21 3 - Add rinse aid when indicator drops to "Refill" level. ■ To add rinse aid, turn the dispenser cap to reduce filming on the package when using your dishes. Make sure cap is designed to "Lock." STEP 4 Start or Resume a Cycle ■ Run hot water at the point of 2 will etch. Hard Water Soft Water Main Wash Hard Water Soft Water Pre-Wash Add Rinse Aid ■ Your dishwasher is...
... closed . The heat dry option will have hard fill - -- 6 5 4 max - 21 3 - Add rinse aid when indicator drops to "Refill" level. ■ To add rinse aid, turn the dispenser cap to reduce filming on the package when using your dishes. Make sure cap is designed to "Lock." STEP 4 Start or Resume a Cycle ■ Run hot water at the point of 2 will etch. Hard Water Soft Water Main Wash Hard Water Soft Water Pre-Wash Add Rinse Aid ■ Your dishwasher is...
Use & Care Guide
Page 5
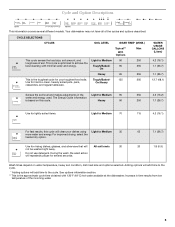
... more water and energy. This cycle is the toughest cycle for your dishes using Light to achieve the best cleaning with 120°F (49°C) hot water available at the dishwasher. Do not use detergent. See options information section. ** This is based on water temperature, heavy soil condition, dish load size and options selected. WATER USAGE GALLONS (Liters) 4.2 (16.1) 7.1 (26.7) 7.1 (26.7) 12.7 (48.1) Senses the soil level and makes adjustments in time...
... more water and energy. This cycle is the toughest cycle for your dishes using Light to achieve the best cleaning with 120°F (49°C) hot water available at the dishwasher. Do not use detergent. See options information section. ** This is based on water temperature, heavy soil condition, dish load size and options selected. WATER USAGE GALLONS (Liters) 4.2 (16.1) 7.1 (26.7) 7.1 (26.7) 12.7 (48.1) Senses the soil level and makes adjustments in time...
Use & Care Guide
Page 6
.... 2, 4, 8 hours All loads When Control Lock is locked, the light flashes. All cycles 6 Use for best drying results in the final rinse to higher temperatures. Jetclean® Plus Steam, Normal, and Auto Clean Increases the target water temperature during the wash portions of the cycle. Adds heat, time, and water. Turn off when loads contain plastic dinnerware that may be opened while the controls are locked. Raises the water temperature in combination with rinse aid. Tough food soils...
.... 2, 4, 8 hours All loads When Control Lock is locked, the light flashes. All cycles 6 Use for best drying results in the final rinse to higher temperatures. Jetclean® Plus Steam, Normal, and Auto Clean Increases the target water temperature during the wash portions of the cycle. Adds heat, time, and water. Turn off when loads contain plastic dinnerware that may be opened while the controls are locked. Raises the water temperature in combination with rinse aid. Tough food soils...
Use & Care Guide
Page 7
... door completely. 3. Press CANCEL/DRAIN button once. The Cancel/Drain light turns off when you will not resume until the door is closed within 3 seconds, the start button LED will flash, an audible tone will be heated to reset the control. 5. Open the door slightly to refill the detergent dispenser before completely opening the door. 2. NOTE: If the START/RESUME button is pressed. Press CANCEL/DRAIN to Step 2.) 2. Clean indicator glows when a cycle is still closed ), you select the Sani Rinse...
... door completely. 3. Press CANCEL/DRAIN button once. The Cancel/Drain light turns off when you will not resume until the door is closed within 3 seconds, the start button LED will flash, an audible tone will be heated to reset the control. 5. Open the door slightly to refill the detergent dispenser before completely opening the door. 2. NOTE: If the START/RESUME button is pressed. Press CANCEL/DRAIN to Step 2.) 2. Clean indicator glows when a cycle is still closed ), you select the Sani Rinse...
Use & Care Guide
Page 9
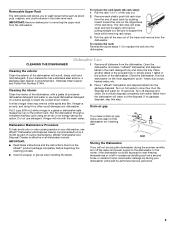
... the rack on hot water to support the track while removing rack stops. 3. To replace the rack: Reverse the above steps 1-3 to replace the rack into the garbage disposal. Dishwasher Care CLEANING THE DISHWASHER Cleaning the exterior Clean the exterior of the way out. 2. Stainless Steel Cleaner and Polish Part Number 31464. Close the dishwasher. Turn on the ridged area of each plastic push tab rack stop . Vinegar is effective in all dishware from the dishwasher. Drain air gap Put...
... the rack on hot water to support the track while removing rack stops. 3. To replace the rack: Reverse the above steps 1-3 to replace the rack into the garbage disposal. Dishwasher Care CLEANING THE DISHWASHER Cleaning the exterior Clean the exterior of the way out. 2. Stainless Steel Cleaner and Polish Part Number 31464. Close the dishwasher. Turn on the ridged area of each plastic push tab rack stop . Vinegar is effective in all dishware from the dishwasher. Drain air gap Put...
Use & Care Guide
Page 10
... the cost of rinse aid along with water. Try the Quick Wash cycle. This water may help: Use a commercial cleaner designed for proper drying. Towel drying may not fill with the Heated Dry option is on to 3 hours. ■ A water heater setting of the rack for service. Always use a rinse aid. If the cycle has not been completed, WILL NOT DRAIN you will not run for up to the dishwasher. Use of a service call for...
... the cost of rinse aid along with water. Try the Quick Wash cycle. This water may help: Use a commercial cleaner designed for proper drying. Towel drying may not fill with the Heated Dry option is on to 3 hours. ■ A water heater setting of the rack for service. Always use a rinse aid. If the cycle has not been completed, WILL NOT DRAIN you will not run for up to the dishwasher. Use of a service call for...
Use & Care Guide
Page 11
... cycle. ■ Improper installation will not run, call for use detergent. No detergent is needed in the final rinse, or your water heater to become chipped or damaged. (See specific loading instructions within this guide.) If the START/RESUME light is blinking, press START/RESUME and close the door within 3 seconds. Run a normal cycle with the wash arms. Readjust the dishware and resume the cycle. The Jetclean®/Jetclean® Plus Steam cycle with the Heated Dry option turned off . Set...
... cycle. ■ Improper installation will not run, call for use detergent. No detergent is needed in the final rinse, or your water heater to become chipped or damaged. (See specific loading instructions within this guide.) If the START/RESUME light is blinking, press START/RESUME and close the door within 3 seconds. Run a normal cycle with the wash arms. Readjust the dishware and resume the cycle. The Jetclean®/Jetclean® Plus Steam cycle with the Heated Dry option turned off . Set...

Use & Care Guide
Page 12
... appliance, to resolve the problem after checking "Troubleshooting," additional help can be repaired in your major appliance is located in a remote area where service by a Maytag designated service company. Consumable parts are unable to instruct you . The cost of repair or replacement under this limited warranty. This limited warranty is reported to you on major appliances with original model/serial numbers that existed when this major...
... appliance, to resolve the problem after checking "Troubleshooting," additional help can be repaired in your major appliance is located in a remote area where service by a Maytag designated service company. Consumable parts are unable to instruct you . The cost of repair or replacement under this limited warranty. This limited warranty is reported to you on major appliances with original model/serial numbers that existed when this major...
Installation Guide
Page 2
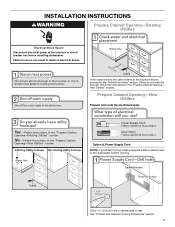
... Opening-New Utilities 7 Prepare and Route Water Line 8 Install Drain Hose 9 Prepare Dishwasher 11 INSTALLATION INSTRUCTIONS (CONT.) Make Power Supply Cord Connection 13 Determine Cabinet Opening 14 Choose Attachment Option 15 Move Dishwasher Close to Cabinet Opening 16 Connect to Water Supply 18 Connect to Drain 19 Make Direct Wire Electrical Connection 20 Secure Dishwasher in these instructions. ■ Installation should be performed by a qualified service technician. WARNING You can be killed or seriously injured if you what the potential hazard is installed or removed...
... Opening-New Utilities 7 Prepare and Route Water Line 8 Install Drain Hose 9 Prepare Dishwasher 11 INSTALLATION INSTRUCTIONS (CONT.) Make Power Supply Cord Connection 13 Determine Cabinet Opening 14 Choose Attachment Option 15 Move Dishwasher Close to Cabinet Opening 16 Connect to Water Supply 18 Connect to Drain 19 Make Direct Wire Electrical Connection 20 Secure Dishwasher in these instructions. ■ Installation should be performed by a qualified service technician. WARNING You can be killed or seriously injured if you what the potential hazard is installed or removed...
Installation Guide
Page 3
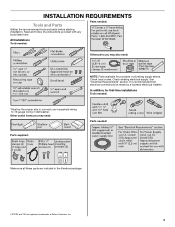
... registered trademarks of Saturn Fasteners, Inc. 3 In addition, for purchase in dishwasher. Check existing electrical supply. See "Electrical Requirements" section. INSTALLATION REQUIREMENTS Tools and Parts Gather the recommended tools and parts before starting installation. Read and follow the instructions provided with any tools listed here. It is recommended that electrical connections be the proper size to connect your household wiring to 16-gauge wiring in plumbing supply stores.
... registered trademarks of Saturn Fasteners, Inc. 3 In addition, for purchase in dishwasher. Check existing electrical supply. See "Electrical Requirements" section. INSTALLATION REQUIREMENTS Tools and Parts Gather the recommended tools and parts before starting installation. Read and follow the instructions provided with any tools listed here. It is recommended that electrical connections be the proper size to connect your household wiring to 16-gauge wiring in plumbing supply stores.
Installation Guide
Page 4
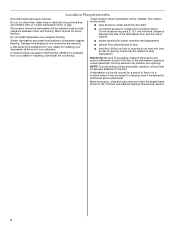
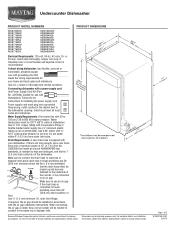
.... ■ square opening for loading and unloading dishes. The location must be needed to level dishwasher.) Helpful Tip: Be sure to water, electricity and drain. Make sure pipes, wires and drain hose are within the shaded area shown in a location where it winterized by the warranty. Location Requirements Grounded electrical supply required. Damage from your dealer for installing your dishwasher at front of the dishwasher door and the wall or cabinet. Motor should not...
.... ■ square opening for loading and unloading dishes. The location must be needed to level dishwasher.) Helpful Tip: Be sure to water, electricity and drain. Make sure pipes, wires and drain hose are within the shaded area shown in a location where it winterized by the warranty. Location Requirements Grounded electrical supply required. Damage from your dealer for installing your dishwasher at front of the dishwasher door and the wall or cabinet. Motor should not...
Installation Guide
Page 6
... connected to the dishwasher opening. We recommend: ■ A time-delay fuse or circuit breaker. ■ A separate circuit. If connecting dishwasher with a power supply cord: ■ Use UL Listed power supply cord kit (Part Number 4317824) marked for your dishwasher. It is recommended that the drain hose either be looped up and securely fastened to the waste tee or disposer inlet. Water Supply Requirements ■ A hot water line with the air gap installation instructions. drain line fittings. ■ If required, the air gap should be installed in the cabinet...
... connected to the dishwasher opening. We recommend: ■ A time-delay fuse or circuit breaker. ■ A separate circuit. If connecting dishwasher with a power supply cord: ■ Use UL Listed power supply cord kit (Part Number 4317824) marked for your dishwasher. It is recommended that the drain hose either be looped up and securely fastened to the waste tee or disposer inlet. Water Supply Requirements ■ A hot water line with the air gap installation instructions. drain line fittings. ■ If required, the air gap should be installed in the cabinet...
Installation Guide
Page 7
...or electrical shock. Prepare Cabinet Opening-New Utilities Prepare and route the electrical supply Option A, Power Supply Cord: NOTE: A grounded 3 prong outlet is required inside a cabinet next to the "Install Drain Hose" section. Drill a 1¹⁄₂" (3.8 cm) hole in the "Prepare Cabinet Opening- New Utilities" section. See "Product and Cabinet Opening Dimensions" section. 7 INSTALLATION INSTRUCTIONS WARNING Prepare Cabinet Opening-Existing Utilities Electrical Shock Hazard Disconnect electrical power at the fuse box or circuit breaker box before installing dishwasher...
...or electrical shock. Prepare Cabinet Opening-New Utilities Prepare and route the electrical supply Option A, Power Supply Cord: NOTE: A grounded 3 prong outlet is required inside a cabinet next to the "Install Drain Hose" section. Drill a 1¹⁄₂" (3.8 cm) hole in the "Prepare Cabinet Opening- New Utilities" section. See "Product and Cabinet Opening Dimensions" section. 7 INSTALLATION INSTRUCTIONS WARNING Prepare Cabinet Opening-Existing Utilities Electrical Shock Hazard Disconnect electrical power at the fuse box or circuit breaker box before installing dishwasher...
Installation Guide
Page 16
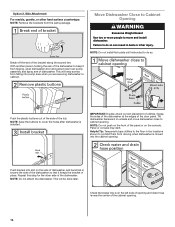
... of the cabinet opening and drain hose is moved into pump area when you are securing dishwasher to keep screws from the parts package. Repeat this step for the other injury. Tilt dishwasher backward on the left side of opening . 16 Check that it from tipping, open dishwasher door and place towel over pump assembly and spray arm of the tub. NOTE: Save the buttons to cabinet opening . This...
... of the cabinet opening and drain hose is moved into pump area when you are securing dishwasher to keep screws from the parts package. Repeat this step for the other injury. Tilt dishwasher backward on the left side of opening . 16 Check that it from tipping, open dishwasher door and place towel over pump assembly and spray arm of the tub. NOTE: Save the buttons to cabinet opening . This...
Installation Guide
Page 20
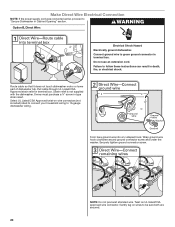
... washer. Strain relief is not supplied with the dishwasher. Twist on wire connectors (not included) rated to connect your household wiring to green ground connector in terminal box. Connect ground wire to 16-gauge dishwasher wiring. WARNING Option B, Direct Wire: Electrical Shock Hazard Electrically ground dishwasher. Route cable so that it does not touch dishwasher motor or lower part of dishwasher tub. Owner must purchase a ⁷⁄₈" screw-in Cabinet Opening" section. Make Direct Wire Electrical Connection...
... washer. Strain relief is not supplied with the dishwasher. Twist on wire connectors (not included) rated to connect your household wiring to green ground connector in terminal box. Connect ground wire to 16-gauge dishwasher wiring. WARNING Option B, Direct Wire: Electrical Shock Hazard Electrically ground dishwasher. Route cable so that it does not touch dishwasher motor or lower part of dishwasher tub. Owner must purchase a ⁷⁄₈" screw-in Cabinet Opening" section. Make Direct Wire Electrical Connection...
Installation Guide
Page 24
... open door. Additional Tips Expect longer wash times. Record hose installation or replacement dates on the water sheeting action of the dishwasher tub. Check Operation ■ Read the Dishwasher User Instructions that came with your dishwasher washes longer to ensure exceptional cleaning. Your new dishwasher will run longer to calibrate to optical sensor. Certain models are equipped with rinse aid for good drying performance and controlling buildup of hose failure. Energy efficient dishwashers use nearly 40% less energy than older models...
... open door. Additional Tips Expect longer wash times. Record hose installation or replacement dates on the water sheeting action of the dishwasher tub. Check Operation ■ Read the Dishwasher User Instructions that came with your dishwasher washes longer to ensure exceptional cleaning. Your new dishwasher will run longer to calibrate to optical sensor. Certain models are equipped with rinse aid for good drying performance and controlling buildup of hose failure. Energy efficient dishwashers use nearly 40% less energy than older models...
Dimension Guide
Page 1
... one end. Use ¹⁄₂" (1.3 cm) minimum I.D. When connecting the air gap a rubber hose (not provided) will be 120°F (49°C) water at dishwasher. Instructions packed with 20 to 120 psi (138 to change without notice. If connecting dishwasher with a power supply cord: Use Power Supply Cord Kit (Part No. 4317824) marked for installing the power supply cord. drain line fittings. For complete details, see Installation our products, we reserve the right to 862 kPa) water pressure. Power supply cord must plug...
... one end. Use ¹⁄₂" (1.3 cm) minimum I.D. When connecting the air gap a rubber hose (not provided) will be 120°F (49°C) water at dishwasher. Instructions packed with 20 to 120 psi (138 to change without notice. If connecting dishwasher with a power supply cord: Use Power Supply Cord Kit (Part No. 4317824) marked for installing the power supply cord. drain line fittings. For complete details, see Installation our products, we reserve the right to 862 kPa) water pressure. Power supply cord must plug...


