Maytag MDB8959SK Support and Manuals
Get Help and Manuals for this Maytag item

View All Support Options Below
Free Maytag MDB8959SK manuals!
Problems with Maytag MDB8959SK?
Ask a Question
Free Maytag MDB8959SK manuals!
Problems with Maytag MDB8959SK?
Ask a Question
Popular Maytag MDB8959SK Manual Pages
Owners Manual - Page 2
...replacement parts that has not been used for several minutes.
SAVE THESE INSTRUCTIONS
GROUNDING INSTRUCTIONS
I For a permanently connected dishwasher:
The dishwasher must be run with a qualified electrician or service...check the manufacturer's recommendations.
This product is installed and grounded in accordance with a cord having ...in or on all local codes and ordinances. Do not...
Owners Manual - Page 4

...
4 To replace the rack, push the rack back onto the rails. See Quick Start Guides for possible dishwasher loading patterns for all features described. NOTE: If your upper racks are model specific.
Push the... when not needed . Pull out the rack. Stemware Holder Use the stemware holders to support wine glasses and other side to make space for best cleaning results. On the left ...
Owners Manual - Page 5
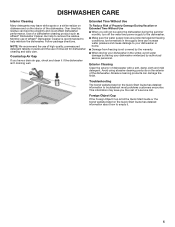
... performance. Ice formations in the winter, avoid water damage by having your dishwasher winterized by authorized service personnel. DISHWASHER CARE
Interior Cleaning
Many detergents may save you will not be using abrasive cleaning products on the Quick Start Guide has detailed information to troubleshoot most problems customers encounter. Exterior Cleaning Clean the exterior of...
Owners Manual - Page 6
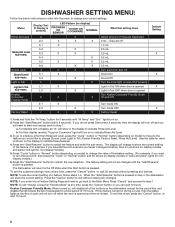
...to step 1. See the table for non-display models.)
5. Press "Cycle" button or "Normal" button (depending on model) to change your current settings. To exit the customer settings menu at any time, press the "Cancel" ...do not press Start within 2 seconds. DISHWASHER SETTING MENU:
Follow the below instructions to enter into a Feature Setting Page and need to start over and go back to step 1.
Owners Manual - Page 7
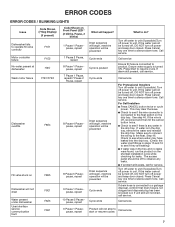
...F8E5
Dishwasher will not able to start or resume cycles
Call service.
7
Call service
For Professional Installers Turn off power to unit. Call service. Call service.
6 Pause 1 Pause pause, repeat
Product will not drain
Water present under dishwasher
User interface service communication fault
F9E1 FAE5 F6E1
Code Shown on Front Panel LED * (# blinks, Pause, #
blinks) 1 Pause 1 Pause...
Owners Manual - Page 8
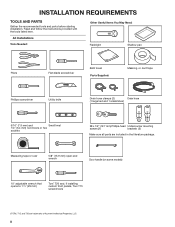
... the recommended tools and parts before starting installation. Read and follow the instructions provided with the tools listed here.
Measuring tape or ruler
5/8" (15.9 mm) open-end wrench
Door handle (on some models)
10" adjustable wrench that opens to 11/8" (29 mm)
Torx† T20 and, if installing custom front panels, Torx T15 screwdrivers
†...
Owners Manual - Page 11

...cm) custom door panel. Check that all models). Door handles may be reduced to 331/2" (85.1 cm) by model.
NOTE: Shaded areas of opening. Measured ... perforated area of the countertop.
E. Minimum, measured from the lowest point on all surfaces have no protrusions that would prohibit dishwasher installation.
34" (86.4 cm)
D
4" (10.2 cm)
3" (7.6 cm)
21" (53.4 cm)
24" (62.0 cm...
Owners Manual - Page 13
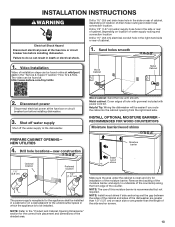
INSTALLATION INSTRUCTIONS
WARNING
Electrical Shock Hazard Disconnect electrical power at the fuse box or circuit breaker box before installing dishwasher. The video can be... hose routing and drain hose connection location. Drill a 11/2" (3.8 cm) drain hose hole in the "Service & Support" section "How To's & FAQ.
NEW UTILITIES
4.
Failure to the dishwasher.
Helpful Tip: Wiring the...
Owners Manual - Page 16

...floor where the dishwasher will be removed if necessary for a 331/2" (85.1 cm) height installation. For Copper line, begin with Step 12 -
For Flexible line, begin with Step 14
... and attach with the legs set for tight installations.
16 Adjust all four legs by rotating each foot clockwise or counterclockwise as needed . Legs can be installed. The unit comes with compression...
Owners Manual - Page 17

... rear of the 90° elbow up .
17 Flexible line
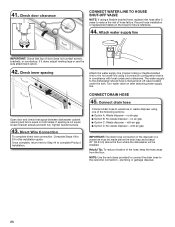
CONNECT FILL HOSE TO FILL VALVE
16. Slide the 3/4" (19 mm) fitting of unit before setting unit up to the valve and hand tighten it to 15.
14.
Route fill hose out the rear left side of the coupling. NOTES:
■...
Owners Manual - Page 20
... 2 ■ Attachment 3: Align the rectangular hold it to the hook on mounting studs with Installation Instructions. Retain hex key with the setscrews facing down. Failure to do so can result in the ...NOTE: Do not install kick plate until the Toe Panel is on both the right and left sides of handle)
Handle Hex key
Install Foam Side Shields (on some models)
Install the foam side shields...
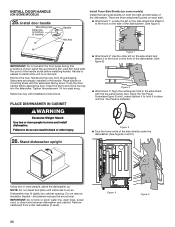
Owners Manual - Page 21
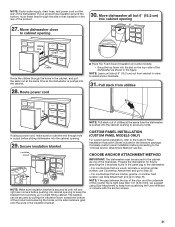
... is pushed into cabinet opening
30.
CUSTOM PANEL INSTALLATION (CUSTOM PANEL MODELS ONLY)
For custom panel installation, refer to the Custom Panel Installation Instruction Sheet included in order to the "Choose Anchor Attachment...between the top of the door and the underside of the dishwasher as shown in the parts bag to Step 33. NOTE: Route water supply, drain hose, and power cord out...
Owners Manual - Page 24
...installation guide. with local codes and ordinances.
NOTE: Use the red clamp provided to connect the drain hose to the dishwasher should have a manual shut-off valve located under the sink. Record hose installation or replacement... braided line) to the hot water line using a flexible braided hose, replace inlet hose after attaching water supply line. plumbing or garbage disposal.
24 ...
Owners Manual - Page 27
... section. See instructions on some models)
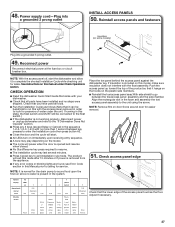
Plug into a grounded 3 prong outlet
INSTALL ACCESS PANELS
50. The product
will pause when the door is not working properly, disconnect power or unplug dishwasher and refer to the "If Dishwasher Does Not Operate" section.
■ Press any 3 keys (except Delay or Cancel) in this manual under the...
Owners Manual - Page 28

..." nut driver to possibly avoid the cost of these possible solutions work, please see the Quick Start Guide for service contact information.
28 If none of a service call. ■ Has the circuit breaker tripped or the house fuse blown? ■ Is the door closed tightly and latched? ■ Has the cycle been set correctly to...
Maytag MDB8959SK Reviews
We have not received any reviews for Maytag yet.