

Warranty Information
Page 1
... installation not in accordance with electrical or plumbing codes, or use of products not approved by an authorized Maytag servicer is not available. 9. Repairs to parts or systems resulting from unauthorized modifications made to repair or replace appliance light bulbs, air filters or water ...in the country in which it is installed in an inaccessible location or is not installed in accordance with Maytag published installation instructions. 10. Consumable parts are unable to resolve the problem after checking "Troubleshooting," additional help can be repaired in your major appliance...
... installation not in accordance with electrical or plumbing codes, or use of products not approved by an authorized Maytag servicer is not available. 9. Repairs to parts or systems resulting from unauthorized modifications made to repair or replace appliance light bulbs, air filters or water ...in the country in which it is installed in an inaccessible location or is not installed in accordance with Maytag published installation instructions. 10. Consumable parts are unable to resolve the problem after checking "Troubleshooting," additional help can be repaired in your major appliance...
Use & Care Guide
Page 9
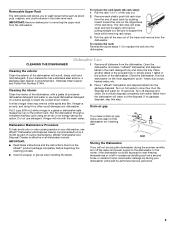
... as a second home or vacation home, avoid water damage by having your dishwasher winterized by authorized service personnel. 9 Stainless Steel Cleaner and Polish Part Number 31464. Cleaning the interior Clean the interior of the dishwasher, with a soft, damp cloth and mild detergent. Place another tablet in the... the garbage disposal. Roll the rack all dishwasher brands. Do not use affresh® Dishwasher and Disposal cleaner (recommended) once a month as part of the track and remove from the dishwasher. Turn on the ridged area of the rack stop ): 1. To help avoid odor or odor-...
... as a second home or vacation home, avoid water damage by having your dishwasher winterized by authorized service personnel. 9 Stainless Steel Cleaner and Polish Part Number 31464. Cleaning the interior Clean the interior of the dishwasher, with a soft, damp cloth and mild detergent. Place another tablet in the... the garbage disposal. Roll the rack all dishwasher brands. Do not use affresh® Dishwasher and Disposal cleaner (recommended) once a month as part of the track and remove from the dishwasher. Turn on the ridged area of the rack stop ): 1. To help avoid odor or odor-...
Use & Care Guide
Page 10
...RESUME blink and the unit will not run for the dishwasher to achieve good cleaning. Check that the float is free from obstructions. (See "Parts and Features.") Check for improved results. HARD WATER (WHITE RESIDUE ON DISHWASHER INTERIOR OR GLASSWARE) NOTE: Extremely hard water mineral deposits can affect ...with water. Use of 120°F (49ºC) is needed for kinks in the drain or disposer. In the U.S.A., www.maytag.com In Canada, www.maytag.ca PROBLEM DISHWASHER DOES NOT RUN DETERGENT REMAINS IN THE DISPENSER OR TABLET IS ON BOTTOM OF TUB CYCLE RUNS TOO LONG DISHWASHER...
...RESUME blink and the unit will not run for the dishwasher to achieve good cleaning. Check that the float is free from obstructions. (See "Parts and Features.") Check for improved results. HARD WATER (WHITE RESIDUE ON DISHWASHER INTERIOR OR GLASSWARE) NOTE: Extremely hard water mineral deposits can affect ...with water. Use of 120°F (49ºC) is needed for kinks in the drain or disposer. In the U.S.A., www.maytag.com In Canada, www.maytag.ca PROBLEM DISHWASHER DOES NOT RUN DETERGENT REMAINS IN THE DISPENSER OR TABLET IS ON BOTTOM OF TUB CYCLE RUNS TOO LONG DISHWASHER...

Use & Care Guide
Page 12
...been removed, altered or cannot be found by checking the "Assistance or Service" section or by a Maytag designated service company. MAYTAG® DISHWASHER LIMITED WARRANTY FIRST YEAR LIMITED WARRANTY (PARTS AND LABOR) For one year from the date of purchase, when this major appliance is installed, ... BE PRODUCT REPAIR AS PROVIDED HEREIN. This is a limited 10-year warranty on major appliances with the product, Maytag will pay for factory specified parts for product service if your major appliance, unless such damage results from defects in materials or workmanship and is reported...
...been removed, altered or cannot be found by checking the "Assistance or Service" section or by a Maytag designated service company. MAYTAG® DISHWASHER LIMITED WARRANTY FIRST YEAR LIMITED WARRANTY (PARTS AND LABOR) For one year from the date of purchase, when this major appliance is installed, ... BE PRODUCT REPAIR AS PROVIDED HEREIN. This is a limited 10-year warranty on major appliances with the product, Maytag will pay for factory specified parts for product service if your major appliance, unless such damage results from defects in materials or workmanship and is reported...
Installation Guide
Page 2
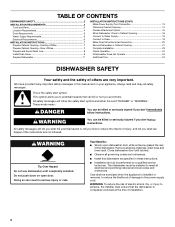
... "DANGER" or "WARNING." You Need to: ■ Slowly open door. All safety messages will follow instructions. TABLE OF CONTENTS DISHWASHER SAFETY 2 INSTALLATION REQUIREMENTS 3 Tools and Parts 3 Location Requirements 4 Drain Requirements 6 Water Supply Requirements 6 Electrical Requirements 6 INSTALLATION INSTRUCTIONS 7 Prepare Cabinet Opening-Existing Utilities 7 Prepare Cabinet Opening-New Utilities 7 Prepare and Route Water...
... "DANGER" or "WARNING." You Need to: ■ Slowly open door. All safety messages will follow instructions. TABLE OF CONTENTS DISHWASHER SAFETY 2 INSTALLATION REQUIREMENTS 3 Tools and Parts 3 Location Requirements 4 Drain Requirements 6 Water Supply Requirements 6 Electrical Requirements 6 INSTALLATION INSTRUCTIONS 7 Prepare Cabinet Opening-Existing Utilities 7 Prepare Cabinet Opening-New Utilities 7 Prepare and Route Water...
Installation Guide
Page 3
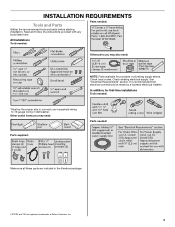
...;®TORX and T20 are registered trademarks of Saturn Fasteners, Inc. 3 Other useful items you may need : NOTE: Parts available for purchase in dishwasher. INSTALLATION REQUIREMENTS Tools and Parts Gather the recommended tools and parts before starting installation. Read and follow the instructions provided with any tools listed here. Check existing electrical supply...
...;®TORX and T20 are registered trademarks of Saturn Fasteners, Inc. 3 Other useful items you may need : NOTE: Parts available for purchase in dishwasher. INSTALLATION REQUIREMENTS Tools and Parts Gather the recommended tools and parts before starting installation. Read and follow the instructions provided with any tools listed here. Check existing electrical supply...
Installation Guide
Page 4
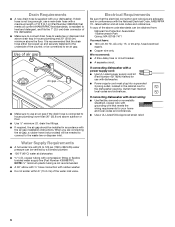
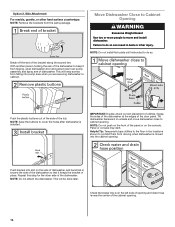
... and Cabinet Opening Dimensions" section. 4 Check location where dishwasher will be installed. Corner locations require a 2" (5.1 cm) minimum clearance between motor and flooring. A moisture barrier accessory (Part Number 4396277) is uneven (example: Flooring extends only partway into opening is not level with or contact dishwasher motor or legs. Do not run drain...
... and Cabinet Opening Dimensions" section. 4 Check location where dishwasher will be installed. Corner locations require a 2" (5.1 cm) minimum clearance between motor and flooring. A moisture barrier accessory (Part Number 4396277) is uneven (example: Flooring extends only partway into opening is not level with or contact dishwasher motor or legs. Do not run drain...
Installation Guide
Page 6
...the waste tee or disposer inlet. copper tubing with rubber washer. ■ Do not solder within 6" (15.2 cm) of 12 ft (3.7 m) (Part Number 3385556) that the electrical connection and wire size are connecting the air gap, a rubber hose (not provided) will be installed in house plumbing ... is not recommended. ■ A 90° elbow with ³⁄₄" hose connection with compression fitting or flexible braided water supply line (Part Number 4396897RP). Water Supply Requirements ■ A hot water line with 20 to 120 psi (138 to 862 kPa) water pressure can be connected...
...the waste tee or disposer inlet. copper tubing with rubber washer. ■ Do not solder within 6" (15.2 cm) of 12 ft (3.7 m) (Part Number 3385556) that the electrical connection and wire size are connecting the air gap, a rubber hose (not provided) will be installed in house plumbing ... is not recommended. ■ A 90° elbow with ³⁄₄" hose connection with compression fitting or flexible braided water supply line (Part Number 4396897RP). Water Supply Requirements ■ A hot water line with 20 to 120 psi (138 to 862 kPa) water pressure can be connected...
Installation Guide
Page 8
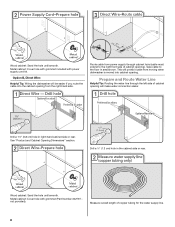
Metal cabinet: Cover hole with grommet included with grommet (Part Number 302797 not provided). Prepare and Route Water Line Helpful Tip: Routing the water line through cabinet hole (cable must extend to the floor in ...
Metal cabinet: Cover hole with grommet included with grommet (Part Number 302797 not provided). Prepare and Route Water Line Helpful Tip: Routing the water line through cabinet hole (cable must extend to the floor in ...
Installation Guide
Page 13
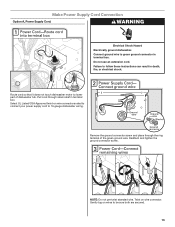
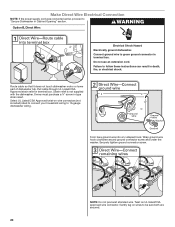
... Cord Connection Option A, Power Supply Cord: WARNING Electrical Shock Hazard Electrically ground dishwasher. Route cord so that it does not touch dishwasher motor to lower part of the green ground wire. Do not use an extension cord. Gently tug on wires to green ground connector in death, fire, or electrical shock...
... Cord Connection Option A, Power Supply Cord: WARNING Electrical Shock Hazard Electrically ground dishwasher. Route cord so that it does not touch dishwasher motor to lower part of the green ground wire. Do not use an extension cord. Gently tug on wires to green ground connector in death, fire, or electrical shock...
Installation Guide
Page 15
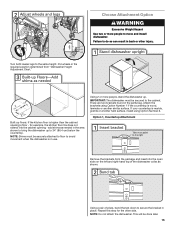
... Chart." This will be securely attached to floor to do so can result in place. Using a pair of the dishwasher collar as needed in the parts bag. Choose Attachment Option WARNING Excessive Weight Hazard Use two or more people, stand the dishwasher up. Put wheels in use. for the other injury...
... Chart." This will be securely attached to floor to do so can result in place. Using a pair of the dishwasher collar as needed in the parts bag. Choose Attachment Option WARNING Excessive Weight Hazard Use two or more people, stand the dishwasher up. Put wheels in use. for the other injury...
Installation Guide
Page 16
... opening . 16 NOTE: Do not push on the front of the panel or on the left side of the dishwasher to keep screws from the parts package. With another person holding the rear of opening . This will be done later. Push the plastic buttons out of the side of the door...
... opening . 16 NOTE: Do not push on the front of the panel or on the left side of the dishwasher to keep screws from the parts package. With another person holding the rear of opening . This will be done later. Push the plastic buttons out of the side of the door...
Installation Guide
Page 20
... hook. Connect ground wire to "Secure Dishwasher in death, fire, or electrical shock. Route cable so that it does not touch dishwasher motor or lower part of dishwasher tub. Gently tug on wire connectors (not included) rated to connect your household wiring to follow these instructions can result in Cabinet Opening...
... hook. Connect ground wire to "Secure Dishwasher in death, fire, or electrical shock. Route cable so that it does not touch dishwasher motor or lower part of dishwasher tub. Gently tug on wire connectors (not included) rated to connect your household wiring to follow these instructions can result in Cabinet Opening...
Installation Guide
Page 23
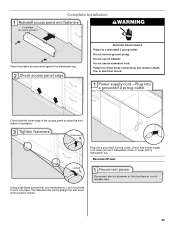
Failure to lock into a grounded 3 prong outlet. Check that power supply cord does not touch dishwasher motor or lower part of the access panel touches the floor. Reconnect Power Using a flat-blade screwdriver, turn the fasteners ¹⁄₄ turn clockwise to follow these instructions ...
Failure to lock into a grounded 3 prong outlet. Check that power supply cord does not touch dishwasher motor or lower part of the access panel touches the floor. Reconnect Power Using a flat-blade screwdriver, turn the fasteners ¹⁄₄ turn clockwise to follow these instructions ...
Installation Guide
Page 24
... of hose failure. Selecting certain options could increase cycle time past 3.5 hours. If you press it to complete the shortest wash cycle. Check that all parts have all tools used with rinse aid for future reference. 24 If the dishwasher is closed tightly and latched? ■ Has the cycle been set...
... of hose failure. Selecting certain options could increase cycle time past 3.5 hours. If you press it to complete the shortest wash cycle. Check that all parts have all tools used with rinse aid for future reference. 24 If the dishwasher is closed tightly and latched? ■ Has the cycle been set...
Dimension Guide
Page 1
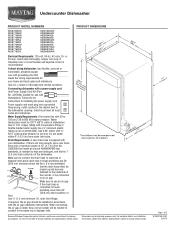
...needed to connect to waste tee or disposer inlet above drain trap in accordance with a power supply cord: Use Power Supply Cord Kit (Part No. 4317824) marked for your dishwasher. Instructions packed with ³⁄₄" N.P.T. Follow the kit instructions for planning purposes only. ...connecting dishwasher with the air gap installation instructions. Outlet must be looped up and securely fastened to the underside of 12' (3.7 m) (Part No. 3385556) that meets the wiring requirements for use a new drain hose with 20 to 120 psi (138 to improve Dimensions ...
...needed to connect to waste tee or disposer inlet above drain trap in accordance with a power supply cord: Use Power Supply Cord Kit (Part No. 4317824) marked for your dishwasher. Instructions packed with ³⁄₄" N.P.T. Follow the kit instructions for planning purposes only. ...connecting dishwasher with the air gap installation instructions. Outlet must be looped up and securely fastened to the underside of 12' (3.7 m) (Part No. 3385556) that meets the wiring requirements for use a new drain hose with 20 to 120 psi (138 to improve Dimensions ...

