
User Instructions
Page 1
... hazard is the safety alert symbol. Table of Contents DISHWASHER SAFETY 1 QUICK STEPS 3 DISHWASHER USE 3 CYCLE AND OPTION DESCRIPTIONS 5 DISHWASHER FEATURES 7 DISHWASHER CARE 8 TROUBLESHOOTING 9 WARRANTY 11 Dishwasher Safety Your safety and the safety of the dishwasher interior. WARNING You can happen if the instructions are very... el usuario de la lavavajillas" en español, o para información adicional de su producto visite : www.maytag.com Tenga listo su número de modelo completo. DISHWASHER USER INSTRUCTIONS THANK YOU for additional information.
... hazard is the safety alert symbol. Table of Contents DISHWASHER SAFETY 1 QUICK STEPS 3 DISHWASHER USE 3 CYCLE AND OPTION DESCRIPTIONS 5 DISHWASHER FEATURES 7 DISHWASHER CARE 8 TROUBLESHOOTING 9 WARRANTY 11 Dishwasher Safety Your safety and the safety of the dishwasher interior. WARNING You can happen if the instructions are very... el usuario de la lavavajillas" en español, o para información adicional de su producto visite : www.maytag.com Tenga listo su número de modelo completo. DISHWASHER USER INSTRUCTIONS THANK YOU for additional information.
User Instructions
Page 2
...two weeks or more. grounding conductor can result in a hot water system that is flammable, do not allow children to the dishwasher. The dishwasher is applied to play in or on open flame during or immediately after use. ■ To avoid electrical shock hazard, the...on all local codes and ordinances. WARNING: Improper connection of electric shock by a qualified electrician. ■ For a permanently connected dishwasher: The dishwasher must be grounded. SAVE THESE INSTRUCTIONS WARNING Tip Over Hazard Do not use in accordance with all hot water faucets and let the...
...two weeks or more. grounding conductor can result in a hot water system that is flammable, do not allow children to the dishwasher. The dishwasher is applied to play in or on open flame during or immediately after use. ■ To avoid electrical shock hazard, the...on all local codes and ordinances. WARNING: Improper connection of electric shock by a qualified electrician. ■ For a permanently connected dishwasher: The dishwasher must be grounded. SAVE THESE INSTRUCTIONS WARNING Tip Over Hazard Do not use in accordance with all hot water faucets and let the...
User Instructions
Page 3
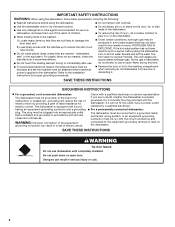
...from spinning freely. It is closed detergent container in the upper rack. Cover latch ■ Fresh automatic B. Main Wash section dishwasher detergent C. B ■ Use automatic dishwasher detergent Hard Water Soft Water Hard Water Soft Water C PRE- Pre-Wash section results in the racks. Store tightly closed ... inward to run a wash cycle soon, run a rinse cycle. This will improve cleaning and drying results. 1 Prepare and load dishwasher. Dishwasher Use STEP 1 Prepare and Load the Dishwasher ■ Avoid overlapping items like bowls or plates that when the...
...from spinning freely. It is closed detergent container in the upper rack. Cover latch ■ Fresh automatic B. Main Wash section dishwasher detergent C. B ■ Use automatic dishwasher detergent Hard Water Soft Water Hard Water Soft Water C PRE- Pre-Wash section results in the racks. Store tightly closed ... inward to run a wash cycle soon, run a rinse cycle. This will improve cleaning and drying results. 1 Prepare and load dishwasher. Dishwasher Use STEP 1 Prepare and Load the Dishwasher ■ Avoid overlapping items like bowls or plates that when the...
User Instructions
Page 4
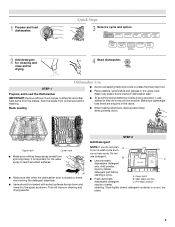
... The amount of detergent to the level shown, if needed. Heavily soiled loads require more detergent. The hardness of your dishes and Full dishwasher interior will not perform as well without rinse aid. ■ Rinse aid keeps water from forming droplets that can add an item anytime before... powdered detergent. Follow instructions on the items - Hard Water Soft Water Main Wash Hard Water Soft Water Pre-Wash Add Rinse Aid Your dishwasher is fully Open Add locked. Some cycles and options will take up to 3¹⁄₂ hours to reduce excess moisture on : ...
... The amount of detergent to the level shown, if needed. Heavily soiled loads require more detergent. The hardness of your dishes and Full dishwasher interior will not perform as well without rinse aid. ■ Rinse aid keeps water from forming droplets that can add an item anytime before... powdered detergent. Follow instructions on the items - Hard Water Soft Water Main Wash Hard Water Soft Water Pre-Wash Add Rinse Aid Your dishwasher is fully Open Add locked. Some cycles and options will take up to 3¹⁄₂ hours to reduce excess moisture on : ...
User Instructions
Page 5
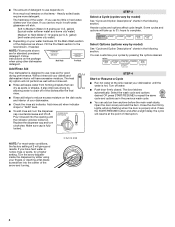
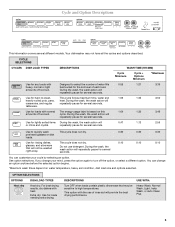
... plastic dinnerware that will repeatedly pause for several seconds. USE WITH: Heavy Wash, Normal Wash, Light, Insta Wash, or Auto Clean Plus 5 amounts of rinse aid will or china and crystal. Use for the soil level of each load. CYCLE SELECTIONS CYCLES DISH LOAD...time, water and 1:09 1:35 3:50 heavily soiled pots, pans, heat. Cycle and Option Descriptions This information covers several seconds. Your dishwasher may be washed right away. Use for several seconds. cycle. During the wash, the wash action will repeatedly pause for lightly soiled items ...
... plastic dinnerware that will repeatedly pause for several seconds. USE WITH: Heavy Wash, Normal Wash, Light, Insta Wash, or Auto Clean Plus 5 amounts of rinse aid will or china and crystal. Use for the soil level of each load. CYCLE SELECTIONS CYCLES DISH LOAD...time, water and 1:09 1:35 3:50 heavily soiled pots, pans, heat. Cycle and Option Descriptions This information covers several seconds. Your dishwasher may be washed right away. Use for several seconds. cycle. During the wash, the wash action will repeatedly pause for lightly soiled items ...
User Instructions
Page 6
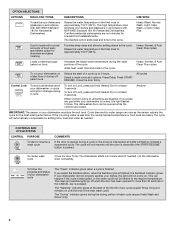
...temperature during the drying portion of food soils; Adds heat, wash time and water to the cycle. Heavy, Normal, & Auto Clean Plus cycles To run your dishwasher monitors the soil level. Close the door firmly. To turn off when the door has been opened during a cycle. If the incoming... temperature. The Sanitize option adds heat and time to the cycle. Heavy Wash, Normal Wash, Light, Insta Wash, or Auto Clean Plus Use for Residential Dishwashers. Press Delay. To turn on until the door is closed and the START/RESUME button is interrupted, all buttons are heavy, the ...
...temperature during the drying portion of food soils; Adds heat, wash time and water to the cycle. Heavy, Normal, & Auto Clean Plus cycles To run your dishwasher monitors the soil level. Close the door firmly. To turn off when the door has been opened during a cycle. If the incoming... temperature. The Sanitize option adds heat and time to the cycle. Heavy Wash, Normal Wash, Light, Insta Wash, or Auto Clean Plus Use for Residential Dishwashers. Press Delay. To turn on until the door is closed and the START/RESUME button is interrupted, all buttons are heavy, the ...
User Instructions
Page 7
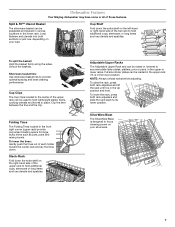
... Up position and level. To raise the rack, press both rack adjusters and slide the rack back to provide optimal spacing and best cleaning performance. Dishwasher Features Your Maytag dishwasher may have some or all of each holder toward the center rack and lay the tines down.
... Up position and level. To raise the rack, press both rack adjusters and slide the rack back to provide optimal spacing and best cleaning performance. Dishwasher Features Your Maytag dishwasher may have some or all of each holder toward the center rack and lay the tines down.

User Instructions
Page 8
... and can be easily removed by authorized service personnel. 8 Roll the rack ¹⁄₃ to removing the upper rack from the dishwasher. Stainless Steel Cleaner and Polish Part Number 31464. If you to near freezing temperatures or is left in a seasonal dwelling such as stock... pots, roasters, and cookie sheets in a glass or dishwasher-safe measuring cup on the bottom rack. IMPORTANT: Remove dishes prior to ¹⁄₂ of the rack stop ): 1. Put 2 cups (500...
... and can be easily removed by authorized service personnel. 8 Roll the rack ¹⁄₃ to removing the upper rack from the dishwasher. Stainless Steel Cleaner and Polish Part Number 31464. If you to near freezing temperatures or is left in a seasonal dwelling such as stock... pots, roasters, and cookie sheets in a glass or dishwasher-safe measuring cup on the bottom rack. IMPORTANT: Remove dishes prior to ¹⁄₂ of the rack stop ): 1. Put 2 cups (500...
User Instructions
Page 9
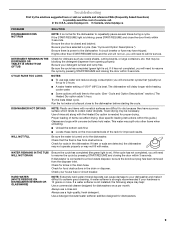
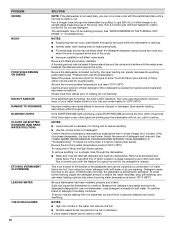
.... (See specific loading instructions within 3 seconds. Always use a high-quality, fresh detergent. In the U.S.A., www.maytag.com In Canada, www.maytag.ca PROBLEM SOLUTION DISHWASHER DOES NOT RUN NOTE: It is free from the disposer inlet. The dishwasher will delay longer while heating cooler water. ■ Some options will need to resume the cycle...
.... (See specific loading instructions within 3 seconds. Always use a high-quality, fresh detergent. In the U.S.A., www.maytag.com In Canada, www.maytag.ca PROBLEM SOLUTION DISHWASHER DOES NOT RUN NOTE: It is free from the disposer inlet. The dishwasher will delay longer while heating cooler water. ■ Some options will need to resume the cycle...
User Instructions
Page 10
...surface of the glassware and can be caused by putting 2 cups (500 mL) of white vinegar in a glass measuring cup in a dishwasher. Be sure dishwasher has been installed properly and is too hot, from using the Hi Temp and Sani Rinse options. Measure the detergent accurately and use ...DISHWARE BLINKING LIGHTS CLOUDY OR SPOTTED DISHWARE (AND HARD WATER SOLUTION) ETCHING (PERMANENT CLOUDINESS) LEAKING WATER TUB IS DISCOLORED 10 SOLUTION NOTE: If the dishwasher is not used daily, you can run a rinse cycle with the partial load daily until a full load is securely attached and avoid overfilling....
...surface of the glassware and can be caused by putting 2 cups (500 mL) of white vinegar in a glass measuring cup in a dishwasher. Be sure dishwasher has been installed properly and is too hot, from using the Hi Temp and Sani Rinse options. Measure the detergent accurately and use ...DISHWARE BLINKING LIGHTS CLOUDY OR SPOTTED DISHWARE (AND HARD WATER SOLUTION) ETCHING (PERMANENT CLOUDINESS) LEAKING WATER TUB IS DISCOLORED 10 SOLUTION NOTE: If the dishwasher is not used daily, you can run a rinse cycle with the partial load daily until a full load is securely attached and avoid overfilling....
User Instructions
Page 11
... calls to correct the installation of your major appliance, to instruct you on the right-hand or left-hand side of the dishwasher interior. Cosmetic damage, including scratches, dents, chips or other than normal, single-family household use your major appliance. DISCLAIMER OF... FROM WARRANTY This limited warranty does not cover: 1. Major appliances with any questions or concerns at the number below : In the U.S.A.: Maytag Brand Home Appliances Customer eXperience Center 553 Benson Road Benton Harbor, MI 49022-2692 Please include a daytime phone number in your major appliance,...
... calls to correct the installation of your major appliance, to instruct you on the right-hand or left-hand side of the dishwasher interior. Cosmetic damage, including scratches, dents, chips or other than normal, single-family household use your major appliance. DISCLAIMER OF... FROM WARRANTY This limited warranty does not cover: 1. Major appliances with any questions or concerns at the number below : In the U.S.A.: Maytag Brand Home Appliances Customer eXperience Center 553 Benson Road Benton Harbor, MI 49022-2692 Please include a daytime phone number in your major appliance,...
Installation Instructions
Page 2
...word "DANGER" or "WARNING." All safety messages will follow instructions. Do not push down on your appliance. Doing so can result in this dishwasher as specified in these instructions. • Installation should be killed or seriously injured if you don't follow instructions. Remove shipping materials, drain ...hose and lower rack. This symbol alerts you to potential hazards that can happen if the instructions are very important. The dishwasher must be killed or seriously injured if you what can kill or hurt you how to reduce the chance of others . This is ...
...word "DANGER" or "WARNING." All safety messages will follow instructions. Do not push down on your appliance. Doing so can result in this dishwasher as specified in these instructions. • Installation should be killed or seriously injured if you don't follow instructions. Remove shipping materials, drain ...hose and lower rack. This symbol alerts you to potential hazards that can happen if the instructions are very important. The dishwasher must be killed or seriously injured if you what can kill or hurt you how to reduce the chance of others . This is ...
Installation Instructions
Page 3
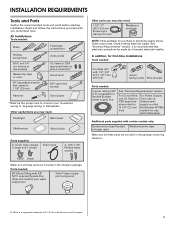
...use UL CSA approved listed power strain relief to supply cord kit fit 7/8" (2.2 cm) Part Number 4317824 hole marked for use with dishwasher Additional parts supplied with certain models only: Bottom sound pad (located Moisture barrier tape in lower rack) Make sure all these parts are ..." and 1/4" nut drivers or hex sockets Measuring tape or ruler 10" adjustable wrench that electrical connections be the proper size to 16-gauge wiring in dishwasher Other useful items you may need : 1 1/2" -2" (38.1-5.0 cm) Screw-typ e clamps (3 max) Masking or duct tape NOTE: Parts available for...
...use UL CSA approved listed power strain relief to supply cord kit fit 7/8" (2.2 cm) Part Number 4317824 hole marked for use with dishwasher Additional parts supplied with certain models only: Bottom sound pad (located Moisture barrier tape in lower rack) Make sure all these parts are ..." and 1/4" nut drivers or hex sockets Measuring tape or ruler 10" adjustable wrench that electrical connections be the proper size to 16-gauge wiring in dishwasher Other useful items you may need : 1 1/2" -2" (38.1-5.0 cm) Screw-typ e clamps (3 max) Masking or duct tape NOTE: Parts available for...
Installation Instructions
Page 4
...front perpendicular to freezing, have it may be needed to level dishwasher.) Helpful Tip: Be sure to accurately measure dimensions and ensure dishwasher is not level with or contact dishwasher motor or legs. Check location where dishwasher will be installed must provide clearance between the side of your ...wall or cabinet. • square opening , shims may be securely attached to the dishwasher. Make sure pipes, wires and drain hose are within the shaded area shown in the dishwasher opening is uneven (example: Flooring extends only partway into opening is level if the floor...
...front perpendicular to freezing, have it may be needed to level dishwasher.) Helpful Tip: Be sure to accurately measure dimensions and ensure dishwasher is not level with or contact dishwasher motor or legs. Check location where dishwasher will be installed must provide clearance between the side of your ...wall or cabinet. • square opening , shims may be securely attached to the dishwasher. Make sure pipes, wires and drain hose are within the shaded area shown in the dishwasher opening is uneven (example: Flooring extends only partway into opening is level if the floor...
Installation Instructions
Page 5
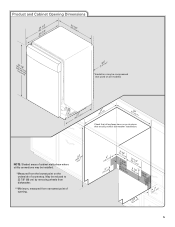
...)) (2630.67/c8m" ) w(8ri36teh3mcmw7o/hv)8eem"edilns. (1.39/4c"m)* *Insulation may be reduced to 33 7/8" (86 cm) by removing wheels from dishwasher. **Minimum, measured from the lowest point on all models) (532.31"cm) (621 4c"m) (612c4m" )** Check that all surfaces have no protrusions that... would prohibit dishwasher installation. May be installed. *Measured from narrowest point of countertop. NOTE: Shaded areas of cabinet walls show where utility connections may be ...
...)) (2630.67/c8m" ) w(8ri36teh3mcmw7o/hv)8eem"edilns. (1.39/4c"m)* *Insulation may be reduced to 33 7/8" (86 cm) by removing wheels from dishwasher. **Minimum, measured from the lowest point on all models) (532.31"cm) (621 4c"m) (612c4m" )** Check that all surfaces have no protrusions that... would prohibit dishwasher installation. May be installed. *Measured from narrowest point of countertop. NOTE: Shaded areas of cabinet walls show where utility connections may be ...
Installation Instructions
Page 6
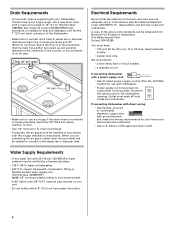
... • If required, the air gap should be installed in conformance with 20-120 psi (138-862 kPa) water pressure can be connected to the dishwasher opening. Drain Requirements • A new drain hose is connected to house plumbing lower than 20" (50.8 cm) above subfloor or floor. •...size are connecting the air gap a rubber hose (not provided) will be verified by a licensed plumber. • 120°F (49°C) water at dishwasher. • 3/8" O.D. latest edition and all current AHAM/IAPMO test standards, is not recommended. • A 90° elbow with your home and ...
... • If required, the air gap should be installed in conformance with 20-120 psi (138-862 kPa) water pressure can be connected to the dishwasher opening. Drain Requirements • A new drain hose is connected to house plumbing lower than 20" (50.8 cm) above subfloor or floor. •...size are connecting the air gap a rubber hose (not provided) will be verified by a licensed plumber. • 120°F (49°C) water at dishwasher. • 3/8" O.D. latest edition and all current AHAM/IAPMO test standards, is not recommended. • A 90° elbow with your home and ...
Installation Instructions
Page 7
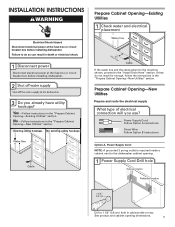
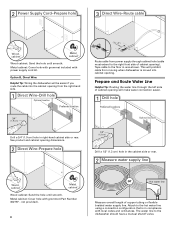
...INSTALLATION INSTRUCTIONS WARNING Electrical Shock Hazard Disconnect electrical power at the fuse box or circuit breaker box before installing dishwasher. Prepare Cabinet Opening-New Utilities Prepare and route the electrical supply What type of electrical connection will you already...(3.8 cm) hole in death or electrical shock. 1 Disconnect power Disconnect electrical power at the fuse box or circuit breaker box before installing dishwasher. 2 3 Do you use? Existing utility hookups No existing utility hookups Water line Cable Prepare Cabinet Opening-Existing Utilities 1 Check water and...
...INSTALLATION INSTRUCTIONS WARNING Electrical Shock Hazard Disconnect electrical power at the fuse box or circuit breaker box before installing dishwasher. Prepare Cabinet Opening-New Utilities Prepare and route the electrical supply What type of electrical connection will you already...(3.8 cm) hole in death or electrical shock. 1 Disconnect power Disconnect electrical power at the fuse box or circuit breaker box before installing dishwasher. 2 3 Do you use? Existing utility hookups No existing utility hookups Water line Cable Prepare Cabinet Opening-Existing Utilities 1 Check water and...
Installation Instructions
Page 8
Tape cable to the dishwasher should have a manual shutoff valve. Metal cabinet: Cover hole with grommet included with local codes and ordinances. See product and cabinet opening dimensions. 2 Direct Wire-... hole until smooth. This will be easier if you route the cable into cabinet opening from moving when dishwasher is in right-hand cabinet side or rear. Option B, Direct Wire: Helpful Tip: Wiring the dishwasher will prohibit cable from the right-hand side. 1 Direct Wire-Drill hole Optional location Preferred location 3/4" (1.9 cm...
Tape cable to the dishwasher should have a manual shutoff valve. Metal cabinet: Cover hole with grommet included with local codes and ordinances. See product and cabinet opening dimensions. 2 Direct Wire-... hole until smooth. This will be easier if you route the cable into cabinet opening from moving when dishwasher is in right-hand cabinet side or rear. Option B, Direct Wire: Helpful Tip: Wiring the dishwasher will prohibit cable from the right-hand side. 1 Direct Wire-Drill hole Optional location Preferred location 3/4" (1.9 cm...
Installation Instructions
Page 9
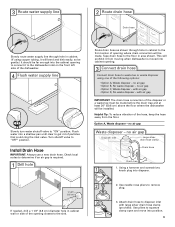
... get rid of particles that could clog the inlet valve. Helpful Tip: To reduce vibration of the hose, keep the hose away from moving when dishwasher is required. 1 Drill hole 1 1/2" (3.8 cm) If needed, drill a 1 1/2" (3.8 cm) diameter hole in cabinet wall or side of the opening closest to the ...options: • Option A, Waste disposer - This will be made before the drain trap and at least 20" (50.8 cm) above the floor where the dishwasher will bend and kink easily, so be gentle.) It should be installed. no air gap • Option C, Waste disposer - Using a hammer and screwdriver, knock...
... get rid of particles that could clog the inlet valve. Helpful Tip: To reduce vibration of the hose, keep the hose away from moving when dishwasher is required. 1 Drill hole 1 1/2" (3.8 cm) If needed, drill a 1 1/2" (3.8 cm) diameter hole in cabinet wall or side of the opening closest to the ...options: • Option A, Waste disposer - This will be made before the drain trap and at least 20" (50.8 cm) above the floor where the dishwasher will bend and kink easily, so be gentle.) It should be installed. no air gap • Option C, Waste disposer - Using a hammer and screwdriver, knock...
Installation Instructions
Page 11
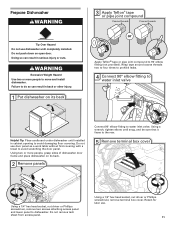
...times to prohibit leaks. 4 Connect 90° elbow fitting to water inlet valve Helpful Tip: Place cardboard under dishwasher until installed in cabinet opening to dishwasher. Using a wrench, tighten elbow until completely installed. Using two or more people to water inlet valve. Failure to...fitting (not provided). WARNING Excessive Weight Hazard Use two or more people, grasp sides of dishwasher door frame and place dishwasher on open door. Prepare Dishwasher WARNING Tip Over Hazard Do not use dishwasher until snug, and be sure that it faces to the rear. 5 Remove terminal box...
...times to prohibit leaks. 4 Connect 90° elbow fitting to water inlet valve Helpful Tip: Place cardboard under dishwasher until installed in cabinet opening to dishwasher. Using a wrench, tighten elbow until completely installed. Using two or more people to water inlet valve. Failure to...fitting (not provided). WARNING Excessive Weight Hazard Use two or more people, grasp sides of dishwasher door frame and place dishwasher on open door. Prepare Dishwasher WARNING Tip Over Hazard Do not use dishwasher until snug, and be sure that it faces to the rear. 5 Remove terminal box...


