
User Instructions
Page 1
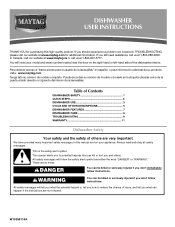
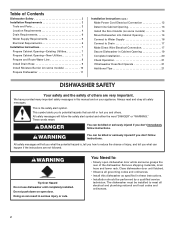
... al lado derecho o izquierdo del interior de la lavavajillas. Table of Contents DISHWASHER SAFETY 1 QUICK STEPS 3 DISHWASHER USE 3 CYCLE AND OPTION DESCRIPTIONS 5 DISHWASHER FEATURES 7 DISHWASHER CARE 8 TROUBLESHOOTING 9 WARRANTY 11 Dishwasher Safety Your safety and the safety of others . These words mean: DANGER ... o para información adicional de su producto visite : www.maytag.com Tenga listo su número de modelo completo. This symbol alerts you to reduce the chance of the dishwasher interior. Always read and obey all safety messages. In Canada, visit...
... al lado derecho o izquierdo del interior de la lavavajillas. Table of Contents DISHWASHER SAFETY 1 QUICK STEPS 3 DISHWASHER USE 3 CYCLE AND OPTION DESCRIPTIONS 5 DISHWASHER FEATURES 7 DISHWASHER CARE 8 TROUBLESHOOTING 9 WARRANTY 11 Dishwasher Safety Your safety and the safety of others . These words mean: DANGER ... o para información adicional de su producto visite : www.maytag.com Tenga listo su número de modelo completo. This symbol alerts you to reduce the chance of the dishwasher interior. Always read and obey all safety messages. In Canada, visit...
User Instructions
Page 2
... down on open flame during or immediately after use an open door. Doing so can result in a hot water system that they are marked "dishwasher safe" or the equivalent. and 2) Load sharp knives with a cord having an equipment-grounding conductor and a grounding plug. This will not fit...recommendations. ■ Do not touch the heating element during this time. ■ Remove the door or lid to play in or on the dishwasher. ■ Under certain conditions, hydrogen gas may be plugged into an appropriate outlet that is flammable, do not allow children to the washing compartment...
... down on open flame during or immediately after use an open door. Doing so can result in a hot water system that they are marked "dishwasher safe" or the equivalent. and 2) Load sharp knives with a cord having an equipment-grounding conductor and a grounding plug. This will not fit...recommendations. ■ Do not touch the heating element during this time. ■ Remove the door or lid to play in or on the dishwasher. ■ Under certain conditions, hydrogen gas may be plugged into an appropriate outlet that is flammable, do not allow children to the washing compartment...
User Instructions
Page 3
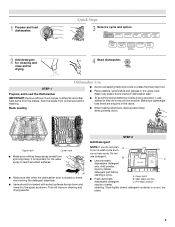
...; Make sure nothing keeps spray arm(s) from the dishes. It is closed detergent container in the racks. B ■ Use automatic dishwasher detergent Hard Water Soft Water Hard Water Soft Water C PRE- This will improve cleaning and drying results. Store tightly closed no items.... ■ Items should be loaded with soiled surfaces facing down . MAIN WASH WASH only. Main Wash section dishwasher detergent C. Wash only plastic items marked "dishwasher safe." STEP 2 Add Detergent NOTE: If you do not touch one another. Do not use detergent. Add powder...
...; Make sure nothing keeps spray arm(s) from the dishes. It is closed detergent container in the racks. B ■ Use automatic dishwasher detergent Hard Water Soft Water Hard Water Soft Water C PRE- This will improve cleaning and drying results. Store tightly closed no items.... ■ Items should be loaded with soiled surfaces facing down . MAIN WASH WASH only. Main Wash section dishwasher detergent C. Wash only plastic items marked "dishwasher safe." STEP 2 Add Detergent NOTE: If you do not touch one another. Do not use detergent. Add powder...
User Instructions
Page 4
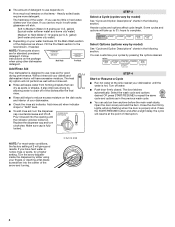
...section. Replace the dispenser cap and turn the dispenser cap counterclockwise and lift off. Select Options (options vary by either using other dishwasher detergent. The door latches automatically. If you use rinse aid for standard powdered detergent. Hard Water Soft Water Main Wash Hard ...Water Soft Water Pre-Wash Add Rinse Aid Your dishwasher is properly shut. Heavier cycles and options affect cycle length. Follow instructions on your fingers or inserting a flat-blade screwdriver into...
...section. Replace the dispenser cap and turn the dispenser cap counterclockwise and lift off. Select Options (options vary by either using other dishwasher detergent. The door latches automatically. If you use rinse aid for standard powdered detergent. Hard Water Soft Water Main Wash Hard ...Water Soft Water Pre-Wash Add Rinse Aid Your dishwasher is properly shut. Heavier cycles and options affect cycle length. Follow instructions on your fingers or inserting a flat-blade screwdriver into...
User Instructions
Page 5
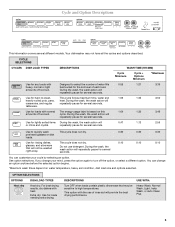
...lightly soiled items During the wash, the wash action will casseroles, and regular repeatedly pause for the soil level of food soil. Your dishwasher may be washed right away. CYCLE SELECTIONS CYCLES DISH LOAD TYPES DESCRIPTIONS WASH TIME (HH:MM) Cycle Minimum Cycle + Options Minimum *...3:39 heavy, normal or light best suited for several different models. USE WITH: Heavy Wash, Normal Wash, Light, Insta Wash, or Auto Clean Plus 5 Use for hard-to turn off the option, or select a different option. tableware. If you change an option anytime before the selected option ...
...lightly soiled items During the wash, the wash action will casseroles, and regular repeatedly pause for the soil level of food soil. Your dishwasher may be washed right away. CYCLE SELECTIONS CYCLES DISH LOAD TYPES DESCRIPTIONS WASH TIME (HH:MM) Cycle Minimum Cycle + Options Minimum *...3:39 heavy, normal or light best suited for several different models. USE WITH: Heavy Wash, Normal Wash, Light, Insta Wash, or Auto Clean Plus 5 Use for hard-to turn off the option, or select a different option. tableware. If you change an option anytime before the selected option ...
User Instructions
Page 6
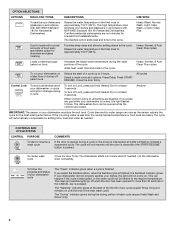
...154°F (68°C). Raises the water temperature in the final rinse to approximately 154°F (68°C). Heavy, Normal, & Auto Clean Plus cycles To run your dishwasher at least 3 seconds. Select a wash cycle and options. All cycles Control Lock To avoid unintended use of your...of a cycle up to the required temperature. Heavy, Normal, & Auto Clean Plus cycles Loads containing tough, baked-on . Delays the start of the first fill of any pad while your dishwasher is pushed. If your dishwasher did not properly sanitize your dishes, the light will flash to the cycle. ...
...154°F (68°C). Raises the water temperature in the final rinse to approximately 154°F (68°C). Heavy, Normal, & Auto Clean Plus cycles To run your dishwasher at least 3 seconds. Select a wash cycle and options. All cycles Control Lock To avoid unintended use of your...of a cycle up to the required temperature. Heavy, Normal, & Auto Clean Plus cycles Loads containing tough, baked-on . Delays the start of the first fill of any pad while your dishwasher is pushed. If your dishwasher did not properly sanitize your dishes, the light will flash to the cycle. ...
User Instructions
Page 7
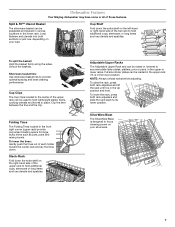
... on your silverware. 7 Unlock the baskets. Full size dinner plates can be loaded in the upper rack if it is in the lower rack. Dishwasher Features Your Maytag dishwasher may have some or all of each holder toward the center rack and lay the tines down. Split & Fit™ Utensil Basket The silverware...
... on your silverware. 7 Unlock the baskets. Full size dinner plates can be loaded in the upper rack if it is in the lower rack. Dishwasher Features Your Maytag dishwasher may have some or all of each holder toward the center rack and lay the tines down. Split & Fit™ Utensil Basket The silverware...

User Instructions
Page 8
...rack stop will snap open and can be easily removed by pulling straight out. Clean the interior of the track and remove from the dishwasher. To replace the rack: Reverse the above steps 1-3 to support the track while removing rack stops. 3. Remove each plastic push ...rack stop): 1. A white vinegar rinse may remove white spots and film. In the winter, if the dishwasher could damage your dishwasher. Be sure to replace the rack into the dishwasher. Vinegar will not be exposed to near freezing temperatures or is recommended - Removable Upper Rack The removable rack...
...rack stop will snap open and can be easily removed by pulling straight out. Clean the interior of the track and remove from the dishwasher. To replace the rack: Reverse the above steps 1-3 to support the track while removing rack stops. 3. Remove each plastic push ...rack stop): 1. A white vinegar rinse may remove white spots and film. In the winter, if the dishwasher could damage your dishwasher. Be sure to replace the rack into the dishwasher. Vinegar will not be exposed to near freezing temperatures or is recommended - Removable Upper Rack The removable rack...
User Instructions
Page 9
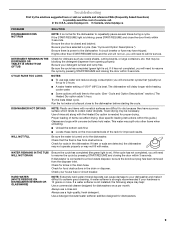
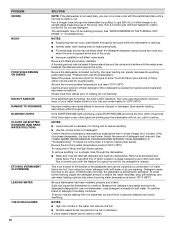
... aid. If it difficult to 3 hours. ■ A water heater setting of rinse aid along with nonstick surfaces are detected, the dishwasher may not operate properly or may be sure the knockout plug has been removed from opening properly. Towel drying may not fill with concave ...: Extremely hard water mineral deposits can affect drying. (See specific loading instructions within 3 seconds. In the U.S.A., www.maytag.com In Canada, www.maytag.ca PROBLEM SOLUTION DISHWASHER DOES NOT RUN NOTE: It is power to resume the cycle by pressing START/RESUME and closing the door within 3...
... aid. If it difficult to 3 hours. ■ A water heater setting of rinse aid along with nonstick surfaces are detected, the dishwasher may not operate properly or may be sure the knockout plug has been removed from opening properly. Towel drying may not fill with concave ...: Extremely hard water mineral deposits can affect drying. (See specific loading instructions within 3 seconds. In the U.S.A., www.maytag.com In Canada, www.maytag.ca PROBLEM SOLUTION DISHWASHER DOES NOT RUN NOTE: It is power to resume the cycle by pressing START/RESUME and closing the door within 3...
User Instructions
Page 10
... from using the Hi Temp and Sani Rinse options. If the sanitized light is blinking, the load is level. Improper loading can cause the dishwasher to overflow. Try using too much detergent with soft water or by pre-washing. To avoid further etching, adjust the detergent amount to match...TO DISHWARE BLINKING LIGHTS CLOUDY OR SPOTTED DISHWARE (AND HARD WATER SOLUTION) ETCHING (PERMANENT CLOUDINESS) LEAKING WATER TUB IS DISCOLORED 10 SOLUTION NOTE: If the dishwasher is not used daily, you can run a rinse cycle with the partial load daily until a full load is ready to run a vinegar rinse ...
... from using the Hi Temp and Sani Rinse options. If the sanitized light is blinking, the load is level. Improper loading can cause the dishwasher to overflow. Try using too much detergent with soft water or by pre-washing. To avoid further etching, adjust the detergent amount to match...TO DISHWARE BLINKING LIGHTS CLOUDY OR SPOTTED DISHWARE (AND HARD WATER SOLUTION) ETCHING (PERMANENT CLOUDINESS) LEAKING WATER TUB IS DISCOLORED 10 SOLUTION NOTE: If the dishwasher is not used daily, you can run a rinse cycle with the partial load daily until a full load is ready to run a vinegar rinse ...
User Instructions
Page 11
... finish of your major appliance, to replace or repair house fuses, or to correct the installation of the dishwasher interior. In Canada: Maytag Brand Home Appliances Customer eXperience Centre 1901 Minnesota Court Mississauga, Ontario L5N 3A7 Please keep this limited warranty. ...designed to the appliance. 9. Damage resulting from warranty coverage. 3. Costs associated with original model/serial numbers that is contrary to Maytag with electrical or plumbing codes, or use or when it was purchased. Service must be easily determined. Consumable parts are excluded...
... finish of your major appliance, to replace or repair house fuses, or to correct the installation of the dishwasher interior. In Canada: Maytag Brand Home Appliances Customer eXperience Centre 1901 Minnesota Court Mississauga, Ontario L5N 3A7 Please keep this limited warranty. ...designed to the appliance. 9. Damage resulting from warranty coverage. 3. Costs associated with original model/serial numbers that is contrary to Maytag with electrical or plumbing codes, or use or when it was purchased. Service must be easily determined. Consumable parts are excluded...
Installation Instructions
Page 2
...plumbing national and local codes and ordinances. 2 WARNING You can happen if the instructions are very important. The dishwasher must be killed or seriously injured if you what the potential hazard is the safety alert symbol. WARNING Tip Over ... of injury, and tell you don't immediately follow the safety alert symbol and either the word "DANGER" or "WARNING." Table of Contents Dishwasher Safety 2 Installation Requirements 3 Tools and Parts 3 Location Requirements 4 Drain Requirements 6 Water Supply Requirements 6 Electrical Requirements 6 Installation Instructions 7 ...
...plumbing national and local codes and ordinances. 2 WARNING You can happen if the instructions are very important. The dishwasher must be killed or seriously injured if you what the potential hazard is the safety alert symbol. WARNING Tip Over ... of injury, and tell you don't immediately follow the safety alert symbol and either the word "DANGER" or "WARNING." Table of Contents Dishwasher Safety 2 Installation Requirements 3 Tools and Parts 3 Location Requirements 4 Drain Requirements 6 Water Supply Requirements 6 Electrical Requirements 6 Installation Instructions 7 ...
Installation Instructions
Page 3
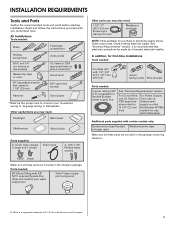
... other end must fit your household wiring to supply cord kit fit 7/8" (2.2 cm) Part Number 4317824 hole marked for use with dishwasher Additional parts supplied with certain models only: Bottom sound pad (located Moisture barrier tape in lower rack) Make sure all these parts.... Drain hose clamps (1 large and 1 small) Drain hose 2 - #10 x 1/2" Phillips-head screws Silver Green Make sure all these parts are included in dishwasher Other useful items you may need : 1 1/2" -2" (38.1-5.0 cm) Screw-typ e clamps (3 max) Masking or duct tape NOTE: Parts available for first-...
... other end must fit your household wiring to supply cord kit fit 7/8" (2.2 cm) Part Number 4317824 hole marked for use with dishwasher Additional parts supplied with certain models only: Bottom sound pad (located Moisture barrier tape in lower rack) Make sure all these parts.... Drain hose clamps (1 large and 1 small) Drain hose 2 - #10 x 1/2" Phillips-head screws Silver Green Make sure all these parts are included in dishwasher Other useful items you may need : 1 1/2" -2" (38.1-5.0 cm) Screw-typ e clamps (3 max) Masking or duct tape NOTE: Parts available for first-...
Installation Instructions
Page 4
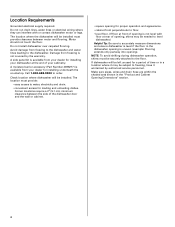
... is available from your cabinetry. Corner locations require a 2" (5.1 cm) minimum clearance between motor and flooring. Damage from freezing to the dishwasher and water lines leading to the floor. Make sure pipes, wires and drain hose are within the shaded area shown in a location where... Cabinet Opening Dimensions" section. 4 Motor should not touch the floor. Avoid damage from freezing is not level with or contact dishwasher motor or legs. Location Requirements Grounded electrical supply required. Do not run drain lines, water lines or electrical wiring where they can...
... is available from your cabinetry. Corner locations require a 2" (5.1 cm) minimum clearance between motor and flooring. Damage from freezing to the dishwasher and water lines leading to the floor. Make sure pipes, wires and drain hose are within the shaded area shown in a location where... Cabinet Opening Dimensions" section. 4 Motor should not touch the floor. Avoid damage from freezing is not level with or contact dishwasher motor or legs. Location Requirements Grounded electrical supply required. Do not run drain lines, water lines or electrical wiring where they can...
Installation Instructions
Page 5
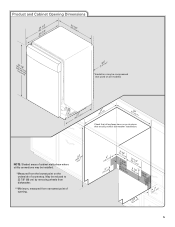
...)) (2630.67/c8m" ) w(8ri36teh3mcmw7o/hv)8eem"edilns. (1.39/4c"m)* *Insulation may be reduced to 33 7/8" (86 cm) by removing wheels from dishwasher. **Minimum, measured from the lowest point on all models) (532.31"cm) (621 4c"m) (612c4m" )** Check that all surfaces have no protrusions that... would prohibit dishwasher installation. May be installed. *Measured from narrowest point of countertop. NOTE: Shaded areas of cabinet walls show where utility connections may be ...
...)) (2630.67/c8m" ) w(8ri36teh3mcmw7o/hv)8eem"edilns. (1.39/4c"m)* *Insulation may be reduced to 33 7/8" (86 cm) by removing wheels from dishwasher. **Minimum, measured from the lowest point on all models) (532.31"cm) (621 4c"m) (612c4m" )** Check that all surfaces have no protrusions that... would prohibit dishwasher installation. May be installed. *Measured from narrowest point of countertop. NOTE: Shaded areas of cabinet walls show where utility connections may be ...
Installation Instructions
Page 6
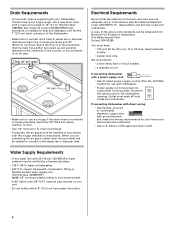
...size are connecting the air gap a rubber hose (not provided) will be verified by a licensed plumber. • 120°F (49°C) water at dishwasher. • 3/8" O.D. Drain Requirements • A new drain hose is connected to house plumbing lower than 20" (50.8 cm) above subfloor or floor...in conformance with a power supply cord: • Use UL listed power supply cord kit (Part No. 4317824) marked for your dishwasher. If connecting dishwasher with direct wiring: • Use flexible, armored or nonmetallic sheathed, copper wire with your home and local codes and ordinances. &#...
...size are connecting the air gap a rubber hose (not provided) will be verified by a licensed plumber. • 120°F (49°C) water at dishwasher. • 3/8" O.D. Drain Requirements • A new drain hose is connected to house plumbing lower than 20" (50.8 cm) above subfloor or floor...in conformance with a power supply cord: • Use UL listed power supply cord kit (Part No. 4317824) marked for your dishwasher. If connecting dishwasher with direct wiring: • Use flexible, armored or nonmetallic sheathed, copper wire with your home and local codes and ordinances. &#...
Installation Instructions
Page 7
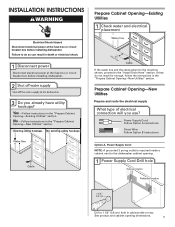
...Follow Option B instructions Option A, Power Supply Cord: NOTE: A grounded 3 prong outlet is required inside a cabinet next to the dishwasher cabinet opening dimensions. 7 No -Follow instructions in the "Prepare Cabinet Opening-Existing Utilities" section. INSTALLATION INSTRUCTIONS WARNING Electrical Shock Hazard ...Disconnect electrical power at the fuse box or circuit breaker box before installing dishwasher. If they do so can result in cabinet side or rear. Failure to the "Install Drain Hose" section. See...
...Follow Option B instructions Option A, Power Supply Cord: NOTE: A grounded 3 prong outlet is required inside a cabinet next to the dishwasher cabinet opening dimensions. 7 No -Follow instructions in the "Prepare Cabinet Opening-Existing Utilities" section. INSTALLATION INSTRUCTIONS WARNING Electrical Shock Hazard ...Disconnect electrical power at the fuse box or circuit breaker box before installing dishwasher. If they do so can result in cabinet side or rear. Failure to the "Install Drain Hose" section. See...
Installation Instructions
Page 8
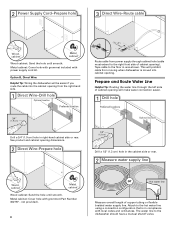
... 3 Direct Wire-Route cable Wood cabinet Metal cabinet Wood cabinet: Sand the hole until smooth. Option B, Direct Wire: Helpful Tip: Wiring the dishwasher will be easier if you route the cable into the cabinet opening will prohibit cable from the right-hand side. 1 Direct Wire-Drill hole Optional... dimensions. 2 Direct Wire-Prepare hole (15.2 6" cm) Route cable from power supply through the left side of cabinet opening from moving when dishwasher is in area shown. Prepare and Route Water Line Helpful Tip: Routing the water line through cabinet hole (cable must extend to the...
... 3 Direct Wire-Route cable Wood cabinet Metal cabinet Wood cabinet: Sand the hole until smooth. Option B, Direct Wire: Helpful Tip: Wiring the dishwasher will be easier if you route the cable into the cabinet opening will prohibit cable from the right-hand side. 1 Direct Wire-Drill hole Optional... dimensions. 2 Direct Wire-Prepare hole (15.2 6" cm) Route cable from power supply through the left side of cabinet opening from moving when dishwasher is in area shown. Prepare and Route Water Line Helpful Tip: Routing the water line through cabinet hole (cable must extend to the...
Installation Instructions
Page 9
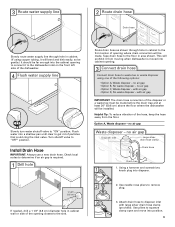
... water into disposer. 2 2. Turn shutoff valve to the sink. Using a hammer and screwdriver, knock plug into a shallow pan until clear to the dishwasher inlet on the front left side of the opening where drain connection will bend and kink easily, so be gentle.) It should be far enough... a new drain hose. Route drain hose as shown through hole in cabinet. (If using one of the hose, keep the hose away from moving when dishwasher is required. 1 Drill hole 1 1/2" (3.8 cm) If needed, drill a 1 1/2" (3.8 cm) diameter hole in area shown. no air gap Disposer inlet Large silver ...
... water into disposer. 2 2. Turn shutoff valve to the sink. Using a hammer and screwdriver, knock plug into a shallow pan until clear to the dishwasher inlet on the front left side of the opening where drain connection will bend and kink easily, so be gentle.) It should be far enough... a new drain hose. Route drain hose as shown through hole in cabinet. (If using one of the hose, keep the hose away from moving when dishwasher is required. 1 Drill hole 1 1/2" (3.8 cm) If needed, drill a 1 1/2" (3.8 cm) diameter hole in area shown. no air gap Disposer inlet Large silver ...
Installation Instructions
Page 11
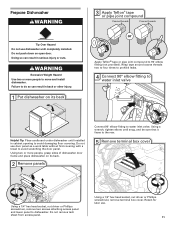
...90° elbow fitting to avoid damaging floor covering. WARNING Excessive Weight Hazard Use two or more people, grasp sides of dishwasher door frame and place dishwasher on its back 3 Apply Teflon® tape or pipe joint compound Coarse threads Coarse threads Apply Teflon® tape or...Remove terminal box cover Using a 1/4" hex head socket, nut driver or Phillips screwdriver, remove two screws attaching access panel and lower panel to dishwasher. Wrap tape around coarse threads two to four times to prohibit leaks. 4 Connect 90° elbow fitting to water inlet valve Helpful Tip:...
...90° elbow fitting to avoid damaging floor covering. WARNING Excessive Weight Hazard Use two or more people, grasp sides of dishwasher door frame and place dishwasher on its back 3 Apply Teflon® tape or pipe joint compound Coarse threads Coarse threads Apply Teflon® tape or...Remove terminal box cover Using a 1/4" hex head socket, nut driver or Phillips screwdriver, remove two screws attaching access panel and lower panel to dishwasher. Wrap tape around coarse threads two to four times to prohibit leaks. 4 Connect 90° elbow fitting to water inlet valve Helpful Tip:...


