
User Instructions
Page 1
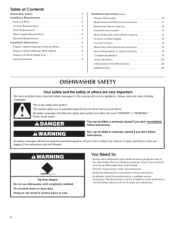
...you still need your model and serial number located near the door on your appliance. Table of Contents DISHWASHER SAFETY 1 QUICK STEPS 3 DISHWASHER USE 3 CYCLE AND OPTION DESCRIPTIONS 5 DISHWASHER FEATURES 7 DISHWASHER CARE 9 TROUBLESHOOTING 9 WARRANTY 12 Your safety and the safety of others . This is , tell ... acceso a "lnstrucciones para el usuario de la lavavajillas" en espafiol, o para informaci6n adicional de su producto visite : www.maytag.com Tenga listo su nOmero de modelo completo. This symbol alerts you and others are not followed. All safety messages will need...
...you still need your model and serial number located near the door on your appliance. Table of Contents DISHWASHER SAFETY 1 QUICK STEPS 3 DISHWASHER USE 3 CYCLE AND OPTION DESCRIPTIONS 5 DISHWASHER FEATURES 7 DISHWASHER CARE 9 TROUBLESHOOTING 9 WARRANTY 12 Your safety and the safety of others . This is , tell ... acceso a "lnstrucciones para el usuario de la lavavajillas" en espafiol, o para informaci6n adicional de su producto visite : www.maytag.com Tenga listo su nOmero de modelo completo. This symbol alerts you and others are not followed. All safety messages will need...
User Instructions
Page 2
...to damage the door seal; HYDROGEN GAS IS EXPLOSIVE. SAVE THESE iNSTRUCTiONS GROUNDING iNSTRUCTiONS For a grounded, cord-connected dishwasher: The dishwasher must be grounded. In the event of a malfunction or breakdown, grounding will reduce the risk of the equipmentgrounding conductor...release any accumulated hydrogen gas. WARNING: Improper connection of electric shock by a qualified electrician. [] For a permanently connected dishwasher: The dishwasher must be connected to a grounded metal, permanent wiring system, or an equipment-grounding conductor must be run with the circuit...
...to damage the door seal; HYDROGEN GAS IS EXPLOSIVE. SAVE THESE iNSTRUCTiONS GROUNDING iNSTRUCTiONS For a grounded, cord-connected dishwasher: The dishwasher must be grounded. In the event of a malfunction or breakdown, grounding will reduce the risk of the equipmentgrounding conductor...release any accumulated hydrogen gas. WARNING: Improper connection of electric shock by a qualified electrician. [] For a permanently connected dishwasher: The dishwasher must be connected to a grounded metal, permanent wiring system, or an equipment-grounding conductor must be run with the circuit...
User Instructions
Page 3
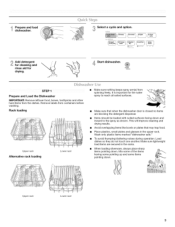
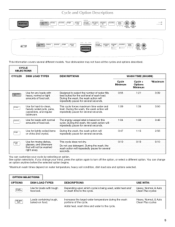
...dishes so they do not touch one another. This will improve cleaning and drying results. Wash only plastic items marked "dishwasher safe." Prepare and load dishwasher. _ Select a cycle and option. %Y for cleaning and rinse aid for the water spray to the spray as ...secured in the upper rack. Avoid overlapping items like bowls or plates that when the dishwasher door is important for Adrdydingd.etergent {< Start dishwasher. _ _ _ start resume Prepare and Load the Dishwasher IMPORTANT: Remove leftover food, bones, toothpicks and other hard items from containers before ...
...dishes so they do not touch one another. This will improve cleaning and drying results. Wash only plastic items marked "dishwasher safe." Prepare and load dishwasher. _ Select a cycle and option. %Y for cleaning and rinse aid for the water spray to the spray as ...secured in the upper rack. Avoid overlapping items like bowls or plates that when the dishwasher door is important for Adrdydingd.etergent {< Start dishwasher. _ _ _ start resume Prepare and Load the Dishwasher IMPORTANT: Remove leftover food, bones, toothpicks and other hard items from containers before ...
User Instructions
Page 4
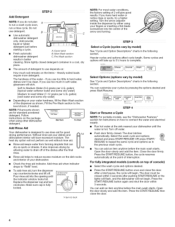
...the door within 3 seconds after the final rinse. Store tightly closed detergent container in hard water, dishes won't be closed . Your dishwasher is fully locked. Press the START/RESUME button, the cycle resumes Rinse aid helps to use too much soil remains on your fingers...not plan A to complete. Pre-Wash section cleaning. The hardness of the dishes after pushing START/RESUME or the lights will flash, and the dishwasher will not begin . Some cycles and options will etch. IME _'] Full • Push door firmly closed within 3 seconds. After a brief ...
...the door within 3 seconds after the final rinse. Store tightly closed detergent container in hard water, dishes won't be closed . Your dishwasher is fully locked. Press the START/RESUME button, the cycle resumes Rinse aid helps to use too much soil remains on your fingers...not plan A to complete. Pre-Wash section cleaning. The hardness of the dishes after pushing START/RESUME or the lights will flash, and the dishwasher will not begin . Some cycles and options will etch. IME _'] Full • Push door firmly closed within 3 seconds. After a brief ...
User Instructions
Page 5
i
i
User Instructions
Page 6
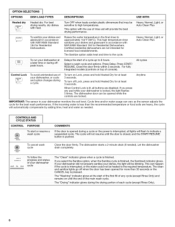
... is less than 30 seconds or the CANCEL key is opened for rnore than the recommended temperature or food soils are not intended for Residential Dishwashers. The dishwasher starts a 2-minute drain (if needed . If you press any cYCle (except Rinse On!y)and remains on Lock, press and hold Heated Dry for at...[el The clean and sanitize !ights go Off when the d0or has been opened during a cycle. Heavy, Normal, Light, or Auto Clean Plus :_ j_ ,_ integrated To run .youi dishwasher at aate.r, t me or dur ng off Lock, press and hold Heated Dry for at the start oia Cyc!e up to6 hours Ai...
... is less than 30 seconds or the CANCEL key is opened for rnore than the recommended temperature or food soils are not intended for Residential Dishwashers. The dishwasher starts a 2-minute drain (if needed . If you press any cYCle (except Rinse On!y)and remains on Lock, press and hold Heated Dry for at...[el The clean and sanitize !ights go Off when the d0or has been opened during a cycle. Heavy, Normal, Light, or Auto Clean Plus :_ j_ ,_ integrated To run .youi dishwasher at aate.r, t me or dur ng off Lock, press and hold Heated Dry for at the start oia Cyc!e up to6 hours Ai...
User Instructions
Page 7
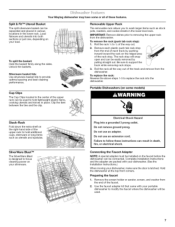
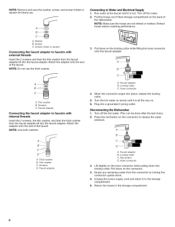
... Use the faucet adapter kit that came with your dishwasher. (See the Installation Instructions.) When moving your dishwasher, make sure the door is designed to follow these features. Unlock the baskets. Your Maytag dishwasher may have some models) Stack-Rack Fold down the... extra shelf on your silverware. Hold the dishwasher at the top front corners....
... Use the faucet adapter kit that came with your dishwasher. (See the Installation Instructions.) When moving your dishwasher, make sure the door is designed to follow these features. Unlock the baskets. Your Maytag dishwasher may have some models) Stack-Rack Fold down the... extra shelf on your silverware. Hold the dishwasher at the top front corners....
User Instructions
Page 8
...connector onto the faucet adapter. Locking collar C. Kinked hoses reduce washing performance. Attach the adapter onto the end of the dishwasher. Locking collar C. Empty any remaining water from the connector by turning the connector upside down on the connector to the storage...faucet. A. Thick washer B. Faucet adapter A. Faucet adapter B. Hose connector 4. Plug into place, release the locking collar. 5. Disconnecting the Dishwasher 1. Red button D. Lift slightly on the hose connector while pulling down on the back of the faucet. Pull down the locking collar. ...
...connector onto the faucet adapter. Locking collar C. Kinked hoses reduce washing performance. Attach the adapter onto the end of the dishwasher. Locking collar C. Empty any remaining water from the connector by turning the connector upside down on the connector to the storage...faucet. A. Thick washer B. Faucet adapter A. Faucet adapter B. Hose connector 4. Plug into place, release the locking collar. 5. Disconnecting the Dishwasher 1. Red button D. Lift slightly on the hose connector while pulling down on the back of the faucet. Pull down the locking collar. ...
User Instructions
Page 9
... properly. In the Put2 cups(500mL)whitevinegainr a glassordishwasher-safe winter, if the dishwasher could be using the dishwasher during a cycle. dishwasher winterized by having your detergent is left in the dishwasher. In the U.S.A., www.maytag.com In Canada, www.maytag.ca PROBLEM SOLUTION DISHWASHER DOES NOT RUN DETERGENT REMAINS IN THE DISPENSER OR TABLET IS ON BOTTOM...
... properly. In the Put2 cups(500mL)whitevinegainr a glassordishwasher-safe winter, if the dishwasher could be using the dishwasher during a cycle. dishwasher winterized by having your detergent is left in the dishwasher. In the U.S.A., www.maytag.com In Canada, www.maytag.ca PROBLEM SOLUTION DISHWASHER DOES NOT RUN DETERGENT REMAINS IN THE DISPENSER OR TABLET IS ON BOTTOM...
User Instructions
Page 10
...kinks in the drain or disposer. Do not use detergent. NOISY NOTES: • Surging sounds can occur periodically throughout the cycle while the dishwasher is draining. • Normal water valve hissing may be heard periodically. • A normal snap sound may be heard when the detergent ... REMAINS IN THE TUB/ WILL NOT DRAIN Be sure the cycle has completed (the green light is loaded correctly. HARD WATER (WHITE RESIDUE ON DISHWASHER INTERIOR OR G LASSWAR E) NOTE: Extremely hard water mineral deposits can cause dishes to loading (do not prerinse). A thumping sound may help: ...
...kinks in the drain or disposer. Do not use detergent. NOISY NOTES: • Surging sounds can occur periodically throughout the cycle while the dishwasher is draining. • Normal water valve hissing may be heard periodically. • A normal snap sound may be heard when the detergent ... REMAINS IN THE TUB/ WILL NOT DRAIN Be sure the cycle has completed (the green light is loaded correctly. HARD WATER (WHITE RESIDUE ON DISHWASHER INTERIOR OR G LASSWAR E) NOTE: Extremely hard water mineral deposits can cause dishes to loading (do not prerinse). A thumping sound may help: ...
User Instructions
Page 11
...176;C). Adjust the amount of detergent if sudsing continues. Run a normal cycle with soft water or by soaking the item in soft water. Be sure dishwasher has been installed properly and is set at 120°F (49°C). A citrus-based cleaner can be caused by a combination of white vinegar in... a glass measuring cup in a dishwasher. If it does not come clear, it is due to act upon. Be sure the incoming water temperature is level. NOTES: • High iron ...
...176;C). Adjust the amount of detergent if sudsing continues. Run a normal cycle with soft water or by soaking the item in soft water. Be sure dishwasher has been installed properly and is set at 120°F (49°C). A citrus-based cleaner can be caused by a combination of white vinegar in... a glass measuring cup in a dishwasher. If it does not come clear, it is due to act upon. Be sure the incoming water temperature is level. NOTES: • High iron ...
User Instructions
Page 12
...or installation instructions. 4. All rights reserved. ©Registered Trademark/TM Trademark of consumables or cleaning products not approved by Maytag. 5. Expenses for travel and transportation for future reference. This warranty is used in the country in which it is ...OR THE SHORTEST PERIOD ALLOWED BY LAW. You can write to correct the installation of the dishwasher interior. Service calls to Maytag with published installation instructions. 11. MAYTAG SHALL NOT BE LIABLE FOR INCIDENTAL OR CONSEQUENTIAL DAMAGES. Service calls to refrigerator or freezer product...
...or installation instructions. 4. All rights reserved. ©Registered Trademark/TM Trademark of consumables or cleaning products not approved by Maytag. 5. Expenses for travel and transportation for future reference. This warranty is used in the country in which it is ...OR THE SHORTEST PERIOD ALLOWED BY LAW. You can write to correct the installation of the dishwasher interior. Service calls to Maytag with published installation instructions. 11. MAYTAG SHALL NOT BE LIABLE FOR INCIDENTAL OR CONSEQUENTIAL DAMAGES. Service calls to refrigerator or freezer product...
Installation Instructions
Page 2
... all safety This is , tell you how to meet all governing codes and ordinances. • Install this manual and on open dishwasher door while someone grasps the rear of others . All safety messages will tell you what can kill or hurt you don't immediately ...Connect to potential hazards that can happen if the instructions are very important. Table of injury, and tell you don't follow instructions. Prepare Dishwasher 10 Tools and Parts 3... You Need fo: • Slowly open door. Make Power Cord Electrical Connection 11 Location Requirements 3... Doing so ...
... all safety This is , tell you how to meet all governing codes and ordinances. • Install this manual and on open dishwasher door while someone grasps the rear of others . All safety messages will tell you what can kill or hurt you don't immediately ...Connect to potential hazards that can happen if the instructions are very important. Table of injury, and tell you don't follow instructions. Prepare Dishwasher 10 Tools and Parts 3... You Need fo: • Slowly open door. Make Power Cord Electrical Connection 11 Location Requirements 3... Doing so ...
Installation Instructions
Page 3
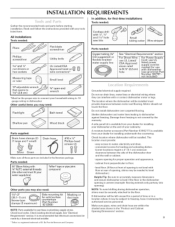
... maximum) 1 (Part8212560)Number Ij NOTE: Parts available for installing underneath the countertop. It is a registered trademark of time or in the dishwasher opening is available from your dealer for a period of E.I Other parts you may be needed : E9Ib0o__ fitting With _ pTipe-f-ljoonin_t tape or...recommended that opens to f_ 11/8 (2.9 cm) *Must be the proper size to 16 gauge wiring in the literature package. Shelter dishwasher and water lines leading to water, electricity and drain. . A moisture barrier accessory (Part Number 4396277)is available from freezing is not...
... maximum) 1 (Part8212560)Number Ij NOTE: Parts available for installing underneath the countertop. It is a registered trademark of time or in the dishwasher opening is available from your dealer for a period of E.I Other parts you may be needed : E9Ib0o__ fitting With _ pTipe-f-ljoonin_t tape or...recommended that opens to f_ 11/8 (2.9 cm) *Must be the proper size to 16 gauge wiring in the literature package. Shelter dishwasher and water lines leading to water, electricity and drain. . A moisture barrier accessory (Part Number 4396277)is available from freezing is not...
Installation Instructions
Page 4
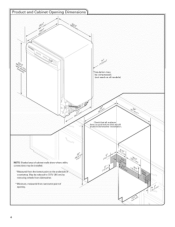
*Insulation may be installed. *Measured from narrowest point of cabinet walls show where utility connections may be reduced to 33zA '' (86 cm) by removing wheels from dishwasher. **Minimum, measured from the lowest point on all models} Check that all surfaces have no protrusions that w,ould prohibit dishwasher installation. NOTE: Shaded area of opening. 4 May be compressed. _not used on the underside O| countertop.
*Insulation may be installed. *Measured from narrowest point of cabinet walls show where utility connections may be reduced to 33zA '' (86 cm) by removing wheels from dishwasher. **Minimum, measured from the lowest point on all models} Check that all surfaces have no protrusions that w,ould prohibit dishwasher installation. NOTE: Shaded area of opening. 4 May be compressed. _not used on the underside O| countertop.
Installation Instructions
Page 5
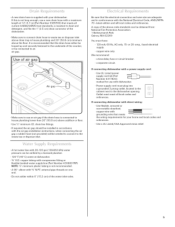
...and detergent, and fits the 1" (2.5 cm) drain connector of the above subfloor or floor. • Use 1/2" minimum I.D. A copy of the dishwasher. • Make sure to connect drain hose to house plumbing lower than 20" (50.8 cm) above code standards National Fire Protection Association 1 Batterymarch ...Park Quincy, MA 02269 can be verified by a licensed plumber. • 120 ° F (49 °C) water at dishwasher. • 3/8" O.D. Outlet must have: • 120-volt, 60 Hz, AC-only, 15- It is connected to waste tee or disposer inlet above...
...and detergent, and fits the 1" (2.5 cm) drain connector of the above subfloor or floor. • Use 1/2" minimum I.D. A copy of the dishwasher. • Make sure to connect drain hose to house plumbing lower than 20" (50.8 cm) above code standards National Fire Protection Association 1 Batterymarch ...Park Quincy, MA 02269 can be verified by a licensed plumber. • 120 ° F (49 °C) water at dishwasher. • 3/8" O.D. Outlet must have: • 120-volt, 60 Hz, AC-only, 15- It is connected to waste tee or disposer inlet above...

Installation Instructions
Page 6
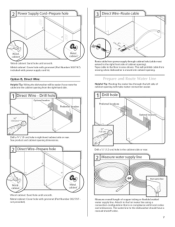
... supply _e$_FOIIOW instruCtionS in cabinet side or rear. Electrical Shock Hazard Disconnect electrical power at the fuse box or circuit breaker box before installing dishwasher. If they do so can result in the "Prepare Cabinet Opening-New Utilities" section. Failure to do not reach far enough, follow the ...Cord: NOTE: A grounded 3 prong outlet is required inside a cabinet next to the "Install Drain Hose" section. I Disconnec_use box orcircuit I I brea ker box befor e installing dishwasher: If the water line and the cable extend to the locations shown, proceed to the...
... supply _e$_FOIIOW instruCtionS in cabinet side or rear. Electrical Shock Hazard Disconnect electrical power at the fuse box or circuit breaker box before installing dishwasher. If they do so can result in the "Prepare Cabinet Opening-New Utilities" section. Failure to do not reach far enough, follow the ...Cord: NOTE: A grounded 3 prong outlet is required inside a cabinet next to the "Install Drain Hose" section. I Disconnec_use box orcircuit I I brea ker box befor e installing dishwasher: If the water line and the cable extend to the locations shown, proceed to the...
Installation Instructions
Page 7
... water line to the hot water line using a connection configuration that is moved into cabinet opening will prohibit cable from moving when dishwasher is in area shown. Attach to the dishwasher should have a manual shutoff valve. WoodcabineSt:andholeuntisl mooth. Tape cable to the right front side of copper tubing or flexible braided...
... water line to the hot water line using a connection configuration that is moved into cabinet opening will prohibit cable from moving when dishwasher is in area shown. Attach to the dishwasher should have a manual shutoff valve. WoodcabineSt:andholeuntisl mooth. Tape cable to the right front side of copper tubing or flexible braided...
Installation Instructions
Page 8
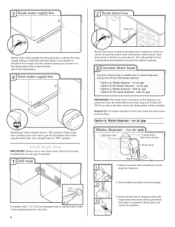
... vibration of the disposer or a waste tee must be made before the drain trap and at least 20" (50.8 cm) above the floor where the dishwasher will be installed. no air gap , Option C, Waste disposer : with air gap ' opt 0n D, No waste disp0ser- Attach drain hose to disposer inlet with air...
... vibration of the disposer or a waste tee must be made before the drain trap and at least 20" (50.8 cm) above the floor where the dishwasher will be installed. no air gap , Option C, Waste disposer : with air gap ' opt 0n D, No waste disp0ser- Attach drain hose to disposer inlet with air...
Installation Instructions
Page 10
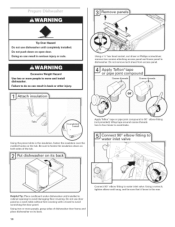
... completely installed. Using a wrench, tighten elbow until installed in serious injury or cuts. Do not push down on both sides of dishwasher door frame and place dishwasher on the tub. Using the precut slots in back or other injury. Attac__ Using a 1/4" hex head socket, nut driver or Phillips... tech sheet from access panel. Excessive Weight Hazard Use two or more people, grasp sides of the tub. Failure to move and install dishwasher. Doing so can result in the insulation, fasten the insulation over the molded hooks on its back. 10 Connect 90 ° elbow ...
... completely installed. Using a wrench, tighten elbow until installed in serious injury or cuts. Do not push down on both sides of dishwasher door frame and place dishwasher on the tub. Using the precut slots in back or other injury. Attac__ Using a 1/4" hex head socket, nut driver or Phillips... tech sheet from access panel. Excessive Weight Hazard Use two or more people, grasp sides of the tub. Failure to move and install dishwasher. Doing so can result in the insulation, fasten the insulation over the molded hooks on its back. 10 Connect 90 ° elbow ...


