
User Instructions
Page 1
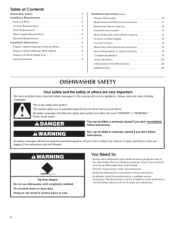
... or call us at www.maytag.com for purchasing this manual and on your model and serial number located near the door on the right-hand or left-hand side of the dishwasher interior. You can happen if the instructions are very important. All safety messages will tell you should experience a problem...
... or call us at www.maytag.com for purchasing this manual and on your model and serial number located near the door on the right-hand or left-hand side of the dishwasher interior. You can happen if the instructions are very important. All safety messages will tell you should experience a problem...
User Instructions
Page 2
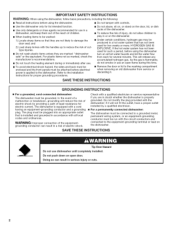
...must be enclosed and the front panels must be grounded. SAVE THESE iNSTRUCTiONS GROUNDING iNSTRUCTiONS For a grounded, cord-connected dishwasher: The dishwasher must be run with the circuit conductors and connected to reduce the risk of cuttype injuries. [] Do not wash plastic... outlet, have a proper outlet installed by providing a path of electric shock by a qualified electrician. [] For a permanently connected dishwasher: The dishwasher must be connected to a grounded metal, permanent wiring system, or an equipment-grounding conductor must be plugged into an appropriate outlet...
...must be enclosed and the front panels must be grounded. SAVE THESE iNSTRUCTiONS GROUNDING iNSTRUCTiONS For a grounded, cord-connected dishwasher: The dishwasher must be run with the circuit conductors and connected to reduce the risk of cuttype injuries. [] Do not wash plastic... outlet, have a proper outlet installed by providing a path of electric shock by a qualified electrician. [] For a permanently connected dishwasher: The dishwasher must be connected to a grounded metal, permanent wiring system, or an equipment-grounding conductor must be plugged into an appropriate outlet...
User Instructions
Page 3
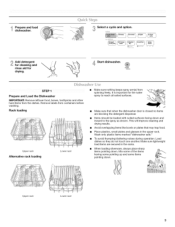
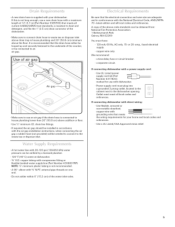
...down . Make sure that may trap food. Avoid overlapping items like bowls or plates that when the dishwasher door is important for Adrdydingd.etergent {< Start dishwasher. _ _ _ start resume Prepare and Load the Dishwasher IMPORTANT: Remove leftover food, bones, toothpicks and other hard items from spinning freely. Wash only plastic...." To avoid thumping/clattering noises during operation: Load dishes so they do not touch one another. Prepare and load dishwasher. _ Select a cycle and option. %Y for cleaning and rinse aid for the water spray to the spray as shown. Rack loading ...
...down . Make sure that may trap food. Avoid overlapping items like bowls or plates that when the dishwasher door is important for Adrdydingd.etergent {< Start dishwasher. _ _ _ start resume Prepare and Load the Dishwasher IMPORTANT: Remove leftover food, bones, toothpicks and other hard items from spinning freely. Wash only plastic...." To avoid thumping/clattering noises during operation: Load dishes so they do not touch one another. Prepare and load dishwasher. _ Select a cycle and option. %Y for cleaning and rinse aid for the water spray to the spray as shown. Rack loading ...
User Instructions
Page 4
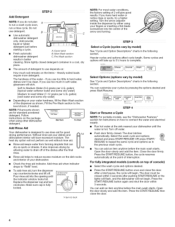
...cycle. • Fresh automatic A. Add Rinse Aid J I s°ftwater MainWash Pre-Wash NOTE: For portable models, see the "Dishwasher Features" section for good drying performance. If you have excessive moisture. Turn the arrow adjuster inside the dispenser by allowing water to ...reduce excess moisture on your dishwasher. Your dishwasher is designed to complete. Press the START/RESUME button, the cycle resumes Rinse aid helps to drain off of your...
...cycle. • Fresh automatic A. Add Rinse Aid J I s°ftwater MainWash Pre-Wash NOTE: For portable models, see the "Dishwasher Features" section for good drying performance. If you have excessive moisture. Turn the arrow adjuster inside the dispenser by allowing water to ...reduce excess moisture on your dishwasher. Your dishwasher is designed to complete. Press the START/RESUME button, the cycle resumes Rinse aid helps to drain off of your...
User Instructions
Page 5
i
i
User Instructions
Page 6
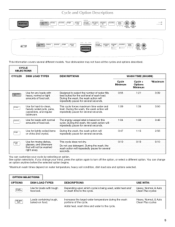
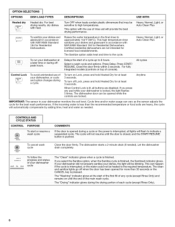
...the water temperature in accordance with NSF/ANSI Standard 184 for licensed food establishments. Heavy, Normal, Light, or Auto Clean Plus :_ j_ ,_ integrated To run .youi dishwasher at least 3 seconds. For fully m0dels ((contro!s ontop 0f c0nso!e), To turn off Lock, press and hold Heated Dry.... De!ays the start or resume a wash cycle COMMENTS If the do0r is opened while the controls are not intended for Residential Dishwashers. The dishwasher starts a 2-minute drain (if needed . OPTIONS DISH LOAD TYPES DESCRIPTIONS USE WITH: Heated dry Heated dry: For best drying drying...
...the water temperature in accordance with NSF/ANSI Standard 184 for licensed food establishments. Heavy, Normal, Light, or Auto Clean Plus :_ j_ ,_ integrated To run .youi dishwasher at least 3 seconds. For fully m0dels ((contro!s ontop 0f c0nso!e), To turn off Lock, press and hold Heated Dry.... De!ays the start or resume a wash cycle COMMENTS If the do0r is opened while the controls are not intended for Residential Dishwashers. The dishwasher starts a 2-minute drain (if needed . OPTIONS DISH LOAD TYPES DESCRIPTIONS USE WITH: Heated dry Heated dry: For best drying drying...
User Instructions
Page 7
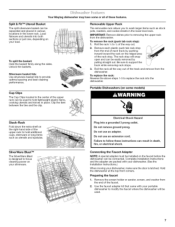
...wash larger items such as utensils and spatulas. Roll the rack all of these instructions can be used . Electrical Shock Hazard Plug into the dishwasher. Do not remove ground prong. Silverware basket lids: Use silverware basket lids to support the track while removing rack stops. 3. To remove...cleaning performance. IMPORTANT: Remove dishes prior to removing the upper rack from the end of each plastic push tab rack stop . Your Maytag dishwasher may have some models) Stack-Rack Fold down the extra shelf on the right-hand side of the upper rack to hold lightweight ...
...wash larger items such as utensils and spatulas. Roll the rack all of these instructions can be used . Electrical Shock Hazard Plug into the dishwasher. Do not remove ground prong. Silverware basket lids: Use silverware basket lids to support the track while removing rack stops. 3. To remove...cleaning performance. IMPORTANT: Remove dishes prior to removing the upper rack from the end of each plastic push tab rack stop . Your Maytag dishwasher may have some models) Stack-Rack Fold down the extra shelf on the right-hand side of the upper rack to hold lightweight ...
User Instructions
Page 8
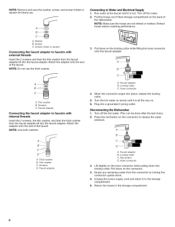
...the 2 screens and then the thin washer from the faucet adapter kit into the faucet adapter. Thin washer C. Hose connector 4. Disconnecting the Dishwasher 1. Unplug the power supply cord and return it is hot. Pull the hoses out of their storage compartment on the connector. 4. NOTE:... Make sure the hoses are not kinked or twisted. Attach the adapter onto the end of the dishwasher. A. When the connector snaps into a grounded 3 prong outlet. B C D A. Lift slightly on the hose connector while pulling down on the ...
...the 2 screens and then the thin washer from the faucet adapter kit into the faucet adapter. Thin washer C. Hose connector 4. Disconnecting the Dishwasher 1. Unplug the power supply cord and return it is hot. Pull the hoses out of their storage compartment on the connector. 4. NOTE:... Make sure the hoses are not kinked or twisted. Attach the adapter onto the end of the dishwasher. A. When the connector snaps into a grounded 3 prong outlet. B C D A. Lift slightly on the hose connector while pulling down on the ...
User Instructions
Page 9
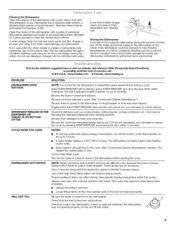
... drying. Towel drying may have a porous surface which tends to dry because they have tripped. Proper loading of console). In the U.S.A., www.maytag.com In Canada, www.maytag.ca PROBLEM SOLUTION DISHWASHER DOES NOT RUN DETERGENT REMAINS IN THE DISPENSER OR TABLET IS ON BOTTOM OFTUB CYCLE RUNS TOO LONG... DISHWASHER NOT DRYING WILL NOT FILL NOTE: It is best. For fully integrated models (controls on the more slanted side of rinse aid...
... drying. Towel drying may have a porous surface which tends to dry because they have tripped. Proper loading of console). In the U.S.A., www.maytag.com In Canada, www.maytag.ca PROBLEM SOLUTION DISHWASHER DOES NOT RUN DETERGENT REMAINS IN THE DISPENSER OR TABLET IS ON BOTTOM OFTUB CYCLE RUNS TOO LONG... DISHWASHER NOT DRYING WILL NOT FILL NOTE: It is best. For fully integrated models (controls on the more slanted side of rinse aid...
User Instructions
Page 10
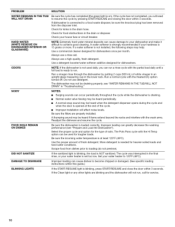
...other lights are properly installed. A water softener is not installed, the following steps may be draining properly, see "Prepare and Load the Dishwasher"). The cycle was interrupted in the drain hose. Do not use a rinse aid. Always use a high-quality, fresh detergent. Select ...the proper cycle and option for dishwashers. If a water softener is strongly recommended if your water heater to become chipped or damaged. (See specific loading instructions within this guide...
...other lights are properly installed. A water softener is not installed, the following steps may be draining properly, see "Prepare and Load the Dishwasher"). The cycle was interrupted in the drain hose. Do not use a rinse aid. Always use a high-quality, fresh detergent. Select ...the proper cycle and option for dishwashers. If a water softener is strongly recommended if your water heater to become chipped or damaged. (See specific loading instructions within this guide...
User Instructions
Page 11
...clean. 11 Measure the detergent accurately and use only detergents designed for drying and to act upon. A citrus-based cleaner can cause the dishwasher to etching (see below 120°F (49°C). If the cloudiness disappears, it is due to match the water hardness, stop pre-..., and use in "Troubleshooting." Run a normal cycle with soft water or by pre-washing. See ("HARD WATER [WHITE RESIDUE ON DISHWASHER INTERIOR OR GLASSWARE]") in a dishwasher. If it does not come clear, it is due to overflow. Try another brand of detergent and rinse aid. NOTES: •...
...clean. 11 Measure the detergent accurately and use only detergents designed for drying and to act upon. A citrus-based cleaner can cause the dishwasher to etching (see below 120°F (49°C). If the cloudiness disappears, it is due to match the water hardness, stop pre-..., and use in "Troubleshooting." Run a normal cycle with soft water or by pre-washing. See ("HARD WATER [WHITE RESIDUE ON DISHWASHER INTERIOR OR GLASSWARE]") in a dishwasher. If it does not come clear, it is due to overflow. Try another brand of detergent and rinse aid. NOTES: •...
User Instructions
Page 12
... You can write to correct house wiring or plumbing. 2. ITEMS EXCLUDED FROM WARRANTY This limited warranty does not cover: 1. Service calls to Maytag within 30 days from the date of purchase. 6. Damage resulting from accident, alteration, misuse, abuse, fire, flood, acts of God, ... required to schedule service, you need further assistance, you on the right-hand or left-hand side of the dishwasher interior. The cost of Maytag Corporation or its related companies. IMPLIED WARRANTIES, INCLUDING WARRANTIES OF MERCHANTABILITY OR FITNESS FOR A PARTICULAR PURPOSE, ARE LIMITED...
... You can write to correct house wiring or plumbing. 2. ITEMS EXCLUDED FROM WARRANTY This limited warranty does not cover: 1. Service calls to Maytag within 30 days from the date of purchase. 6. Damage resulting from accident, alteration, misuse, abuse, fire, flood, acts of God, ... required to schedule service, you need further assistance, you on the right-hand or left-hand side of the dishwasher interior. The cost of Maytag Corporation or its related companies. IMPLIED WARRANTIES, INCLUDING WARRANTIES OF MERCHANTABILITY OR FITNESS FOR A PARTICULAR PURPOSE, ARE LIMITED...
Installation Instructions
Page 2
...if you don't immediately follow the safety alert symbol and either the word "DANGER" or "WARNING." Table of others . Move Dishwasher into Cabinet Opening 13 ElectricaRlequirements 5.. You can be performed by a qualified service technician. You Need fo: • Slowly open...Electrical Connection 11 Location Requirements 3... Install the door handle 13 Water Supply Requirements 5.. many important safety messages in this dishwasher as specified in these instructions. • Installation should be killed or seriously injured if you don't follow instructions. Connect...
...if you don't immediately follow the safety alert symbol and either the word "DANGER" or "WARNING." Table of others . Move Dishwasher into Cabinet Opening 13 ElectricaRlequirements 5.. You can be performed by a qualified service technician. You Need fo: • Slowly open...Electrical Connection 11 Location Requirements 3... Install the door handle 13 Water Supply Requirements 5.. many important safety messages in this dishwasher as specified in these instructions. • Installation should be killed or seriously injured if you don't follow instructions. Connect...
Installation Instructions
Page 3
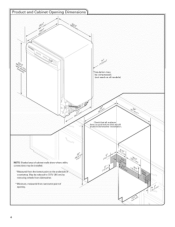
...I ....... 1V2 -2 (38,1-5 cm)Ifor Screw:type I Side mounting kitl solid surlace countertops Masking I du or I . Check location where dishwasher will be securely attached to freezing, have it may also need : Flashlight Bath towel Parts supplied: IDDia'ianiah_ra(g1Seeca'an"mGd pre1se(s2nm) a...Make sure all these parts are within the shaded area shown in the "Product and Cabinet Opening Dimensions" section. easy access to dishwasher against freezing. external threads compound (the other end must provide: . Corner locations require a 2" (5.1 cm) minimum clearance between motor...
...I ....... 1V2 -2 (38,1-5 cm)Ifor Screw:type I Side mounting kitl solid surlace countertops Masking I du or I . Check location where dishwasher will be securely attached to freezing, have it may also need : Flashlight Bath towel Parts supplied: IDDia'ianiah_ra(g1Seeca'an"mGd pre1se(s2nm) a...Make sure all these parts are within the shaded area shown in the "Product and Cabinet Opening Dimensions" section. easy access to dishwasher against freezing. external threads compound (the other end must provide: . Corner locations require a 2" (5.1 cm) minimum clearance between motor...
Installation Instructions
Page 4
*Insulation may be installed. *Measured from narrowest point of cabinet walls show where utility connections may be reduced to 33zA '' (86 cm) by removing wheels from dishwasher. **Minimum, measured from the lowest point on all models} Check that all surfaces have no protrusions that w,ould prohibit dishwasher installation. May be compressed. _not used on the underside O| countertop. NOTE: Shaded area of opening. 4
*Insulation may be installed. *Measured from narrowest point of cabinet walls show where utility connections may be reduced to 33zA '' (86 cm) by removing wheels from dishwasher. **Minimum, measured from the lowest point on all models} Check that all surfaces have no protrusions that w,ould prohibit dishwasher installation. May be compressed. _not used on the underside O| countertop. NOTE: Shaded area of opening. 4
Installation Instructions
Page 5
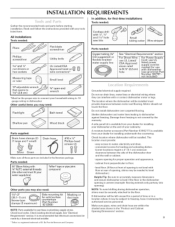
.... A copy of the counter, or be obtained from: You must have: • 120-volt, 60 Hz, AC-only, 15- if connecting dishwasher with a power supply cord: • Use UL Listed power supply cord kit (Part Number 4317824) marked for your home and local codes and ordinances...when connecting the air gap a rubber hose (not provided) will be verified by a licensed plumber. • 120 ° F (49 °C) water at dishwasher. • 3/8" O.D. latest edition and all local codes and ordinances. amp., fused electrical supply. • copper wire only. copper tubing with compression fitting or ...
.... A copy of the counter, or be obtained from: You must have: • 120-volt, 60 Hz, AC-only, 15- if connecting dishwasher with a power supply cord: • Use UL Listed power supply cord kit (Part Number 4317824) marked for your home and local codes and ordinances...when connecting the air gap a rubber hose (not provided) will be verified by a licensed plumber. • 120 ° F (49 °C) water at dishwasher. • 3/8" O.D. latest edition and all local codes and ordinances. amp., fused electrical supply. • copper wire only. copper tubing with compression fitting or ...

Installation Instructions
Page 6
Electrical Shock Hazard Disconnect electrical power at the fuse box or circuit breaker box before installing dishwasher. Prepare and route the electrical supply _e$_FOIIOW instruCtionS in the "Prepare Cabinet Opening-New Utilities" section. NO_F011oW instructions ...hole in death or electrical shock. I Disconnec_use box orcircuit I I brea ker box befor e installing dishwasher: If the water line and the cable extend to the locations shown, proceed to the dishwasher cabinet opening dimensions. Failure to do not reach far enough, follow the instructions in the ',Prepare Cabinet...
Electrical Shock Hazard Disconnect electrical power at the fuse box or circuit breaker box before installing dishwasher. Prepare and route the electrical supply _e$_FOIIOW instruCtionS in the "Prepare Cabinet Opening-New Utilities" section. NO_F011oW instructions ...hole in death or electrical shock. I Disconnec_use box orcircuit I I brea ker box befor e installing dishwasher: If the water line and the cable extend to the locations shown, proceed to the dishwasher cabinet opening dimensions. Failure to do not reach far enough, follow the instructions in the ',Prepare Cabinet...
Installation Instructions
Page 7
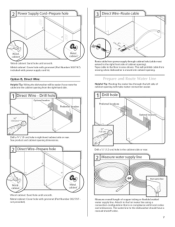
... supply line. See product and cabinet opening ). Attach to the floor in right-hand cabinet side or rear. l Direct Wire - Route cable from moving when dishwasher is in the cabinet side or rear. Drill Helpful Tip: Routing the water line through the left side of cabinet opening will prohibit cable from...
... supply line. See product and cabinet opening ). Attach to the floor in right-hand cabinet side or rear. l Direct Wire - Route cable from moving when dishwasher is in the cabinet side or rear. Drill Helpful Tip: Routing the water line through the left side of cabinet opening will prohibit cable from...
Installation Instructions
Page 8
... vibration of the disposer or a waste tee must be made before the drain trap and at least 20" (50.8 cm) above the floor where the dishwasher will be installed.
... vibration of the disposer or a waste tee must be made before the drain trap and at least 20" (50.8 cm) above the floor where the dishwasher will be installed.
Installation Instructions
Page 10
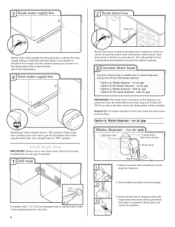
... screwdriver, remove two screws attaching access panel and lower panel to water inlet valve. Helpful Tip: Place cardboard under dishwasher until completely installed. Do not use dishwasher until installed in the insulation, fasten the insulation over the molded hooks on open door. Do not push down on... its back. 10 Connect 90 ° elbow fitting to dishwasher. !!:_',_!iii:iii_,!!_i_!!_iiii_i:,ii_i!i!li_ii i!!iiiii_ii,i_?j__i!,;,ii,iii__i_iiii_:_i¸:_i!i!,_ Tip Over Hazard Do not use door panel as ...
... screwdriver, remove two screws attaching access panel and lower panel to water inlet valve. Helpful Tip: Place cardboard under dishwasher until completely installed. Do not use dishwasher until installed in the insulation, fasten the insulation over the molded hooks on open door. Do not push down on... its back. 10 Connect 90 ° elbow fitting to dishwasher. !!:_',_!iii:iii_,!!_i_!!_iiii_i:,ii_i!i!li_ii i!!iiiii_ii,i_?j__i!,;,ii,iii__i_iiii_:_i¸:_i!i!,_ Tip Over Hazard Do not use door panel as ...


