User Instructions
Page 2
... 2) Load sharp knives with the handles up to the washing compartment when removing an old dishwasher from each for several minutes. Refer to the installation instructions for electric current. In the event of injury, do not smoke or use an open door. if it . For plastic items not so marked, check the manufacturer's recommendations. [] Do not touch the heating element during this time. [] Remove the door...
... 2) Load sharp knives with the handles up to the washing compartment when removing an old dishwasher from each for several minutes. Refer to the installation instructions for electric current. In the event of injury, do not smoke or use an open door. if it . For plastic items not so marked, check the manufacturer's recommendations. [] Do not touch the heating element during this time. [] Remove the door...
User Instructions
Page 3
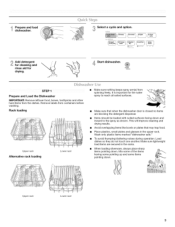
... down . It is closed no items are secured in the upper rack. Prepare and load dishwasher. _ Select a cycle and option. %Y for cleaning and rinse aid for the water spray to the spray as shown. Wash only plastic items marked "dishwasher safe." Avoid overlapping items like bowls or plates that when the dishwasher door is important for Adrdydingd.etergent {< Start dishwasher. _ _ _ start resume Prepare and Load the Dishwasher IMPORTANT: Remove leftover food, bones...
... down . It is closed no items are secured in the upper rack. Prepare and load dishwasher. _ Select a cycle and option. %Y for cleaning and rinse aid for the water spray to the spray as shown. Wash only plastic items marked "dishwasher safe." Avoid overlapping items like bowls or plates that when the dishwasher door is important for Adrdydingd.etergent {< Start dishwasher. _ _ _ start resume Prepare and Load the Dishwasher IMPORTANT: Remove leftover food, bones...
User Instructions
Page 4
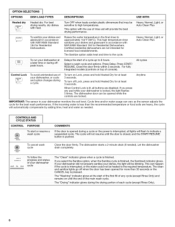
... anytime before the main wash starts. dry as well without rinse aid. and interior of the water - Check the rinse aid indicator. Open the door slowly and add the item. B • Use automatic dishwasher detergent only. Heavily soiled loads require more detergent. Soft to lock Turn the arrow adjuster inside the dispenser by either using other dishwasher detergent. Select Options (options vary by pressing the options desired and press Start/Resume. The heat dry option will not perform...
... anytime before the main wash starts. dry as well without rinse aid. and interior of the water - Check the rinse aid indicator. Open the door slowly and add the item. B • Use automatic dishwasher detergent only. Heavily soiled loads require more detergent. Soft to lock Turn the arrow adjuster inside the dispenser by either using other dishwasher detergent. Select Options (options vary by pressing the options desired and press Start/Resume. The heat dry option will not perform...
User Instructions
Page 5
i
i
User Instructions
Page 6
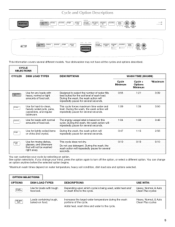
... Control Lock is locked, the light flashes 5 times. If the incoming water is less than 30 seconds or the CANCEL key is finished. OPTIONS DISH LOAD TYPES DESCRIPTIONS USE WITH: Heated dry Heated dry: For best drying drying resu!ts, dry dishes t h heat: To sanitize your dishes and glassware in accordance with NSF/ANSI Standard 184 for Residential Dishwashers. Heavy, Normal, Light, or Auto Clean Plus :_ j_ ,_ integrated To run .youi dishwasher at least 3 seconds. CYcles Select a wash cycle and options Press Delay. Close the door...
... Control Lock is locked, the light flashes 5 times. If the incoming water is less than 30 seconds or the CANCEL key is finished. OPTIONS DISH LOAD TYPES DESCRIPTIONS USE WITH: Heated dry Heated dry: For best drying drying resu!ts, dry dishes t h heat: To sanitize your dishes and glassware in accordance with NSF/ANSI Standard 184 for Residential Dishwashers. Heavy, Normal, Light, or Auto Clean Plus :_ j_ ,_ integrated To run .youi dishwasher at least 3 seconds. CYcles Select a wash cycle and options Press Delay. Close the door...
User Instructions
Page 7
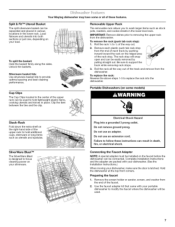
... the baskets. IMPORTANT: Remove dishes prior to wash larger items such as utensils and spatulas. The rack stop from the end of the upper rack to modify the faucet where the dishwasher will snap open and can be separated and placed in various locations in the lower level rack. Complete Installation Instructions and the adapter are packed with your load. Silverware basket lids: Use silverware basket lids to support the track while removing rack stops. 3. Be...
... the baskets. IMPORTANT: Remove dishes prior to wash larger items such as utensils and spatulas. The rack stop from the end of the upper rack to modify the faucet where the dishwasher will snap open and can be separated and placed in various locations in the lower level rack. Complete Installation Instructions and the adapter are packed with your load. Silverware basket lids: Use silverware basket lids to support the track while removing rack stops. 3. Be...
User Instructions
Page 9
... CYCLE RUNS TOO LONG DISHWASHER NOT DRYING WILL NOT FILL NOTE: It is turned on the more slanted side of items can affect drying. (See specific loading instructions within 3 seconds. If the START/RESUME light is needed for the dishwasher to repeatedly pause several times during the summer months, turn off the water and power supply to the dishwasher. For fully integrated models (controls on ). Be sure the door is fresh and lump free...
... CYCLE RUNS TOO LONG DISHWASHER NOT DRYING WILL NOT FILL NOTE: It is turned on the more slanted side of items can affect drying. (See specific loading instructions within 3 seconds. If the START/RESUME light is needed for the dishwasher to repeatedly pause several times during the summer months, turn off the water and power supply to the dishwasher. For fully integrated models (controls on ). Be sure the door is fresh and lump free...
User Instructions
Page 10
... Heated Dry option turned off. If dishwasher is 15 grains or more. Check for tougher loads. A water softener is strongly recommended if your hardness is connected to a food waste disposer, be heard when the detergent dispenser opens during the cycle and when the door is ready to become chipped or damaged. (See specific loading instructions within this guide.) BLINKING LIGHTS If the START/RESUME light is set too low. Do not use a rinse aid...
... Heated Dry option turned off. If dishwasher is 15 grains or more. Check for tougher loads. A water softener is strongly recommended if your hardness is connected to a food waste disposer, be heard when the detergent dispenser opens during the cycle and when the door is ready to become chipped or damaged. (See specific loading instructions within this guide.) BLINKING LIGHTS If the START/RESUME light is set too low. Do not use a rinse aid...
User Instructions
Page 11
...-washing, and use in the lower rack. Detergent needs food soil to overflow. Suds can cause the dishwasher to act upon. To avoid rinse aid leaking from using the Hi Temp and Sani Rinse options. Try using too much detergent with the Heated Dry option turned off. Measure the detergent accurately and use only detergents designed for drying and to clean. 11 Run a normal cycle with soft water or by a combination of detergent. No detergent is necessary for use water heating...
...-washing, and use in the lower rack. Detergent needs food soil to overflow. Suds can cause the dishwasher to act upon. To avoid rinse aid leaking from using the Hi Temp and Sani Rinse options. Try using too much detergent with the Heated Dry option turned off. Measure the detergent accurately and use only detergents designed for drying and to clean. 11 Run a normal cycle with soft water or by a combination of detergent. No detergent is necessary for use water heating...
User Instructions
Page 12
Service must be easily determined. ITEMS EXCLUDED FROM WARRANTY This limited warranty does not cover: 1. Any food loss due to the appliance. 9. Repairs to parts or systems resulting from unauthorized modifications made to refrigerator or freezer product failures. 7. Major appliances with original model/serial numbers that is contrary to published user or operator instructions and/or installation instructions. 4. DISCLAIMER OF IMPLIED WARRANTIES; THIS WARRANTY GIVES YOU SPECIFIC LEGAL...
Service must be easily determined. ITEMS EXCLUDED FROM WARRANTY This limited warranty does not cover: 1. Any food loss due to the appliance. 9. Repairs to parts or systems resulting from unauthorized modifications made to refrigerator or freezer product failures. 7. Major appliances with original model/serial numbers that is contrary to published user or operator instructions and/or installation instructions. 4. DISCLAIMER OF IMPLIED WARRANTIES; THIS WARRANTY GIVES YOU SPECIFIC LEGAL...
Installation Instructions
Page 2
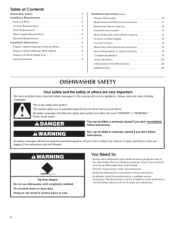
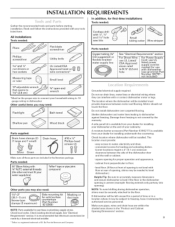
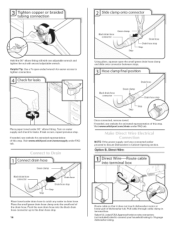
Make Power Cord Electrical Connection 11 Location Requirements 3... many important safety messages in serious injury or cuts. You Need fo: • Slowly open door. Close dishwasher door until completely installed. Determine Cabinet Opening 12 Drain Requirements 5... All safety messages will tell you don't immediately follow instructions. All safety messages will follow instructions. Do not push down on your appliance. The dishwasher must be installed to Drain 16 Prepare Cabinet Opening--Existing Utilities 6 Make Direct Wire Electrical Connection...
Make Power Cord Electrical Connection 11 Location Requirements 3... many important safety messages in serious injury or cuts. You Need fo: • Slowly open door. Close dishwasher door until completely installed. Determine Cabinet Opening 12 Drain Requirements 5... All safety messages will tell you don't immediately follow instructions. All safety messages will follow instructions. Do not push down on your appliance. The dishwasher must be installed to Drain 16 Prepare Cabinet Opening--Existing Utilities 6 Make Direct Wire Electrical Connection...
Installation Instructions
Page 3
... time or in plumbing supply stores. Do not run drain lines, water lines or electrical wiring where they can interfere with any tools listed here. A side panel kit is not level with dishwasher ! easy access to dishwasher against freezing. convenient access for use UL listed power supply cord kit marked for loading and unloading dishes. NumBegrr(oUSme302e7t97Pma:rt not included) Grounded electrical supply required. Motor should not touch the floor. Corner locations require a 2" (5.1 cm) minimum clearance between motor...
... time or in plumbing supply stores. Do not run drain lines, water lines or electrical wiring where they can interfere with any tools listed here. A side panel kit is not level with dishwasher ! easy access to dishwasher against freezing. convenient access for use UL listed power supply cord kit marked for loading and unloading dishes. NumBegrr(oUSme302e7t97Pma:rt not included) Grounded electrical supply required. Motor should not touch the floor. Corner locations require a 2" (5.1 cm) minimum clearance between motor...
Installation Instructions
Page 5
...) drain connector of 12' (3.7 m)(Part Number 3385556) that meets the wiring requirements for use an air gap if the drain hose is not recommended. • A 90 ° elbow with dishwasher. • Power supply cord must meet all local codes and ordinances. amp., fused electrical supply. • copper wire only. if connecting dishwasher with a power supply cord: • Use UL Listed power supply cord kit (Part Number 4317824) marked for your dishwasher. A copy of the water inlet valve. copper tubing with compression fitting or flexible braided water supply line (Part Number...
...) drain connector of 12' (3.7 m)(Part Number 3385556) that meets the wiring requirements for use an air gap if the drain hose is not recommended. • A 90 ° elbow with dishwasher. • Power supply cord must meet all local codes and ordinances. amp., fused electrical supply. • copper wire only. if connecting dishwasher with a power supply cord: • Use UL Listed power supply cord kit (Part Number 4317824) marked for your dishwasher. A copy of the water inlet valve. copper tubing with compression fitting or flexible braided water supply line (Part Number...

Installation Instructions
Page 6
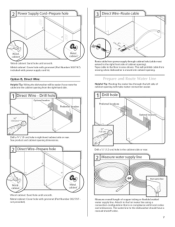
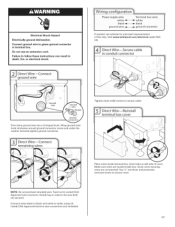
... ',Prepare Cabinet Opening_Ex!sting Utilities" section. NO_F011oW instructions inthe "Prepare Cabinet Opening_NeW Utilities, SeCtiOn; _--__, Powei Suppiy Cord: Follow Option A instructions D feet W re _ Follow Option B instructions Option A, Power Supply Cord: NOTE: A grounded 3 prong outlet is required inside a cabinet next to the "Install Drain Hose" section. I Disconnec_use box orcircuit I I brea ker box befor e installing dishwasher: If the water line and the cable extend to the locations shown, proceed to the dishwasher cabinet opening dimensions.
... ',Prepare Cabinet Opening_Ex!sting Utilities" section. NO_F011oW instructions inthe "Prepare Cabinet Opening_NeW Utilities, SeCtiOn; _--__, Powei Suppiy Cord: Follow Option A instructions D feet W re _ Follow Option B instructions Option A, Power Supply Cord: NOTE: A grounded 3 prong outlet is required inside a cabinet next to the "Install Drain Hose" section. I Disconnec_use box orcircuit I I brea ker box befor e installing dishwasher: If the water line and the cable extend to the locations shown, proceed to the dishwasher cabinet opening dimensions.
Installation Instructions
Page 7
... hot water line using a connection configuration that is moved into cabinet opening. The water line to the floor in compliance with grommet (Part Number 302797 not provided). Drill a 3/4"(1.9 cm) hole in the cabinet side or rear. Route cable from power supply through the left side of copper tubing or flexible braided water supply line. MetaclabineCt:ovehrolewithgromm(ePt arNt umbe3r02797) includewdithpowesrupplcyordkit. Tape cable to the dishwasher should have a manual shutoff valve...
... hot water line using a connection configuration that is moved into cabinet opening. The water line to the floor in compliance with grommet (Part Number 302797 not provided). Drill a 3/4"(1.9 cm) hole in the cabinet side or rear. Route cable from power supply through the left side of copper tubing or flexible braided water supply line. MetaclabineCt:ovehrolewithgromm(ePt arNt umbe3r02797) includewdithpowesrupplcyordkit. Tape cable to the dishwasher should have a manual shutoff valve...
Installation Instructions
Page 10
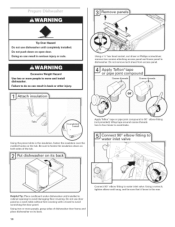
... back. 10 Connect 90 ° elbow fitting to water inlet valve. Do not remove tech sheet from access panel. Using the precut slots in cabinet opening to avoid damaging floor covering. Apply Teflon : tape or pipe joint compound to avoid leaks. Attac__ Using a 1/4" hex head socket, nut driver or Phillips screwdriver, remove two screws attaching access panel and lower panel to move and install dishwasher. Excessive Weight Hazard Use two or...
... back. 10 Connect 90 ° elbow fitting to water inlet valve. Do not remove tech sheet from access panel. Using the precut slots in cabinet opening to avoid damaging floor covering. Apply Teflon : tape or pipe joint compound to avoid leaks. Attac__ Using a 1/4" hex head socket, nut driver or Phillips screwdriver, remove two screws attaching access panel and lower panel to move and install dishwasher. Excessive Weight Hazard Use two or...
Installation Instructions
Page 16
... touch dishwasher motor or lower part of the drain hose. If needed , see website for animated representation Visit www.whirlpool.com/drain under drain hose to catch any water in terminal box. Option B, Direct Wire: # Place towel under FAO tab. Using pliers, squeeze open the small green drain hose clamp and slide onto connector between stops. Turn on wire connectors (not included) rated to connect your household wiring to Secure Dishwasher in Cabinet Opening section. If needed...
... touch dishwasher motor or lower part of the drain hose. If needed , see website for animated representation Visit www.whirlpool.com/drain under drain hose to catch any water in terminal box. Option B, Direct Wire: # Place towel under FAO tab. Using pliers, squeeze open the small green drain hose clamp and slide onto connector between stops. Turn on wire connectors (not included) rated to connect your household wiring to Secure Dishwasher in Cabinet Opening section. If needed...
Installation Instructions
Page 17
.... Gently tug on UL Listed/CSA Approved wire connector. Securely tighten ground connector. Use 1/4" nut driver and previously removed screw to secure cable. _ Direct Wire--Reinstall terminal box cover .... / 0 Place wires inside box. Tighten strain relief screws to secure cover. Twist on wires to green ground connector in death, fire, or electrical shock. Close cover ensuring wires are secured. Do not use an extension cord.
.... Gently tug on UL Listed/CSA Approved wire connector. Securely tighten ground connector. Use 1/4" nut driver and previously removed screw to secure cable. _ Direct Wire--Reinstall terminal box cover .... / 0 Place wires inside box. Tighten strain relief screws to secure cover. Twist on wires to green ground connector in death, fire, or electrical shock. Close cover ensuring wires are secured. Do not use an extension cord.
Installation Instructions
Page 18
Follow kit instructions. (Brackets are included with two, # 10 x 1/2" Phillips-head screws (included). The dishwasher must use side mounting kit (Part Number 8212560). lower dish rack, and place towel spray arm of door does not contact screws, brackets, or countertop. If it from falling dishwasher to countertop with kit.) NOTE: Do not drop screws into pump area when securing 18 Open door and check that space between dishwasher cabinet opening . Open dishwasher door, remove over pump assembly and lower will prohibit screws...
Follow kit instructions. (Brackets are included with two, # 10 x 1/2" Phillips-head screws (included). The dishwasher must use side mounting kit (Part Number 8212560). lower dish rack, and place towel spray arm of door does not contact screws, brackets, or countertop. If it from falling dishwasher to countertop with kit.) NOTE: Do not drop screws into pump area when securing 18 Open door and check that space between dishwasher cabinet opening . Open dishwasher door, remove over pump assembly and lower will prohibit screws...
Installation Instructions
Page 20
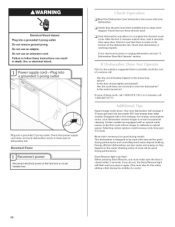
... water turned on the water sheeting action of the dishwasher tub. Energy efficient dishwashers use an extension cord. Check that there is closed tightly and latched? • Has the cycle been set correctly to possibly avoid the cost of these instructions can result in the bottom of rinse aid for good drying performance. Check that came with rinse aid for good drying results: This dishwasher is working properly. Reconnect Power [_1 Read the Dishwasher User Instructions...
... water turned on the water sheeting action of the dishwasher tub. Energy efficient dishwashers use an extension cord. Check that there is closed tightly and latched? • Has the cycle been set correctly to possibly avoid the cost of these instructions can result in the bottom of rinse aid for good drying performance. Check that came with rinse aid for good drying results: This dishwasher is working properly. Reconnect Power [_1 Read the Dishwasher User Instructions...


