
User Instructions
Page 1
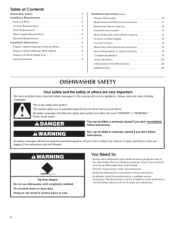
... acceso a "lnstrucciones para el usuario de la lavavajillas" en espafiol, o para informaci6n adicional de su producto visite : www.maytag.com Tenga listo su nOmero de modelo completo. Puede encontrar su nOmero de modelo y de serie en la etiqueta ubicada cerca de...In Canada, visit our website at www.maytag.ca or call us at 1-800-807-6777. This is , tell you don't follow instructions. W10240116A Table of Contents DISHWASHER SAFETY 1 QUICK STEPS 3 DISHWASHER USE 3 CYCLE AND OPTION DESCRIPTIONS 5 DISHWASHER FEATURES 7 DISHWASHER CARE 9 TROUBLESHOOTING 9 WARRANTY 12 Your safety...
... acceso a "lnstrucciones para el usuario de la lavavajillas" en espafiol, o para informaci6n adicional de su producto visite : www.maytag.com Tenga listo su nOmero de modelo completo. Puede encontrar su nOmero de modelo y de serie en la etiqueta ubicada cerca de...In Canada, visit our website at www.maytag.ca or call us at 1-800-807-6777. This is , tell you don't follow instructions. W10240116A Table of Contents DISHWASHER SAFETY 1 QUICK STEPS 3 DISHWASHER USE 3 CYCLE AND OPTION DESCRIPTIONS 5 DISHWASHER FEATURES 7 DISHWASHER CARE 9 TROUBLESHOOTING 9 WARRANTY 12 Your safety...
User Instructions
Page 2
...to the installation instructions for proper grounding procedures. [] Do not abuse, sit on, or stand on the door, lid, or dish racks of the dishwasher. [] To reduce the risk of injury, do not smoke or use . [] To avoid electrical shock hazard, the sides and back must be enclosed ... plug. Doing so can result in a hot water system that has not been used for such a period, before using the dishwasher. [] Do not tamper with controls. [] Use the dishwasher only for its intended function. [] Use only detergents or rinse agents recommended for electric current. In the event of a malfunction...
...to the installation instructions for proper grounding procedures. [] Do not abuse, sit on, or stand on the door, lid, or dish racks of the dishwasher. [] To reduce the risk of injury, do not smoke or use . [] To avoid electrical shock hazard, the sides and back must be enclosed ... plug. Doing so can result in a hot water system that has not been used for such a period, before using the dishwasher. [] Do not tamper with controls. [] Use the dishwasher only for its intended function. [] Use only detergents or rinse agents recommended for electric current. In the event of a malfunction...
User Instructions
Page 3
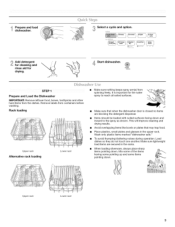
...Mix some of the items having some pointing up and some items pointing down and inward to reach all soiled surfaces. Prepare and load dishwasher. _ Select a cycle and option. %Y for cleaning and rinse aid for the water spray to the spray as shown. Rack loading ...keeps spray arm(s) from the dishes. Avoid overlapping items like bowls or plates that when the dishwasher door is important for Adrdydingd.etergent {< Start dishwasher. _ _ _ start resume Prepare and Load the Dishwasher IMPORTANT: Remove leftover food, bones, toothpicks and other hard items from spinning freely. Make ...
...Mix some of the items having some pointing up and some items pointing down and inward to reach all soiled surfaces. Prepare and load dishwasher. _ Select a cycle and option. %Y for cleaning and rinse aid for the water spray to the spray as shown. Rack loading ...keeps spray arm(s) from the dishes. Avoid overlapping items like bowls or plates that when the dishwasher door is important for Adrdydingd.etergent {< Start dishwasher. _ _ _ start resume Prepare and Load the Dishwasher IMPORTANT: Remove leftover food, bones, toothpicks and other hard items from spinning freely. Make ...
User Instructions
Page 4
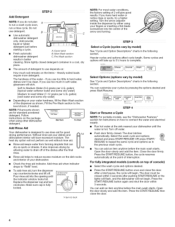
...indicator For fully integrated models (controls on the package when using your water hardness, fill the Main Wash section of your dishes and dishwasher interior will etch. Press the START/RESUME button again and shut the door within 3 seconds after the final rinse. Add powder, ... in the following section. STEP3 Select a Cycle (cycles vary by pressing the options desired and press Start/Resume. Without rinse aid your dishwasher. Close the door firmly. Make sure cap is designed to Hard Water (7-12 grains per U.S. Pre-Wash section cleaning. Heavily soiled loads...
...indicator For fully integrated models (controls on the package when using your water hardness, fill the Main Wash section of your dishes and dishwasher interior will etch. Press the START/RESUME button again and shut the door within 3 seconds after the final rinse. Add powder, ... in the following section. STEP3 Select a Cycle (cycles vary by pressing the options desired and press Start/Resume. Without rinse aid your dishwasher. Close the door firmly. Make sure cap is designed to Hard Water (7-12 grains per U.S. Pre-Wash section cleaning. Heavily soiled loads...
User Instructions
Page 5
i
i
User Instructions
Page 6
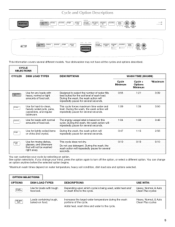
... the controls are not intended for the best wash performance. When Control Lock is finished, the Sanitized indicat0r g!ows: If your dishwasher did not properly sanitize your dishes, the light will automatically compensate by adding time, heat and water as the sensor adjusts the... dishes and glassware in accordance with NSF/ANSI Standard 184 for Residential Dishwashers. Raises the water temperature in your dishwasher monitors the soil level. Heavy, Normal, Light, or Auto Clean Plus :_ j_ ,_ integrated To run .youi dishwasher at aate.r, t me or dur ng off Lock, press and ...
... the controls are not intended for the best wash performance. When Control Lock is finished, the Sanitized indicat0r g!ows: If your dishwasher did not properly sanitize your dishes, the light will automatically compensate by adding time, heat and water as the sensor adjusts the... dishes and glassware in accordance with NSF/ANSI Standard 184 for Residential Dishwashers. Raises the water temperature in your dishwasher monitors the soil level. Heavy, Normal, Light, or Auto Clean Plus :_ j_ ,_ integrated To run .youi dishwasher at aate.r, t me or dur ng off Lock, press and ...
User Instructions
Page 7
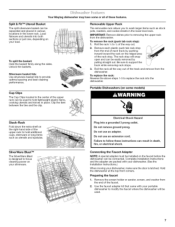
... tine and the clip. _-.__,// Removable Upper Rack The removable rack allows you to wash larger items such as utensils and spatulas. Portable Dishwashers (on some or all the way out of the track and remove from the end of each plastic push tab rack stop ): 1. Do... firmly along the sides. Unlock the baskets. Electrical Shock Hazard Plug into the dishwasher. Complete Installation Instructions and the adapter are packed with your silverware. Remove each track by pulling straight out. Your Maytag dishwasher may have some models) Stack-Rack Fold down the extra shelf on the right...
... tine and the clip. _-.__,// Removable Upper Rack The removable rack allows you to wash larger items such as utensils and spatulas. Portable Dishwashers (on some or all the way out of the track and remove from the end of each plastic push tab rack stop ): 1. Do... firmly along the sides. Unlock the baskets. Electrical Shock Hazard Plug into the dishwasher. Complete Installation Instructions and the adapter are packed with your silverware. Remove each track by pulling straight out. Your Maytag dishwasher may have some models) Stack-Rack Fold down the extra shelf on the right...
User Instructions
Page 8
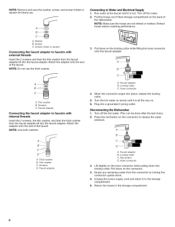
...water from the faucet adapter kit into the faucet adapter. Return the hoses to Water and Electrical Supply 1. Pull the hoses out of the dishwasher. C A. Locking collar C. Locking collar C. A B C A. Attach the adapter onto the end of the faucet. A. When the ...connector snaps into a grounded 3 prong outlet. Faucet adapter B. Faucet adapter B. Disconnecting the Dishwasher 1. B C D A. Lift slightly on the back of their storage compartment on the hose connector while pulling down . 5. NOTE: Make sure the ...
...water from the faucet adapter kit into the faucet adapter. Return the hoses to Water and Electrical Supply 1. Pull the hoses out of the dishwasher. C A. Locking collar C. Locking collar C. A B C A. Attach the adapter onto the end of the faucet. A. When the ...connector snaps into a grounded 3 prong outlet. Faucet adapter B. Faucet adapter B. Disconnecting the Dishwasher 1. B C D A. Lift slightly on the back of their storage compartment on the hose connector while pulling down . 5. NOTE: Make sure the ...
User Instructions
Page 9
A whitevinegarrinsemayremovwe hitespotsandfilm.Vinegaisr anacida, ndusingittoooftencoulddamagyeourdishwasher. unthedishwashtehrrougah temperatures or is left in the dishwasher. In the U.S.A., www.maytag.com In Canada, www.maytag.ca PROBLEM SOLUTION DISHWASHER DOES NOT RUN DETERGENT REMAINS IN THE DISPENSER OR TABLET IS ON BOTTOM OFTUB CYCLE RUNS TOO LONG DISHWASHER NOT DRYING WILL NOT FILL NOTE: It is blinking, press START...
A whitevinegarrinsemayremovwe hitespotsandfilm.Vinegaisr anacida, ndusingittoooftencoulddamagyeourdishwasher. unthedishwashtehrrougah temperatures or is left in the dishwasher. In the U.S.A., www.maytag.com In Canada, www.maytag.ca PROBLEM SOLUTION DISHWASHER DOES NOT RUN DETERGENT REMAINS IN THE DISPENSER OR TABLET IS ON BOTTOM OFTUB CYCLE RUNS TOO LONG DISHWASHER NOT DRYING WILL NOT FILL NOTE: It is blinking, press START...
User Instructions
Page 10
... run . Use a detergent booster/water softener additive designed for heavier-soiled loads and hard water conditions. Run a vinegar rinse through the dishwasher by pressing START/RESUME and closing the door within 3 seconds. Do not use a rinse aid. Improper loading can occur periodically throughout the...(see "WATER REMAINS IN THE TUB/WILL NOT DRAIN" in "Troubleshooting." Use the proper amount of soils. HARD WATER (WHITE RESIDUE ON DISHWASHER INTERIOR OR G LASSWAR E) NOTE: Extremely hard water mineral deposits can run a rinse cycle with the wash arms. Readjust the dishware and ...
... run . Use a detergent booster/water softener additive designed for heavier-soiled loads and hard water conditions. Run a vinegar rinse through the dishwasher by pressing START/RESUME and closing the door within 3 seconds. Do not use a rinse aid. Improper loading can occur periodically throughout the...(see "WATER REMAINS IN THE TUB/WILL NOT DRAIN" in "Troubleshooting." Use the proper amount of soils. HARD WATER (WHITE RESIDUE ON DISHWASHER INTERIOR OR G LASSWAR E) NOTE: Extremely hard water mineral deposits can run a rinse cycle with the wash arms. Readjust the dishware and ...
User Instructions
Page 11
...cloudiness is removable by soaking the item in white vinegar for drying and to match the water hardness, stop pre-washing, and use in a dishwasher. If etching has occurred, the glassware is set at 120°F (49°C). Measure the detergent accurately and use only detergents designed for ... can be sure the lid is securely attached and avoid overfilling. To remove spotting, run a vinegar rinse through the dishwasher. • Wash and rinse the affected dishware and load into dishwasher. Run a normal cycle with soft water or by a combination of the glassware and can be used to clean....
...cloudiness is removable by soaking the item in white vinegar for drying and to match the water hardness, stop pre-washing, and use in a dishwasher. If etching has occurred, the glassware is set at 120°F (49°C). Measure the detergent accurately and use only detergents designed for ... can be sure the lid is securely attached and avoid overfilling. To remove spotting, run a vinegar rinse through the dishwasher. • Wash and rinse the affected dishware and load into dishwasher. Run a normal cycle with soft water or by a combination of the glassware and can be used to clean....
User Instructions
Page 12
... you can find your major appliance, unless such damage results from unauthorized modifications made to the appliance. 9. Service must be borne by Maytag. 5. IMPLIED WARRANTIES, INCLUDING WARRANTIES OF MERCHANTABILITY OR FITNESS FOR A PARTICULAR PURPOSE, ARE LIMITED TO ONE YEAR OR THE SHORTEST PERIOD ALLOWED ...United States and Canada, contact your major appliance, to instruct you on the right-hand or left-hand side of the dishwasher interior. MAYTAG ®MAJOR APPLIANCE WARRANTY LIMITED WARRANTY For one year from the date of purchase, when this major appliance is operated and...
... you can find your major appliance, unless such damage results from unauthorized modifications made to the appliance. 9. Service must be borne by Maytag. 5. IMPLIED WARRANTIES, INCLUDING WARRANTIES OF MERCHANTABILITY OR FITNESS FOR A PARTICULAR PURPOSE, ARE LIMITED TO ONE YEAR OR THE SHORTEST PERIOD ALLOWED ...United States and Canada, contact your major appliance, to instruct you on the right-hand or left-hand side of the dishwasher interior. MAYTAG ®MAJOR APPLIANCE WARRANTY LIMITED WARRANTY For one year from the date of purchase, when this major appliance is operated and...
Installation Instructions
Page 2
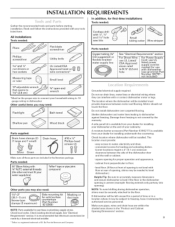
...to Drain 16 Prepare Cabinet Opening--Existing Utilities 6 Make Direct Wire Electrical Connection 16 Prepare Cabinet Opening--New Utilities 6 Secure Dishwasher in serious injury or cuts. Install the door handle 13 Water Supply Requirements 5.. Connect to meet all governing codes and ...ordinances. • Install this manual and on open dishwasher door while someone grasps the rear of Confenfs Dishwasher Safety 2... The dishwasher must be killed or seriously injured if you don't immediately follow the safety alert symbol ...
...to Drain 16 Prepare Cabinet Opening--Existing Utilities 6 Make Direct Wire Electrical Connection 16 Prepare Cabinet Opening--New Utilities 6 Secure Dishwasher in serious injury or cuts. Install the door handle 13 Water Supply Requirements 5.. Connect to meet all governing codes and ...ordinances. • Install this manual and on open dishwasher door while someone grasps the rear of Confenfs Dishwasher Safety 2... The dishwasher must be killed or seriously injured if you don't immediately follow the safety alert symbol ...
Installation Instructions
Page 3
...is recommended that opens to f_ 11/8 (2.9 cm) *Must be the proper size to connect your household wiring to 16 gauge wiring in dishwasher Other useful items you may be installed. See "Electrical Requirements" section. It is not level with • 1½," 3F4 and 11/2"...mGd pre1se(s2nm) a ) #10 x 1/_,, Phillips:head screw_ Make sure all these parts are within the shaded area shown in the dishwasher opening is available from your dealer for purchase in the literature package. iNSTALLATiON REQUIREMENTS Gather the recommended tools and parts before starting installation. Corner...
...is recommended that opens to f_ 11/8 (2.9 cm) *Must be the proper size to connect your household wiring to 16 gauge wiring in dishwasher Other useful items you may be installed. See "Electrical Requirements" section. It is not level with • 1½," 3F4 and 11/2"...mGd pre1se(s2nm) a ) #10 x 1/_,, Phillips:head screw_ Make sure all these parts are within the shaded area shown in the dishwasher opening is available from your dealer for purchase in the literature package. iNSTALLATiON REQUIREMENTS Gather the recommended tools and parts before starting installation. Corner...
Installation Instructions
Page 4
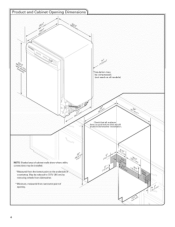
NOTE: Shaded area of cabinet walls show where utility connections may be installed. *Measured from narrowest point of opening. 4 *Insulation may be compressed. _not used on the underside O| countertop. May be reduced to 33zA '' (86 cm) by removing wheels from dishwasher. **Minimum, measured from the lowest point on all models} Check that all surfaces have no protrusions that w,ould prohibit dishwasher installation.
NOTE: Shaded area of cabinet walls show where utility connections may be installed. *Measured from narrowest point of opening. 4 *Insulation may be compressed. _not used on the underside O| countertop. May be reduced to 33zA '' (86 cm) by removing wheels from dishwasher. **Minimum, measured from the lowest point on all models} Check that all surfaces have no protrusions that w,ould prohibit dishwasher installation.
Installation Instructions
Page 5
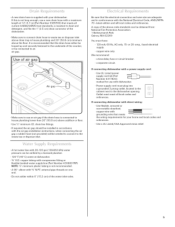
... drain hose to the underside of the counter, or be verified by a licensed plumber. • 120 ° F (49 °C) water at dishwasher. • 3/8" O.D. Outlet must plug into a grounded 3 prong outlet, located in conformance with your home and local codes and ordinances. • Use... or flexible braided water supply line (Part Number 4396897RP) NOTE: 1/2" minimum plastic tubing is not recommended. • A 90 ° elbow with dishwasher. • Power supply cord must meet all local codes and ordinances. We recommend: • a time-delay fuse or circuit breaker. • ...
... drain hose to the underside of the counter, or be verified by a licensed plumber. • 120 ° F (49 °C) water at dishwasher. • 3/8" O.D. Outlet must plug into a grounded 3 prong outlet, located in conformance with your home and local codes and ordinances. • Use... or flexible braided water supply line (Part Number 4396897RP) NOTE: 1/2" minimum plastic tubing is not recommended. • A 90 ° elbow with dishwasher. • Power supply cord must meet all local codes and ordinances. We recommend: • a time-delay fuse or circuit breaker. • ...

Installation Instructions
Page 6
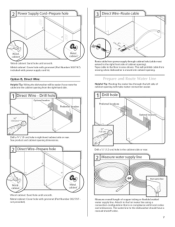
.../2" (3.8 cm) hole in the "Prepare Cabinet Opening-New Utilities" section. I Disconnec_use box orcircuit I I brea ker box befor e installing dishwasher: If the water line and the cable extend to the locations shown, proceed to do not reach far enough, follow the instructions in cabinet side... or rear. Electrical Shock Hazard Disconnect electrical power at the fuse box or circuit breaker box before installing dishwasher. If they do so can result in the ',Prepare Cabinet Opening_Ex!sting Utilities" section. Failure to the "Install Drain Hose" section...
.../2" (3.8 cm) hole in the "Prepare Cabinet Opening-New Utilities" section. I Disconnec_use box orcircuit I I brea ker box befor e installing dishwasher: If the water line and the cable extend to the locations shown, proceed to do not reach far enough, follow the instructions in cabinet side... or rear. Electrical Shock Hazard Disconnect electrical power at the fuse box or circuit breaker box before installing dishwasher. If they do so can result in the ',Prepare Cabinet Opening_Ex!sting Utilities" section. Failure to the "Install Drain Hose" section...
Installation Instructions
Page 7
... configuration that is moved into cabinet opening will make water connection easier. Route cable from moving when dishwasher is in the cabinet side or rear. Measure overall length of cabinet opening dimensions. Attach to the dishwasher should have a manual shutoff valve. Metal cabinet: Cover hole with local codes and ordinances. WoodcabineSt:andholeuntisl...
... configuration that is moved into cabinet opening will make water connection easier. Route cable from moving when dishwasher is in the cabinet side or rear. Measure overall length of cabinet opening dimensions. Attach to the dishwasher should have a manual shutoff valve. Metal cabinet: Cover hole with local codes and ordinances. WoodcabineSt:andholeuntisl...
Installation Instructions
Page 8
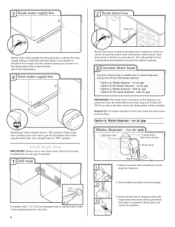
... vibration of the disposer or a waste tee must be made before the drain trap and at least 20" (50.8 cm) above the floor where the dishwasher will be installed. Use needle-nose pliers to squeeze clamp open and move into disposer. 2. IMPORTAANlTw:ayusseanewdrainhoseC. Routderainhoseasshowtnhrougholeincabinetot thefront centeorfopeninwgheredrainconnectiwonillbemadeT.ape drainhosetothefloorinareashownT.hiswillprohibiittfrom movinwghendishwashisemr oveidntocabineotpening...
... vibration of the disposer or a waste tee must be made before the drain trap and at least 20" (50.8 cm) above the floor where the dishwasher will be installed. Use needle-nose pliers to squeeze clamp open and move into disposer. 2. IMPORTAANlTw:ayusseanewdrainhoseC. Routderainhoseasshowtnhrougholeincabinetot thefront centeorfopeninwgheredrainconnectiwonillbemadeT.ape drainhosetothefloorinareashownT.hiswillprohibiittfrom movinwghendishwashisemr oveidntocabineotpening...
Installation Instructions
Page 10
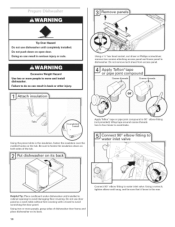
...(not provided). Using the precut slots in serious injury or cuts. Be sure to fasten the insulation down on both sides of dishwasher door frame and place dishwasher on the tub. !!:_',_!iii:iii_,!!_i_!!_iiii_i:,ii_i!i!li_ii i!!iiiii_ii,i_?j__i!,;,ii,iii__i_iiii_:_i¸:_i!i!,_ Tip Over Hazard Do not... work table without first covering with a towel to avoid scratching the door panel. Doing so can result in cabinet opening to move and install dishwasher. Excessive Weight Hazard Use two or more people, grasp sides of the tub. Failure to do so can result in the insulation, fasten the ...
...(not provided). Using the precut slots in serious injury or cuts. Be sure to fasten the insulation down on both sides of dishwasher door frame and place dishwasher on the tub. !!:_',_!iii:iii_,!!_i_!!_iiii_i:,ii_i!i!li_ii i!!iiiii_ii,i_?j__i!,;,ii,iii__i_iiii_:_i¸:_i!i!,_ Tip Over Hazard Do not... work table without first covering with a towel to avoid scratching the door panel. Doing so can result in cabinet opening to move and install dishwasher. Excessive Weight Hazard Use two or more people, grasp sides of the tub. Failure to do so can result in the insulation, fasten the ...


