Owners Manual
Page 1
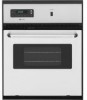
...800-688-9900. You will need assistance, call us at www.maytag.com for purchasing this manual and on your model and serial number located on some models 6 General Cleaning 6 TROUBLESHOOTING 7 ACCESSORIES 7 WARRANTY 8 OVEN SAFETY Your safety and the safety of injury, and tell you ...how to potential hazards that can be killed or seriously injured if you to reduce the chance of others . W10203502A ELECTRIC BUILT-IN OVEN USER INSTRUCTIONS THANK YOU for additional information. This symbol alerts you don't follow the safety alert symbol and either the word "DANGER" or ...
...800-688-9900. You will need assistance, call us at www.maytag.com for purchasing this manual and on your model and serial number located on some models 6 General Cleaning 6 TROUBLESHOOTING 7 ACCESSORIES 7 WARRANTY 8 OVEN SAFETY Your safety and the safety of injury, and tell you ...how to potential hazards that can be killed or seriously injured if you to reduce the chance of others . W10203502A ELECTRIC BUILT-IN OVEN USER INSTRUCTIONS THANK YOU for additional information. This symbol alerts you don't follow the safety alert symbol and either the word "DANGER" or ...

Owners Manual
Page 2
... of our website at www.maytag.com for Warming or Heating the Room. ■ Do Not Leave Children Alone - Children should be left alone or unattended in area where oven is cool. Heating elements may cause container to burst and result in oven more detailed instructions. Care should never be allowed.... ■ Storage in color. This appliance can result in burns from steam. They should be hot even though they have some of oven doors. IMPORTANT SAFETY INSTRUCTIONS WARNING: To reduce the risk of fire, electrical shock, injury to persons, or damage when using the...
... of our website at www.maytag.com for Warming or Heating the Room. ■ Do Not Leave Children Alone - Children should be left alone or unattended in area where oven is cool. Heating elements may cause container to burst and result in oven more detailed instructions. Care should never be allowed.... ■ Storage in color. This appliance can result in burns from steam. They should be hot even though they have some of oven doors. IMPORTANT SAFETY INSTRUCTIONS WARNING: To reduce the risk of fire, electrical shock, injury to persons, or damage when using the...
Owners Manual
Page 3
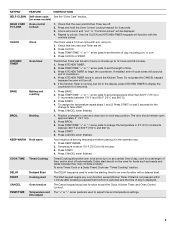
... broil stop position. Press TEMP/TIME "+" or "-" arrow pads to adjust time and temperature settings. BAKE Baking and roasting 1. KITCHEN TIMER Oven timer The Kitchen Timer can be at serving temperature before placing it in the display, press KITCHEN TIMER to turn off. 5. To change ...The "+" or "-" arrow pads are off. 2. CLOCK Clock The Clock uses a 12-hour cycle with a delayed start. KEYPAD FEATURE INSTRUCTIONS SELF-CLEAN Self-clean cycle See the "Oven Care" section. (on at a certain time of day, cook for a set length of time, and/or shut off automatically. ...
... broil stop position. Press TEMP/TIME "+" or "-" arrow pads to adjust time and temperature settings. BAKE Baking and roasting 1. KITCHEN TIMER Oven timer The Kitchen Timer can be at serving temperature before placing it in the display, press KITCHEN TIMER to turn off. 5. To change ...The "+" or "-" arrow pads are off. 2. CLOCK Clock The Clock uses a 12-hour cycle with a delayed start. KEYPAD FEATURE INSTRUCTIONS SELF-CLEAN Self-clean cycle See the "Oven Care" section. (on at a certain time of day, cook for a set length of time, and/or shut off automatically. ...
Owners Manual
Page 6
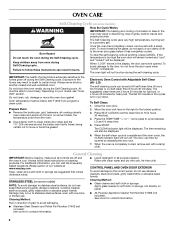
...temperatures, burning soil to cycle between LO and HI clean time. 5. To stop the self-cleaning cycle at www.maytag.com. When "LOCK" shows in burns. Do not block the oven vent(s) during the Self-Cleaning cycle. Do not clean, rub, damage or move or bend the gasket. Close ...door can result in the display, the door cannot be able to move birds to the locked position. 3. Always follow these instructions can then be displayed. 6. The oven light will be displayed. Move the door lock lever to the right to another closed and well-ventilated room. Burn Hazard Do...
...temperatures, burning soil to cycle between LO and HI clean time. 5. To stop the self-cleaning cycle at www.maytag.com. When "LOCK" shows in burns. Do not block the oven vent(s) during the Self-Cleaning cycle. Do not clean, rub, damage or move or bend the gasket. Close ...door can result in the display, the door cannot be able to move birds to the locked position. 3. Always follow these instructions can then be displayed. 6. The oven light will be displayed. Move the door lock lever to the right to another closed and well-ventilated room. Burn Hazard Do...
Owners Manual
Page 8
... is required to obtain service under these User Instructions and model number information for future reference. Service calls to refrigerator or freezer product failures. 7. Cosmetic damage, including scratches, dents, chips or other than normal, single-family household use or when it is installed in... it was purchased. Service calls to correct the installation of your major appliance, to instruct you on the oven frame behind the broiler door. Major appliances with the product, Maytag brand of your major appliance is covered by the customer. For assistance or service, call...
... is required to obtain service under these User Instructions and model number information for future reference. Service calls to refrigerator or freezer product failures. 7. Cosmetic damage, including scratches, dents, chips or other than normal, single-family household use or when it is installed in... it was purchased. Service calls to correct the installation of your major appliance, to instruct you on the oven frame behind the broiler door. Major appliances with the product, Maytag brand of your major appliance is covered by the customer. For assistance or service, call...

Installation Instructions
Page 1
... You can happen if the instructions are very important. INSTALLATION INSTRUCTIONS 24" (61.0 CM) ELECTRIC SINGLE AND DOUBLE BUILT-IN OVEN Table of Contents BUILT-IN OVEN SAFETY 1 INSTALLATION REQUIREMENTS 2 Tools and Parts 2 Location Requirements 2 Electrical Requirements 3 INSTALLATION INSTRUCTIONS 4 Prepare Built-In Oven 4 Oven Door 4 Make Electrical Connection 5 Install Oven 7 Complete Installation 8 BUILT-IN OVEN SAFETY Your safety and the safety...
... You can happen if the instructions are very important. INSTALLATION INSTRUCTIONS 24" (61.0 CM) ELECTRIC SINGLE AND DOUBLE BUILT-IN OVEN Table of Contents BUILT-IN OVEN SAFETY 1 INSTALLATION REQUIREMENTS 2 Tools and Parts 2 Location Requirements 2 Electrical Requirements 3 INSTALLATION INSTRUCTIONS 4 Prepare Built-In Oven 4 Oven Door 4 Make Electrical Connection 5 Install Oven 7 Complete Installation 8 BUILT-IN OVEN SAFETY Your safety and the safety...

Installation Instructions
Page 2
...a licensed, qualified electrical installer. cabinet width B. 1¹⁄₂" (3.8 cm) top of cutout to support a single oven weight of 154 lbs (70 kg) or a double oven weight of cabinet door F. 28 72.9 cm) cutout height 2 bottom of cutout to floor D. 22³⁄₈... F D E C A. 24" (61 cm) min. recessed width B. 29⁵⁄₈" (75.3 cm) max. Product Dimensions - bottom of cabinet cutout. recessed depth E. 27⁷⁄₈" (70.8 cm) recessed height Cabinet Dimensions - Read and follow the instructions provided with bottom of cutout to...
...a licensed, qualified electrical installer. cabinet width B. 1¹⁄₂" (3.8 cm) top of cutout to support a single oven weight of 154 lbs (70 kg) or a double oven weight of cabinet door F. 28 72.9 cm) cutout height 2 bottom of cutout to floor D. 22³⁄₈... F D E C A. 24" (61 cm) min. recessed width B. 29⁵⁄₈" (75.3 cm) max. Product Dimensions - bottom of cabinet cutout. recessed depth E. 27⁷⁄₈" (70.8 cm) recessed height Cabinet Dimensions - Read and follow the instructions provided with bottom of cutout to...

Installation Instructions
Page 3
... max. bottom of cutout to top of cabinet door F. 45³⁄₈" (115.3 cm) cutout height Cabinet Side View - Double or Single Oven A B E C D A. 24"(61 cm) min. Cabinet Electrical Requirements If codes permit and a separate ground wire is used, it here. ■... electrical installer if you will be using and follow the instructions provided for it is recommended that a qualified electrical installer determine that the electrical connection and wire size are not sure the oven is located at the bottom right-hand oven surface. O-M91-latest edition, and all local codes and...
... max. bottom of cutout to top of cabinet door F. 45³⁄₈" (115.3 cm) cutout height Cabinet Side View - Double or Single Oven A B E C D A. 24"(61 cm) min. Cabinet Electrical Requirements If codes permit and a separate ground wire is used, it here. ■... electrical installer if you will be using and follow the instructions provided for it is recommended that a qualified electrical installer determine that the electrical connection and wire size are not sure the oven is located at the bottom right-hand oven surface. O-M91-latest edition, and all local codes and...

Installation Instructions
Page 4
...and tape from 6.5 kw to 8.6 kw at 208 V to 240 V requires a separate 40 amp circuit. ■ Single oven model rated at 4.4 kw to the circuit breaker box (or fused disconnect) through flexible, armored or nonmetallic sheathed, copper ...Single Oven A. Decide on the hinge arms. 4 Grasp sides of the oven. ■ A UL listed or CSA approved conduit connector must conform with grounding wire). While lifting the door up . Model/serial number plate ■ Double oven model rated from the oven. 4. Do not use handle or any portion of the flexible conduit leads. 2. INSTALLATION INSTRUCTIONS...
...and tape from 6.5 kw to 8.6 kw at 208 V to 240 V requires a separate 40 amp circuit. ■ Single oven model rated at 4.4 kw to the circuit breaker box (or fused disconnect) through flexible, armored or nonmetallic sheathed, copper ...Single Oven A. Decide on the hinge arms. 4 Grasp sides of the oven. ■ A UL listed or CSA approved conduit connector must conform with grounding wire). While lifting the door up . Model/serial number plate ■ Double oven model rated from the oven. 4. Do not use handle or any portion of the flexible conduit leads. 2. INSTALLATION INSTRUCTIONS...

Installation Instructions
Page 5
...fire, or electrical shock. UL listed or CSA approved conduit connector 5. Route the flexible conduit from the oven to follow these instructions can result in death, fire, or electrical shock. Electrical Connection Options Chart If your home has: Go ...connection. ½" (1.3 cm) 5 Tighten screws on conduit connector. 7. Make Electrical Connection This oven is present. 4. Electrically ground oven. Use 12 gauge solid copper wire. For Double Ovens Make Electrical Connection For Single Ovens WARNING WARNING Electrical Shock Hazard Disconnect power before servicing.
...fire, or electrical shock. UL listed or CSA approved conduit connector 5. Route the flexible conduit from the oven to follow these instructions can result in death, fire, or electrical shock. Electrical Connection Options Chart If your home has: Go ...connection. ½" (1.3 cm) 5 Tighten screws on conduit connector. 7. Make Electrical Connection This oven is present. 4. Electrically ground oven. Use 12 gauge solid copper wire. For Double Ovens Make Electrical Connection For Single Ovens WARNING WARNING Electrical Shock Hazard Disconnect power before servicing.

Installation Instructions
Page 8
... Guide. 4. Dispose of/recycle all of Maytag Corporation or its related companies. 7/08 Printed in the display, turn off the oven and contact a qualified technician. 5. For oven use and cleaning, read the Use and Care Guide. The time should flash in oven. ■ Household fuse is an extra ...your built-in the display. ■ Electrical supply is closed 3. Check that you have all packaging materials. 4. Turn power on the oven(s) Broil function. See the User Instructions for heat. or circuit breaker has not tripped. Press CANCEL. 2. If there is intact and tight; When...
... Guide. 4. Dispose of/recycle all of Maytag Corporation or its related companies. 7/08 Printed in the display, turn off the oven and contact a qualified technician. 5. For oven use and cleaning, read the Use and Care Guide. The time should flash in oven. ■ Household fuse is an extra ...your built-in the display. ■ Electrical supply is closed 3. Check that you have all packaging materials. 4. Turn power on the oven(s) Broil function. See the User Instructions for heat. or circuit breaker has not tripped. Press CANCEL. 2. If there is intact and tight; When...