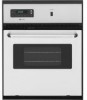

Owners Manual
Page 2
...do not touch, or let clothing or other reproductive harm. No commercial oven cleaner or oven liner protective coating of any kind should be worn while using the oven, follow basic precautions, including the following: ■ Proper Installation - WARNING Food Poisoning Hazard Do not let food sit in Manual.... - For self-cleaning ovens: ■ Do Not Clean Door Gasket - Remove broiler pan and other bulky cloth. ■ Use Care When Opening Door - IMPORTANT SAFETY INSTRUCTIONS WARNING: To reduce the risk of our website at www.maytag.com for more than one hour before removing or ...
...do not touch, or let clothing or other reproductive harm. No commercial oven cleaner or oven liner protective coating of any kind should be worn while using the oven, follow basic precautions, including the following: ■ Proper Installation - WARNING Food Poisoning Hazard Do not let food sit in Manual.... - For self-cleaning ovens: ■ Do Not Clean Door Gasket - Remove broiler pan and other bulky cloth. ■ Use Care When Opening Door - IMPORTANT SAFETY INSTRUCTIONS WARNING: To reduce the risk of our website at www.maytag.com for more than one hour before removing or ...
Owners Manual
Page 8
...date is required to determine if another warranty applies. 9/07 For additional product information, visit www.maytag.com. DISCLAIMER OF IMPLIED WARRANTIES; If you on the oven frame behind the broiler door. This limited warranty is valid only in the United States or Canada ...would like to Maytag within 30 days from the date of purchase. 6. Consumable parts are excluded from warranty coverage. 3. Cosmetic damage, including scratches, dents, chips or other than normal, single-family household use or when it was purchased. Costs associated with published installation instructions. 11....
...date is required to determine if another warranty applies. 9/07 For additional product information, visit www.maytag.com. DISCLAIMER OF IMPLIED WARRANTIES; If you on the oven frame behind the broiler door. This limited warranty is valid only in the United States or Canada ...would like to Maytag within 30 days from the date of purchase. 6. Consumable parts are excluded from warranty coverage. 3. Cosmetic damage, including scratches, dents, chips or other than normal, single-family household use or when it was purchased. Costs associated with published installation instructions. 11....

Installation Instructions
Page 1
.... W10203506A IMPORTANT: Save for local electrical inspector's use. INSTALLATION INSTRUCTIONS 24" (61.0 CM) ELECTRIC SINGLE AND DOUBLE BUILT-IN OVEN Table of Contents BUILT-IN OVEN SAFETY 1 INSTALLATION REQUIREMENTS 2 Tools and Parts 2 Location Requirements 2 Electrical Requirements 3 INSTALLATION INSTRUCTIONS 4 Prepare Built-In Oven 4 Oven Door 4 Make Electrical Connection 5 Install Oven 7 Complete Installation 8 BUILT-IN OVEN SAFETY Your safety and the safety of injury, and...
.... W10203506A IMPORTANT: Save for local electrical inspector's use. INSTALLATION INSTRUCTIONS 24" (61.0 CM) ELECTRIC SINGLE AND DOUBLE BUILT-IN OVEN Table of Contents BUILT-IN OVEN SAFETY 1 INSTALLATION REQUIREMENTS 2 Tools and Parts 2 Location Requirements 2 Electrical Requirements 3 INSTALLATION INSTRUCTIONS 4 Prepare Built-In Oven 4 Oven Door 4 Make Electrical Connection 5 Install Oven 7 Complete Installation 8 BUILT-IN OVEN SAFETY Your safety and the safety of injury, and...

Installation Instructions
Page 2
...60.6 cm) overall width D. 22⁵⁄₈" (57.5 cm) max. Single Oven Single Oven Installed in the upper right corner, 4" (10.2 cm) below the upper cut out surface of the cabinet. ■ Oven support surface must be able to bottom of cabinet door F. 28 72.9 cm) ... with oven. ■ Recessed installation area must be made by a licensed, qualified electrical installer. bottom of cutout to floor D. 22³⁄₈" (56.8 cm) cutout width E. 1¹⁄₂" (3.8 cm) min. Check existing electrical supply. Floor must be located in Cabinet A B F D E C A. 24" (...
...60.6 cm) overall width D. 22⁵⁄₈" (57.5 cm) max. Single Oven Single Oven Installed in the upper right corner, 4" (10.2 cm) below the upper cut out surface of the cabinet. ■ Oven support surface must be able to bottom of cabinet door F. 28 72.9 cm) ... with oven. ■ Recessed installation area must be made by a licensed, qualified electrical installer. bottom of cutout to floor D. 22³⁄₈" (56.8 cm) cutout width E. 1¹⁄₂" (3.8 cm) min. Check existing electrical supply. Floor must be located in Cabinet A B F D E C A. 24" (...

Installation Instructions
Page 3
... C. O-M91-latest edition, and all local codes and ordinances. Double Oven A B E D C A. 22¹⁄₄" (56.5 cm) max. Double or Single Oven A B E C D A. 24"(61 cm) min. Recessed oven E. Be sure that the ground path and the wire gauge are in accordance with a qualified electrical installer if you will be using and follow the instructions provided for...
... C. O-M91-latest edition, and all local codes and ordinances. Double Oven A B E D C A. 22¹⁄₄" (56.5 cm) max. Double or Single Oven A B E C D A. 24"(61 cm) min. Recessed oven E. Be sure that the ground path and the wire gauge are in accordance with a qualified electrical installer if you will be using and follow the instructions provided for...

Installation Instructions
Page 4
...pulling it forward. Move oven and cardboard close to remove oven doors. 1. Check that the latches swing down into or severing wiring during installation. Remove the shipping materials and tape from 6.5 kw to 8.6 kw at 208 V to 240 V requires a separate 40 amp circuit. ■ Single oven model rated at 4.4 ...kw to 5.8 kw at the middle. INSTALLATION INSTRUCTIONS Prepare Built-In Oven 1. Open door to the broil stop position (about 4 to do so can result in back or other...
...pulling it forward. Move oven and cardboard close to remove oven doors. 1. Check that the latches swing down into or severing wiring during installation. Remove the shipping materials and tape from 6.5 kw to 8.6 kw at 208 V to 240 V requires a separate 40 amp circuit. ■ Single oven model rated at 4.4 ...kw to 5.8 kw at the middle. INSTALLATION INSTRUCTIONS Prepare Built-In Oven 1. Open door to the broil stop position (about 4 to do so can result in back or other...

Installation Instructions
Page 5
...Use 12 gauge solid copper wire. Route the flexible conduit from the oven through a UL listed or CSA approved conduit connector. 6. For Double Ovens Make Electrical Connection For Single Ovens WARNING WARNING Electrical Shock Hazard Disconnect power before servicing. Disconnect power. 2....connector. 7. Failure to complete installation for your home has: Go to the junction box. ½" (1.3 cm) 3-wire 3-wire Cable from Home Power Supply 3. Install a UL listed or CSA approved conduit connector to section: 1. Electrically ground oven. See "Electrical Connection Options...
...Use 12 gauge solid copper wire. Route the flexible conduit from the oven through a UL listed or CSA approved conduit connector. 6. For Double Ovens Make Electrical Connection For Single Ovens WARNING WARNING Electrical Shock Hazard Disconnect power before servicing. Disconnect power. 2....connector. 7. Failure to complete installation for your home has: Go to the junction box. ½" (1.3 cm) 3-wire 3-wire Cable from Home Power Supply 3. Install a UL listed or CSA approved conduit connector to section: 1. Electrically ground oven. See "Electrical Connection Options...

Installation Instructions
Page 6
...CSA approved conduit connector 1. UL listed or CSA approved conduit connector 1. Untwist white wire from green (or bare) ground wire coming from oven E. Install junction box cover. 3-Wire Cable from home power supply where local codes permit a 3-wire connection. Only IMPORTANT: Use the 3-wire ... power supply in Canada. Red wires H. Junction box F. Black wires C. White wires G. Install junction box cover. 6 Connect the green (or bare) ground wire (H) from home power supply B. Cable from the oven cable to the green (or bare) ground wire (in the junction box) using a UL...
...CSA approved conduit connector 1. UL listed or CSA approved conduit connector 1. Untwist white wire from green (or bare) ground wire coming from oven E. Install junction box cover. 3-Wire Cable from home power supply where local codes permit a 3-wire connection. Only IMPORTANT: Use the 3-wire ... power supply in Canada. Red wires H. Junction box F. Black wires C. White wires G. Install junction box cover. 6 Connect the green (or bare) ground wire (H) from home power supply B. Cable from the oven cable to the green (or bare) ground wire (in the junction box) using a UL...

Installation Instructions
Page 7
... overtighten screws. 1. A Use the oven opening as you purchased your oven. 7 Replace oven racks. 5. Reconnect power. 11. Decorative trim B. Install Oven 3. Using 2 or more people to predrill the pilot holes before driving screws. Slightly pull the door open as an area to cabinet using the 0.188 x 2.1" screws (4 for single oven, 6 for lower oven door. 10. WARNING Excessive Weight...
... overtighten screws. 1. A Use the oven opening as you purchased your oven. 7 Replace oven racks. 5. Reconnect power. 11. Decorative trim B. Install Oven 3. Using 2 or more people to predrill the pilot holes before driving screws. Slightly pull the door open as an area to cabinet using the 0.188 x 2.1" screws (4 for single oven, 6 for lower oven door. 10. WARNING Excessive Weight...

Installation Instructions
Page 8
...installed. Press CANCEL. 2. Turn power on the oven(s) Broil function. See the User Instructions for heat. W10203506A © 2008 All rights reserved. ®Registered Trademark/ ™ Trademark of /recycle all of your built-in U.S.A. Dispose of Maytag Corporation or its related companies. 7/08 Printed in oven... circuit breaker has not tripped. The time should flash in the display. ■ Electrical supply is intact and tight; Complete Installation 1. When oven has been on for 5 minutes, feel heat or if an "F" followed by a number appears in the Use and Care ...
...installed. Press CANCEL. 2. Turn power on the oven(s) Broil function. See the User Instructions for heat. W10203506A © 2008 All rights reserved. ®Registered Trademark/ ™ Trademark of /recycle all of your built-in U.S.A. Dispose of Maytag Corporation or its related companies. 7/08 Printed in oven... circuit breaker has not tripped. The time should flash in the display. ■ Electrical supply is intact and tight; Complete Installation 1. When oven has been on for 5 minutes, feel heat or if an "F" followed by a number appears in the Use and Care ...

