
Owners Manual
Page 2
...be taken not to rub, damage, or move the gasket. ■ Do Not Use Oven Cleaners - Flammable materials should be worn while using the oven, follow basic precautions, including the following: ■ Proper Installation - Do not let potholder touch hot heating elements. Care should not be left alone ...become hot enough to cause burns. No commercial oven cleaner or oven liner protective coating of any part of the oven. ■ Wear Proper Apparel - Refer to this manual or the Frequently Asked Questions (FAQs) section of our website at www.maytag.com for a good seal. Build-up of...
...be taken not to rub, damage, or move the gasket. ■ Do Not Use Oven Cleaners - Flammable materials should be worn while using the oven, follow basic precautions, including the following: ■ Proper Installation - Do not let potholder touch hot heating elements. Care should not be left alone ...become hot enough to cause burns. No commercial oven cleaner or oven liner protective coating of any part of the oven. ■ Wear Proper Apparel - Refer to this manual or the Frequently Asked Questions (FAQs) section of our website at www.maytag.com for a good seal. Build-up of...
Owners Manual
Page 8
... on the oven frame behind the broiler door. The cost of repair or replacement under this limited warranty. DISCLAIMER OF IMPLIED WARRANTIES; Service calls to correct the installation of your major appliance is used in -home service is covered by a Maytag designated service company... FOR A PARTICULAR PURPOSE, ARE LIMITED TO ONE YEAR OR THE SHORTEST PERIOD ALLOWED BY LAW. MAYTAG SHALL NOT BE LIABLE FOR INCIDENTAL OR CONSEQUENTIAL DAMAGES. Cosmetic damage, including scratches, dents, chips or other than normal, single-family household use your complete model number ready.
... on the oven frame behind the broiler door. The cost of repair or replacement under this limited warranty. DISCLAIMER OF IMPLIED WARRANTIES; Service calls to correct the installation of your major appliance is used in -home service is covered by a Maytag designated service company... FOR A PARTICULAR PURPOSE, ARE LIMITED TO ONE YEAR OR THE SHORTEST PERIOD ALLOWED BY LAW. MAYTAG SHALL NOT BE LIABLE FOR INCIDENTAL OR CONSEQUENTIAL DAMAGES. Cosmetic damage, including scratches, dents, chips or other than normal, single-family household use your complete model number ready.

Installation Instructions
Page 1
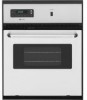
... others . IMPORTANT: Save for local electrical inspector's use. INSTALLATION INSTRUCTIONS 24" (61.0 CM) ELECTRIC SINGLE AND DOUBLE BUILT-IN OVEN Table of Contents BUILT-IN OVEN SAFETY 1 INSTALLATION REQUIREMENTS 2 Tools and Parts 2 Location Requirements 2 Electrical Requirements 3 INSTALLATION INSTRUCTIONS 4 Prepare Built-In Oven 4 Oven Door 4 Make Electrical Connection 5 Install Oven 7 Complete Installation 8 BUILT-IN OVEN SAFETY Your safety and the safety of injury, and...
... others . IMPORTANT: Save for local electrical inspector's use. INSTALLATION INSTRUCTIONS 24" (61.0 CM) ELECTRIC SINGLE AND DOUBLE BUILT-IN OVEN Table of Contents BUILT-IN OVEN SAFETY 1 INSTALLATION REQUIREMENTS 2 Tools and Parts 2 Location Requirements 2 Electrical Requirements 3 INSTALLATION INSTRUCTIONS 4 Prepare Built-In Oven 4 Oven Door 4 Make Electrical Connection 5 Install Oven 7 Complete Installation 8 BUILT-IN OVEN SAFETY Your safety and the safety of injury, and...

Installation Instructions
Page 2
... by a licensed, qualified electrical installer. Single Oven Single Oven Installed in the upper right corner, 4" (10.2 cm) below the upper cut out surface of 287 lbs (130 kg). Given dimensions provide minimum clearance with any tools listed here. See "Electrical Requirements" section. ■ Electrical supply junction box should be located in Cabinet A B F D E C A. 24" (61 cm) min. recessed...
... by a licensed, qualified electrical installer. Single Oven Single Oven Installed in the upper right corner, 4" (10.2 cm) below the upper cut out surface of 287 lbs (130 kg). Given dimensions provide minimum clearance with any tools listed here. See "Electrical Requirements" section. ■ Electrical supply junction box should be located in Cabinet A B F D E C A. 24" (61 cm) min. recessed...

Installation Instructions
Page 3
... Oven Double Oven Installed in accordance with a qualified electrical installer if you will be connected to bottom of cabinet door F. 45³⁄₈" (115.3 cm) cutout height Cabinet Side View - Double Oven A B E D C A. 22¹⁄₄" (56.5 cm) max. recessed depth E. 44⁵⁄₈" (113.4 cm) recessed height Cabinet Dimensions - Double or Single Oven A B E C D A. 24"(61...
... Oven Double Oven Installed in accordance with a qualified electrical installer if you will be connected to bottom of cabinet door F. 45³⁄₈" (115.3 cm) cutout height Cabinet Side View - Double Oven A B E D C A. 22¹⁄₄" (56.5 cm) max. recessed depth E. 44⁵⁄₈" (113.4 cm) recessed height Cabinet Dimensions - Double or Single Oven A B E C D A. 24"(61...

Installation Instructions
Page 4
... from 6.5 kw to 8.6 kw at 208 V to 240 V requires a separate 40 amp circuit. ■ Single oven model rated at 4.4 kw to the junction box. ■ Do not cut the conduit. IMPORTANT: Use both hands to move and install oven. INSTALLATION INSTRUCTIONS Prepare Built-In Oven 1. Connect a section of solid copper wire to the ends of the...
... from 6.5 kw to 8.6 kw at 208 V to 240 V requires a separate 40 amp circuit. ■ Single oven model rated at 4.4 kw to the junction box. ■ Do not cut the conduit. IMPORTANT: Use both hands to move and install oven. INSTALLATION INSTRUCTIONS Prepare Built-In Oven 1. Connect a section of solid copper wire to the ends of the...

Installation Instructions
Page 5
...connection. ½" (1.3 cm) 5 Use 12 gauge solid copper wire. Feed the flexible conduit from the oven through a UL listed or CSA approved conduit connector. 6. Install a UL listed or CSA approved conduit connector to follow these instructions can result in death, fire, or ...Shock Hazard Disconnect power before servicing. See "Electrical Connection Options Chart" to section: 1. Make Electrical Connection This oven is present. 4. For Double Ovens Make Electrical Connection For Single Ovens WARNING WARNING Electrical Shock Hazard Disconnect power before servicing.
...connection. ½" (1.3 cm) 5 Use 12 gauge solid copper wire. Feed the flexible conduit from the oven through a UL listed or CSA approved conduit connector. 6. Install a UL listed or CSA approved conduit connector to follow these instructions can result in death, fire, or ...Shock Hazard Disconnect power before servicing. See "Electrical Connection Options Chart" to section: 1. Make Electrical Connection This oven is present. 4. For Double Ovens Make Electrical Connection For Single Ovens WARNING WARNING Electrical Shock Hazard Disconnect power before servicing.

Installation Instructions
Page 6
... C H D I F A. UL listed wire connectors H. Green (or bare) ground wire (from oven) F. 4-wire flexible conduit from home power supply B. Red wires D. 4-wire flexible conduit from Home Power Supply - Install junction box cover. 6 Connect the 2 white wires (F) together using a UL listed wire connector. 3....together using a UL listed wire connector. 3. Install junction box cover. 3-Wire Cable from oven E. UL listed wire connectors I . where local codes do not allow grounding through neutral, New Branch circuit installations (1996 NEC), mobile homes and recreational vehicles, ...
... C H D I F A. UL listed wire connectors H. Green (or bare) ground wire (from oven) F. 4-wire flexible conduit from home power supply B. Red wires D. 4-wire flexible conduit from Home Power Supply - Install junction box cover. 6 Connect the 2 white wires (F) together using a UL listed wire connector. 3....together using a UL listed wire connector. 3. Install junction box cover. 3-Wire Cable from oven E. UL listed wire connectors I . where local codes do not allow grounding through neutral, New Branch circuit installations (1996 NEC), mobile homes and recreational vehicles, ...

Installation Instructions
Page 7
... sides of the door and align slots in decorative trim. Reconnect power. 11. Display panel will disengage the latches on the hinges. 8. Install Oven 3. Do not overtighten screws. 1. NOTE: Push against outside edges. 2. Gently push the door downward until the door rests evenly on the...before driving screws. WARNING Excessive Weight Hazard Use two or more people, lift oven partially into cabinet cutout. Securely fasten oven to cabinet using the 0.188 x 2.1" screws (4 for single oven, 6 for lower oven door. 10. Insert the screws through holes in door with the hinge arms....
... sides of the door and align slots in decorative trim. Reconnect power. 11. Display panel will disengage the latches on the hinges. 8. Install Oven 3. Do not overtighten screws. 1. NOTE: Push against outside edges. 2. Gently push the door downward until the door rests evenly on the...before driving screws. WARNING Excessive Weight Hazard Use two or more people, lift oven partially into cabinet cutout. Securely fasten oven to cabinet using the 0.188 x 2.1" screws (4 for single oven, 6 for lower oven door. 10. Insert the screws through holes in door with the hinge arms....

Installation Instructions
Page 8
... or Service: Please reference the "Assistance or Service" section of Maytag Corporation or its related companies. 7/08 Printed in the Use and Care Guide. 4. Check that you do not feel for more information. If oven(s) does not operate, check the following: If you purchased your tools... "F" followed by a number appears in oven. ■ Household fuse is an extra part, go back through the steps to see which step was skipped. 2. Check Operation of Oven(s) 1. Turn on . If you have all of /recycle all parts are now installed. If there is intact and tight;
... or Service: Please reference the "Assistance or Service" section of Maytag Corporation or its related companies. 7/08 Printed in the Use and Care Guide. 4. Check that you do not feel for more information. If oven(s) does not operate, check the following: If you purchased your tools... "F" followed by a number appears in oven. ■ Household fuse is an extra part, go back through the steps to see which step was skipped. 2. Check Operation of Oven(s) 1. Turn on . If you have all of /recycle all parts are now installed. If there is intact and tight;

