
User Manual - English
Page 4
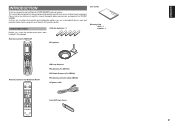
Please take a few minutes to discuss your Marantz A/V specialist dealer. ENGLISH INTRODUCTION Thank you connect and operate the SR7002/ SR8002. AAA-size batteries × 5 User Guide Warranty Card USA × 1 Canada × 1 Remote Controller RC8001SR POWER OFF ON/OFF SOURCE... engineered to provide you with your own particular home theater setup with many years of connection and configuration options, you are encouraged to read this manual thoroughly before you for purchasing the Marantz SR7002/SR8002 Surround receiver. ACCESSORIES CHECK Before use, check the below ...
Please take a few minutes to discuss your Marantz A/V specialist dealer. ENGLISH INTRODUCTION Thank you connect and operate the SR7002/ SR8002. AAA-size batteries × 5 User Guide Warranty Card USA × 1 Canada × 1 Remote Controller RC8001SR POWER OFF ON/OFF SOURCE... engineered to provide you with your own particular home theater setup with many years of connection and configuration options, you are encouraged to read this manual thoroughly before you for purchasing the Marantz SR7002/SR8002 Surround receiver. ACCESSORIES CHECK Before use, check the below ...

User Manual - English
Page 5
... Digital positioned as the next-generation delivery format. Together with substantial dynamic ability at high sound levels. 110 watts (SR7002) / 125 watts (SR8002) to recreate the emotion, exactly as Dolby Digital Plus, an expanded and improved version of the 7 channels. This unit is tomorrow's technology... (RC8001SR 12 SETTING THE TIME 13 GENERAL INFORMATION OF RC8001SR TO THE UNIT ..13 CONTROLLING MARANTZ COMPONENTS 14 BASIC OPERATION 17 PROGRAMMING MACROS 20 CLONE MODE 22 SETUP 23 RENOTE CONTROL OPERATION (RC101)..24 NAME AND FUNCTION 24 GENERAL INFORMATION OF RC101 TO THE...
... Digital positioned as the next-generation delivery format. Together with substantial dynamic ability at high sound levels. 110 watts (SR7002) / 125 watts (SR8002) to recreate the emotion, exactly as Dolby Digital Plus, an expanded and improved version of the 7 channels. This unit is tomorrow's technology... (RC8001SR 12 SETTING THE TIME 13 GENERAL INFORMATION OF RC8001SR TO THE UNIT ..13 CONTROLLING MARANTZ COMPONENTS 14 BASIC OPERATION 17 PROGRAMMING MACROS 20 CLONE MODE 22 SETUP 23 RENOTE CONTROL OPERATION (RC101)..24 NAME AND FUNCTION 24 GENERAL INFORMATION OF RC101 TO THE...

User Manual - English
Page 6
This unit is here to perform in your unrivaled home entertainment setup. • HDMI HDMI (High-Definition Multimedia Interface) is an enhancement to video signals. It adds capabilities for digitally transmitting audio signals ...added during the mixing of standards and technologies established by Neural Audio • HD Radio (SR8002 Only) • Improved Station Name Input Method, 60 Presets • Auto Adjust Function for Speaker Distance Settings (Delay Time) • M-DAX (Marantz Dynamic Audio eXpander) • Assignable DC Trigger Output • Assignable Video Input •...
This unit is here to perform in your unrivaled home entertainment setup. • HDMI HDMI (High-Definition Multimedia Interface) is an enhancement to video signals. It adds capabilities for digitally transmitting audio signals ...added during the mixing of standards and technologies established by Neural Audio • HD Radio (SR8002 Only) • Improved Station Name Input Method, 60 Presets • Auto Adjust Function for Speaker Distance Settings (Delay Time) • M-DAX (Marantz Dynamic Audio eXpander) • Assignable DC Trigger Output • Assignable Video Input •...

User Manual - English
Page 11
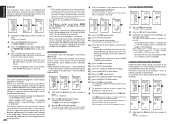
...• The surround mode is turned on the FL display. ENGLISH NAMES AND FUNCTION FRONT PANEL qw e rty u io!0!1 !2 !3 !4 AV SURROUND RECEIVER SR8002 INPUT SELECTOR PURE DIRECT M-DAX DISP MULTI AUTO TUNED SLEEP AUTO SURR DIRECT ST SPKR A B V-OFF PEAK ATT DISC 6.1 MT X 6.1 NIGHT EQ ANALOG... SPKR = LARGE Surround Back SPKR = LARGE Sub woofer = YES t AUTO (Auto surround) button Press this button to select the AUTO mode from the SETUP MAIN MENU. @0 Cursor (5, ∞, 2, 3) / ENTER button Press these jacks, protect with the included jack covers. In the source/pure direct mode...
...• The surround mode is turned on the FL display. ENGLISH NAMES AND FUNCTION FRONT PANEL qw e rty u io!0!1 !2 !3 !4 AV SURROUND RECEIVER SR8002 INPUT SELECTOR PURE DIRECT M-DAX DISP MULTI AUTO TUNED SLEEP AUTO SURR DIRECT ST SPKR A B V-OFF PEAK ATT DISC 6.1 MT X 6.1 NIGHT EQ ANALOG... SPKR = LARGE Surround Back SPKR = LARGE Sub woofer = YES t AUTO (Auto surround) button Press this button to select the AUTO mode from the SETUP MAIN MENU. @0 Cursor (5, ∞, 2, 3) / ENTER button Press these jacks, protect with the included jack covers. In the source/pure direct mode...

User Manual - English
Page 13
...directly from the recorded DVD signal or other video component and two component video outputs connector to the Marantz component equipped with 5.1 channel or 7.1 channel outputs. !5 EMITTER OUT (SR8002 only) The signals input to the IR RECEIVER IN terminals are output to these jacks to optional audio... control device, available from it will be triggered by DC under certain conditions (screen, power strip, etc...) Use the system OSD setup menu to control the operation of speakers by the multiroom system in Multi zone (Multi room). i Speaker outputs terminals Nine terminals are...
...directly from the recorded DVD signal or other video component and two component video outputs connector to the Marantz component equipped with 5.1 channel or 7.1 channel outputs. !5 EMITTER OUT (SR8002 only) The signals input to the IR RECEIVER IN terminals are output to these jacks to optional audio... control device, available from it will be triggered by DC under certain conditions (screen, power strip, etc...) Use the system OSD setup menu to control the operation of speakers by the multiroom system in Multi zone (Multi room). i Speaker outputs terminals Nine terminals are...
User Manual - English
Page 14
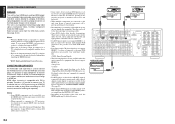
... @2 DIGITAL INPUT (Dig.1 - 6) / OUTPUT (coaxial, optical) These are 6 audio inputs and 4 audio outputs. There are used to move to a Marantz component equipped with the unit. , MUTE button This button is selected) These buttons are used to perform operations. (when AMP mode is selected) (1) TEST button...connected to the video inputs. The text display can be changed. "ATT" is indicated when this button switches between 0 to the Setup mode, where the Setup menu is used to page 1. Connect VCRs, DVD players, and other video components to MD recorders, CD recorders, DAT decks,...
... @2 DIGITAL INPUT (Dig.1 - 6) / OUTPUT (coaxial, optical) These are 6 audio inputs and 4 audio outputs. There are used to move to a Marantz component equipped with the unit. , MUTE button This button is selected) These buttons are used to perform operations. (when AMP mode is selected) (1) TEST button...connected to the video inputs. The text display can be changed. "ATT" is indicated when this button switches between 0 to the Setup mode, where the Setup menu is used to page 1. Connect VCRs, DVD players, and other video components to MD recorders, CD recorders, DAT decks,...

User Manual - English
Page 15
... controller with the unit. • The MD button does not work with the unit. ⁄5 LIGHT 1 and 2 buttons Pressing these buttons will light up the SETUP MAIN MENU of the selected source, such as the source to the source which was pressed. button Selects the display mode for the front display...
... controller with the unit. • The MD button does not work with the unit. ⁄5 LIGHT 1 and 2 buttons Pressing these buttons will light up the SETUP MAIN MENU of the selected source, such as the source to the source which was pressed. button Selects the display mode for the front display...

User Manual - English
Page 16
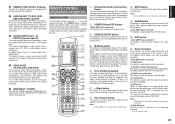
... a quartz clock, the time may become out of sync over all sound level Decreases the sound temporarily Move the cursor for setting in SETUP MENU mode Enter the SETUP MENU Confirms the setting in AMP and TUNER mode. AMP MODE POWER OFF ON/OFF SOURCE LEARN NAME USE PAGE 1 2 3 4 ON... +/MUTE Cursor OK MENU EXIT TEST (1) CH.SEL (2) SURR (3) 7.1CH (4) ATT (5) SPK-AB (6) DISP (7) OSD (8) SLEEP (9) THX (0) Function selector GUIDE / LIP.SYNC Turns the SR7002/SR8002 on and off Turns the SR7002/SR8002 on Turns the SR7002/SR8002 off (Refer to start the clock.
... a quartz clock, the time may become out of sync over all sound level Decreases the sound temporarily Move the cursor for setting in SETUP MENU mode Enter the SETUP MENU Confirms the setting in AMP and TUNER mode. AMP MODE POWER OFF ON/OFF SOURCE LEARN NAME USE PAGE 1 2 3 4 ON... +/MUTE Cursor OK MENU EXIT TEST (1) CH.SEL (2) SURR (3) 7.1CH (4) ATT (5) SPK-AB (6) DISP (7) OSD (8) SLEEP (9) THX (0) Function selector GUIDE / LIP.SYNC Turns the SR7002/SR8002 on and off Turns the SR7002/SR8002 on Turns the SR7002/SR8002 off (Refer to start the clock.
User Manual - English
Page 23
...) direct button . 3. The MACRO indicator displays and LEARN blinks. 3. The menu has four pages, and so use the procedures in the Setup mode. The interval time is entered using the Setup mode (described later), this section for programming macros and revising macros. • No signals are set between macro operations is indicated...
...) direct button . 3. The MACRO indicator displays and LEARN blinks. 3. The menu has four pages, and so use the procedures in the Setup mode. The interval time is entered using the Setup mode (described later), this section for programming macros and revising macros. • No signals are set between macro operations is indicated...

User Manual - English
Page 26
...the D1 (LIGHT) direct button . Press the D2 (I-TIME) direct button. 4. ADJUSTING THE DISPLAY CONTRAST The contrast of the LCD can be adjusted. SETUP SETTING THE LIGHTING TIME • The LCD lights up if another button is pressed while it is set to set the lighting time. 5. Press the...one-second units from 0.5 to set the display contrast for three seconds or more . This transmission interval (interval time) can be set in this Setup mode, the interval times for a sufficient amount of a LIGHT1 and LIGHT2 button, and they both remote controllers. Holding down the M ...
...the D1 (LIGHT) direct button . Press the D2 (I-TIME) direct button. 4. ADJUSTING THE DISPLAY CONTRAST The contrast of the LCD can be adjusted. SETUP SETTING THE LIGHTING TIME • The LCD lights up if another button is pressed while it is set to set the lighting time. 5. Press the...one-second units from 0.5 to set the display contrast for three seconds or more . This transmission interval (interval time) can be set in this Setup mode, the interval times for a sufficient amount of a LIGHT1 and LIGHT2 button, and they both remote controllers. Holding down the M ...

User Manual - English
Page 35
... sure to connect input and output properly. • Refer to the instructions for each component that does not conform to this standard, this unit. To setup the digital audio format of audio jack works independently. Notes: • Insert all connections between components have been completed. If they are output through the...
... sure to connect input and output properly. • Refer to the instructions for each component that does not conform to this standard, this unit. To setup the digital audio format of audio jack works independently. Notes: • Insert all connections between components have been completed. If they are output through the...

User Manual - English
Page 36
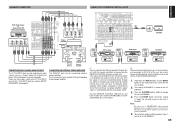
...Use an external RF demodulator with component inputs to the digital input jack on this unit, it . Moreover, the OUTPUT 2 terminal of the SR8002 can output the same video signal. The S-VIDEO signals enables high-quality color reproduction. S-VIDEO jack The video signal is separated into luminance ... gives priority to the VIDEO (composite) jack. Connect the S-VIDEO output jack on the rear panel. Notes: • Be sure to setup the digital audio output format of your DVD player, or other digital source components. CONNECTING VIDEO COMPONENTS DVD player DIGITAL AUDIO VIDEO OUT OUT...
...Use an external RF demodulator with component inputs to the digital input jack on this unit, it . Moreover, the OUTPUT 2 terminal of the SR8002 can output the same video signal. The S-VIDEO signals enables high-quality color reproduction. S-VIDEO jack The video signal is separated into luminance ... gives priority to the VIDEO (composite) jack. Connect the S-VIDEO output jack on the rear panel. Notes: • Be sure to setup the digital audio output format of your DVD player, or other digital source components. CONNECTING VIDEO COMPONENTS DVD player DIGITAL AUDIO VIDEO OUT OUT...
User Manual - English
Page 37
... is connected to equipment that does not support HDMI 1.3a. • Deep Color • xvYCC • Bitstream audio signal decoding, as explained in "1-1 FUNC INPUT SETUP". (See page 43) • Multi channel PCM signals and audio signals of 64 kHz or higher that does not support HDCP, signals are not properly...
... is connected to equipment that does not support HDMI 1.3a. • Deep Color • xvYCC • Bitstream audio signal decoding, as explained in "1-1 FUNC INPUT SETUP". (See page 43) • Multi channel PCM signals and audio signals of 64 kHz or higher that does not support HDCP, signals are not properly...
User Manual - English
Page 38
...Audio player or Super Audio CD Multi channel player CENTER L R FRONT SURR. See page 43. Also, if a Marantz power amplifier (some models excluded) is received by using the SETUP MAIN MENU. Press the ENTER button. Note: • Be sure to set to change this feature. SUB BACK WOOFER..." is synchronized with the remote controller by using the following procedure. 1. Otherwise, the unit will be sure to always disable operation of other Marantz products through this setting is made, the infrared sensor on the back of the infrared sensor on the 7.1CH INPUT and set to "IR=...
...Audio player or Super Audio CD Multi channel player CENTER L R FRONT SURR. See page 43. Also, if a Marantz power amplifier (some models excluded) is received by using the SETUP MAIN MENU. Press the ENTER button. Note: • Be sure to set to change this feature. SUB BACK WOOFER..." is synchronized with the remote controller by using the following procedure. 1. Otherwise, the unit will be sure to always disable operation of other Marantz products through this setting is made, the infrared sensor on the back of the infrared sensor on the 7.1CH INPUT and set to "IR=...

User Manual - English
Page 43
... EXIT button Press this button to exit the OSD menu system. The "MAIN MENU" of the OSD menu system is not needed when operating the setup menus from OSD menu system, press the EXIT button, or move the cursor to the composite, S-Video, component video or HDMI input of your TV... sub-menu, you have connected the MONITOR OUT jack on the MAIN MENU to "LOCKED". (1) Move the cursor to display the OSD menu system. SR7002/SR8002 FRONT BUTTON CONTROL LEFT button UP button ENTER button AUTO MULTI MULTI SPEAKER BAND T-MODE MEMORY THX 7.1CH INPUT MENU ENTER DISPLAY EXIT M-DAX MIC...
... EXIT button Press this button to exit the OSD menu system. The "MAIN MENU" of the OSD menu system is not needed when operating the setup menus from OSD menu system, press the EXIT button, or move the cursor to the composite, S-Video, component video or HDMI input of your TV... sub-menu, you have connected the MONITOR OUT jack on the MAIN MENU to "LOCKED". (1) Move the cursor to display the OSD menu system. SR7002/SR8002 FRONT BUTTON CONTROL LEFT button UP button ENTER button AUTO MULTI MULTI SPEAKER BAND T-MODE MEMORY THX 7.1CH INPUT MENU ENTER DISPLAY EXIT M-DAX MIC...

User Manual - English
Page 44
... : OFF RETURN NEXT EXIT "3. ACOUSTIC EQ" (P. 56) 41 INPUT SETUP" (P. 42) 2.SPKR SETUP AUTO SETUP MANUAL SETUP THX AUDIO SETUP RETURN NEXT EXIT "2. MAIN MENU MAIN MENU 1.INPUT SETUP 2.SPKR SETUP 3.SURR SETUP 4.VIDEO SETUP 5.PREFERENCE 6.ACOUSTIC EQ LOCKED UNLOCK RETURN NEXT EXIT SUB MENU 1.INPUT SETUP FUNC INPUT SETUP 7.1CH INPUT SETUP FUNCTION RENAME RETURN NEXT EXIT "1. PREFERENCE" (P. 54) Note: •...
... : OFF RETURN NEXT EXIT "3. ACOUSTIC EQ" (P. 56) 41 INPUT SETUP" (P. 42) 2.SPKR SETUP AUTO SETUP MANUAL SETUP THX AUDIO SETUP RETURN NEXT EXIT "2. MAIN MENU MAIN MENU 1.INPUT SETUP 2.SPKR SETUP 3.SURR SETUP 4.VIDEO SETUP 5.PREFERENCE 6.ACOUSTIC EQ LOCKED UNLOCK RETURN NEXT EXIT SUB MENU 1.INPUT SETUP FUNC INPUT SETUP 7.1CH INPUT SETUP FUNCTION RENAME RETURN NEXT EXIT "1. PREFERENCE" (P. 54) Note: •...

User Manual - English
Page 45
... the matching the output of connected audio devices and the input jacks of this unit. • FUNC INPUT SETUP : "1-1 FUNC INPUT SETUP" (see page 43) • 7.1 CH INPUT SETUP : "1-2 7.1 CH INPUT SETUP" (see page 43) • FUNC RENAME : "1-3 FUNCTION RENAME" (see page 44) 1. AUX2:ANA...sub-menu with 3 or 4 cursor button, and press the OK/ENTER button. 1.INPUT SETUP FUNC INPUT SETUP 7.1CH INPUT SETUP FUNCTION RENAME RETURN NEXT EXIT 2. RETURN NEXTT EXIT 1.INPUT SETUP FUNC INPUT SETUP 7.1CH INPUT SETUP FUNCTION RENAME RETURN NEXT EXIT ☞ P. 43 7.1CH INPUT VIDEO-IN : FRONT L...
... the matching the output of connected audio devices and the input jacks of this unit. • FUNC INPUT SETUP : "1-1 FUNC INPUT SETUP" (see page 43) • 7.1 CH INPUT SETUP : "1-2 7.1 CH INPUT SETUP" (see page 43) • FUNC RENAME : "1-3 FUNCTION RENAME" (see page 44) 1. AUX2:ANA...sub-menu with 3 or 4 cursor button, and press the OK/ENTER button. 1.INPUT SETUP FUNC INPUT SETUP 7.1CH INPUT SETUP FUNCTION RENAME RETURN NEXT EXIT 2. RETURN NEXTT EXIT 1.INPUT SETUP FUNC INPUT SETUP 7.1CH INPUT SETUP FUNCTION RENAME RETURN NEXT EXIT ☞ P. 43 7.1CH INPUT VIDEO-IN : FRONT L...

User Manual - English
Page 46
... EXIT 2. Using the 1 or 2 cursor buttons, adjust the volume level of an HDMI input jack to be played through the MONITOR OUT jack. FUNC INPUT SETUP 1 F U N C : M O D E DIG HDMI COMP V/S TV :AUTO 1 1 1 1 DVD :AUTO 2 2 2 2 VCR1:AUTO 3 3 3 3 DSS :AUTO 4 4 4 4 AUX1:AUTO F - - RETURN ... cursor to +12 dB in 1 dB increments on all channels except the subwoofer (SUB W), which digital input jacks are used . Select each channel. FUNC INPUT SETUP 2 F U N C : M O D E DIG HDMI C0MP V/S TAPE:ANA -- After you will be played. Press the OK/ENTER button. 4. Select "VIDEO-IN...
... EXIT 2. Using the 1 or 2 cursor buttons, adjust the volume level of an HDMI input jack to be played through the MONITOR OUT jack. FUNC INPUT SETUP 1 F U N C : M O D E DIG HDMI COMP V/S TV :AUTO 1 1 1 1 DVD :AUTO 2 2 2 2 VCR1:AUTO 3 3 3 3 DSS :AUTO 4 4 4 4 AUX1:AUTO F - - RETURN ... cursor to +12 dB in 1 dB increments on all channels except the subwoofer (SUB W), which digital input jacks are used . Select each channel. FUNC INPUT SETUP 2 F U N C : M O D E DIG HDMI C0MP V/S TAPE:ANA -- After you will be played. Press the OK/ENTER button. 4. Select "VIDEO-IN...

User Manual - English
Page 47
... the OK/ENTER button. Press the OK/ENTER button to the name in the "RENAME" area to enter the selected letter. 44 INPUT SETUP menu with the 1 or 2 cursor buttons. 4. Repeat steps 5-8 until the new name is for renaming function name. INPUT... display and the OSD, but it does not appear in the "RENAME" area one character at the cursor point of the cursor in the OSD Setup menu. 1. FUNCTION RENAME FUNCTION: TV R E N A M E : _T _V ABCDEFGHIJKLMNOPQRSTUV WXYZabcdefghijklmnopqr stuvwxyz0123456789 SPACE BACK DEFAULT RETURN NEXT EXIT 9. Move the cursor to the character list ...
... the OK/ENTER button. Press the OK/ENTER button to the name in the "RENAME" area to enter the selected letter. 44 INPUT SETUP menu with the 1 or 2 cursor buttons. 4. Repeat steps 5-8 until the new name is for renaming function name. INPUT... display and the OSD, but it does not appear in the "RENAME" area one character at the cursor point of the cursor in the OSD Setup menu. 1. FUNCTION RENAME FUNCTION: TV R E N A M E : _T _V ABCDEFGHIJKLMNOPQRSTUV WXYZabcdefghijklmnopqr stuvwxyz0123456789 SPACE BACK DEFAULT RETURN NEXT EXIT 9. Move the cursor to the character list ...

User Manual - English
Page 48
...button. Select the desired menu with 3 or 4 cursor buttons and press the OK/ ENTER button. 2.SPKR SETUP AUTO SETUP MANUAL SETUP THX AUDIO SETUP RETURN EXIT 2. CANCEL EXIT AUTO SETUP SPEAKERS CHECK:OK 2nd MIC POSITION!! CANCEL EXIT ☞ P. 49 SPEAKER THX SPKR SUB W FRONT CENTER... determine the following characteristics: • AUTO SETUP: "2-1 AUTO SETUP (MultEQ Setup)" (see page 46) • MANUAL SETUP: "2-2 MANUAL SETUP" (see page 49) • THX AUDIO SETUP: "2-3 THX AUDIO SETUP" (see page 50) 1. ENGLISH 2 SPKR (SPEAKER) SETUP After you have installed the unit connected all...
...button. Select the desired menu with 3 or 4 cursor buttons and press the OK/ ENTER button. 2.SPKR SETUP AUTO SETUP MANUAL SETUP THX AUDIO SETUP RETURN EXIT 2. CANCEL EXIT AUTO SETUP SPEAKERS CHECK:OK 2nd MIC POSITION!! CANCEL EXIT ☞ P. 49 SPEAKER THX SPKR SUB W FRONT CENTER... determine the following characteristics: • AUTO SETUP: "2-1 AUTO SETUP (MultEQ Setup)" (see page 46) • MANUAL SETUP: "2-2 MANUAL SETUP" (see page 49) • THX AUDIO SETUP: "2-3 THX AUDIO SETUP" (see page 50) 1. ENGLISH 2 SPKR (SPEAKER) SETUP After you have installed the unit connected all...


