
User Guide
Page 5
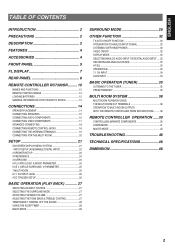
ENGLISH TABLE OF CONTENTS INTRODUCTION 2 PRECAUTIONS 2 DESCRIPTION 2 FEATURES 4 ACCESSORIES 4 FRONT PANEL 5 FL DISPLAY 7 REAR PANEL 8 REMOTE CONTROLLER RC7300SR ......... 10 NAMES AND FUNCTIONS 10 REMOTE CONTROL RANGE 12 LOADING BATTERIES 12 GENERAL INFORMATION OF RC7300SR TO SR7300 13 CONNECTIONS ...MULTI ROOM OUT TERMINALS 38 OPERATION TO MULTI ROOM OUTPUTS WITH THE REMOTE CONTROLLER FROM SECOND ROOM. ......... 38 REMOTE CONTROLLER OPERATION ..... 39 CONTROLLING MARANTZ COMPONENTS 39 LEARN MODE 41 MACRO MODE 42 TROUBLESHOOTING 46 TECHNICAL SPECIFICATIONS 48 DIMENSION 48 1
ENGLISH TABLE OF CONTENTS INTRODUCTION 2 PRECAUTIONS 2 DESCRIPTION 2 FEATURES 4 ACCESSORIES 4 FRONT PANEL 5 FL DISPLAY 7 REAR PANEL 8 REMOTE CONTROLLER RC7300SR ......... 10 NAMES AND FUNCTIONS 10 REMOTE CONTROL RANGE 12 LOADING BATTERIES 12 GENERAL INFORMATION OF RC7300SR TO SR7300 13 CONNECTIONS ...MULTI ROOM OUT TERMINALS 38 OPERATION TO MULTI ROOM OUTPUTS WITH THE REMOTE CONTROLLER FROM SECOND ROOM. ......... 38 REMOTE CONTROLLER OPERATION ..... 39 CONTROLLING MARANTZ COMPONENTS 39 LEARN MODE 41 MACRO MODE 42 TROUBLESHOOTING 46 TECHNICAL SPECIFICATIONS 48 DIMENSION 48 1

User Guide
Page 12
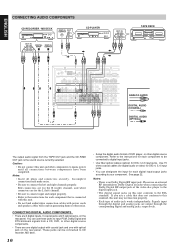
... making recordings. SR7300 can be used with an external controller to output it will provide good AM reception in conjunction with both MONITOR OUT. ENGLISH REAR PANEL zx c v bn m, ANTENNA FM (75Ω) VIDEO TV GND AM DVD VCR1 IN OUT COMPONENT VIDEO DVD DSS / VCR2 MONI OUT Y CB / PB CR / PR...
... making recordings. SR7300 can be used with an external controller to output it will provide good AM reception in conjunction with both MONITOR OUT. ENGLISH REAR PANEL zx c v bn m, ANTENNA FM (75Ω) VIDEO TV GND AM DVD VCR1 IN OUT COMPONENT VIDEO DVD DSS / VCR2 MONI OUT Y CB / PB CR / PR...

User Guide
Page 19
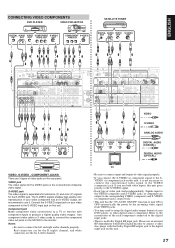
... of each other and do not let the bare speaker wires touch each terminal. 5. If your subwoofer is passive type (power amplifier is on the rear panel of this unit. • To prevent damage to the amplifier. 15 SR7300 AC IN SERIAL NO. Tighten the knob by turning clockwise and then insert...
... of each other and do not let the bare speaker wires touch each terminal. 5. If your subwoofer is passive type (power amplifier is on the rear panel of this unit. • To prevent damage to the amplifier. 15 SR7300 AC IN SERIAL NO. Tighten the knob by turning clockwise and then insert...
User Guide
Page 20
...CD, DVD, or other components to this standard, this unit. • Do not bind audio/video connection cables with optical jack on the rear panel. Notes: • Insert all connections between components have been completed. You can use these jacks to input PCM, Dolby Digital and DTS bitstream... Refer to the instructions for each digital input/output jacks according to the digital input jack. • The digital signal jacks on the rear panel. These jacks can designate the input for each component to be connected to CD recorder, MD deck. 16 • Setup the digital ...
...CD, DVD, or other components to this standard, this unit. • Do not bind audio/video connection cables with optical jack on the rear panel. Notes: • Insert all connections between components have been completed. You can use these jacks to input PCM, Dolby Digital and DTS bitstream... Refer to the instructions for each digital input/output jacks according to the digital input jack. • The digital signal jacks on the rear panel. These jacks can designate the input for each component to be connected to CD recorder, MD deck. 16 • Setup the digital ...
User Guide
Page 21
The S-VIDEO signals enables high-quality color reproduction. If your video component to the S-VIDEO input jack on the rear panel. VIDEO or component jack on the SR7300 to the monitor. Signals input to the VIDEO (composite) and S-VIDEO jacks or component are output to the ...
The S-VIDEO signals enables high-quality color reproduction. If your video component to the S-VIDEO input jack on the rear panel. VIDEO or component jack on the SR7300 to the monitor. Signals input to the VIDEO (composite) and S-VIDEO jacks or component are output to the ...
User Guide
Page 25
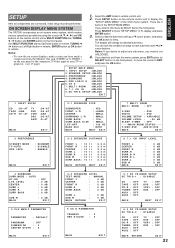
... menu by using the cursor ( , , , ) and OK buttons on the remote control unit or MULTI FUNCTION dial, TUNING / button and ENTER button on the front panel), or move the cursor to entry. PREF ERENCE : UNLOCK 4 . SURROUND : UNLOCK 5 . TR I G SE TUP : UNLOCK EX I T 1 I MER : OF F - - - - ...: OFF MA I N R E T URN EX I NPUT SE TUP : UNLOCK 2 . Select the AMP mode in FL display and press ENTER button. 3. Press SETUP button on the rear panel to the composite, S-Video input of the OSD menu system. I T 21 SPEAKER SE TUP : UNLOCK 3 . P RO L OG I T 2 - 3 SPEAKERS T E S ...
... menu by using the cursor ( , , , ) and OK buttons on the remote control unit or MULTI FUNCTION dial, TUNING / button and ENTER button on the front panel), or move the cursor to entry. PREF ERENCE : UNLOCK 4 . SURROUND : UNLOCK 5 . TR I G SE TUP : UNLOCK EX I T 1 I MER : OF F - - - - ...: OFF MA I N R E T URN EX I NPUT SE TUP : UNLOCK 2 . Select the AMP mode in FL display and press ENTER button. 3. Press SETUP button on the rear panel to the composite, S-Video input of the OSD menu system. I T 21 SPEAKER SE TUP : UNLOCK 3 . P RO L OG I T 2 - 3 SPEAKERS T E S ...


