Owner s Manual In English
Page 1
Contents . Connections Playback Settings Tips Appendix AV Surround Receiver SR5011 Front panel Display Rear panel 1 Remote Owner's Manual Index
Contents . Connections Playback Settings Tips Appendix AV Surround Receiver SR5011 Front panel Display Rear panel 1 Remote Owner's Manual Index
Owner s Manual In English
Page 5
... Audyssey® Setup 189 160 Procedure for speaker settings (Audyssey® Setup) 191 161 Error messages 197 164 Retrieving Audyssey® Setup settings 198 165 Manual Setup 199 165 Amp Assign 199 166 Speaker Config. 200 169 Distances 205 171 Levels 206 171 Crossovers 207 173 Bass 208 178 Front Speaker...
... Audyssey® Setup 189 160 Procedure for speaker settings (Audyssey® Setup) 191 161 Error messages 197 164 Retrieving Audyssey® Setup settings 198 165 Manual Setup 199 165 Amp Assign 199 166 Speaker Config. 200 169 Distances 205 171 Levels 206 171 Crossovers 207 173 Bass 208 178 Front Speaker...
Owner s Manual In English
Page 7
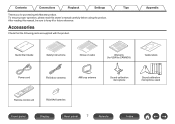
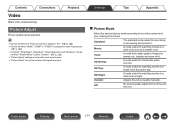
After reading this manual, be sure to keep it for CANADA) Cable labels Power cord FM indoor antenna AM loop antenna Sound calibration microphone Sound calibration microphone stand Remote ... product. Quick Start Guide Safety Instructions Notes on radio Warranty (for USA/for future reference. Contents Connections Playback Settings Thank you for purchasing this owner's manual carefully before using the product. To ensure proper operation, please read this...
After reading this manual, be sure to keep it for CANADA) Cable labels Power cord FM indoor antenna AM loop antenna Sound calibration microphone Sound calibration microphone stand Remote ... product. Quick Start Guide Safety Instructions Notes on radio Warranty (for USA/for future reference. Contents Connections Playback Settings Thank you for purchasing this owner's manual carefully before using the product. To ensure proper operation, please read this...

Owner s Manual In English
Page 21
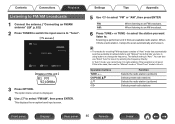
... to connect home automation controller devices fitted with RS-232C connectors. B Turn off the power of this unit. Contents Connections Playback ty u . Consult the owner's manual of the home automation controller for more information about serial control of this unit. Front panel Display Rear panel 21 Remote Index C Check that the...
... to connect home automation controller devices fitted with RS-232C connectors. B Turn off the power of this unit. Contents Connections Playback ty u . Consult the owner's manual of the home automation controller for more information about serial control of this unit. Front panel Display Rear panel 21 Remote Index C Check that the...
Owner s Manual In English
Page 85
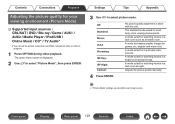
...CH 1 FM 92.10MHz STEREO AUTO Now Playing Tune Preset OPTION Option G Display of "Auto" mode that automatically searches available broadcast stations and "Manual" mode that lets you tune in by entering the frequency directly. FM: When listening to select "FM/AM", then press ENTER. If this unit ... tune in . Operation buttons TUNE +, - When it finds a radio station, it finds an available radio station. You can also use the "Manual" mode or "Direct Tune" mode to tune in to "Tuner". Contents Connections Playback Listening to FM/AM broadcasts 1 Connect the antenna. ("Connecting...
...CH 1 FM 92.10MHz STEREO AUTO Now Playing Tune Preset OPTION Option G Display of "Auto" mode that automatically searches available broadcast stations and "Manual" mode that lets you tune in by entering the frequency directly. FM: When listening to select "FM/AM", then press ENTER. If this unit ... tune in . Operation buttons TUNE +, - When it finds a radio station, it finds an available radio station. You can also use the "Manual" mode or "Direct Tune" mode to tune in to "Tuner". Contents Connections Playback Listening to FM/AM broadcasts 1 Connect the antenna. ("Connecting...
Owner s Manual In English
Page 87
...) A maximum of 56 radio stations can change the mode for tuning into FM and AM broadcasts. The option menu screen is "Tuner". Auto: Manual: Automatically search for about 5 seconds and the option menu screen turns off. 0 The preset memory is "Tuner". Front panel Display Rear panel 87... the input source is displayed. 2 Use ui to select "Tune Mode", then press ENTER. 3 Use o p to a receivable radio station. Manually change the mode to "Manual" and tune in automatically with "Auto" mode, change the frequency one step at a time each time the button is displayed. 2 Use ui ...
...) A maximum of 56 radio stations can change the mode for tuning into FM and AM broadcasts. The option menu screen is "Tuner". Auto: Manual: Automatically search for about 5 seconds and the option menu screen turns off. 0 The preset memory is "Tuner". Front panel Display Rear panel 87... the input source is displayed. 2 Use ui to select "Tune Mode", then press ENTER. 3 Use o p to a receivable radio station. Manually change the mode to "Manual" and tune in automatically with "Auto" mode, change the frequency one step at a time each time the button is displayed. 2 Use ui ...
Owner s Manual In English
Page 97
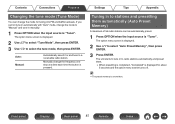
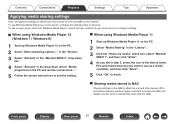
... streaming options..." Front panel Display Rear panel 97 Remote Index For details, see the owner's manual that came with the NAS. To use as media controllers to access the NAS. in the "Stream". 3 Select "Allowed" in the "Marantz SR5011" drop-down list for "Media programs on this unit and other devices (PCs and... advance. o Sharing media stored in NAS Change settings on the PC. 2 Select "Media Sharing" in the "Library". 3 Click the "Share my media" check box, select "Marantz SR5011", and then click "Allow". 4 As you want to finish.
... streaming options..." Front panel Display Rear panel 97 Remote Index For details, see the owner's manual that came with the NAS. To use as media controllers to access the NAS. in the "Stream". 3 Select "Allowed" in the "Marantz SR5011" drop-down list for "Media programs on this unit and other devices (PCs and... advance. o Sharing media stored in NAS Change settings on the PC. 2 Select "Media Sharing" in the "Library". 3 Click the "Share my media" check box, select "Marantz SR5011", and then click "Allow". 4 As you want to finish.
Owner s Manual In English
Page 111
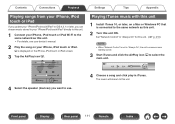
..." to "Always On" for this unit. (v p. 216) NOTE 0 When "Network Control" is connected to the same network as this unit. 0 For details, see your device's manual. 2 Play the song on your "iPhone/iPod touch/iPad" to iOS 4.2.1 or later, you want to use. 4 Choose a song and click play in iTunes. AirDrop...
..." to "Always On" for this unit. (v p. 216) NOTE 0 When "Network Control" is connected to the same network as this unit. 0 For details, see your device's manual. 2 Play the song on your "iPhone/iPod touch/iPad" to iOS 4.2.1 or later, you want to use. 4 Choose a song and click play in iTunes. AirDrop...
Owner s Manual In English
Page 123
... suited for each input source. The option menu screen is displayed. 2 Use ui to select picture mode. brighter and more vivid. Adjusts the picture quality manually. 4 Press ENTER. 0 "Picture Mode" settings are stored for watching movies in a dark room at night. A mode suited for your viewing environment (Picture Mode) n Supported input...
... suited for each input source. The option menu screen is displayed. 2 Use ui to select picture mode. brighter and more vivid. Adjusts the picture quality manually. 4 Press ENTER. 0 "Picture Mode" settings are stored for watching movies in a dark room at night. A mode suited for your viewing environment (Picture Mode) n Supported input...

Owner s Manual In English
Page 137
Set "HDMI Control" to standby. Check the owner's manual of this unit. Setting procedure 1 Enable the HDMI control function of this unit also goes to "On". (v p. 175) 2 Turn the power on the connected TV ...
Set "HDMI Control" to standby. Check the owner's manual of this unit. Setting procedure 1 Enable the HDMI control function of this unit also goes to "On". (v p. 175) 2 Turn the power on the connected TV ...
Owner s Manual In English
Page 155
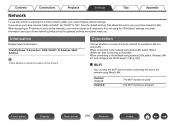
... LAN or a wired LAN. 210 Used for input source. Sets up the speakers manually or changes the Audyssey® Setup settings. Used to your preferences. Network Manual Setup Information Connection Settings Network Control Friendly Name Diagnostics Description Changes input connector assignment. Sets...Inputs Detailed items Input Assign Source Rename Hide Sources Source Level Input Select Audyssey® Setup . Changes the display name for manually setting the IP address or when using a proxy server. 214 Enables network communication in standby power mode. 216 The "Friendly...
... LAN or a wired LAN. 210 Used for input source. Sets up the speakers manually or changes the Audyssey® Setup settings. Used to your preferences. Network Manual Setup Information Connection Settings Network Control Friendly Name Diagnostics Description Changes input connector assignment. Sets...Inputs Detailed items Input Assign Source Rename Hide Sources Source Level Input Select Audyssey® Setup . Changes the display name for manually setting the IP address or when using a proxy server. 214 Enables network communication in standby power mode. 216 The "Friendly...
Owner s Manual In English
Page 156
...Setup Description Changes the language of the display on this unit settings, input signals, etc. Changes the display title of the separate manual "Quick Start Guide" Front panel Display Rear panel 156 Remote Index Protects settings from the beginning according to one you prefer. ... out function. Changes the Smart Select Name display title to the display on the TV screen. Sets individual setting items according to Marantz. Makes settings related to one you prefer. Select the conditions for audio playback with ZONE2. Shows information about updates and upgrades, ...
...Setup Description Changes the language of the display on this unit settings, input signals, etc. Changes the display title of the separate manual "Quick Start Guide" Front panel Display Rear panel 156 Remote Index Protects settings from the beginning according to one you prefer. ... out function. Changes the Smart Select Name display title to the display on the TV screen. Sets individual setting items according to Marantz. Makes settings related to one you prefer. Select the conditions for audio playback with ZONE2. Shows information about updates and upgrades, ...
Owner s Manual In English
Page 165
... timing from TV compatible with Auto Lip Sync. On (Default): Off: Correct automatically. o Adjust The timing mismatch between video and audio. 0 This cannot be corrected manually. 0 ms - 500 ms (Default : 0 ms) Volume Set the MAIN ZONE (room where the unit is located) volume setting. Contents Connections Playback Settings Tips Appendix Audio...
... timing from TV compatible with Auto Lip Sync. On (Default): Off: Correct automatically. o Adjust The timing mismatch between video and audio. 0 This cannot be corrected manually. 0 ms - 500 ms (Default : 0 ms) Volume Set the MAIN ZONE (room where the unit is located) volume setting. Contents Connections Playback Settings Tips Appendix Audio...
Owner s Manual In English
Page 171
... more vivid. Settings Tips Appendix o Picture Mode Select the desired picture mode according to "Custom". (v p. 123) 0 "Picture Adjust" settings are input. Adjusts the picture quality manually. No picture quality adjustment is set when "Picture Mode" is done with this unit. A mode suited for each input source. (v p. 186) 0 "Contrast", "Brightness", "Saturation", "Noise...
... more vivid. Settings Tips Appendix o Picture Mode Select the desired picture mode according to "Custom". (v p. 123) 0 "Picture Adjust" settings are input. Adjusts the picture quality manually. No picture quality adjustment is set when "Picture Mode" is done with this unit. A mode suited for each input source. (v p. 186) 0 "Contrast", "Brightness", "Saturation", "Noise...
Owner s Manual In English
Page 189
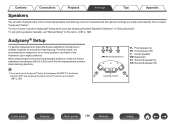
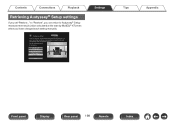
... Index To set up to perform Audyssey® Setup when you measure in six or more positions, as shown in the illustration (up the speakers manually, use "Manual Setup" on the menu. (v p. 199) Audyssey® Setup To perform measurement, place the Sound calibration microphone in "Setup Assistant". This is called "Audyssey®...
... Index To set up to perform Audyssey® Setup when you measure in six or more positions, as shown in the illustration (up the speakers manually, use "Manual Setup" on the menu. (v p. 199) Audyssey® Setup To perform measurement, place the Sound calibration microphone in "Setup Assistant". This is called "Audyssey®...
Owner s Manual In English
Page 198
to Audyssey® Setup measurement result (value calculated at the start by MultEQ® XT) even when you have changed each setting manually. Amp Assign Channel Select Dolby Speaker Setup Check Results Restore... Start Settings Tips Appendix . Front panel Display Rear panel 198 Remote Index Set the following ...
to Audyssey® Setup measurement result (value calculated at the start by MultEQ® XT) even when you have changed each setting manually. Amp Assign Channel Select Dolby Speaker Setup Check Results Restore... Start Settings Tips Appendix . Front panel Display Rear panel 198 Remote Index Set the following ...
Owner s Manual In English
Page 199
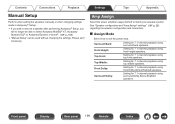
..." can be used without changing the settings. Setting for 7.1-channel playback using top middle speakers. Contents Connections Playback Settings Tips Appendix Manual Setup Perform when setting the speakers manually or when changing settings made in Audyssey® Setup. 0 If you add or remove a speaker after performing Audyssey® Setup, you will no...
..." can be used without changing the settings. Setting for 7.1-channel playback using top middle speakers. Contents Connections Playback Settings Tips Appendix Manual Setup Perform when setting the speakers manually or when changing settings made in Audyssey® Setup. 0 If you add or remove a speaker after performing Audyssey® Setup, you will no...
Owner s Manual In English
Page 207
... be played back through each speaker individually. can be set when "Individual" is selected differ depending on to "Small" at "Speaker Config." See the speaker manual for all speakers. setting. (v p. 200) Front panel Display Rear panel 207 Remote Index All (Default): Individual: Sets the same crossover frequency for information concerning speaker...
... be played back through each speaker individually. can be set when "Individual" is selected differ depending on to "Small" at "Speaker Config." See the speaker manual for all speakers. setting. (v p. 200) Front panel Display Rear panel 207 Remote Index All (Default): Individual: Sets the same crossover frequency for information concerning speaker...
Owner s Manual In English
Page 210
... 0 MAC Address is used. Enabled (Default): Disabled: The Wi-Fi function is required to create a vTuner account. When assigning an IP address to each device manually, you need to assign an IP address to this unit to the network using the "IP Address" settings, and enter information about your home network...
... 0 MAC Address is used. Enabled (Default): Disabled: The Wi-Fi function is required to create a vTuner account. When assigning an IP address to each device manually, you need to assign an IP address to this unit to the network using the "IP Address" settings, and enter information about your home network...
Owner s Manual In English
Page 213
...the browser and enter "192.168.1.16" in the URL. 4. When connecting to Wi-Fi network called "Marantz SR5011"" appears in the display. 3. Connect the wireless LAN of the PC or tablet used to "Marantz SR5011" when the message "Connect your Wi-Fi device to a "WEP" encrypted network, "Default Key" menu... the power of the unit is displayed. 2. When using a device that supports wireless LAN connection. Use the browser to . 1. Contents Connections Playback o Manual Enter the name (SSID) and password of the network you are using Wi-Fi" (v p. 212) in "Use iOS Device". 1.
...the browser and enter "192.168.1.16" in the URL. 4. When connecting to Wi-Fi network called "Marantz SR5011"" appears in the display. 3. Connect the wireless LAN of the PC or tablet used to "Marantz SR5011" when the message "Connect your Wi-Fi device to a "WEP" encrypted network, "Default Key" menu... the power of the unit is displayed. 2. When using a device that supports wireless LAN connection. Use the browser to . 1. Contents Connections Playback o Manual Enter the name (SSID) and password of the network you are using Wi-Fi" (v p. 212) in "Use iOS Device". 1.


