
Instruction Manual in English
Page 2
... and functions Front panel Display Rear panel Remote control unit Connections Connecting speakers Speaker installation Speaker connection Speaker configuration and Amp Assign settings Connecting a TV Connection 1 : TV equipped with an HDMI connector and compatible with the ARC (Audio Return Channel) Connection 2 : TV equipped with an HDMI connector and incompatible with the ARC (Audio Return Channel) Connection 3 : TV equipped without an HDMI connector 7 Connecting a playback device 43 8 Connecting a DVD player or Blu-ray Disc player 44 8 Connecting a set-top box (Satellite tuner/cable...
... and functions Front panel Display Rear panel Remote control unit Connections Connecting speakers Speaker installation Speaker connection Speaker configuration and Amp Assign settings Connecting a TV Connection 1 : TV equipped with an HDMI connector and compatible with the ARC (Audio Return Channel) Connection 2 : TV equipped with an HDMI connector and incompatible with the ARC (Audio Return Channel) Connection 3 : TV equipped without an HDMI connector 7 Connecting a playback device 43 8 Connecting a DVD player or Blu-ray Disc player 44 8 Connecting a set-top box (Satellite tuner/cable...
Instruction Manual in English
Page 6
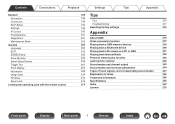
... Connections Playback Settings Tips Appendix Network Information Connection Wi-Fi Setup Settings IP Control Friendly Name Diagnostics Maintenance Mode General Language ECO ZONE2 Setup Zone Rename Smart Select Names Trigger Out Front Display Information Usage Data Firmware Setup Lock Limiting the operating zone with the remote control 196 Tips 196 196 Tips 215 197 Troubleshooting 217 199 Resetting factory settings 233 200 Appendix 201 201 About HDMI 234 202 Video conversion function 237 203 Playing back a USB...
... Connections Playback Settings Tips Appendix Network Information Connection Wi-Fi Setup Settings IP Control Friendly Name Diagnostics Maintenance Mode General Language ECO ZONE2 Setup Zone Rename Smart Select Names Trigger Out Front Display Information Usage Data Firmware Setup Lock Limiting the operating zone with the remote control 196 Tips 196 196 Tips 215 197 Troubleshooting 217 199 Resetting factory settings 233 200 Appendix 201 201 About HDMI 234 202 Video conversion function 237 203 Playing back a USB...

Instruction Manual in English
Page 24
...25 Connecting a TV 39 Connecting a playback device 43 Connecting an iPod or USB memory device to the USB port 48 Connecting an FM/AM antenna 50 Connecting to connect. Settings Tips Appendix o Cables used for making connections. (During "Setup Assistant" operation, the input/output connectors do not conduct current.) 0 Do not bundle power cords together with connection cables. Speaker cable Subwoofer cable HDMI cable Component video cable Video cable Coaxial digital cable Optical cable Audio cable LAN cable L L R R Front panel Display Rear panel 24 Remote Index...
...25 Connecting a TV 39 Connecting a playback device 43 Connecting an iPod or USB memory device to the USB port 48 Connecting an FM/AM antenna 50 Connecting to connect. Settings Tips Appendix o Cables used for making connections. (During "Setup Assistant" operation, the input/output connectors do not conduct current.) 0 Do not bundle power cords together with connection cables. Speaker cable Subwoofer cable HDMI cable Component video cable Video cable Coaxial digital cable Optical cable Audio cable LAN cable L L R R Front panel Display Rear panel 24 Remote Index...
Instruction Manual in English
Page 31
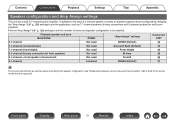
... speaker and zone MAIN ZONE ZONE2 "Amp Assign" settings Connection page 5.1-channel Not used ZONE2 (Default) 32 7.1-channel (surround back) Not used Surround Back (Default) 33 7.1-channel (front height) Not used Front Height 34 5.1-channel (bi-amp connection for multi-zone playback. In addition to the basic 5.1-channel system, a variety of speaker systems can be installed. Contents Connections Playback Settings Tips Appendix Speaker configuration and Amp Assign settings This unit has a built-in 7-channel power amplifier. Front panel Display Rear panel 31 Remote...
... speaker and zone MAIN ZONE ZONE2 "Amp Assign" settings Connection page 5.1-channel Not used ZONE2 (Default) 32 7.1-channel (surround back) Not used Surround Back (Default) 33 7.1-channel (front height) Not used Front Height 34 5.1-channel (bi-amp connection for multi-zone playback. In addition to the basic 5.1-channel system, a variety of speaker systems can be installed. Contents Connections Playback Settings Tips Appendix Speaker configuration and Amp Assign settings This unit has a built-in 7-channel power amplifier. Front panel Display Rear panel 31 Remote...

Instruction Manual in English
Page 115
...menu screen is displayed. 2 Use ui to select "Video Select", then press ENTER. 3 Use o p to play back, then press ENTER. Settings Tips Appendix 4 If you selected "On" in step 3, press i and select "Source". 5 Use o p to select the input source for video you want to select the Video Select mode. You can display video from a different source on TV during audio playback. n Supported input sources : iPod/USB / CDz / Tuner / Online Music / Bluetooth z This cannot be set this for each input source. Front panel Display Rear panel 115 Remote Index Off (Default): On: Disable Video...
...menu screen is displayed. 2 Use ui to select "Video Select", then press ENTER. 3 Use o p to play back, then press ENTER. Settings Tips Appendix 4 If you selected "On" in step 3, press i and select "Source". 5 Use o p to select the input source for video you want to select the Video Select mode. You can display video from a different source on TV during audio playback. n Supported input sources : iPod/USB / CDz / Tuner / Online Music / Bluetooth z This cannot be set this for each input source. Front panel Display Rear panel 115 Remote Index Off (Default): On: Disable Video...

Instruction Manual in English
Page 117
... play back the music being played back in MAIN ZONE simultaneously in ZONE2 (another room). Front panel Display Rear panel 117 Remote Index It is available. The option menu screen is displayed. 2 Use ui to select "All Zone Stereo", then press ENTER. 3 Select "Stop", then press ENTER. 0 The All Zone Stereo mode is canceled even when the power supply of the MAIN ZONE is turned off. 0 In the All Zone Stereo mode, only the "Multi Ch Stereo" and "Stereo" sound modes...
... play back the music being played back in MAIN ZONE simultaneously in ZONE2 (another room). Front panel Display Rear panel 117 Remote Index It is available. The option menu screen is displayed. 2 Use ui to select "All Zone Stereo", then press ENTER. 3 Select "Stop", then press ENTER. 0 The All Zone Stereo mode is canceled even when the power supply of the MAIN ZONE is turned off. 0 In the All Zone Stereo mode, only the "Multi Ch Stereo" and "Stereo" sound modes...

Instruction Manual in English
Page 124
... are played back via the front (L/R) speakers, the surround speakers and surround back speakers (if connected). For Dolby Digital or DTS, the music is for enjoying stereo sound from all speakers. Front panel Display Rear panel 124 Remote Index If the input signal is analog or PCM (2-channel), stereo playback is detected, and the playback mode switches automatically to the respective channel number. Description In this mode, the type of digital signal input, such as Dolby Digital, Dolby TrueHD, Dolby Digital Plus, DolbyDigital EX, DTS, DTS-HD, DTS-ES, PCM (multi-channel) is used.
... are played back via the front (L/R) speakers, the surround speakers and surround back speakers (if connected). For Dolby Digital or DTS, the music is for enjoying stereo sound from all speakers. Front panel Display Rear panel 124 Remote Index If the input signal is analog or PCM (2-channel), stereo playback is detected, and the playback mode switches automatically to the respective channel number. Description In this mode, the type of digital signal input, such as Dolby Digital, Dolby TrueHD, Dolby Digital Plus, DolbyDigital EX, DTS, DTS-HD, DTS-ES, PCM (multi-channel) is used.

Instruction Manual in English
Page 145
... Front panel Display Rear panel 145 Remote Index Subwoofer Level Adjust This setting adjusts the volume level for this unit while viewing the TV. The recommended settings are using menu operations, connect this unit to clarify the dialogue output from the center 151 channel. Audio M-DAX Expands the low and high frequency components of each speaker. 160 Picture Adjust Adjusts picture quality. 162 HDMI Setup Makes settings for HDMI video/audio output. 164 Output Settings Makes settings for incorrect timing between video and audio. 157 Volume Sets the MAIN ZONE...
... Front panel Display Rear panel 145 Remote Index Subwoofer Level Adjust This setting adjusts the volume level for this unit while viewing the TV. The recommended settings are using menu operations, connect this unit to clarify the dialogue output from the center 151 channel. Audio M-DAX Expands the low and high frequency components of each speaker. 160 Picture Adjust Adjusts picture quality. 162 HDMI Setup Makes settings for HDMI video/audio output. 164 Output Settings Makes settings for incorrect timing between video and audio. 157 Volume Sets the MAIN ZONE...

Instruction Manual in English
Page 146
... service technician or custom installation professional. Page 174 176 176 176 177 178 188 Displays network information. 196 Selects whether to connect the home network to a wireless LAN or a wired LAN. 196 Used for input source. Used to your preferences. Sets the audio input mode and decode mode. Network Manual Setup Information Connection Settings IP Control Friendly Name Diagnostics Maintenance Mode Description Changes input connector assignment. The acoustic characteristics of the audio input. Sets up the speakers manually or changes the Audyssey® Setup settings...
... service technician or custom installation professional. Page 174 176 176 176 177 178 188 Displays network information. 196 Selects whether to connect the home network to a wireless LAN or a wired LAN. 196 Used for input source. Used to your preferences. Sets the audio input mode and decode mode. Network Manual Setup Information Connection Settings IP Control Friendly Name Diagnostics Maintenance Mode Description Changes input connector assignment. The acoustic characteristics of the audio input. Sets up the speakers manually or changes the Audyssey® Setup settings...
Instruction Manual in English
Page 167
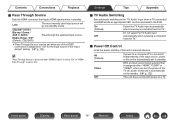
... power to a TV. Settings Tips Appendix o TV Audio Switching Sets automatic switching to the "TV Audio" input when a TV connected via HDMI sends an appropriate CEC control command to external devices. With an input source being selected that inputs HDMI signals when in the "Input Assign" setting. (v p. 174) "Pass Through Source" can be set when any of the HDMI connectors is assigned to "CD" for the input source in standby. Front panel Display Rear panel 167 Remote Index On (Default): Select the TV Audio input automatically when receiving...
... power to a TV. Settings Tips Appendix o TV Audio Switching Sets automatic switching to the "TV Audio" input when a TV connected via HDMI sends an appropriate CEC control command to external devices. With an input source being selected that inputs HDMI signals when in the "Input Assign" setting. (v p. 174) "Pass Through Source" can be set when any of the HDMI connectors is assigned to "CD" for the input source in standby. Front panel Display Rear panel 167 Remote Index On (Default): Select the TV Audio input automatically when receiving...

Instruction Manual in English
Page 177
... to set the audio input mode to "7.1CH IN". This item can be set for input sources for which "HDMI" or "DIGITAL" is assigned at "Input Assign" (v p. 174). 0 If "HDMI Control" is set to "On" and a TV compatible with the ARC is connected via the HDMI MONITOR 1 connectors, the input mode whose input source is "TV Audio" is normally recommended to set to "Auto". Auto (Default): Detect type of digital audio input signal and decode and play only PCM input signals. Front panel Display Rear panel 177 Remote Index "Input Select" settings are stored for input source. It...
... to set the audio input mode to "7.1CH IN". This item can be set for input sources for which "HDMI" or "DIGITAL" is assigned at "Input Assign" (v p. 174). 0 If "HDMI Control" is set to "On" and a TV compatible with the ARC is connected via the HDMI MONITOR 1 connectors, the input mode whose input source is "TV Audio" is normally recommended to set to "Auto". Auto (Default): Detect type of digital audio input signal and decode and play only PCM input signals. Front panel Display Rear panel 177 Remote Index "Input Select" settings are stored for input source. It...

Instruction Manual in English
Page 184
Configure the settings as preferred. when enjoying a movie or TV program in the middle of the night. 0 Dynamic Volume adjusts the output volume to the optimal level while constantly monitoring the level of the sound when, for example, the volume suddenly increases for Audyssey Dynamic EQ® and Audyssey Dynamic Volume®. Please disconnect the microphone from the SETUP MIC jack on the Dynamic EQ? The following screen is recommended when using the unit with the volume turned down...
Configure the settings as preferred. when enjoying a movie or TV program in the middle of the night. 0 Dynamic Volume adjusts the output volume to the optimal level while constantly monitoring the level of the sound when, for example, the volume suddenly increases for Audyssey Dynamic EQ® and Audyssey Dynamic Volume®. Please disconnect the microphone from the SETUP MIC jack on the Dynamic EQ? The following screen is recommended when using the unit with the volume turned down...

Instruction Manual in English
Page 202
Settings Tips Appendix Front panel Display Rear panel 202 Remote Index Contents Connections Playback Maintenance Mode Use when receiving maintenance from a Marantz service engineer or custom installer. Ordinarily, this function if so instructed by a trained service technician or custom installation professional. NOTE Only use this mode isn't suitable for use by the end user, only by a Marantz serviceperson or installer.
Settings Tips Appendix Front panel Display Rear panel 202 Remote Index Contents Connections Playback Maintenance Mode Use when receiving maintenance from a Marantz service engineer or custom installer. Ordinarily, this function if so instructed by a trained service technician or custom installation professional. NOTE Only use this mode isn't suitable for use by the end user, only by a Marantz serviceperson or installer.

Instruction Manual in English
Page 215
... bass and clarity during playback at power on the input signals and sound mode, the subwoofer may not output audio. You can have the subwoofer always output audio 0 Depending on for "Volume Limit" in TV shows or movies are automatically adjusted to your desired level. (v p. 160) Front panel Display Rear panel 215 Remote Index Volume level changes (between quiet scenes and loud scenes) in the menu beforehand. To use a fixed volume level, set to standby on this for each zone...
... bass and clarity during playback at power on the input signals and sound mode, the subwoofer may not output audio. You can have the subwoofer always output audio 0 Depending on for "Volume Limit" in TV shows or movies are automatically adjusted to your desired level. (v p. 160) Front panel Display Rear panel 215 Remote Index Volume level changes (between quiet scenes and loud scenes) in the menu beforehand. To use a fixed volume level, set to standby on this for each zone...

Instruction Manual in English
Page 220
... a device equipped with the metal part on speaker terminals. 0 Securely tighten the speaker terminals. Contents Connections Playback Settings Tips Appendix o No sound comes out Symptom Cause / Solution No sound comes out of a TV that a proper input source is selected. 0 Adjust the volume. 0 Cancel the mute mode. 0 Check the digital audio input connector setting. 0 Check the digital audio output setting on the main unit, sound is not output from the speaker terminal and PRE OUT connector.
... a device equipped with the metal part on speaker terminals. 0 Securely tighten the speaker terminals. Contents Connections Playback Settings Tips Appendix o No sound comes out Symptom Cause / Solution No sound comes out of a TV that a proper input source is selected. 0 Adjust the volume. 0 Cancel the mute mode. 0 Check the digital audio input connector setting. 0 Check the digital audio output setting on the main unit, sound is not output from the speaker terminal and PRE OUT connector.

Instruction Manual in English
Page 221
...; Front panel Display Rear panel 221 Remote Index On some devices, "PCM" is set too low. setting in menu. 0 Check the "Assign Mode" setting in the input signals, no subwoofer audio signal (LFE) is included in the menu. 0 When the sound mode is "Stereo" and "Virtual", audio is set for the "Speaker Config." "Subwoofer" on the input signal and the sound mode, no sound may be output from the subwoofer. 0 When no sound may not reach the upper limit. Contents Connections Playback Settings Tips Appendix o Desired sound does...
...; Front panel Display Rear panel 221 Remote Index On some devices, "PCM" is set too low. setting in menu. 0 Check the "Assign Mode" setting in the input signals, no subwoofer audio signal (LFE) is included in the menu. 0 When the sound mode is "Stereo" and "Virtual", audio is set for the "Speaker Config." "Subwoofer" on the input signal and the sound mode, no sound may be output from the subwoofer. 0 When no sound may not reach the upper limit. Contents Connections Playback Settings Tips Appendix o Desired sound does...

Instruction Manual in English
Page 222
... Dolby Digital or DTS surround, "M-DAX" cannot be used. 0 Switch to a sound mode other than "Direct" or "Pure Direct". 0 Digital signal audio input from the HDMI connector or digital audio connectors (OPTICAL/COAXIAL) cannot be selected when using the headphones. 0 Check that an analog signal or PCM signal (Sample Rate = 44.1/48 kHz) is output when using headphones. 0 These cannot be selected when you have not performed Audyssey® Setup. 0 Switch to a sound mode other than "Direct" or "Pure Direct". 0 These cannot be played back. Audyssey MultEQ® XT, Audyssey Dynamic...
... Dolby Digital or DTS surround, "M-DAX" cannot be used. 0 Switch to a sound mode other than "Direct" or "Pure Direct". 0 Digital signal audio input from the HDMI connector or digital audio connectors (OPTICAL/COAXIAL) cannot be selected when using the headphones. 0 Check that an analog signal or PCM signal (Sample Rate = 44.1/48 kHz) is output when using headphones. 0 These cannot be selected when you have not performed Audyssey® Setup. 0 Switch to a sound mode other than "Direct" or "Pure Direct". 0 These cannot be played back. Audyssey MultEQ® XT, Audyssey Dynamic...
Instruction Manual in English
Page 235
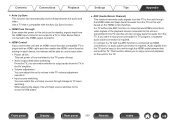
... ARC function is connected via HDMI connections, no audio cable connection is required. This function allows you want to enjoy surround audio for the TV. Audio signals from the TV can be linked to the TV power off step. 0 Audio output destination switching From the TV, you connect the unit and an HDMI control function compatible TV or player with the Auto Lip Sync function. 0 HDMI Pass Through Even when the power to the HDMI output connector. 0 HDMI Control If you can automatically correct delay...
... ARC function is connected via HDMI connections, no audio cable connection is required. This function allows you want to enjoy surround audio for the TV. Audio signals from the TV can be linked to the TV power off step. 0 Audio output destination switching From the TV, you connect the unit and an HDMI control function compatible TV or player with the Auto Lip Sync function. 0 HDMI Pass Through Even when the power to the HDMI output connector. 0 HDMI Control If you can automatically correct delay...

Instruction Manual in English
Page 268
... Settings Tips Appendix v D Direct sound mode 125 Display 16 DLNA 256 Dolby sound mode 122, 250 DTS sound mode 123, 252 v E ECO Mode 203 Error messages (Audyssey® Setup 186 Explanation of terms/technology .......... 234, 250 v F Firmware Update 210 Front height speaker 27, 34 Front panel 13 v G General settings 147, 203 v H HDCP 236 HDMI Control 130, 166 v I Input Assign 174 Input signal 247 Input source settings 146, 174 Inputting characters 149 Inserting the batteries 8 iPod Browse Mode 62 iTunes 258 v J JPEG 65, 85 v L Listening...
... Settings Tips Appendix v D Direct sound mode 125 Display 16 DLNA 256 Dolby sound mode 122, 250 DTS sound mode 123, 252 v E ECO Mode 203 Error messages (Audyssey® Setup 186 Explanation of terms/technology .......... 234, 250 v F Firmware Update 210 Front height speaker 27, 34 Front panel 13 v G General settings 147, 203 v H HDCP 236 HDMI Control 130, 166 v I Input Assign 174 Input signal 247 Input source settings 146, 174 Inputting characters 149 Inserting the batteries 8 iPod Browse Mode 62 iTunes 258 v J JPEG 65, 85 v L Listening...

Instruction Manual in English
Page 269
... Troubleshooting 217 Turning off the sound temporarily (Muting) ..... 59 Turning the power on 58 v S Save to Favorites 109 Selecting the input source 58 Setup Assistant 147 Sleep timer 131 Slideshow 111 Slideshow Interval 112 Smart select function 133 Sound mode 119, 243, 244 Speaker connection 25 Speaker Settings 146, 178 Stereo sound mode 125 Surround back speaker 27 v V Video Conversion 169, 237 Video Select 115 Video settings 145, 162 v W Web control 136 Wi-Fi settings 197 Tips Appendix Front panel Display Rear panel...
... Troubleshooting 217 Turning off the sound temporarily (Muting) ..... 59 Turning the power on 58 v S Save to Favorites 109 Selecting the input source 58 Setup Assistant 147 Sleep timer 131 Slideshow 111 Slideshow Interval 112 Smart select function 133 Sound mode 119, 243, 244 Speaker connection 25 Speaker Settings 146, 178 Stereo sound mode 125 Surround back speaker 27 v V Video Conversion 169, 237 Video Select 115 Video settings 145, 162 v W Web control 136 Wi-Fi settings 197 Tips Appendix Front panel Display Rear panel...


