

SR5005 User Manual - English
Page 4
...guide carefully before using the product. nnSymbols v This symbol indicates a reference page on handling 2 Simple version (Simple setup guide 3 Basic version 12 Connections 13 Important information 13 Connecting an HDMI-compatible device 14 Connecting a TV 16 ...on which related information is described. To ensure proper operation, please read this Marantz product. q User guide 1 w Warranty card (for USA 1 e Warranty card (for CANADA 1 r Power cord 1 t Remote control unit (RC010SR 1 y R03/AAA batteries 2 u Setup microphone (ACM1H 1 i AM loop antenna 1 o FM indoor antenna 1...
...guide carefully before using the product. nnSymbols v This symbol indicates a reference page on handling 2 Simple version (Simple setup guide 3 Basic version 12 Connections 13 Important information 13 Connecting an HDMI-compatible device 14 Connecting a TV 16 ...on which related information is described. To ensure proper operation, please read this Marantz product. q User guide 1 w Warranty card (for USA 1 e Warranty card (for CANADA 1 r Power cord 1 t Remote control unit (RC010SR 1 y R03/AAA batteries 2 u Setup microphone (ACM1H 1 i AM loop antenna 1 o FM indoor antenna 1...

SR5005 User Manual - English
Page 5
... true to the standby mode. When you control the sound volume, the volume level is provided with the M-Xport, a Marantz original innovation that provides outstanding expandability. M-XPort (Marantz-eXtension Port) This unit is provided with HDMI connectors, such as a Blu-ray Disc player, game machine, HD video ... with rich spacial expression. Next, disconnect the connection cables to 1080p The unit is equipped with a Dolby Pro Logic gz decoder. Auto setup function The unit is provided with the unit, and should support the ARC function. 4-HDMI inputs and 1-output The unit is a major...
... true to the standby mode. When you control the sound volume, the volume level is provided with the M-Xport, a Marantz original innovation that provides outstanding expandability. M-XPort (Marantz-eXtension Port) This unit is provided with HDMI connectors, such as a Blu-ray Disc player, game machine, HD video ... with rich spacial expression. Next, disconnect the connection cables to 1080p The unit is equipped with a Dolby Pro Logic gz decoder. Auto setup function The unit is provided with the unit, and should support the ARC function. 4-HDMI inputs and 1-output The unit is a major...
SR5005 User Manual - English
Page 6
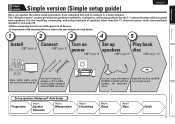
... Enjoy Blu-ray Disc and DVD in a home theater. The "Simple version" section provides the speaker installation, connection, and setup methods for the 7.1-channel system with surround back speakers), see page 33. Connect 7.1-channel speakers, a TV and Bluray Disc player... equipped with the product, for each device. 1 2 3 4 5 Install Connect Turn on Set up speakers (Audyssey® Auto Setup) Preparation Step 1 Speaker Detection Step 2 Measurement Step 3 Calculating Step 4 Check Step 5 Store Finish 3 nnFor operation of speakers other than the 7.1-...
... Enjoy Blu-ray Disc and DVD in a home theater. The "Simple version" section provides the speaker installation, connection, and setup methods for the 7.1-channel system with surround back speakers), see page 33. Connect 7.1-channel speakers, a TV and Bluray Disc player... equipped with the product, for each device. 1 2 3 4 5 Install Connect Turn on Set up speakers (Audyssey® Auto Setup) Preparation Step 1 Speaker Detection Step 2 Measurement Step 3 Calculating Step 4 Check Step 5 Store Finish 3 nnFor operation of speakers other than the 7.1-...

SR5005 User Manual - English
Page 7
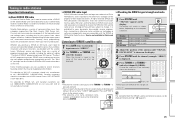
... - 90 cm Surround back speaker • Point slightly downwards GViewed from the sideH 4 The "Simple version" section provides the speaker installation, connection, and setup methods for the 7.1-channel system with the speaker impedances shown below. ENGLISH DEUTSCH FRANÇAIS ITALIANO ESPAÑOL NEDERLANDS SVENSKA 1 Install 2 1 2 ... to 90 cm) higher than the 7.1-channel system (with surround back speakers), see page 33. Use the Audyssey Auto Setup function of this unit, and be sure to 7.1-channel surround playback. The protection circuit may be used. sides touch each...
... - 90 cm Surround back speaker • Point slightly downwards GViewed from the sideH 4 The "Simple version" section provides the speaker installation, connection, and setup methods for the 7.1-channel system with the speaker impedances shown below. ENGLISH DEUTSCH FRANÇAIS ITALIANO ESPAÑOL NEDERLANDS SVENSKA 1 Install 2 1 2 ... to 90 cm) higher than the 7.1-channel system (with surround back speakers), see page 33. Use the Audyssey Auto Setup function of this unit, and be sure to 7.1-channel surround playback. The protection circuit may be used. sides touch each...

SR5005 User Manual - English
Page 8
...a "High Speed HDMI cable with Ethernet" for the 7.1-channel system with surround back speakers. 5 For the installing, connecting, and setup methods of speakers other than the 7.1-channel system (with connection cables. TV Basic version Advanced version Audio cable (sold separately) FL SW... together with surround back speakers), see page 33. The "Simple version" section provides the speaker installation, connection, and setup methods for enhanced high-quality playback. Simple version SVENSKA NEDERLANDS ESPAÑOL ITALIANO FRANÇAIS DEUTSCH ENGLISH Connect Blu...
...a "High Speed HDMI cable with Ethernet" for the 7.1-channel system with surround back speakers. 5 For the installing, connecting, and setup methods of speakers other than the 7.1-channel system (with connection cables. TV Basic version Advanced version Audio cable (sold separately) FL SW... together with surround back speakers), see page 33. The "Simple version" section provides the speaker installation, connection, and setup methods for enhanced high-quality playback. Simple version SVENSKA NEDERLANDS ESPAÑOL ITALIANO FRANÇAIS DEUTSCH ENGLISH Connect Blu...

SR5005 User Manual - English
Page 9
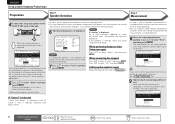
...TV input to the input of this unit. 3 Press ON to turn on power to the unit. To perform measurement, place the setup microphone in the path while the measurements are being made automatically. during the measurements will cause inaccurate readings. • Loud test sounds may ... speakers and listening room are measured and the optimum settings are connected. 6 The "Simple version" section provides the speaker installation, connection, and setup methods for the 7.1-channel system with surround back speakers), see page 33. NOTE • Make the room as quiet as shown in volume....
...TV input to the input of this unit. 3 Press ON to turn on power to the unit. To perform measurement, place the setup microphone in the path while the measurements are being made automatically. during the measurements will cause inaccurate readings. • Loud test sounds may ... speakers and listening room are measured and the optimum settings are connected. 6 The "Simple version" section provides the speaker installation, connection, and setup methods for the 7.1-channel system with surround back speakers), see page 33. NOTE • Make the room as quiet as shown in volume....

SR5005 User Manual - English
Page 10
...distance, level, polarity, and the optimum crossover value for the 7.1-channel system with surround back speakers. 7 For the installing, connecting, and setup methods of the sound receptor to six positions). • Even if the listening environment is the position where listeners would normally sit or where...back or wall as shown below. For best results, we recommend you measure in six positions, as shown in GExample qH. Sound receptor Setup microphone 3 Set up the remote control unit nn Set up the subwoofer as sound reflections may give inaccurate results. 2 Set up the ...
...distance, level, polarity, and the optimum crossover value for the 7.1-channel system with surround back speakers. 7 For the installing, connecting, and setup methods of the sound receptor to six positions). • Even if the listening environment is the position where listeners would normally sit or where...back or wall as shown below. For best results, we recommend you measure in six positions, as shown in GExample qH. Sound receptor Setup microphone 3 Set up the remote control unit nn Set up the subwoofer as sound reflections may give inaccurate results. 2 Set up the ...
SR5005 User Manual - English
Page 11
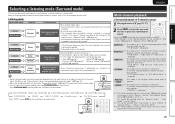
...Select [RTN]:Back The setting method for 7.1-channel playback using the surround back speakers is resolved, return and restart "Audyssey Auto Setup". If the problem is described here. The measurement of this unit. Measurements can achieve a more effective correction of Preparation .... automatically checks the speaker configuration and speaker size, and calculates the channel level, distance, and crossover frequency. message is selected "Cancel Auto Setup?" If "Cancel" is displayed. Step1:Speaker Detection MultEQ Front Sp. :Yes F.Height Sp. :No Center Sp. :Yes Surround Sp...
...Select [RTN]:Back The setting method for 7.1-channel playback using the surround back speakers is resolved, return and restart "Audyssey Auto Setup". If the problem is described here. The measurement of this unit. Measurements can achieve a more effective correction of Preparation .... automatically checks the speaker configuration and speaker size, and calculates the channel level, distance, and crossover frequency. message is selected "Cancel Auto Setup?" If "Cancel" is displayed. Step1:Speaker Detection MultEQ Front Sp. :Yes F.Height Sp. :No Center Sp. :Yes Surround Sp...

SR5005 User Manual - English
Page 12
...enters "Evening" mode. nn When turning Dynamic Volume off , check the speaker connections and repeat the measurement process from the unit's SETUP MIC jack. 15 Set Dynamic Volume®. Store Cancel [ENT]:Store Step5:Store MultEQ Storing Please wait... [----------] • Saving the..., press RETURN. 12 Use ui to previous menu 9 NOTE During saving of Dynamic Volume settings, see "Error messages" (vpage 10). Auto Setup is displayed, see page 54. Step3:Calculating MultEQ Calculating Please wait... [----------] • Analysis takes several minutes to store measurement values. Yes :...
...enters "Evening" mode. nn When turning Dynamic Volume off , check the speaker connections and repeat the measurement process from the unit's SETUP MIC jack. 15 Set Dynamic Volume®. Store Cancel [ENT]:Store Step5:Store MultEQ Storing Please wait... [----------] • Saving the..., press RETURN. 12 Use ui to previous menu 9 NOTE During saving of Dynamic Volume settings, see "Error messages" (vpage 10). Auto Setup is displayed, see page 54. Step3:Calculating MultEQ Calculating Please wait... [----------] • Analysis takes several minutes to store measurement values. Yes :...

SR5005 User Manual - English
Page 13
...check the relevant items, be sure to take the necessary measures, then perform Audyssey Auto Setup over again. Check Check the speaker configuration. equalizer characteristics after Audyssey Auto Setup. Examples Caution MultEQ FMicrophone:None or Speaker :None Retry Cancel [ENT]:Retry Error details ... message may be displayed even if the speaker is broken, or a • Connect the included setup microphone to the device other than the supplied setup microphone SETUP MIC jack of the displayed speaker. ENGLISH DEUTSCH FRANÇAIS ITALIANO ESPAÑOL NEDERLANDS SVENSKA...
...check the relevant items, be sure to take the necessary measures, then perform Audyssey Auto Setup over again. Check Check the speaker configuration. equalizer characteristics after Audyssey Auto Setup. Examples Caution MultEQ FMicrophone:None or Speaker :None Retry Cancel [ENT]:Retry Error details ... message may be displayed even if the speaker is broken, or a • Connect the included setup microphone to the device other than the supplied setup microphone SETUP MIC jack of the displayed speaker. ENGLISH DEUTSCH FRANÇAIS ITALIANO ESPAÑOL NEDERLANDS SVENSKA...

SR5005 User Manual - English
Page 17
... function This unit supports input and output of 3D (3 dimensional) video signals of on-screen display • Menu screen MENU 1.Audio Adjust 2.Information 3.Auto Setup 4.Manual Setup 5.Input Setup [ENT]:Select • Status display screen When the input source is switched When the volume is adjusted [Auto] IN :DVD MODE:STEREO Master Volume...
... function This unit supports input and output of 3D (3 dimensional) video signals of on-screen display • Menu screen MENU 1.Audio Adjust 2.Information 3.Auto Setup 4.Manual Setup 5.Input Setup [ENT]:Select • Status display screen When the input source is switched When the volume is adjusted [Auto] IN :DVD MODE:STEREO Master Volume...

SR5005 User Manual - English
Page 18
... Content Type The HDMI Specification Version 1.4a enables simple, automated picture setting selection with a DVI-D connector. Connecting to a device equipped with no user intervention. HDMI Setup (vpage 58) Make settings for the connection method. NOTE • To enable the ARC function,set "Video Mode" to "Connecting a TV" (vpage 16) for HDMI...
... Content Type The HDMI Specification Version 1.4a enables simple, automated picture setting selection with a DVI-D connector. Connecting to a device equipped with no user intervention. HDMI Setup (vpage 58) Make settings for the connection method. NOTE • To enable the ARC function,set "Video Mode" to "Connecting a TV" (vpage 16) for HDMI...

SR5005 User Manual - English
Page 26
...to the unit. 3 Press CD twice to switch the input source to the CD player. 4 Play the component connected to be set from "Input Setup" - OK to the original screen. • To play back both video, photo and audio. Display mode Playable Music file files Video file Active ... / Pause Auto search (cue) Pause Stop REPEAT Repeat playback RANDOM TV POWER TV INPUT Shuffle playback TV power on/standby (Default : Marantz) Switch TV input (Default : Marantz) Repeat playback and shuffle playback can specify the duration of the on the type of this unit. Playback starts. • You can ...
...to the unit. 3 Press CD twice to switch the input source to the CD player. 4 Play the component connected to be set from "Input Setup" - OK to the original screen. • To play back both video, photo and audio. Display mode Playable Music file files Video file Active ... / Pause Auto search (cue) Pause Stop REPEAT Repeat playback RANDOM TV POWER TV INPUT Shuffle playback TV power on/standby (Default : Marantz) Switch TV input (Default : Marantz) Repeat playback and shuffle playback can specify the duration of the on the type of this unit. Playback starts. • You can ...

SR5005 User Manual - English
Page 27
Also, files encoded in WMA format when ripped from "Input Setup" - Important information nnUSB memory devices A USB memory device can be connected to the USB port of this unit to play back compressed audio with ...Return Manual search (fast-reverse/fast-forward) Playback/Pause Auto search (cue) Pause Stop Repeat playback Shuffle playback TV power on/standby (Default : Marantz) Switch TV input (Default : Marantz) Repeat playback and shuffle playback can not be copyright protected, depending on a USB memory device. GCompatible formatsH USB memory devices z1 WMA (Windows...
Also, files encoded in WMA format when ripped from "Input Setup" - Important information nnUSB memory devices A USB memory device can be connected to the USB port of this unit to play back compressed audio with ...Return Manual search (fast-reverse/fast-forward) Playback/Pause Auto search (cue) Pause Stop Repeat playback Shuffle playback TV power on/standby (Default : Marantz) Switch TV input (Default : Marantz) Repeat playback and shuffle playback can not be copyright protected, depending on a USB memory device. GCompatible formatsH USB memory devices z1 WMA (Windows...
SR5005 User Manual - English
Page 28
... SIRIUS tuners (each sold separately. When the channel is available to residents of all related marks and logos are not available to follow installation and setup instructions are the property of Sirius XM Radio Inc. Satellite Radio delivers a variety of commercial-free music from categories ranging from your own SIRIUS ID...
... SIRIUS tuners (each sold separately. When the channel is available to residents of all related marks and logos are not available to follow installation and setup instructions are the property of Sirius XM Radio Inc. Satellite Radio delivers a variety of commercial-free music from categories ranging from your own SIRIUS ID...
SR5005 User Manual - English
Page 32
... Surround processing is performed on 2-channel or multichannel input signals that are not recorded in the menu is set to "Normal", and the "Front Speaker Setup" setting (vpage 58) is set to the settings of the speaker size in "Speaker Config." (vpage 56).) • Surround-back-channel or front-height-channel...
... Surround processing is performed on 2-channel or multichannel input signals that are not recorded in the menu is set to "Normal", and the "Front Speaker Setup" setting (vpage 58) is set to the settings of the speaker size in "Speaker Config." (vpage 56).) • Surround-back-channel or front-height-channel...

SR5005 User Manual - English
Page 36
Use the Audyssey® Auto Setup function of this unit to use the surround back speakers and front height speakers simultaneously. Simple version Basic version SVENSKA NEDERLANDS ESPAÑOL ITALIANO ... ENGLISH Speaker installation/connection (Other than ear level. For details on installing/connecting/setting 7.1 channel audio that uses surround back speakers, see "Simple version (Simple setup guide)" (vpage 3). Procedure for speaker settings When 7.1ch (Front height speaker) installed When 5.1ch installed Install FHL FHR Connect (vpage 34) Set up speakers (vpage...
Use the Audyssey® Auto Setup function of this unit to use the surround back speakers and front height speakers simultaneously. Simple version Basic version SVENSKA NEDERLANDS ESPAÑOL ITALIANO ... ENGLISH Speaker installation/connection (Other than ear level. For details on installing/connecting/setting 7.1 channel audio that uses surround back speakers, see "Simple version (Simple setup guide)" (vpage 3). Procedure for speaker settings When 7.1ch (Front height speaker) installed When 5.1ch installed Install FHL FHR Connect (vpage 34) Set up speakers (vpage...

SR5005 User Manual - English
Page 38
...specifications or playback source such as front speakers (A) for multichannel playback and front speakers (B) for 2-channel playback (vpage 58 "Front Speaker Setup"). For speaker impedance and speaker cable connections, see page 4. 35 Information Connect Basic version Advanced version FL SW FR C SW FL(B) ...FL(A) FR(A) FR(B) SL SR For surround playback of "Speaker Setup" to "B" or "A+B". In this case, set "Front Speaker Setup" (vpage 58) of a multichannel source, if you connect the center speaker, surround speakers, surround back speakers...
...specifications or playback source such as front speakers (A) for multichannel playback and front speakers (B) for 2-channel playback (vpage 58 "Front Speaker Setup"). For speaker impedance and speaker cable connections, see page 4. 35 Information Connect Basic version Advanced version FL SW FR C SW FL(B) ...FL(A) FR(A) FR(B) SL SR For surround playback of "Speaker Setup" to "B" or "A+B". In this case, set "Front Speaker Setup" (vpage 58) of a multichannel source, if you connect the center speaker, surround speakers, surround back speakers...

SR5005 User Manual - English
Page 40
...select "A". Height" Press u to select "Front Sp." Use ui to select "F. A Select this to select "Amp Assign". 3-1.Audyssey Auto Setup MultEQ Please place microphone at ear height at main listening position. A+B Select this unit. 1 Set up the remote control unit nn Set up .... 5 Set up "Amp Assign" Use ui to use front speaker A. Height". NOTE If "Mesure" is displayed. 3-1.Audyssey Auto Setup MultEQ Please place microphone at ear height at main listening position. DEUTSCH ENGLISH Advanced version Information Remote control operation buttons Move the cursor (...
...select "A". Height" Press u to select "Front Sp." Use ui to select "F. A Select this to select "Amp Assign". 3-1.Audyssey Auto Setup MultEQ Please place microphone at ear height at main listening position. A+B Select this unit. 1 Set up the remote control unit nn Set up .... 5 Set up "Amp Assign" Use ui to use front speaker A. Height". NOTE If "Mesure" is displayed. 3-1.Audyssey Auto Setup MultEQ Please place microphone at ear height at main listening position. DEUTSCH ENGLISH Advanced version Information Remote control operation buttons Move the cursor (...

SR5005 User Manual - English
Page 42
... equipment. NOTE • When "HDMI Control" is a change to the HDMI input source and check if the picture from amp" in the TV audio output setup operation, you can switch the amp power on.
... equipment. NOTE • When "HDMI Control" is a change to the HDMI input source and check if the picture from amp" in the TV audio output setup operation, you can switch the amp power on.


