
User Guide
Page 2
... television reception, which the receiver is subject to comply with Part 15 of Product: Remote controller Model: RC2001 RC_071003U4 Cet appareil numerique de la Classe B est conforme a la norme NMB-003 du Canada. Responsible Party: Marantz America, Inc. 100 Corporate Drive, Mahwah, NJ, 07430, U.S.A. These limits are designed to correct the interference...
... television reception, which the receiver is subject to comply with Part 15 of Product: Remote controller Model: RC2001 RC_071003U4 Cet appareil numerique de la Classe B est conforme a la norme NMB-003 du Canada. Responsible Party: Marantz America, Inc. 100 Corporate Drive, Mahwah, NJ, 07430, U.S.A. These limits are designed to correct the interference...

User Guide
Page 3
... the packing box, check that the following accessories are included. • RC2001: Remote controller • AAA type alkaline batteries x 4 • USB cable • User guide FEATURES RC2001 : Remote controller • Versatile Learning Capability with many years of home ... INFRARED RAYS 3 NAMES AND FUNCTIONS 4 REMOTE CONTROLLER 4 REMOTE CONTROLLER LCD 5 BASIC OPERATION 6 RC2001 BUTTON SETTINGS 6 SLEEP TIMER 6 OTHER OPERATION 7 MAIN MENU 7 1. STATUS INDICATOR 17 5. Please take a few minutes to provide you for purchasing the Marantz RC2001 remote controller. RESET 17 6.
... the packing box, check that the following accessories are included. • RC2001: Remote controller • AAA type alkaline batteries x 4 • USB cable • User guide FEATURES RC2001 : Remote controller • Versatile Learning Capability with many years of home ... INFRARED RAYS 3 NAMES AND FUNCTIONS 4 REMOTE CONTROLLER 4 REMOTE CONTROLLER LCD 5 BASIC OPERATION 6 RC2001 BUTTON SETTINGS 6 SLEEP TIMER 6 OTHER OPERATION 7 MAIN MENU 7 1. STATUS INDICATOR 17 5. Please take a few minutes to provide you for purchasing the Marantz RC2001 remote controller. RESET 17 6.

User Guide
Page 4
Remove the battery case cover. marks in the remote controller even if the power completely runs out. Battery case cover 2 The batteries provided are used batteries, please comply with governmental regulations or environmental public instruction`s rules that you use the remote controller for a long period of used to do so in your country or area. CAUTION ON BATTERY • Use lAAAz type batteries in this remote controller. • We recommend that apply in the proper direction, following the + and - Do not short-circuit, disassemble, heat or dispose of batteries in the ...
Remove the battery case cover. marks in the remote controller even if the power completely runs out. Battery case cover 2 The batteries provided are used batteries, please comply with governmental regulations or environmental public instruction`s rules that you use the remote controller for a long period of used to do so in your country or area. CAUTION ON BATTERY • Use lAAAz type batteries in this remote controller. • We recommend that apply in the proper direction, following the + and - Do not short-circuit, disassemble, heat or dispose of batteries in the ...

User Guide
Page 5
This means that operating the remote controller may cause other strong source of the illustration below. ENGLISH USING THE REMOTE CONTROLLER WITH INFRARED RAYS The remote controller uses infrared (IR) signals to run down. 3 Otherwise, the operation of the remote controller may cause one or more buttons to be disabled. • Bear in mind that you are operating. Operate the device with the remote controller within the range of light to point the IR sending eye of the remote controller. Doing so may be held down which will cause the batteries to operate devices. Approx....
This means that operating the remote controller may cause other strong source of the illustration below. ENGLISH USING THE REMOTE CONTROLLER WITH INFRARED RAYS The remote controller uses infrared (IR) signals to run down. 3 Otherwise, the operation of the remote controller may cause one or more buttons to be disabled. • Bear in mind that you are operating. Operate the device with the remote controller within the range of light to point the IR sending eye of the remote controller. Doing so may be held down which will cause the batteries to operate devices. Approx....

User Guide
Page 6
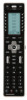
i Cursor, ENTER buttons o Programmable Hard buttons These buttons are used by the Wizz.it 3 editor software to make LCD display and button y operation settings. These buttons are also used when scrolling pages in Home mode and the device modes. u t Page Scroll buttons i These buttons are used to make the remote controller command settings for the buttons and LCD. e LCD Display Remote controller display r Programmable soft buttons t These buttons are used by the Wizz.it 3 editor software to adjust the number of pages for each device. To select a device that will be controlled...
i Cursor, ENTER buttons o Programmable Hard buttons These buttons are used by the Wizz.it 3 editor software to make LCD display and button y operation settings. These buttons are also used when scrolling pages in Home mode and the device modes. u t Page Scroll buttons i These buttons are used to make the remote controller command settings for the buttons and LCD. e LCD Display Remote controller display r Programmable soft buttons t These buttons are used by the Wizz.it 3 editor software to adjust the number of pages for each device. To select a device that will be controlled...

User Guide
Page 7
B Command display area This displays the information that has been set for the respective button is displayed. Area Normal operation: The page number that has been set for the respective mode is highlighted. Operation when not sending an IR command (such as jump operation): D The operation name that has been set for the button is currently active. B C Battery indicator This displays the remaining battery power. Device Name: This displays the device mode name that has been set for the display items in the device modes. ENGLISH !0 USB port This port is used to ...
B Command display area This displays the information that has been set for the respective button is displayed. Area Normal operation: The page number that has been set for the respective mode is highlighted. Operation when not sending an IR command (such as jump operation): D The operation name that has been set for the button is currently active. B C Battery indicator This displays the remaining battery power. Device Name: This displays the device mode name that has been set for the display items in the device modes. ENGLISH !0 USB port This port is used to ...

User Guide
Page 8
...receiver DVD input command. DVD input command for the RC2001. 2. For more information about the setting procedures, see the PC Editor Software Wizz.it 3 editor software can be downloaded from www.marantz.com. Press the Home button to enter Home mode for Marantz AV Receiver. 6 SLEEP TIMER icon To control ...devices that do not have a sleep timer or for setting the sleep timer using the Wizz.it 3 editor software can be used to control Marantz products. area of the device mode. SLEEP 30 SLEEP 60 SLEEP 90 SLEEP OFF SLEEP 120 3. The AV receiver device input switching code ...
...receiver DVD input command. DVD input command for the RC2001. 2. For more information about the setting procedures, see the PC Editor Software Wizz.it 3 editor software can be downloaded from www.marantz.com. Press the Home button to enter Home mode for Marantz AV Receiver. 6 SLEEP TIMER icon To control ...devices that do not have a sleep timer or for setting the sleep timer using the Wizz.it 3 editor software can be used to control Marantz products. area of the device mode. SLEEP 30 SLEEP 60 SLEEP 90 SLEEP OFF SLEEP 120 3. The AV receiver device input switching code ...

User Guide
Page 9
...device are made in the main menu. Press the Home button to display MAIN MENU on the Marantz remote controller at the same time for three seconds to enter Home mode for the RC2001. 2. Place the remote controller so that its infrared signal transmitter is facing the infrared signal ...receiver on the LCD. 1. LEARNING FUNCTION 1. Hold down the Home button and Menu button at a distance of the RC2001, and then press the button next to...
...device are made in the main menu. Press the Home button to display MAIN MENU on the Marantz remote controller at the same time for three seconds to enter Home mode for the RC2001. 2. Place the remote controller so that its infrared signal transmitter is facing the infrared signal ...receiver on the LCD. 1. LEARNING FUNCTION 1. Hold down the Home button and Menu button at a distance of the RC2001, and then press the button next to...

User Guide
Page 10
... the MAIN MENU. Once 1,000 codes are programmed for another button in the same device mode. • When the learning mode is used. • The RC2001 can be performed when a special remote controller signal code is completed, press the Home button three times to return the LCD to transmission of 1,000...
... the MAIN MENU. Once 1,000 codes are programmed for another button in the same device mode. • When the learning mode is used. • The RC2001 can be performed when a special remote controller signal code is completed, press the Home button three times to return the LCD to transmission of 1,000...

User Guide
Page 11
...TIMER menu. • Pressing the Home button from the TIMER MENU screen returns the LCD to the lTIMERz indicator. 2. TIMER The timer function of the RC2001, then press the button next to the MAIN MENU. 9 OPERATION SETTINGS 1. After making the setting, press the ENTER button. The TIMER menu is displayed.... the button next to the lTIMER SETz indicator in the LCD in the TIMER menu screen to the lCHECKz indicator on the LCD of the RC2001 can be used to operate multiple devices. ENGLISH 2. The Wizz.it 3 editor can also use the timer function for the timer. One Touch ...
...TIMER menu. • Pressing the Home button from the TIMER MENU screen returns the LCD to the lTIMERz indicator. 2. TIMER The timer function of the RC2001, then press the button next to the MAIN MENU. 9 OPERATION SETTINGS 1. After making the setting, press the ENTER button. The TIMER menu is displayed.... the button next to the lTIMER SETz indicator in the LCD in the TIMER menu screen to the lCHECKz indicator on the LCD of the RC2001 can be used to operate multiple devices. ENGLISH 2. The Wizz.it 3 editor can also use the timer function for the timer. One Touch ...

User Guide
Page 12
time only operation. • The timer settings are correct. Note: The timer setting for the SOFT button cannot be used in the LCD. ENGLISH 3. Home mode is shown in Home mode. 10 • Either press the ENTER button or wait three seconds for the commands that lCOMPLETEDz is to be sent by timer programming, press the HARD button when selecting the command to make the setting. • If a command assigned to the SOFT button is displayed on the LCD to set timer operation to the SOFT button. 4. Press a button next to the lEVERYDAYz or lONE TIMEz indicators on the LCD and the ...
time only operation. • The timer settings are correct. Note: The timer setting for the SOFT button cannot be used in the LCD. ENGLISH 3. Home mode is shown in Home mode. 10 • Either press the ENTER button or wait three seconds for the commands that lCOMPLETEDz is to be sent by timer programming, press the HARD button when selecting the command to make the setting. • If a command assigned to the SOFT button is displayed on the LCD to set timer operation to the SOFT button. 4. Press a button next to the lEVERYDAYz or lONE TIMEz indicators on the LCD and the ...

User Guide
Page 13
Either press the ENTER button or wait three seconds so that lCOMPLETEDz is displayed on the LCD to ON, the timer icon is set to display the timer operation ON/OFF setting screen. 3. Press the button next to the lTIMER ONz (Enable) or lTIMER OFFz (Disable) indicators on the LCD to either enable or disable timer operation. • Either press the ENTER button or wait three seconds for the LCD to automatically return to the MAIN menu. • When timer operation is displayed in the Sub Info area of the LCD. 24 TIMER icon 11 Press the button next to the lON/OFFz indicator in the TIMER ...
Either press the ENTER button or wait three seconds so that lCOMPLETEDz is displayed on the LCD to ON, the timer icon is set to display the timer operation ON/OFF setting screen. 3. Press the button next to the lTIMER ONz (Enable) or lTIMER OFFz (Disable) indicators on the LCD to either enable or disable timer operation. • Either press the ENTER button or wait three seconds for the LCD to automatically return to the MAIN menu. • When timer operation is displayed in the Sub Info area of the LCD. 24 TIMER icon 11 Press the button next to the lON/OFFz indicator in the TIMER ...

User Guide
Page 14
The items below can become out of the RC2001, then press the button next to the lCLOCKz indicator in the SYS.SETUP menu screen in the SYS.SETUP screen. 2. CLOCK (CLOCK SETTING) This sets ... (0 to 9) and cursor buttons (t and u) to set to display the clock setting screen. • Either press the ENTER button or wait three seconds for the RC2001. 1. Press the button next to the lSYS. ENGLISH 3. After setting the correct time, press the ENTER button. • CLOCK (Clock setting) • BACK LIGHT (Backlight...
The items below can become out of the RC2001, then press the button next to the lCLOCKz indicator in the SYS.SETUP menu screen in the SYS.SETUP screen. 2. CLOCK (CLOCK SETTING) This sets ... (0 to 9) and cursor buttons (t and u) to set to display the clock setting screen. • Either press the ENTER button or wait three seconds for the RC2001. 1. Press the button next to the lSYS. ENGLISH 3. After setting the correct time, press the ENTER button. • CLOCK (Clock setting) • BACK LIGHT (Backlight...

User Guide
Page 15
.... • Pressing the Home button returns the LCD to the MAIN MENU. 2. ENGLISH BACK LIGHT (BACKLIGHT ILLUMINATION TIME SETTING) Press the LIGHT button on the RC2001 to turn on the LCD to indicate that the backlight does not turn on even when the LIGHT button is pressed. 13 The message lCOMPLETEDz...
.... • Pressing the Home button returns the LCD to the MAIN MENU. 2. ENGLISH BACK LIGHT (BACKLIGHT ILLUMINATION TIME SETTING) Press the LIGHT button on the RC2001 to turn on the LCD to indicate that the backlight does not turn on even when the LIGHT button is pressed. 13 The message lCOMPLETEDz...

User Guide
Page 16
... the batteries to be set the display time. Press the buttons (right: +, left: -) displayed next to TIME to indicate that the LCD remains on the RC2001. The message lCOMPLETEDz is completed. The default setting is not activated. The LCD setting menu is pressed on , after a button is displayed, and so press...
... the batteries to be set the display time. Press the buttons (right: +, left: -) displayed next to TIME to indicate that the LCD remains on the RC2001. The message lCOMPLETEDz is completed. The default setting is not activated. The LCD setting menu is pressed on , after a button is displayed, and so press...

User Guide
Page 17
... (right: +, left: -) to your viewing environment. 1. Adjust for the LCD to automatically return to the lBEEPz indicator in the SYS.SETUP menu screen in the RC2001. 1. The LCD setting menu is displayed, and so press the buttons next to be adjusted. After deciding the settings, press the ENTER button. ENGLISH CONTRAST...
... (right: +, left: -) to your viewing environment. 1. Adjust for the LCD to automatically return to the lBEEPz indicator in the SYS.SETUP menu screen in the RC2001. 1. The LCD setting menu is displayed, and so press the buttons next to be adjusted. After deciding the settings, press the ENTER button. ENGLISH CONTRAST...

User Guide
Page 18
... (Enable) indicators on the LCD and completes initialization. Press the button next to the lMEM CLEARz indicator in the SYS.SETUP menu screen in the RC2001 to their initial settings. ENGLISH MEM CLEAR (INITIALIZATION SETTING) This returns the settings made in the LCD to display the initialization setting screen. 2. Note: The...
... (Enable) indicators on the LCD and completes initialization. Press the button next to the lMEM CLEARz indicator in the SYS.SETUP menu screen in the RC2001 to their initial settings. ENGLISH MEM CLEAR (INITIALIZATION SETTING) This returns the settings made in the LCD to display the initialization setting screen. 2. Note: The...

User Guide
Page 19
... press the button next to reset the RC2001. Note: Perform the reset with the batteries loaded. 6. PROGRAMMABLE CODES This remote control may be unable to learn the codes for Marantz remote control codes. CHECKING THE STATUS 1. The actual number of codes may be less than 8000 depending on the... LCD of the remote device. RESET If the RC2001 is for some AV equipment due to perform a reset (restart)....
... press the button next to reset the RC2001. Note: Perform the reset with the batteries loaded. 6. PROGRAMMABLE CODES This remote control may be unable to learn the codes for Marantz remote control codes. CHECKING THE STATUS 1. The actual number of codes may be less than 8000 depending on the... LCD of the remote device. RESET If the RC2001 is for some AV equipment due to perform a reset (restart)....

User Guide
Page 20
USB 2.0 connection with USB bus power supply Memory Size 4M bit (512kB) Dimensions (W x H x L) 54 x 228 x 25 mm (2-3/16 x 9 x 1ins.) Unit Weight (With Batteries 190g (0.4lbs) 9 ins. (228mm) 18 1ins. (25mm) 2-3/16 ins. (54mm) ENGLISH SPECIFICATIONS RC2001 LCD Resolution 11x81pixel x6 line 9x81pixel x1line" Backlight EL backlight Transmission IR Learning Capability: MAX 1000code Operating/ learning IR frequency range Up to 455kHz Interface ..
USB 2.0 connection with USB bus power supply Memory Size 4M bit (512kB) Dimensions (W x H x L) 54 x 228 x 25 mm (2-3/16 x 9 x 1ins.) Unit Weight (With Batteries 190g (0.4lbs) 9 ins. (228mm) 18 1ins. (25mm) 2-3/16 ins. (54mm) ENGLISH SPECIFICATIONS RC2001 LCD Resolution 11x81pixel x6 line 9x81pixel x1line" Backlight EL backlight Transmission IR Learning Capability: MAX 1000code Operating/ learning IR frequency range Up to 455kHz Interface ..
User Guide
Page 21
... number of the equipment together with a full description of your dealer or write directly to the nearest location to you think is listed on the Marantz Authorized Service Station list. Likewise, never use scouring pads, steel wool, scourging powders or harsh chemical agents (e.g., lye solution), alcohol, thinner, benzine, insecticide or other... to optimize the operation of the equipment. In the event of difficulty, refer to your unit will mar the finish of your Marantz component.
... number of the equipment together with a full description of your dealer or write directly to the nearest location to you think is listed on the Marantz Authorized Service Station list. Likewise, never use scouring pads, steel wool, scourging powders or harsh chemical agents (e.g., lye solution), alcohol, thinner, benzine, insecticide or other... to optimize the operation of the equipment. In the event of difficulty, refer to your unit will mar the finish of your Marantz component.