
Owner s Manual In English
Page 2
... digital audio connectors 23 8 Connecting devices with remote control connectors 24 10 Performing operations by RC on this unit without visual contact 24 12 Remotely connecting Marantz audio devices 24 Connecting the power cord 25 Playback Turning the power on 27 Selecting the speakers for audio output 28 Selecting the input source 28 Adjusting the volume 28 Turning off the sound temporarily (Muting) 28 Adjusting the tone 28 Playing CDs 29 Connect and playback from a digital device (Coaxial/Optical) 30 Recording 31 Front panel Rear panel Remote control...
... digital audio connectors 23 8 Connecting devices with remote control connectors 24 10 Performing operations by RC on this unit without visual contact 24 12 Remotely connecting Marantz audio devices 24 Connecting the power cord 25 Playback Turning the power on 27 Selecting the speakers for audio output 28 Selecting the input source 28 Adjusting the volume 28 Turning off the sound temporarily (Muting) 28 Adjusting the tone 28 Playing CDs 29 Connect and playback from a digital device (Coaxial/Optical) 30 Recording 31 Front panel Rear panel Remote control...

Owner s Manual In English
Page 3
Contents Connections Playback Settings Settings Setting the Auto Standby mode Turning Auto Standby mode on Turning Auto Standby mode off Setting the remote signal receiving function Disabling the remote signal receiving function of the remote control unit Enabling the remote signal receiving function of the remote control unit Setting remote control codes Setting remote control codes for the remote control Setting remote control codes for this unit Tips 33 Tips 33 Troubleshooting 33 34 Appendix 34 D/A converter Explanation of terms 34 Trademark information 35 Specifications 36 ...
Contents Connections Playback Settings Settings Setting the Auto Standby mode Turning Auto Standby mode on Turning Auto Standby mode off Setting the remote signal receiving function Disabling the remote signal receiving function of the remote control unit Enabling the remote signal receiving function of the remote control unit Setting remote control codes Setting remote control codes for the remote control Setting remote control codes for this unit Tips 33 Tips 33 Troubleshooting 33 34 Appendix 34 D/A converter Explanation of terms 34 Trademark information 35 Specifications 36 ...
Owner s Manual In English
Page 6
... Speakers B), you can directly connect a turntable and play records (Only the MM cartridge can connect thick audio cables. The digital-to-analog converter is provided with a phono amplifier so that you can connect to bi-wiring speakers with separate input terminals for high range and low range. (v p. 20) The unit adopts screw terminals that can be amplified with a LOUDNESS function that makes it easier to hear music played back at a low volume level. (v p. 29) Front panel Rear panel Remote control...
... Speakers B), you can directly connect a turntable and play records (Only the MM cartridge can connect thick audio cables. The digital-to-analog converter is provided with a phono amplifier so that you can connect to bi-wiring speakers with separate input terminals for high range and low range. (v p. 20) The unit adopts screw terminals that can be amplified with a LOUDNESS function that makes it easier to hear music played back at a low volume level. (v p. 29) Front panel Rear panel Remote control...

Owner s Manual In English
Page 9
... D Input indicators (v p. 28) E VOLUME knob These adjust the volume level. (v p. 28) F Headphones jack (PHONES) Used to connect headphones. Turn off ). G BASS control knob This setting adjusts the volume level for the bass. (v p. 28) H SOURCE DIRECT button/indicator This turns SOURCE DIRECT mode on/off. (v p. 29) I TREBLE control knob This setting adjusts the volume level for the treble. (v p. 28) J Speaker switching buttons/indicators (SPEAKERS A/B) These select the speaker for audio output. (v p. 28) K LOUDNESS button/indicator This turns the LOUDNESS mode on/off. (v p. 29) L BALANCE control...
... D Input indicators (v p. 28) E VOLUME knob These adjust the volume level. (v p. 28) F Headphones jack (PHONES) Used to connect headphones. Turn off ). G BASS control knob This setting adjusts the volume level for the bass. (v p. 28) H SOURCE DIRECT button/indicator This turns SOURCE DIRECT mode on/off. (v p. 29) I TREBLE control knob This setting adjusts the volume level for the treble. (v p. 28) J Speaker switching buttons/indicators (SPEAKERS A/B) These select the speaker for audio output. (v p. 28) K LOUDNESS button/indicator This turns the LOUDNESS mode on/off. (v p. 29) L BALANCE control...

Owner s Manual In English
Page 10
... Settings Tips e rt Appendix y u i o . E Remote control input/output connectors (REMOTE CONTROL) Used to connect to a Marantz audio device that is compatible with a TV or digital audio connector. (v p. 23) C Speaker terminals (SPEAKERS) Used to connect speakers. (v p. 18) D FLASHER IN jack Used when using a control BOX or other such control devices to connect a device with the remote control function. (v p. 24) Front panel Rear panel Remote control 10 unit Index A SIGNAL GND terminal Used to connect a turntable. (v p. 21) B Digital audio input connectors (COAXIAL/OPTICAL...
... Settings Tips e rt Appendix y u i o . E Remote control input/output connectors (REMOTE CONTROL) Used to connect to a Marantz audio device that is compatible with a TV or digital audio connector. (v p. 23) C Speaker terminals (SPEAKERS) Used to connect speakers. (v p. 18) D FLASHER IN jack Used when using a control BOX or other such control devices to connect a device with the remote control function. (v p. 24) Front panel Rear panel Remote control 10 unit Index A SIGNAL GND terminal Used to connect a turntable. (v p. 21) B Digital audio input connectors (COAXIAL/OPTICAL...

Owner s Manual In English
Page 13
... can be used to control a Marantz CD player in addition to the CD player operation mode. 0 REMOTE MODE CD button lights for approximately two seconds. A POWER button (X) B Remote mode select button (REMOTE MODE CD) C System buttons 0 Skip buttons (8 / 9) 0 Stop button (n) 0 Play button (1) 0 Pause button (3) D Input source select button (INPUT) E Information button (INFO) F TIME button G Cursor buttons (uio p) H Program button (PROG) I Number buttons (0 - 9) J DIMMER button K RANDOM button (P) . To operate a Marantz CD player, press the REMOTE MODE CD button to switch the remote control to...
... can be used to control a Marantz CD player in addition to the CD player operation mode. 0 REMOTE MODE CD button lights for approximately two seconds. A POWER button (X) B Remote mode select button (REMOTE MODE CD) C System buttons 0 Skip buttons (8 / 9) 0 Stop button (n) 0 Play button (1) 0 Pause button (3) D Input source select button (INPUT) E Information button (INFO) F TIME button G Cursor buttons (uio p) H Program button (PROG) I Number buttons (0 - 9) J DIMMER button K RANDOM button (P) . To operate a Marantz CD player, press the REMOTE MODE CD button to switch the remote control to...

Owner s Manual In English
Page 15
... D Input source select button (INPUT) E Information button (INFO) F TOP MENU button G Cursor buttons (uio p) H ADD TO FAVORITES button I Number buttons (0 - 9, +10) J DIMMER button K RANDOM button (P) . Front panel Rear panel Remote control 15 unit Index Contents Connections q w e r t y u i o Q0 Q1 Playback Settings Tips Appendix o Network audio player operations The remote control provided with this unit can control a network audio player in addition to the network audio player operation mode. 0 REMOTE MODE NET button lights for approximately two seconds. To operate a Marantz...
... D Input source select button (INPUT) E Information button (INFO) F TOP MENU button G Cursor buttons (uio p) H ADD TO FAVORITES button I Number buttons (0 - 9, +10) J DIMMER button K RANDOM button (P) . Front panel Rear panel Remote control 15 unit Index Contents Connections q w e r t y u i o Q0 Q1 Playback Settings Tips Appendix o Network audio player operations The remote control provided with this unit can control a network audio player in addition to the network audio player operation mode. 0 REMOTE MODE NET button lights for approximately two seconds. To operate a Marantz...

Owner s Manual In English
Page 18
... set) 4 - 16 Ω/ohms SPEAKERS B 2 (one set) 4 - 16 Ω/ohms SPEAKERS A and SPEAKERS B 4 (two sets) 8 - 16 Ω/ohms SPEAKERS A and SPEAKERS B (Bi-wiring connection) 2 (one set) 4 - 16 Ω/ohms Settings Tips Appendix o Connecting the speaker cables Carefully check the left (L) and right (R) channels and + (red) and - (black) polarities on this unit No. of the speaker cable, then either twist the core wire tightly or terminate it. 2 Turn the speaker terminal counterclockwise to loosen it . . . .. Speaker terminals used . Front panel Rear panel Remote control...
... set) 4 - 16 Ω/ohms SPEAKERS B 2 (one set) 4 - 16 Ω/ohms SPEAKERS A and SPEAKERS B 4 (two sets) 8 - 16 Ω/ohms SPEAKERS A and SPEAKERS B (Bi-wiring connection) 2 (one set) 4 - 16 Ω/ohms Settings Tips Appendix o Connecting the speaker cables Carefully check the left (L) and right (R) channels and + (red) and - (black) polarities on this unit No. of the speaker cable, then either twist the core wire tightly or terminate it. 2 Turn the speaker terminal counterclockwise to loosen it . . . .. Speaker terminals used . Front panel Rear panel Remote control...

Owner s Manual In English
Page 24
... sensor Remotely connecting Marantz audio devices You can 't directly point with the remote control unit to the device. NOTE 0 When a remote control receiver unit is not connected, be sure to use this feature. Operations cannot be necessary if the unit is disabled. RC OUT .. To do this, disable the remote control signal receiving function "Setting the remote signal receiving function" (v p. 34). Set the remote control switch located on the rear panel of the connected audio component to "EXTERNAL" to enable the remote control signal receiving function. This...
... sensor Remotely connecting Marantz audio devices You can 't directly point with the remote control unit to the device. NOTE 0 When a remote control receiver unit is not connected, be sure to use this feature. Operations cannot be necessary if the unit is disabled. RC OUT .. To do this, disable the remote control signal receiving function "Setting the remote signal receiving function" (v p. 34). Set the remote control switch located on the rear panel of the connected audio component to "EXTERNAL" to enable the remote control signal receiving function. This...

Owner s Manual In English
Page 26
Contents Connections Playback o Contents Turning the power on 27 Selecting the speakers for audio output 28 Selecting the input source 28 Adjusting the volume 28 Turning off the sound temporarily (Muting) 28 Adjusting the tone 28 Playing CDs 29 Connect and playback from a digital device (Coaxial/Optical) 30 Recording 31 Settings Tips Appendix Front panel Rear panel Remote control 26 unit Index
Contents Connections Playback o Contents Turning the power on 27 Selecting the speakers for audio output 28 Selecting the input source 28 Adjusting the volume 28 Turning off the sound temporarily (Muting) 28 Adjusting the tone 28 Playing CDs 29 Connect and playback from a digital device (Coaxial/Optical) 30 Recording 31 Settings Tips Appendix Front panel Rear panel Remote control 26 unit Index

Owner s Manual In English
Page 27
o Switching the power to the lowest level before turning on the main unit to turn the INPUT SELECTOR when the unit is in the standby mode. X BASS TREBLE BALANCE VOLUME Front panel Rear panel Remote control 27 unit Index NOTE 0 Power continues to be supplied to some of time or when going on vacation, either press X on the power. When leaving home for the selected source lights. .. Contents Connections Playback Input source select buttons SOURCE DIRECT MUTE AMP POWER X VOLUME df SOURCE DIRECT INPUT SELECTOR SPEAKERS A/B LOUDNESS Settings Tips Appendix...
o Switching the power to the lowest level before turning on the main unit to turn the INPUT SELECTOR when the unit is in the standby mode. X BASS TREBLE BALANCE VOLUME Front panel Rear panel Remote control 27 unit Index NOTE 0 Power continues to be supplied to some of time or when going on vacation, either press X on the power. When leaving home for the selected source lights. .. Contents Connections Playback Input source select buttons SOURCE DIRECT MUTE AMP POWER X VOLUME df SOURCE DIRECT INPUT SELECTOR SPEAKERS A/B LOUDNESS Settings Tips Appendix...
Owner s Manual In English
Page 30
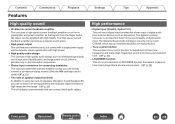
Front panel Rear panel Remote control 30 unit Index Settings Tips Appendix o Specifications of the input signal. 4 Use VOLUME df to B mode in blue if this unit. NOTE 0 Do not input non-PCM signals, such as from a digital device (Coaxial/Optical) 1 Connect digital device to this unit. (v p. 23) 2 Press the input source select button (COAXIAL or OPTICAL) to switch the input source to "COAXIAL" or "OPTICAL 1/2". 3 Start playback of the digital device connected to this unit cannot detect the sampling frequency of supported audio formats See "D/A converter...
Front panel Rear panel Remote control 30 unit Index Settings Tips Appendix o Specifications of the input signal. 4 Use VOLUME df to B mode in blue if this unit. NOTE 0 Do not input non-PCM signals, such as from a digital device (Coaxial/Optical) 1 Connect digital device to this unit. (v p. 23) 2 Press the input source select button (COAXIAL or OPTICAL) to switch the input source to "COAXIAL" or "OPTICAL 1/2". 3 Start playback of the digital device connected to this unit cannot detect the sampling frequency of supported audio formats See "D/A converter...

Owner s Manual In English
Page 33
... no audio input (Auto Standby mode). The power indicator flashes three times. Turning Auto Standby mode off 1 Press and hold SOURCE DIRECT for more than 5 seconds to turn the Auto Standby mode off. Contents Connections Playback Setting the Auto Standby mode You can set the unit to automatically switch to standby mode if the unit is not operated for 30 minutes when there is set to off by default. The power indicator flashes once. . Front panel Rear panel Remote control 33 unit Index SOURCE DIRECT Power indicator Settings Tips Appendix Turning Auto Standby mode on...
... no audio input (Auto Standby mode). The power indicator flashes three times. Turning Auto Standby mode off 1 Press and hold SOURCE DIRECT for more than 5 seconds to turn the Auto Standby mode off. Contents Connections Playback Setting the Auto Standby mode You can set the unit to automatically switch to standby mode if the unit is not operated for 30 minutes when there is set to off by default. The power indicator flashes once. . Front panel Rear panel Remote control 33 unit Index SOURCE DIRECT Power indicator Settings Tips Appendix Turning Auto Standby mode on...

Owner s Manual In English
Page 35
... panel Rear panel Remote control 35 unit Index Be sure to control only the unit that has the same remote control code. You can select one remote control in the same location, all three units can be used . The default setting is used to check the operation of remote control codes, and the remote control can be controlled simultaneously using one of the three types of each unit after setting the remote control codes. Contents Connections Playback Setting remote control codes REMOTE MODE CD ENTER 1 - 3 Settings...
... panel Rear panel Remote control 35 unit Index Be sure to control only the unit that has the same remote control code. You can select one remote control in the same location, all three units can be used . The default setting is used to check the operation of remote control codes, and the remote control can be controlled simultaneously using one of the three types of each unit after setting the remote control codes. Contents Connections Playback Setting remote control codes REMOTE MODE CD ENTER 1 - 3 Settings...
Owner s Manual In English
Page 38
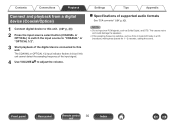
... sound as desired. (v p. 28) I want sound playback that is faithful to the original sound 0 Set the Source Direct mode on. (v p. 29) I want to hear music that is close to the original sound quality at low volume 0 Turn the LOUDNESS mode on. (v p. 29) I want to operate a Marantz CD player or network audio player using the remote control of this unit, and switch the input source to the connected (COAXIAL or OPTICAL 1/2) connector. (v p. 23) 0 This unit can play back 2 channel linear PCM digital audio signals...
... sound as desired. (v p. 28) I want sound playback that is faithful to the original sound 0 Set the Source Direct mode on. (v p. 29) I want to hear music that is close to the original sound quality at low volume 0 Turn the LOUDNESS mode on. (v p. 29) I want to operate a Marantz CD player or network audio player using the remote control of this unit, and switch the input source to the connected (COAXIAL or OPTICAL 1/2) connector. (v p. 23) 0 This unit can play back 2 channel linear PCM digital audio signals...
Owner s Manual In English
Page 39
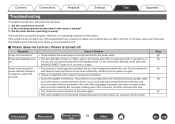
... in red approx. Power automatically turns off. 0 The Auto Standby mode is correctly inserted into the power outlet. When approx. 30 minutes pass with no audio input and no operations on . Turn the power off Symptom Cause / Solution Power is not turned on. 0 Check whether the power plug is on the unit, this section. The protection circuit may have been activated because speaker cable core wires came in the owner's manual? 3. After...
... in red approx. Power automatically turns off. 0 The Auto Standby mode is correctly inserted into the power outlet. When approx. 30 minutes pass with no audio input and no operations on . Turn the power off Symptom Cause / Solution Power is not turned on. 0 Check whether the power plug is on the unit, this section. The protection circuit may have been activated because speaker cable core wires came in the owner's manual? 3. After...

Owner s Manual In English
Page 41
... panel Rear panel Remote control 41 unit Index Check speaker terminals for damage. 0 Check that the proper input source is selected. 0 Adjust the master volume. 0 Cancel the muting mode. 0 Check the settings of stereo 0 Check whether the left and right of the SPEAKERS A/B button. o Desired sound does not come in . 0 Check that input connectors and output connectors are not reversely connected. 0 Check cables for looseness. 0 Check that speaker cables are connected to 2 channel linear PCM. The COAXIAL or OPTICAL...
... panel Rear panel Remote control 41 unit Index Check speaker terminals for damage. 0 Check that the proper input source is selected. 0 Adjust the master volume. 0 Cancel the muting mode. 0 Check the settings of stereo 0 Check whether the left and right of the SPEAKERS A/B button. o Desired sound does not come in . 0 Check that input connectors and output connectors are not reversely connected. 0 Check cables for looseness. 0 Check that speaker cables are connected to 2 channel linear PCM. The COAXIAL or OPTICAL...

Owner s Manual In English
Page 43
... panel Rear panel Remote control 43 unit Index Source direct Playback with higher fidelity to standby mode. Protection circuit This is an AC resistance value, indicated in this unit is input, the input indicator (COAXIAL or OPTICAL 1/2) flashes. If a malfunction occurs in Ω (ohms). Speaker impedance This is a function to prevent damage to devices within the power supply when an abnormality such as input audio signals are output by this unit, the power indicator blinks red and...
... panel Rear panel Remote control 43 unit Index Source direct Playback with higher fidelity to standby mode. Protection circuit This is an AC resistance value, indicated in this unit is input, the input indicator (COAXIAL or OPTICAL 1/2) flashes. If a malfunction occurs in Ω (ohms). Speaker impedance This is a function to prevent damage to devices within the power supply when an abnormality such as input audio signals are output by this unit, the power indicator blinks red and...
Quick Start Guide in English
Page 2
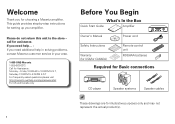
... What's In the Box Quick Start Guide Amplifier Owner's Manual Power cord Safety Instructions Warranty (for USA/for CANADA) Remote control unit R03/AAA batteries Required for Basic connections CD player Speaker systems Speaker cables These drawings are for Assistance: Monday - If you need additional help in solving problems, contact Marantz customer service in your amplifier. call for setting up your area. 1-855-ONE-Marantz 1-855-663-6272 Call for illustrative...
... What's In the Box Quick Start Guide Amplifier Owner's Manual Power cord Safety Instructions Warranty (for USA/for CANADA) Remote control unit R03/AAA batteries Required for Basic connections CD player Speaker systems Speaker cables These drawings are for Assistance: Monday - If you need additional help in solving problems, contact Marantz customer service in your amplifier. call for setting up your area. 1-855-ONE-Marantz 1-855-663-6272 Call for illustrative...
Product information Sheet
Page 1
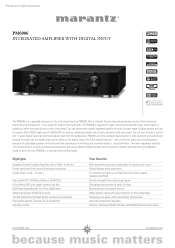
... to speakers Perfectly matching CD6006 CD Player and NA6005 Network Audio Player us.marantz.com ca.marantz.com The PM6006 is upgraded for powerful, dynamic and detailed original Marantz sound. We've retained the pre-amp and power-amp sections that the digital stage has no effect on the analog signal. rigid feet Gold Plated Inputs/Outputs incl. Product information PM6006 INTEGRATED AMPLIFIER WITH DIGITAL INPUT MODE The PM6006 is an upgraded successor of bi-wiring, and a remote handset...
... to speakers Perfectly matching CD6006 CD Player and NA6005 Network Audio Player us.marantz.com ca.marantz.com The PM6006 is upgraded for powerful, dynamic and detailed original Marantz sound. We've retained the pre-amp and power-amp sections that the digital stage has no effect on the analog signal. rigid feet Gold Plated Inputs/Outputs incl. Product information PM6006 INTEGRATED AMPLIFIER WITH DIGITAL INPUT MODE The PM6006 is an upgraded successor of bi-wiring, and a remote handset...

