
DV7600 User Manual
Page 3
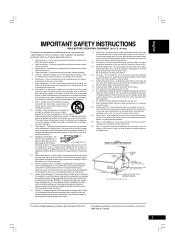
... SYSTEM (NEC ART 250, PART H) NEC - Follow Instructions - If you are provided for long periods of time, unplug it from the product. 14. See Instruction Manual for service. 22. This will fit into such power lines or circuits. Damage Requiring Service - b. this product near water-for future reference. 3. Cet appareil num...
... SYSTEM (NEC ART 250, PART H) NEC - Follow Instructions - If you are provided for long periods of time, unplug it from the product. 14. See Instruction Manual for service. 22. This will fit into such power lines or circuits. Damage Requiring Service - b. this product near water-for future reference. 3. Cet appareil num...

DV7600 User Manual
Page 7
...regulations or environmental bylaws that apply in your country or area. 1 Using the remote control Keep in mind the following when using this MARANTZ product. When disposing of used batteries, please comply with each battery match the indications in the battery compartment. • Remove batteries ...this unit. • Replace the batteries when you for buying this player independently, set a REMOTE CONTROL switch on the rear panel to this manual) • Warranty card Putting the batteries in the remote control 1 Open the battery compartment cover on the back of the remote control. 2...
...regulations or environmental bylaws that apply in your country or area. 1 Using the remote control Keep in mind the following when using this MARANTZ product. When disposing of used batteries, please comply with each battery match the indications in the battery compartment. • Remove batteries ...this unit. • Replace the batteries when you for buying this player independently, set a REMOTE CONTROL switch on the rear panel to this manual) • Warranty card Putting the batteries in the remote control 1 Open the battery compartment cover on the back of the remote control. 2...
DV7600 User Manual
Page 11
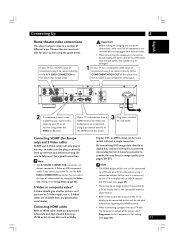
... all components are available from the wall outlet. • When connecting the component is not compatible with the above format. • Refer to the instruction manual of the TV or display to be transmitted with the jack before inserting. Use the standard 3-jack component video ouput. 2 If a component input is correctly...
... all components are available from the wall outlet. • When connecting the component is not compatible with the above format. • Refer to the instruction manual of the TV or display to be transmitted with the jack before inserting. Use the standard 3-jack component video ouput. 2 If a component input is correctly...
DV7600 User Manual
Page 12
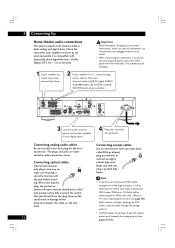
Check the manual for the best connection. When inserting the plug, the protective shutter will open and you should hear it click into a standard AC wall outlet. Be ...
Check the manual for the best connection. When inserting the plug, the protective shutter will open and you should hear it click into a standard AC wall outlet. Be ...
DV7600 User Manual
Page 16
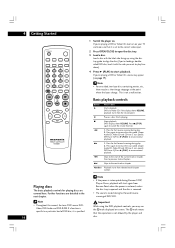
.... Press for fast forward scanning during fast forward/reverse scanning of DVD/VCD. Press again to resume normal playback. ¡ 1. Note Important • Throughout this manual, the term 'DVD' means DVDVideo, DVD-Audio and DVD-R/RW. Load a disc with the label side facing up, using the DVD playback controls, you want...
.... Press for fast forward scanning during fast forward/reverse scanning of DVD/VCD. Press again to resume normal playback. ¡ 1. Note Important • Throughout this manual, the term 'DVD' means DVDVideo, DVD-Audio and DVD-R/RW. Load a disc with the label side facing up, using the DVD playback controls, you want...
DV7600 User Manual
Page 32
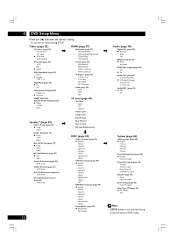
... Audio (page 38) Auto PCM OFF SCART Video Out (Europe Model Only)(page 36) Video S-Video RGB SP Level (page 44) Test Tone* Auto Off Manual Front L Level Center Level Front R Level Speaker* (page 43) Front L/R Size (page 43) \ Large Small Rear RS Level Rear LS Level LFE (Sub Woofer) Level...
... Audio (page 38) Auto PCM OFF SCART Video Out (Europe Model Only)(page 36) Video S-Video RGB SP Level (page 44) Test Tone* Auto Off Manual Front L Level Center Level Front R Level Speaker* (page 43) Front L/R Size (page 43) \ Large Small Rear RS Level Rear LS Level LFE (Sub Woofer) Level...
DV7600 User Manual
Page 33
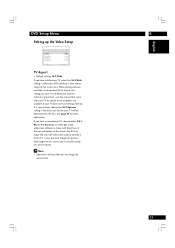
... will be determined by the disc. Pan & Scan chops the sides off widescreen material to change the aspect ratio. 33 The picture you see the manual that came with black bars at the top and bottom of the movie). See page 34 for details on what options are available. When playing...
... will be determined by the disc. Pan & Scan chops the sides off widescreen material to change the aspect ratio. 33 The picture you see the manual that came with black bars at the top and bottom of the movie). See page 34 for details on what options are available. When playing...

DV7600 User Manual
Page 36
...about this setting with progressive scan. Compatible with your TV doesn't have progressive scan component video inputs. Check the TV's instruction manual if you are only applicable if you connected the COMPONENT VIDEO OUT to 16:9 Squeeze. If your TV, the TV may cause... Video - Important If you are fully compatible with a progressive scan signal and choose one of stable, flickerfree images. Check the TV's instruction manual if you make a setting here that have settings to change the TV setting to a standard interlaced TV picture, a progressive scan TV is ...
...about this setting with progressive scan. Compatible with your TV doesn't have progressive scan component video inputs. Check the TV's instruction manual if you are only applicable if you connected the COMPONENT VIDEO OUT to 16:9 Squeeze. If your TV, the TV may cause... Video - Important If you are fully compatible with a progressive scan signal and choose one of stable, flickerfree images. Check the TV's instruction manual if you make a setting here that have settings to change the TV setting to a standard interlaced TV picture, a progressive scan TV is ...
DV7600 User Manual
Page 37
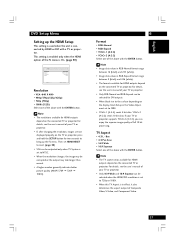
...Normal • RGB-Expand • YCbCr-1 (4:4:4) • YCbCr-2 (4:2:2) Select one of Composite Video, S-Video, and Component Video. 37 For details, see the user's manual of the above with the ENTER button. TV Aspect • 4:3 L - YCbCr-2 (4:2:2) sends 10 bit data. If your TV or projector. • If, after ...or projector, press and hold the SETUP button for HDMI outputs depend on the connected TV or projector. For details, see the user's manual of your TV or projector. • Only 16:9 Wide and 16:9 Squeeze can enjoy the superior image quality of the above with ...
...Normal • RGB-Expand • YCbCr-1 (4:4:4) • YCbCr-2 (4:2:2) Select one of Composite Video, S-Video, and Component Video. 37 For details, see the user's manual of the above with the ENTER button. TV Aspect • 4:3 L - YCbCr-2 (4:2:2) sends 10 bit data. If your TV or projector. • If, after ...or projector, press and hold the SETUP button for HDMI outputs depend on the connected TV or projector. For details, see the user's manual of your TV or projector. • Only 16:9 Wide and 16:9 Squeeze can enjoy the superior image quality of the above with ...

DV7600 User Manual
Page 39
... Audio CD will not output digital sound. • If you set it to PCM (MPEG audio is converted to more compatible PCM audio). Check the manual that came with the other connected component) is Dolby Digital compatible, and has a built in DTS decorder set to Bitstream, otherwise set this system to... as per the HDMI menu Audio setting, and PCM Down Sample is compatible with the other component if you connected this to Off. Check the manual that you 're unsure whether it is MPEG audio compatible. 39 If at any time you need to make Digital Out, MPEG Out and PCM...
... Audio CD will not output digital sound. • If you set it to PCM (MPEG audio is converted to more compatible PCM audio). Check the manual that came with the other connected component) is Dolby Digital compatible, and has a built in DTS decorder set to Bitstream, otherwise set this system to... as per the HDMI menu Audio setting, and PCM Down Sample is compatible with the other component if you connected this to Off. Check the manual that you 're unsure whether it is MPEG audio compatible. 39 If at any time you need to make Digital Out, MPEG Out and PCM...
DV7600 User Manual
Page 40
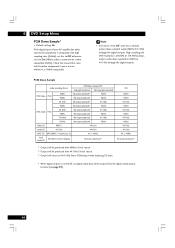
...*3 *1: Output will be produced from 48kHz/16-bit source. *2: Output will be produced from the digital audio output terminal (see page 39). 40 Check the manual that came with high sampling rates (96kHz), set this to Off, otherwise set to Off, some discs will only output down sampled to a more compatible...
...*3 *1: Output will be produced from 48kHz/16-bit source. *2: Output will be produced from the digital audio output terminal (see page 39). 40 Check the manual that came with high sampling rates (96kHz), set this to Off, otherwise set to Off, some discs will only output down sampled to a more compatible...
DV7600 User Manual
Page 44
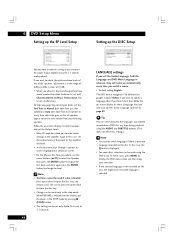
... setting: English The DVD format recognizes 136 different languages. To help you want to refer to the Language code list on -screen. • For the Manual Test Tone procedure, use the cursor buttons (5/∞) to select the Speaker, then press the ENTER button to output the test tone, and once again... the ENTER button to 2 Channel (Stereo, Lt/Rt) or TruSurround. In this case, the mark is selected. In this case, set the Test Tone to Manual (test tone from just that all speakers appear to be the same volume from your selection. • If the selected language is not recorded on...
... setting: English The DVD format recognizes 136 different languages. To help you want to refer to the Language code list on -screen. • For the Manual Test Tone procedure, use the cursor buttons (5/∞) to select the Speaker, then press the ENTER button to output the test tone, and once again... the ENTER button to 2 Channel (Stereo, Lt/Rt) or TruSurround. In this case, the mark is selected. In this case, set the Test Tone to Manual (test tone from just that all speakers appear to be the same volume from your selection. • If the selected language is not recorded on...
DV7600 User Manual
Page 52
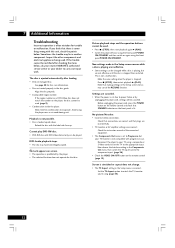
...press the POWER button on the remote control and check that STANDBY indicator on again using the front panel POWER ON/STANDBY. Check the instruction manual of the connected equipment. • The Components Out menu is set the TV to evaporate. See page 48 for condensation to the appropriate input...• When the power is cut due to your TV/monitor is not compatible with this unit, check the points below , ask your nearest MARANTZ authorized service center or your dealer to Progressive but are correct and that making settings in the disc guide. No picture/No color. • ...
...press the POWER button on the remote control and check that STANDBY indicator on again using the front panel POWER ON/STANDBY. Check the instruction manual of the connected equipment. • The Components Out menu is set the TV to evaporate. See page 48 for condensation to the appropriate input...• When the power is cut due to your TV/monitor is not compatible with this unit, check the points below , ask your nearest MARANTZ authorized service center or your dealer to Progressive but are correct and that making settings in the disc guide. No picture/No color. • ...
DV7600 User Manual
Page 55
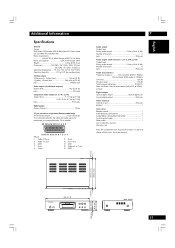
... for connection to 88kHz (DVD-Audio fs: 192kHz) S/N ratio 125 dB Dynamic range 110 dB Total harmonic distortion 0.0012 % Wow and flutter: Limit of this manual) Warranty card Note: The specifications and design of measurement (±0.001% W.
... for connection to 88kHz (DVD-Audio fs: 192kHz) S/N ratio 125 dB Dynamic range 110 dB Total harmonic distortion 0.0012 % Wow and flutter: Limit of this manual) Warranty card Note: The specifications and design of measurement (±0.001% W.

