

DR6000 SPEC SHEET
Page 1
...; www.marantz.com the DR-6000 and DR-6050 finalize a disc in the second tray. buffer memory 3 sec more than 1 track Inputs Analog input Digital inputs 1 2-1 coax, 1 optical Outputs Analog output Digital outputs fixed x 1 2-1 coax, 1 optical General Power requirements: 120 V, 60 Hz, 15 W Dimensions H x W x D: 37/16" x 173/8" x 123/16" 86mm x 440mm x 308mm Weight: 11 lbs. 5 kg DR-6050 Specifications Audio Section Frequency range Dynamic range Signal to disc. Both decks also copy and display CD...
...; www.marantz.com the DR-6000 and DR-6050 finalize a disc in the second tray. buffer memory 3 sec more than 1 track Inputs Analog input Digital inputs 1 2-1 coax, 1 optical Outputs Analog output Digital outputs fixed x 1 2-1 coax, 1 optical General Power requirements: 120 V, 60 Hz, 15 W Dimensions H x W x D: 37/16" x 173/8" x 123/16" 86mm x 440mm x 308mm Weight: 11 lbs. 5 kg DR-6050 Specifications Audio Section Frequency range Dynamic range Signal to disc. Both decks also copy and display CD...

DR6000 USER'S MANUAL
Page 3
... check the contents of the recorder for professional recordings) is forbidden to play the finalized CD-R(W) discs because of the low reflectivity of laser light. Setup - Only authorized technicians are suitable for 'DIGITAL AUDIO' can be used to copy material protected by the following locations: - The discs used or operated in exposure to record must bear the logos shown below . Recording on...
... check the contents of the recorder for professional recordings) is forbidden to play the finalized CD-R(W) discs because of the low reflectivity of laser light. Setup - Only authorized technicians are suitable for 'DIGITAL AUDIO' can be used to copy material protected by the following locations: - The discs used or operated in exposure to record must bear the logos shown below . Recording on...
DR6000 USER'S MANUAL
Page 5
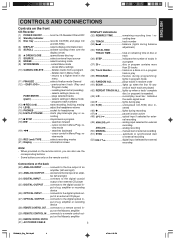
... external CD player (27) OPTICAL OUTPUT ........ review mode (20) REC (ord) TYPE selects recording modes (21) Display information screen DISPLAY indications (32) REM/REC TIME remaining recording time / recording time (33) TRACK track number (34) balance (lights during balance adjustment) (35) TOTAL REM TRACK TIME total or remaining time of disc or track (36) STEP indicates the number of an external CD player (25) DIGITAL OUTPUT ......... When provided on the Marantz amplifier (30) REMOTE CONTROL SWITCH (31) AC POWER CABLE 3 DR6000(U)_Eng_P01-10...
... external CD player (27) OPTICAL OUTPUT ........ review mode (20) REC (ord) TYPE selects recording modes (21) Display information screen DISPLAY indications (32) REM/REC TIME remaining recording time / recording time (33) TRACK track number (34) balance (lights during balance adjustment) (35) TOTAL REM TRACK TIME total or remaining time of disc or track (36) STEP indicates the number of an external CD player (25) DIGITAL OUTPUT ......... When provided on the Marantz amplifier (30) REMOTE CONTROL SWITCH (31) AC POWER CABLE 3 DR6000(U)_Eng_P01-10...

DR6000 USER'S MANUAL
Page 6
.... (ement) .. selects a track by number - stores Menu settings (65) ENTER selects settings in Menu mode - deletes text in Menu mode - cursor control in Menu/Prog. review mode (63 interrupts CD-R(W) play (61) S previous track (Play and Pro- gram mode) (62) Q searches backward - starts playback of each track (56) REPEAT repeat play(All, program or track) (57) Number/alphabet keys 0 - 9 .. - cursor control in Menu/Prog. ENGLISH REMOTE CONTROL Remote control commands (53) STANDBY switches to a higher level in the menu (67) R searches...
.... (ement) .. selects a track by number - stores Menu settings (65) ENTER selects settings in Menu mode - deletes text in Menu mode - cursor control in Menu/Prog. review mode (63 interrupts CD-R(W) play (61) S previous track (Play and Pro- gram mode) (62) Q searches backward - starts playback of each track (56) REPEAT repeat play(All, program or track) (57) Number/alphabet keys 0 - 9 .. - cursor control in Menu/Prog. ENGLISH REMOTE CONTROL Remote control commands (53) STANDBY switches to a higher level in the menu (67) R searches...
DR6000 USER'S MANUAL
Page 7
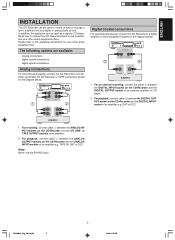
..., connect cable 1 between the DIGITAL OUTPUT-socket on the diagram below: 1 POWER ON/OFF CD RECORDER DR6000 Recordable ReWritable OPEN/CLOSE DISPLAY SCROLLPE SOURCE REC TYPE REW FF STOP PLAY/PAUSE ERASE STORE MENU CANCEL DELETE FINALIZE EASY JOG PUSH ENTER REC LEVEL - + PHONES ANALOG IN/OUT L INPUT R OUTPUT 2 L L R OUTPUT R INPUT Amplifier Digital Coaxial connections For recording and playing, connect the CD-Recorder to the operating instructions for your other audio equipment offers. Note: Never use the PHONO input. digital optical connections Analog...
..., connect cable 1 between the DIGITAL OUTPUT-socket on the diagram below: 1 POWER ON/OFF CD RECORDER DR6000 Recordable ReWritable OPEN/CLOSE DISPLAY SCROLLPE SOURCE REC TYPE REW FF STOP PLAY/PAUSE ERASE STORE MENU CANCEL DELETE FINALIZE EASY JOG PUSH ENTER REC LEVEL - + PHONES ANALOG IN/OUT L INPUT R OUTPUT 2 L L R OUTPUT R INPUT Amplifier Digital Coaxial connections For recording and playing, connect the CD-Recorder to the operating instructions for your other audio equipment offers. Note: Never use the PHONO input. digital optical connections Analog...
DR6000 USER'S MANUAL
Page 8
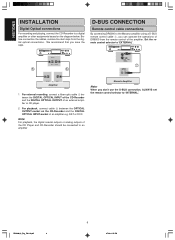
We recommend that you can operate the operations of DR6000 from the digital optical connections. POWER ON/OFF CD RECORDER DR6000 Recordable ReWritable OPEN/CLOSE DISPLAY SCROLLPE SOURCE REC TYPE REW FF STOP PLAY/PAUSE ERASE STORE MENU CANCEL DELETE FINALIZE EASY JOG PUSH ENTER REC LEVEL - + PHONES OPTICAL INPUT OUTPUT 5 6 D-BUS CONNECTION Remote control cable connections By connecting DR6000 to the Marantz amplifier using a D-BUS remote control cable 7, you save the caps. Set the remote control selector to 'INTERNAL'. DAT or DCC...
We recommend that you can operate the operations of DR6000 from the digital optical connections. POWER ON/OFF CD RECORDER DR6000 Recordable ReWritable OPEN/CLOSE DISPLAY SCROLLPE SOURCE REC TYPE REW FF STOP PLAY/PAUSE ERASE STORE MENU CANCEL DELETE FINALIZE EASY JOG PUSH ENTER REC LEVEL - + PHONES OPTICAL INPUT OUTPUT 5 6 D-BUS CONNECTION Remote control cable connections By connecting DR6000 to the Marantz amplifier using a D-BUS remote control cable 7, you save the caps. Set the remote control selector to 'INTERNAL'. DAT or DCC...
DR6000 USER'S MANUAL
Page 9
... the POWER ON/OFF (1) button on or off. Note: - Switching ON and OFF 1 Connect the power cord into the mains. Note: - This remote control can take up , followed by . If a non-audio disc is available the TITLE/ARTIST will calibrate the disc for optimum recording. Always point the remote control directly towards the recorder and make sure there. DR6000(U)_Eng_P01-10.p65 7 7 8/7/00, 1:35 PM lights...
... the POWER ON/OFF (1) button on or off. Note: - Switching ON and OFF 1 Connect the power cord into the mains. Note: - This remote control can take up , followed by . If a non-audio disc is available the TITLE/ARTIST will calibrate the disc for optimum recording. Always point the remote control directly towards the recorder and make sure there. DR6000(U)_Eng_P01-10.p65 7 7 8/7/00, 1:35 PM lights...

DR6000 USER'S MANUAL
Page 10
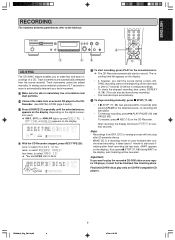
... not be changed and be recorded. - Recording is unlimited. to the music as same as HDCD or DTS, you copy a special disc such as original. plete disc or a program simply by pressing the REC key. - - ENGLISH RECORDING The numbers between parentheses refer to • set the sampling frequency at 0 dB. - cording can be able to listen to make a digital copy from...
... not be changed and be recorded. - Recording is unlimited. to the music as same as HDCD or DTS, you copy a special disc such as original. plete disc or a program simply by pressing the REC key. - - ENGLISH RECORDING The numbers between parentheses refer to • set the sampling frequency at 0 dB. - cording can be able to listen to make a digital copy from...
DR6000 USER'S MANUAL
Page 11
... increment. 1 Make sure the disc is a recording mode for sev- PAUSE (63). ENGLISH RECORDING The numbers between parentheses refer to select ' '; Recorder. (see INSTALLATION page 5 and 6.) 3 Press SOURCE (7) repeatedly until the selected source, appears on the display (depending on any regular CD player, it must first be added manually. and start auto finalizing after pressing PLAY on the display, auto finalizing will be done during...
... increment. 1 Make sure the disc is a recording mode for sev- PAUSE (63). ENGLISH RECORDING The numbers between parentheses refer to select ' '; Recorder. (see INSTALLATION page 5 and 6.) 3 Press SOURCE (7) repeatedly until the selected source, appears on the display (depending on any regular CD player, it must first be added manually. and start auto finalizing after pressing PLAY on the display, auto finalizing will be done during...
DR6000 USER'S MANUAL
Page 12
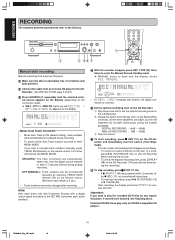
... Consumer Sources with a digital output signal according to the IEC 958 (consumer part) audio standard. 4 With the recorder stopped, press REC TYPE (20) three times to the fold-out. Important: If you wish to the CD- DR6000(U)_Eng_P01-10.p65 10 10 8/7/00, 1:35 PM Recorder. (see MENU MODE. For further instructions see INSTALLATION page 5 and 6.) 3 Press SOURCE (7) repeatedly until , on the remote control. corder...
... Consumer Sources with a digital output signal according to the IEC 958 (consumer part) audio standard. 4 With the recorder stopped, press REC TYPE (20) three times to the fold-out. Important: If you wish to the CD- DR6000(U)_Eng_P01-10.p65 10 10 8/7/00, 1:35 PM Recorder. (see MENU MODE. For further instructions see INSTALLATION page 5 and 6.) 3 Press SOURCE (7) repeatedly until , on the remote control. corder...
DR6000 USER'S MANUAL
Page 13
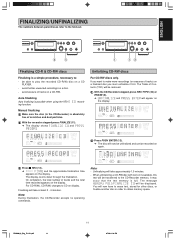
...-RW. Auto finalizing Auto finalizing is full. On completion, the total number of tracks on a CD PLAYER. - Finalizing will take at least 2 - 4 minutes. It may occur that the text memory is possible when using the ing function. OPEN/CLOSE DISPLAY SCROLL SOURCE REC TYPE REW FF STOP PLAY/PAUSE ERASE STORE MENU CANCEL DELETE FINALIZE EASY JOG PUSH ENTER REC LEVEL...
...-RW. Auto finalizing Auto finalizing is full. On completion, the total number of tracks on a CD PLAYER. - Finalizing will take at least 2 - 4 minutes. It may occur that the text memory is possible when using the ing function. OPEN/CLOSE DISPLAY SCROLL SOURCE REC TYPE REW FF STOP PLAY/PAUSE ERASE STORE MENU CANCEL DELETE FINALIZE EASY JOG PUSH ENTER REC LEVEL...
DR6000 USER'S MANUAL
Page 15
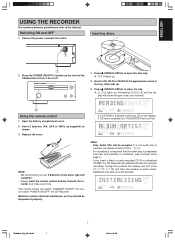
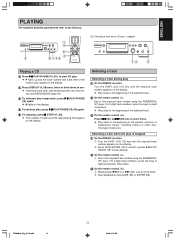
... MENU MODE page 16). 3 To interrupt play temporarily, press 2/; Play starts. 3 On the remote control . lights on the display. 4 To continue play 1 On the DR6000 recorder. Play skips to start CD play. 2 lights up and the track number and track time of the track in play appear on the display. 2 Press DISPLAY (4, 58) once, twice or three times to confirm or press 2/; PLAY/ PAUSE (16) to the beginning of the selected...
... MENU MODE page 16). 3 To interrupt play temporarily, press 2/; Play starts. 3 On the remote control . lights on the display. 4 To continue play 1 On the DR6000 recorder. Play skips to start CD play. 2 lights up and the track number and track time of the track in play appear on the display. 2 Press DISPLAY (4, 58) once, twice or three times to confirm or press 2/; PLAY/ PAUSE (16) to the beginning of the selected...

DR6000 USER'S MANUAL
Page 16
... TRACK lights up , the disc or program plays repeatedly. 2 To return to within the track being played at the time. When REPEAT ALL lights up , the current track plays repeatedly. RANDOM ABC 1 JKL 4 RST 7 DISPLAY CDR DEF 2 MN 5 UVW 8 SPACE 0 FUNCTION GHI 3 OPQ 6 XYZ 9 SCROLL CD MENU/ STORE ENTER CANCEL/ DELETE REMOTE CONTROLLER RC6050DR Scan play 1 To start random play q w TRACK INCR. The SCAN level disappears...
... TRACK lights up , the disc or program plays repeatedly. 2 To return to within the track being played at the time. When REPEAT ALL lights up , the current track plays repeatedly. RANDOM ABC 1 JKL 4 RST 7 DISPLAY CDR DEF 2 MN 5 UVW 8 SPACE 0 FUNCTION GHI 3 OPQ 6 XYZ 9 SCROLL CD MENU/ STORE ENTER CANCEL/ DELETE REMOTE CONTROLLER RC6050DR Scan play 1 To start random play q w TRACK INCR. The SCAN level disappears...

DR6000 USER'S MANUAL
Page 17
... fold-out. ENGLISH PROGRAMMING The numbers between parentheses refer to start programmed play. Programmed play • You can be programmed more than once, but each time counts as a track. (step) Programming for all tracks to be shown on the remote control to clear the program. PROGRAM disappears from a program 1 In Stop mode press PROG (72) on the display. 2 Select the required track numbers by turning the EASY JOG (12...
... fold-out. ENGLISH PROGRAMMING The numbers between parentheses refer to start programmed play. Programmed play • You can be programmed more than once, but each time counts as a track. (step) Programming for all tracks to be shown on the remote control to clear the program. PROGRAM disappears from a program 1 In Stop mode press PROG (72) on the display. 2 Select the required track numbers by turning the EASY JOG (12...
DR6000 USER'S MANUAL
Page 18
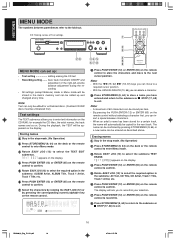
... submenus allows you can set up and changed at any time. ENGLISH MENU MODE The numbers between characters. - for the next track. Note: - EX: Storing names of Text settings POWER ON/OFF CD RECORDER DR6000 Recordable ReWritable OPEN/CLOSE DISPLAY SCROLL SOURCE REC TYPE REW FF STOP PLAY/PAUSE ERASE STORE MENU CANCEL DELETE FINALIZE EASY JOG PUSH ENTER REC LEVEL - + PHONES wo ert...
... submenus allows you can set up and changed at any time. ENGLISH MENU MODE The numbers between characters. - for the next track. Note: - EX: Storing names of Text settings POWER ON/OFF CD RECORDER DR6000 Recordable ReWritable OPEN/CLOSE DISPLAY SCROLL SOURCE REC TYPE REW FF STOP PLAY/PAUSE ERASE STORE MENU CANCEL DELETE FINALIZE EASY JOG PUSH ENTER REC LEVEL - + PHONES wo ert...

DR6000 USER'S MANUAL
Page 19
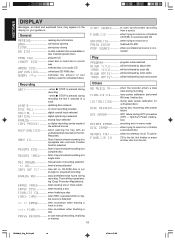
... MENU MODE The numbers between parentheses refer to select the AUTO TRACK submenu. Recording settings • When Auto Track is ON, track numbers will be increase during the recording. • You can adjust the right and left volume balance during recording. • When is selected, track numbers will automatically be automati- Auto track increment 1 Stay in the stop mode. (No Operation) 2 Press STORE/MENU (9, 64) on the remote control...
... MENU MODE The numbers between parentheses refer to select the AUTO TRACK submenu. Recording settings • When Auto Track is ON, track numbers will be increase during the recording. • You can adjust the right and left volume balance during recording. • When is selected, track numbers will automatically be automati- Auto track increment 1 Stay in the stop mode. (No Operation) 2 Press STORE/MENU (9, 64) on the remote control...
DR6000 USER'S MANUAL
Page 20
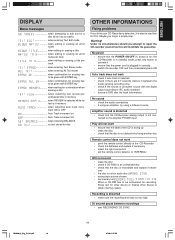
...coaxial input selected digital optical input selected analog input selected ........... ENGLISH DISPLAY Messages, as listed and explained here, may appear on the display for unfinalized discs ........... during OPC procedure (OPC = Optimum Power Calibration) ........... no disc inserted, disc unreadable or disc inserted upside down program full insert disc or insert disc in the CDRecorder) Start of synchronised recording of a cpomplete disc and Auto Finalize function selected Start of synchronised recording of the external source ........... recording error in menu...
...coaxial input selected digital optical input selected analog input selected ........... ENGLISH DISPLAY Messages, as listed and explained here, may appear on the display for unfinalized discs ........... during OPC procedure (OPC = Optimum Power Calibration) ........... no disc inserted, disc unreadable or disc inserted upside down program full insert disc or insert disc in the CDRecorder) Start of synchronised recording of a cpomplete disc and Auto Finalize function selected Start of synchronised recording of the external source ........... recording error in menu...
DR6000 USER'S MANUAL
Page 21
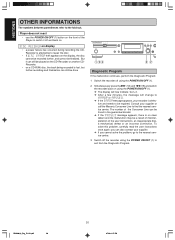
... audio standard • source is DVD disc (no track information) No sound • check the audio connections • if using an amplifier, try using a different source Amplifier sound is distorted • check that the CD-Recorder analog output is in memory when selecting auto track incre- Erase text for other disc(s) or finalise other disc(s) to activate it is not an audio disc ( ) • wrong input source chosen. • text memory full ( / ). ENGLISH DISPLAY Menu...
... audio standard • source is DVD disc (no track information) No sound • check the audio connections • if using an amplifier, try using a different source Amplifier sound is distorted • check that the CD-Recorder analog output is in memory when selecting auto track incre- Erase text for other disc(s) or finalise other disc(s) to activate it is not an audio disc ( ) • wrong input source chosen. • text memory full ( / ). ENGLISH DISPLAY Menu...
DR6000 USER'S MANUAL
Page 22
...on the display, the disc cannot be recorded further, and cannot be repaired. you cannot solve the problem, go to repair the disc • If then appears on a CD-R(W) disc, the track being recorded is defec- pretation of misinter- Player does not react • use the POWER ON/OFF (1) button on ...finalisation can be played on the front of the Player to switch it can also contact your supplier or call the Marantz Consumer Line to the fold-out. The number of the Consumer Line can still be a result of the user instructions, an inappropriate disc, a mechanical defect...
...on the display, the disc cannot be recorded further, and cannot be repaired. you cannot solve the problem, go to repair the disc • If then appears on a CD-R(W) disc, the track being recorded is defec- pretation of misinter- Player does not react • use the POWER ON/OFF (1) button on ...finalisation can be played on the front of the Player to switch it can also contact your supplier or call the Marantz Consumer Line to the fold-out. The number of the Consumer Line can still be a result of the user instructions, an inappropriate disc, a mechanical defect...
DR6000 USER'S MANUAL
Page 24
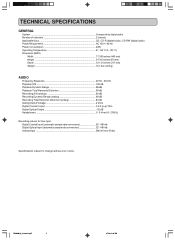
... Compact disc digital audio Number of channels 2 (stereo) Applicable discs CD, CD-R (digital audio), CD-RW (digital audio) Power Requirement AC 120 V 60 Hz Power Consumption 24W Operating Temperature 41 - 95 °F (5 - 35 °C) Dimension (MAX) Width 17-3/8 inches (440 mm) Height 3-7/16 inches (87 mm) Depth 12-1/2 inches (317 mm) Weight 10.1 lbs (4.6 Kg) AUDIO Frequency Response 20 Hz - 20 kHz Playback S/N 105 dB Playback Dynamic Range...
... Compact disc digital audio Number of channels 2 (stereo) Applicable discs CD, CD-R (digital audio), CD-RW (digital audio) Power Requirement AC 120 V 60 Hz Power Consumption 24W Operating Temperature 41 - 95 °F (5 - 35 °C) Dimension (MAX) Width 17-3/8 inches (440 mm) Height 3-7/16 inches (87 mm) Depth 12-1/2 inches (317 mm) Weight 10.1 lbs (4.6 Kg) AUDIO Frequency Response 20 Hz - 20 kHz Playback S/N 105 dB Playback Dynamic Range...


