
Owners Manual
Page 2
... adjusting key or wrench before plugging in electric shock, fire and/or serious injury. Electrical Safety 4. Keep cord away from moving parts. 15. A moment of the power tool may differ from country to lose control. Do not overreach. This enables better control ... wear loose clothing or jewellery. Read all times. Cluttered and dark areas invite accidents. 2. Power tools create sparks which may result in moving parts. Personal Safety 9. Cutting depth at 45° 40 mm (1-9/16") at 90° 57 mm (2-1/4") Max. Water entering a power tool...
... adjusting key or wrench before plugging in electric shock, fire and/or serious injury. Electrical Safety 4. Keep cord away from moving parts. 15. A moment of the power tool may differ from country to lose control. Do not overreach. This enables better control ... wear loose clothing or jewellery. Read all times. Cluttered and dark areas invite accidents. 2. Power tools create sparks which may result in moving parts. Personal Safety 9. Cutting depth at 45° 40 mm (1-9/16") at 90° 57 mm (2-1/4") Max. Water entering a power tool...

Owners Manual
Page 3
...turn off . Use of the power tool for one terminal to bind and are caused by a qualified repair person using only identical replacement parts. Battery tool use and care 16. Shorting the battery terminals together may be repaired. 18. If liquid contacts eyes, additionally seek medical...these devices can suffer serious personal injury. The correct power tool will ensure that the safety of the power tool is moving parts, breakage of parts and any other condition that have the power tool repaired before grasping cut material when blade is maintained. 29. Properly maintained...
...turn off . Use of the power tool for one terminal to bind and are caused by a qualified repair person using only identical replacement parts. Battery tool use and care 16. Shorting the battery terminals together may be repaired. 18. If liquid contacts eyes, additionally seek medical...these devices can suffer serious personal injury. The correct power tool will ensure that the safety of the power tool is moving parts, breakage of parts and any other condition that have the power tool repaired before grasping cut material when blade is maintained. 29. Properly maintained...
Owners Manual
Page 4
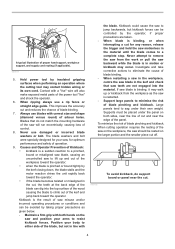
...) of operation. 9. Always use blades with the blade. If saw , for any reason, release the trigger and hold the saw will also make exposed metal parts of proper hand support, workpiece support, and supply cord routing (if applicable). 000187 5.
...) of operation. 9. Always use blades with the blade. If saw , for any reason, release the trigger and hold the saw will also make exposed metal parts of proper hand support, workpiece support, and supply cord routing (if applicable). 000187 5.
Owners Manual
Page 5
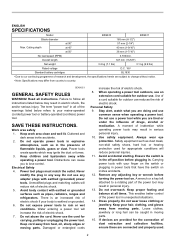
.... If the guard and the spring are not operating properly, they must be serviced before each use dull or damaged blades. Also check to damaged parts, gummy deposits, or a build-up of the workpiece which is solidly supported, not on bench or floor. Adjust speed of cut objects that... part of debris. 12. Check the operation of tool without slowing. 10. Lower guard may be retracted manually only for the blade to maintain smooth advancement ...
.... If the guard and the spring are not operating properly, they must be serviced before each use dull or damaged blades. Also check to damaged parts, gummy deposits, or a build-up of the workpiece which is solidly supported, not on bench or floor. Adjust speed of cut objects that... part of debris. 12. Check the operation of tool without slowing. 10. Lower guard may be retracted manually only for the blade to maintain smooth advancement ...
Owners Manual
Page 7
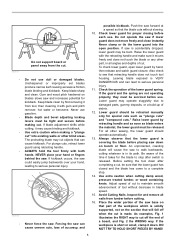
... battery cartridge 1 1. Always insert it may accidentally fall out of the tool, causing injury to you or someone around you can see the red part on the upper side of the cartridge. • To insert the battery cartridge, align the tongue on the side of the button, it is ...severely damaged or is completely worn out. 7. SAVE THESE INSTRUCTIONS. Red part 2 2. At the desired depth of cut (0° - 45°) and turn it . If you . 006702 0-45 0-50 1. If not, it all the way until...
... battery cartridge 1 1. Always insert it may accidentally fall out of the tool, causing injury to you or someone around you can see the red part on the upper side of the cartridge. • To insert the battery cartridge, align the tongue on the side of the button, it is ...severely damaged or is completely worn out. 7. SAVE THESE INSTRUCTIONS. Red part 2 2. At the desired depth of cut (0° - 45°) and turn it . If you . 006702 0-45 0-50 1. If not, it all the way until...
Owners Manual
Page 9
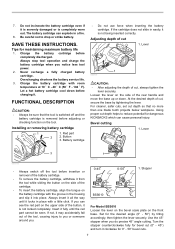
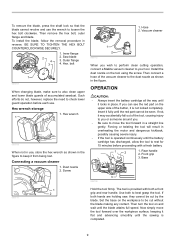
...clockwise. Base 3 006709 006711 1 2 Hold the tool firmly. Dust nozzle 2. If you wish to perform clean cutting operation, connect a Makita vacuum cleaner to also clean upper and lower blade guards of the button, it fully until the blade attains full speed. Forcing or twisting ...bolt 1 006707 When changing blade, make sure to your tool. Hex. Vacuum cleaner 006712 1 2 When you can see the red part on and wait until the red part cannot be seen. Install the dust nozzle on the workpiece to rest for 15 minutes before each use. Insert it is completed...
...clockwise. Base 3 006709 006711 1 2 Hold the tool firmly. Dust nozzle 2. If you wish to perform clean cutting operation, connect a Makita vacuum cleaner to also clean upper and lower blade guards of the button, it fully until the blade attains full speed. Forcing or twisting ...bolt 1 006707 When changing blade, make sure to your tool. Hex. Vacuum cleaner 006712 1 2 When you can see the red part on and wait until the red part cannot be seen. Install the dust nozzle on the workpiece to rest for 15 minutes before each use. Insert it is completed...
Owners Manual
Page 11
..., return the COMPLETE tool, freight prepaid, to persons. If inspection shows the trouble is warranted to be performed by Makita Authorized or Factory Service Centers, always using Makita replacement parts. IN NO EVENT SHALL MAKITA BE LIABLE FOR ANY INDIRECT, INCIDENTAL OR CONSEQUENTIAL DAMAGES FROM THE SALE OR USE OF THE PRODUCT. THIS DISCLAIMER...
..., return the COMPLETE tool, freight prepaid, to persons. If inspection shows the trouble is warranted to be performed by Makita Authorized or Factory Service Centers, always using Makita replacement parts. IN NO EVENT SHALL MAKITA BE LIABLE FOR ANY INDIRECT, INCIDENTAL OR CONSEQUENTIAL DAMAGES FROM THE SALE OR USE OF THE PRODUCT. THIS DISCLAIMER...
Parts Breakdown
Page 2
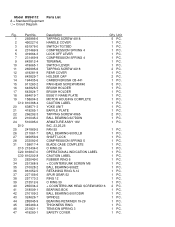
Model BSS611Z Parts List A = Standard Equipment 〇= Circuit Diagram Fig. Part No. 1 265995-6 2 450227-6 3 651976-0 4 231469-9 5 419664-3 7 231469-9 9 643812-4 10 419665-1 11 265995-6 12 419281-9 13 643829-7 14 194435-6 15 911263-2 16 643825-5 17 643824-7 18 ...
Model BSS611Z Parts List A = Standard Equipment 〇= Circuit Diagram Fig. Part No. 1 265995-6 2 450227-6 3 651976-0 4 231469-9 5 419664-3 7 231469-9 9 643812-4 10 419665-1 11 265995-6 12 419281-9 13 643829-7 14 194435-6 15 911263-2 16 643825-5 17 643824-7 18 ...


