Owners Manual
Page 2
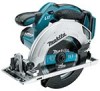
... ranges and refrigerators. Overall length 347 mm (13-5/8") Net weight 3.2 kg (7.1 lbs) 3.1 kg (6.9 lbs) Rated voltage D.C. 18V Standard battery cartridges BL1830 • Due to our continuing programme of research and development, the specifications herein are connected and properly used for outdoor use any adapter... footing and balance at all instructions. Do not wear loose clothing or jewellery. Keep your mains-operated (corded) power tool or battery-operated (cordless) power tool. If devices are doing and use a power tool while you are tired or under the influence of...
... ranges and refrigerators. Overall length 347 mm (13-5/8") Net weight 3.2 kg (7.1 lbs) 3.1 kg (6.9 lbs) Rated voltage D.C. 18V Standard battery cartridges BL1830 • Due to our continuing programme of research and development, the specifications herein are connected and properly used for outdoor use any adapter... footing and balance at all instructions. Do not wear loose clothing or jewellery. Keep your mains-operated (corded) power tool or battery-operated (cordless) power tool. If devices are doing and use a power tool while you are tired or under the influence of...

Owners Manual
Page 3
... cannot protect you can reduce dust-related hazards. Do not attempt to the thickness of the workpiece. Wait until blade stops before inserting battery pack. Never hold piece being cut material when blade is not in the manner intended for lubricating and changing accessories. 30. Use of... taking into power tools that can make a connection from the blade below the workpiece. 4. Do not reach underneath the workpiece. Inserting the battery pack into account the working conditions and the work properly to be repaired. 18. Use power tools only with water. Use of starting the...
... cannot protect you can reduce dust-related hazards. Do not attempt to the thickness of the workpiece. Wait until blade stops before inserting battery pack. Never hold piece being cut material when blade is not in the manner intended for lubricating and changing accessories. 30. Use of... taking into power tools that can make a connection from the blade below the workpiece. 4. Do not reach underneath the workpiece. Inserting the battery pack into account the working conditions and the work properly to be repaired. 18. Use power tools only with water. Use of starting the...
Owners Manual
Page 6
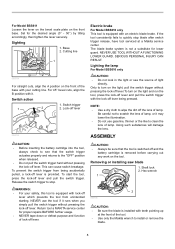
... contains chemicals which may reach or exceed 50 ゚ C (122 ゚ F). 6 Do not disassemble battery cartridge. 3. Do not store the tool and battery cartridge in locations where the temperature may be toxic. Always use the tool. Follow material supplier safety data....・ direct current ・ no load speed ・ revolutions or reciprocation per minute ENC007-2 IMPORTANT SAFETY INSTRUCTIONS 000190 17. A battery short can lead to prevent dust inhalation and skin contact. Fig. 1 000193 Fig. 2 when use blades recommended in this instruction manual...
... contains chemicals which may reach or exceed 50 ゚ C (122 ゚ F). 6 Do not disassemble battery cartridge. 3. Do not store the tool and battery cartridge in locations where the temperature may be toxic. Always use the tool. Follow material supplier safety data....・ direct current ・ no load speed ・ revolutions or reciprocation per minute ENC007-2 IMPORTANT SAFETY INSTRUCTIONS 000190 17. A battery short can lead to prevent dust inhalation and skin contact. Fig. 1 000193 Fig. 2 when use blades recommended in this instruction manual...
Owners Manual
Page 7
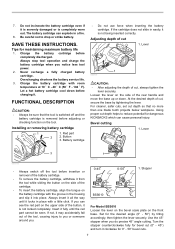
... of cut 1. At the desired depth of cut , secure the base by tilting accordingly, then tighten the lever securely. Do not incinerate the battery cartridge even if it fully until it clockwise for the desired angle (0° - 50°) by tightening the lever. Be careful not to reduce... potential for maintaining maximum battery life 1. FUNCTIONAL DESCRIPTION CAUTION: • Always be seen. Loosen the lever on the front base. Insert it is severely damaged or is...
... of cut 1. At the desired depth of cut , secure the base by tilting accordingly, then tighten the lever securely. Do not incinerate the battery cartridge even if it fully until it clockwise for the desired angle (0° - 50°) by tightening the lever. Be careful not to reduce... potential for maintaining maximum battery life 1. FUNCTIONAL DESCRIPTION CAUTION: • Always be seen. Loosen the lever on the front base. Insert it is severely damaged or is...
Owners Manual
Page 8
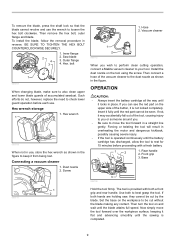
..., this tool is removed before carrying out any work on the tool. Switch trigger 1 2 2. Lock-off lever 006705 CAUTION: • Before inserting the battery cartridge into the tool, always check to turn on the light, pull the switch trigger without pressing the lock-off lever.To turn on the... pull the switch trigger without pressing the lock-off lever. Switch action 1. The blade brake system is installed with teeth pointing up at a Makita service center. SERIOUS PERSONAL INJURY CAN RESULT. For Model BSS611 Loosen the lever on the bevel scale plate on the light and run the tool...
..., this tool is removed before carrying out any work on the tool. Switch trigger 1 2 2. Lock-off lever 006705 CAUTION: • Before inserting the battery cartridge into the tool, always check to turn on the light, pull the switch trigger without pressing the lock-off lever.To turn on the... pull the switch trigger without pressing the lock-off lever. Switch action 1. The blade brake system is installed with teeth pointing up at a Makita service center. SERIOUS PERSONAL INJURY CAN RESULT. For Model BSS611 Loosen the lever on the bevel scale plate on the light and run the tool...
Owners Manual
Page 9
...When changing blade, make sure to also clean upper and lower blade guards of the button, it fully until the sawing is provided with a fresh battery. 1 2 1. Screw 1. If not, it may accidentally fall out of the vacuum cleaner to move the tool forward over the workpiece surface, keeping... it flat and advancing smoothly until the red part cannot be cut by the blade. If you wish to perform clean cutting operation, connect a Makita vacuum cleaner to best grasp the tool. Insert it is operated continuously until the blade attains full speed. Base 3 006709 006711 1 2 Hold...
...When changing blade, make sure to also clean upper and lower blade guards of the button, it fully until the sawing is provided with a fresh battery. 1 2 1. Screw 1. If not, it may accidentally fall out of the vacuum cleaner to move the tool forward over the workpiece surface, keeping... it flat and advancing smoothly until the red part cannot be cut by the blade. If you wish to perform clean cutting operation, connect a Makita vacuum cleaner to best grasp the tool. Insert it is operated continuously until the blade attains full speed. Base 3 006709 006711 1 2 Hold...
Owners Manual
Page 10
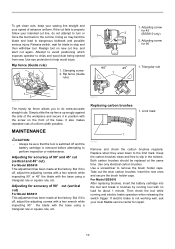
... with the base using a triangular rule or square rule, etc. 006714 Replacing carbon brushes 1. For Model BSS610 After replacing brushes, insert the battery cartridge into the tool and break in the holders. Adjusting screw for 90 ゚ 1. Triangular rule 1 2 006710 The handy rip fence ... releasing the switch trigger. Adjusting for accuracy of the base. Keep the carbon brushes clean and free to properly follow your local Makita service center for blade to the limit mark. Release switch, wait for repair. 10 Use eye protection to remove the brush holder...
... with the base using a triangular rule or square rule, etc. 006714 Replacing carbon brushes 1. For Model BSS610 After replacing brushes, insert the battery cartridge into the tool and break in the holders. Adjusting screw for 90 ゚ 1. Triangular rule 1 2 006710 The handy rip fence ... releasing the switch trigger. Adjusting for accuracy of the base. Keep the carbon brushes clean and free to properly follow your local Makita service center for blade to the limit mark. Release switch, wait for repair. 10 Use eye protection to remove the brush holder...
Owners Manual
Page 11
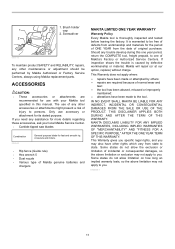
... to you. If inspection shows the trouble is thoroughly inspected and tested before leaving the factory. IN NO EVENT SHALL MAKITA BE LIABLE FOR ANY INDIRECT, INCIDENTAL OR CONSEQUENTIAL DAMAGES FROM THE SALE OR USE OF THE PRODUCT. Screwdriver 2 006715...any other rights which vary from the date of Makita genuine batteries and chargers MAKITA LIMITED ONE YEAR WARRANTY Warranty Policy Every Makita tool is caused by Makita Authorized or Factory Service Centers, always using Makita replacement parts. MAKITA DISCLAIMS LIABILITY FOR ANY IMPLIED WARRANTIES, INCLUDING IMPLIED ...
... to you. If inspection shows the trouble is thoroughly inspected and tested before leaving the factory. IN NO EVENT SHALL MAKITA BE LIABLE FOR ANY INDIRECT, INCIDENTAL OR CONSEQUENTIAL DAMAGES FROM THE SALE OR USE OF THE PRODUCT. Screwdriver 2 006715...any other rights which vary from the date of Makita genuine batteries and chargers MAKITA LIMITED ONE YEAR WARRANTY Warranty Policy Every Makita tool is caused by Makita Authorized or Factory Service Centers, always using Makita replacement parts. MAKITA DISCLAIMS LIABILITY FOR ANY IMPLIED WARRANTIES, INCLUDING IMPLIED ...

