
User manual, English (US)
Page 5
... detergent, abrasive cleaning agents or antistatic spray intended for any purpose without the express written consent of Funai. Dolby Digital Recording "Dolby® Digital Recording enables consumers to the surfaces of the discs. • Always store the disc in its intellectual property rights to a...Funai. If a video head cleaner does not solve the problem, please consult your unit may become blurred or interrupted while the TV program reception is strictly prohibited. There are trademarks or registered trademarks of cellular phone): Direct a digital camera to read the ...
... detergent, abrasive cleaning agents or antistatic spray intended for any purpose without the express written consent of Funai. Dolby Digital Recording "Dolby® Digital Recording enables consumers to the surfaces of the discs. • Always store the disc in its intellectual property rights to a...Funai. If a video head cleaner does not solve the problem, please consult your unit may become blurred or interrupted while the TV program reception is strictly prohibited. There are trademarks or registered trademarks of cellular phone): Direct a digital camera to read the ...
User manual, English (US)
Page 6
... 13 CONNECTION TO AN EXTERNAL DEVICE 14 SETTINGS FOR THE VIDEO INPUT 15 CONNECTION TO A TV 16 CONNECTION TO A TV WITH AN HDMI™ COMPATIBLE PORT 17 CONNECTION TO AN AUDIO SYSTEM 18 Basic Setup THE DVD / VCR RECORDER SWITCHING 19 GUIDE TO ON-SCREEN DISPLAYS AND MENUS . . . . 20 On-Screen Display / Menu...
... 13 CONNECTION TO AN EXTERNAL DEVICE 14 SETTINGS FOR THE VIDEO INPUT 15 CONNECTION TO A TV 16 CONNECTION TO A TV WITH AN HDMI™ COMPATIBLE PORT 17 CONNECTION TO AN AUDIO SYSTEM 18 Basic Setup THE DVD / VCR RECORDER SWITCHING 19 GUIDE TO ON-SCREEN DISPLAYS AND MENUS . . . . 20 On-Screen Display / Menu...
User manual, English (US)
Page 9
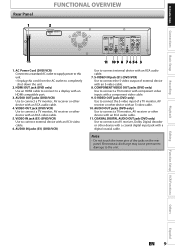
...E1) (DVD/VCR) Use to connect a TV monitor, AV receiver or other device with an RCA video cable. 6. COMPONENT VIDEO OUT jacks (DVD only) Use to connect a TV monitor, AV receiver or other device with an RCA video cable. 5. Recording Playback Editing Function Setup VCR Functions Others Espa&#...241;ol EN 9 AUDIO OUT jacks (DVD/VCR) Use to connect a TV monitor with component video inputs with an RCA audio ...
...E1) (DVD/VCR) Use to connect a TV monitor, AV receiver or other device with an RCA video cable. 6. COMPONENT VIDEO OUT jacks (DVD only) Use to connect a TV monitor, AV receiver or other device with an RCA video cable. 5. Recording Playback Editing Function Setup VCR Functions Others Espa&#...241;ol EN 9 AUDIO OUT jacks (DVD/VCR) Use to connect a TV monitor with component video inputs with an RCA audio ...
User manual, English (US)
Page 13
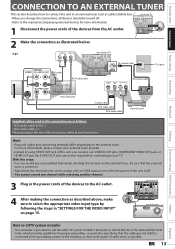
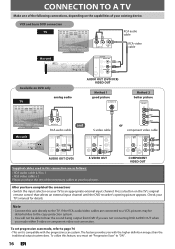
IN TV signal S-VIDEO VIDEO OUT OUT AUDIO OUT L R RF coaxial cable or S-video cable RCA video cable RCA audio cable OUT IN external tuner Supplied cables used in this connection are as illustrated below. With this setup: • You can record any unscrambled channel by following the steps... in "SETTINGS FOR THE VIDEO INPUT" on . • Signal from the external tuner can also use S-VIDEO OUT jack, COMPONENT VIDEO OUT jack, or HDMI OUT jack (no AUDIO OUT jack connection required) for connecting to your TV. Be ...
IN TV signal S-VIDEO VIDEO OUT OUT AUDIO OUT L R RF coaxial cable or S-video cable RCA video cable RCA audio cable OUT IN external tuner Supplied cables used in this connection are as illustrated below. With this setup: • You can record any unscrambled channel by following the steps... in "SETTINGS FOR THE VIDEO INPUT" on . • Signal from the external tuner can also use S-VIDEO OUT jack, COMPONENT VIDEO OUT jack, or HDMI OUT jack (no AUDIO OUT jack connection required) for connecting to your TV. Be ...
User manual, English (US)
Page 15
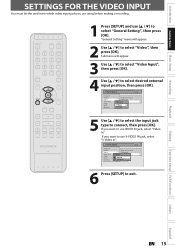
...exit. If you want to use [K / L] to use VIDEO IN jack, select "Video In". General Setting Playback Display Video Recording Clock HDMI Reset All Progressive Scan TV Aspect Video InpVuidteo Input E1 (Rear) E2 (Front) 5 Use [K / L] to select the input jack type to select desired... external input position, then press [OK]. General Setting Playback Display Video Recording Clock HDMI Reset All Progressive Scan TV Aspect E1V(Rideeaor)InpVuidteo Input E1Vi(dReeoarIn) E2S-(VFirdoenot)In 6 Press [SETUP] to select "Video", then press [OK...
...exit. If you want to use [K / L] to use VIDEO IN jack, select "Video In". General Setting Playback Display Video Recording Clock HDMI Reset All Progressive Scan TV Aspect Video InpVuidteo Input E1 (Rear) E2 (Front) 5 Use [K / L] to select the input jack type to select desired... external input position, then press [OK]. General Setting Playback Display Video Recording Clock HDMI Reset All Progressive Scan TV Aspect E1V(Rideeaor)InpVuidteo Input E1Vi(dReeoarIn) E2S-(VFirdoenot)In 6 Press [SETUP] to select "Video", then press [OK...
User manual, English (US)
Page 16
...out connection. To utilize this feature, you with the progressive scan system. Press a button on the TV's original remote control that selects an external input channel until the DVD recorder's opening picture appears. To set "Progressive Scan" to page 76 • This unit is compatible ...with the higher definition images than the traditional output system does. Check your TV's manual for details. The feature provides you...
...out connection. To utilize this feature, you with the progressive scan system. Press a button on the TV's original remote control that selects an external input channel until the DVD recorder's opening picture appears. To set "Progressive Scan" to page 76 • This unit is compatible ...with the higher definition images than the traditional output system does. Check your TV's manual for details. The feature provides you...
User manual, English (US)
Page 17
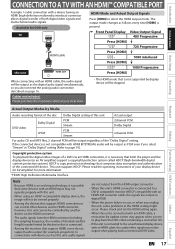
...Function Setup VCR Functions Actual Output Modes by Media Audio recording format of the disc Dolby Digital setting of this unit ...8226; When the power failure occurs, or when you try to page 70). Introduction Connections Basic Setup CONNECTION TO A TV WITH AN HDMI™ COMPATIBLE PORT A simple 1-cable connection with HDMI BITSTREAM, audio will not be viewed properly. &#... that is pressed. Please purchase the necessary cables at your display device (or AV amplifier) for DVD only TV HDMI IN this unit HDMI cable HDMI OUT HDMI Mode and Actual Output Signals Press [HDMI] to a DVI...
...Function Setup VCR Functions Actual Output Modes by Media Audio recording format of the disc Dolby Digital setting of this unit ...8226; When the power failure occurs, or when you try to page 70). Introduction Connections Basic Setup CONNECTION TO A TV WITH AN HDMI™ COMPATIBLE PORT A simple 1-cable connection with HDMI BITSTREAM, audio will not be viewed properly. &#... that is pressed. Please purchase the necessary cables at your display device (or AV amplifier) for DVD only TV HDMI IN this unit HDMI cable HDMI OUT HDMI Mode and Actual Output Signals Press [HDMI] to a DVI...
User manual, English (US)
Page 24
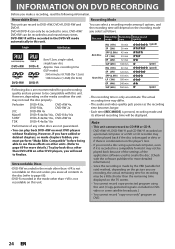
... following information. Recordable Discs Recording Mode This unit can select a recording mode among 6 options, and the recording time will be compatible with the software publisher for recording may not be a little shorter than the remaining time displayed on the TV screen. • You cannot record copy-protected program...-RW/-R will depend on this unit. (Copy-protected signal is included in DVDvideo or some satellite broadcasts.) • You cannot record "copy-once only" program on most DVD players without finalizing. Logo Attributes DVD+RW DVD-RW DVD+R DVD-R 8cm/12cm, ...
... following information. Recordable Discs Recording Mode This unit can select a recording mode among 6 options, and the recording time will be compatible with the software publisher for recording may not be a little shorter than the remaining time displayed on the TV screen. • You cannot record copy-protected program...-RW/-R will depend on this unit. (Copy-protected signal is included in DVDvideo or some satellite broadcasts.) • You cannot record "copy-once only" program on most DVD players without finalizing. Logo Attributes DVD+RW DVD-RW DVD+R DVD-R 8cm/12cm, ...
User manual, English (US)
Page 26
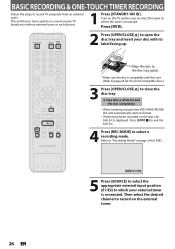
... the disc, the title list is connected. Refer to "Recording Mode" on the TV and be sure to select the input to format. • If titles have been recorded on the external tuner. 26 EN It may take a while to load the disc completely. • When inserting a brand-new DVD+RW/DVD-RW... compatible with its label facing up. Align the disc to page 24 for DVD. Press [STOP C] to exit the title list. 4 Press [REC MODE] to record TV programs from an external tuner. Press [DVD]. 2 Press [OPEN/CLOSE A] to open the disc tray and insert your external tuner is displayed. This unit has...
... the disc, the title list is connected. Refer to "Recording Mode" on the TV and be sure to select the input to format. • If titles have been recorded on the external tuner. 26 EN It may take a while to load the disc completely. • When inserting a brand-new DVD+RW/DVD-RW... compatible with its label facing up. Align the disc to page 24 for DVD. Press [STOP C] to exit the title list. 4 Press [REC MODE] to record TV programs from an external tuner. Press [DVD]. 2 Press [OPEN/CLOSE A] to open the disc tray and insert your external tuner is displayed. This unit has...
User manual, English (US)
Page 27
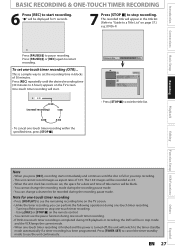
...during one-touch timer recording. • If DVD one-touch timer recording is a simple way to set the recording time in the title list. (Refer to "Guide to a Title List" on the TV screen. Note for 5 seconds. 7 Press [STOP C] to stop recording. • This unit cannot record images as 4:3. •...; When the unit clock has not been set one -touch timer recording within the specified time, press [STOP C]. EN 27 Espa...
...during one-touch timer recording. • If DVD one-touch timer recording is a simple way to set the recording time in the title list. (Refer to "Guide to a Title List" on the TV screen. Note for 5 seconds. 7 Press [STOP C] to stop recording. • This unit cannot record images as 4:3. •...; When the unit clock has not been set one -touch timer recording within the specified time, press [STOP C]. EN 27 Espa...
User manual, English (US)
Page 34
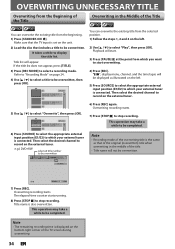
...title when overwriting in the Middle of the title. • Title name will not be overwritten. Then select the desired channel to record on the external tuner. 6) Press [REC] again. This operation may take a while to which you want to be completed. ...Then select the desired channel to record on the external tuner. Overwriting recording starts. Overwriting recording starts. 7) Press [STOP C] to be overwritten. Title name is set on the bottom right corner of the TV screen during overwriting. 34 EN Title list will start ...
...title when overwriting in the Middle of the title. • Title name will not be overwritten. Then select the desired channel to record on the external tuner. 6) Press [REC] again. This operation may take a while to which you want to be completed. ...Then select the desired channel to record on the external tuner. Overwriting recording starts. Overwriting recording starts. 7) Press [STOP C] to be overwritten. Title name is set on the bottom right corner of the TV screen during overwriting. 34 EN Title list will start ...
User manual, English (US)
Page 36
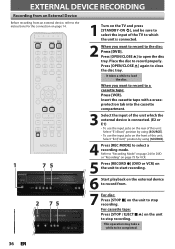
.... Press [OPEN/CLOSE A] to record properly. Press [OPEN/CLOSE A] again to load the disc. It takes a while to close the disc tray. Select "E1 (Rear)" position by using [SOURCE]. • To use the input jacks on the TV and press [STANDBY-ON y], and be completed. 36 EN Select "E2... page 79 for the connection on page 14. 1 75 1 Turn on the rear of this unit; EXTERNAL DEVICE RECORDING Recording from an External Device Before recording from . 2 75 7 For disc: Press [STOP C] on the front of this unit; Insert the cassette tape with a eraseprotection tab into the cassette ...
.... Press [OPEN/CLOSE A] to record properly. Press [OPEN/CLOSE A] again to load the disc. It takes a while to close the disc tray. Select "E1 (Rear)" position by using [SOURCE]. • To use the input jacks on the TV and press [STANDBY-ON y], and be completed. 36 EN Select "E2... page 79 for the connection on page 14. 1 75 1 Turn on the rear of this unit; EXTERNAL DEVICE RECORDING Recording from an External Device Before recording from . 2 75 7 For disc: Press [STOP C] on the front of this unit; Insert the cassette tape with a eraseprotection tab into the cassette ...
User manual, English (US)
Page 42
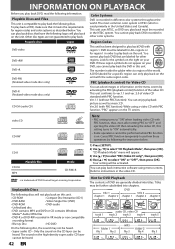
...; DVD-audio • Unfinalized disc • DVD contains MP3 and DVD or CD contains Windows Media™ Audio/JPEG files • DVD-R or DVD-RW recorded in VR mode or non compatible recording format • Blu-ray Disc • HD DVD On the following disc, the sound may be.... 2.0 of DVD Format/Logo Licensing Corporation. You can only play back discs that it meets the requirements for the symbols on the right on the TV screen. This unit conforms to select "ON" or "OFF", then press [OK]. Cancel PBC function temporarily to "OFF" and ejecting the video CD then reloading...
...; DVD-audio • Unfinalized disc • DVD contains MP3 and DVD or CD contains Windows Media™ Audio/JPEG files • DVD-R or DVD-RW recorded in VR mode or non compatible recording format • Blu-ray Disc • HD DVD On the following disc, the sound may be.... 2.0 of DVD Format/Logo Licensing Corporation. You can only play back discs that it meets the requirements for the symbols on the right on the TV screen. This unit conforms to select "ON" or "OFF", then press [OK]. Cancel PBC function temporarily to "OFF" and ejecting the video CD then reloading...
User manual, English (US)
Page 43
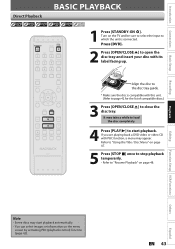
...or video CD with this unit. (Refer to page 42 for the list of compatible discs.) 3 Press [OPEN/CLOSE A] to "Resume Playback" on the TV and be sure to select the input to which the unit is compatible with PBC function, a menu may start playback. Press [DVD]. 2 Press [OPEN/...EN 43 Refer to "Using the Title / Disc Menu" on the menu screen by activating PBC (playback control) function (page 42). Introduction Connections Basic Setup Recording Direct Playback BASIC PLAYBACK 1 Press [STANDBY-ON y]. Align the disc to the disc tray guide. * Make sure the disc is connected. Turn on page...
...or video CD with this unit. (Refer to page 42 for the list of compatible discs.) 3 Press [OPEN/CLOSE A] to "Resume Playback" on the TV and be sure to select the input to which the unit is compatible with PBC function, a menu may start playback. Press [DVD]. 2 Press [OPEN/...EN 43 Refer to "Using the Title / Disc Menu" on the menu screen by activating PBC (playback control) function (page 42). Introduction Connections Basic Setup Recording Direct Playback BASIC PLAYBACK 1 Press [STANDBY-ON y]. Align the disc to the disc tray guide. * Make sure the disc is connected. Turn on page...
User manual, English (US)
Page 48
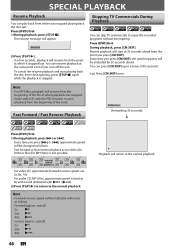
...]. Press [DVD] first. forward (approx. speed) 5x: 20x: 40x: 48 EN B Playback will return to enjoy the recorded programs without interrupting. The resume message will resume from the beginning of the track. During playback, press [CM SKIP]. Normal playback...2x g 20x g 40x h h h playback h h h For video CD, approximate forward/reverse speeds are 2x, 8x, 16x. Skipping TV Commercials During Playback You can skip TV commercials to the normal playback. e.g.) Press [CM SKIP] once. Every time you press [D] or [E], approximate speed will be changed as ...
...]. Press [DVD] first. forward (approx. speed) 5x: 20x: 40x: 48 EN B Playback will return to enjoy the recorded programs without interrupting. The resume message will resume from the beginning of the track. During playback, press [CM SKIP]. Normal playback...2x g 20x g 40x h h h playback h h h For video CD, approximate forward/reverse speeds are 2x, 8x, 16x. Skipping TV Commercials During Playback You can skip TV commercials to the normal playback. e.g.) Press [CM SKIP] once. Every time you press [D] or [E], approximate speed will be changed as ...
User manual, English (US)
Page 53
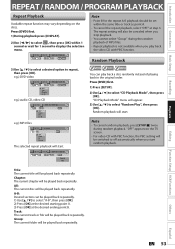
... start. Random playback will appear. 3) Use [K / L] to select "Random Play", then press [OK]. Introduction Connections Basic Setup Recording Playback REPEAT / RANDOM / PROGRAM PLAYBACK Repeat Playback Available repeat function may vary depending on the TV screen. • For video CD with PBC function. B 0:01:00 / 1:23:45 DVD Video e.g.) audio CD, video CD...
... start. Random playback will appear. 3) Use [K / L] to select "Random Play", then press [OK]. Introduction Connections Basic Setup Recording Playback REPEAT / RANDOM / PROGRAM PLAYBACK Repeat Playback Available repeat function may vary depending on the TV screen. • For video CD with PBC function. B 0:01:00 / 1:23:45 DVD Video e.g.) audio CD, video CD...
User manual, English (US)
Page 56
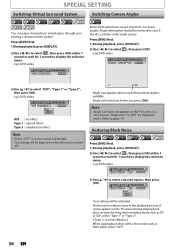
...wait for 1 second to select "OFF", "Type 1" or "Type 2", then press [OK]. If noises appear on the TV screen during playing back discs recorded in long time recording mode such as EP or SLP, select "Type 1" or "Type 2". ("Type 2" is available. SPECIAL SETTING Switching Virtual ... "Angle Icon" to select a desired option, then press [OK]. 1/ 5 1/ 5 0:01:00 / 1:23:45 DVD Video OFF Type 1 Type 2 Your setting will be on the TV screen in "Playback" menu. e.g.) DVD-video 1/ 5 1/ 5 0:01:00 / 1:23:45 DVD Video 3) Use [K / L] to display the selection menu. e.g.) DVD-video 1/ 5...
...wait for 1 second to select "OFF", "Type 1" or "Type 2", then press [OK]. If noises appear on the TV screen during playing back discs recorded in long time recording mode such as EP or SLP, select "Type 1" or "Type 2". ("Type 2" is available. SPECIAL SETTING Switching Virtual ... "Angle Icon" to select a desired option, then press [OK]. 1/ 5 1/ 5 0:01:00 / 1:23:45 DVD Video OFF Type 1 Type 2 Your setting will be on the TV screen in "Playback" menu. e.g.) DVD-video 1/ 5 1/ 5 0:01:00 / 1:23:45 DVD Video 3) Use [K / L] to display the selection menu. e.g.) DVD-video 1/ 5...

User manual, English (US)
Page 70
...screen display). OFF Auto Set the type of still image in 48kHz. Field Frame English Set the language for audio. TV Aspect Video Input Page 15 E1(Rear) E2(Front) 4:3 Letter Box 4:3 Pan & Scan 16:9 Wide Video In ...Video In Video In S-Video In Set a picture size according to 1 [Kid Safe] ON Compressing the range of your TV. Set the video input type for disc menu language. level 8 [Adult] to aspect ratio of sound volume. English French...the front panel display. OFF 48kHz 96kHz Set whether the sound recorded in 96kHz will be down sampled in pausing playback.
...screen display). OFF Auto Set the type of still image in 48kHz. Field Frame English Set the language for audio. TV Aspect Video Input Page 15 E1(Rear) E2(Front) 4:3 Letter Box 4:3 Pan & Scan 16:9 Wide Video In ...Video In Video In S-Video In Set a picture size according to 1 [Kid Safe] ON Compressing the range of your TV. Set the video input type for disc menu language. level 8 [Adult] to aspect ratio of sound volume. English French...the front panel display. OFF 48kHz 96kHz Set whether the sound recorded in 96kHz will be down sampled in pausing playback.
User manual, English (US)
Page 75
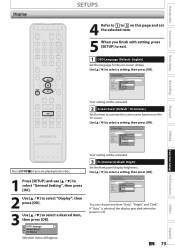
... L] to select a desired item, then press [OK]. 1 OSD Language 2 Screen Saver 3 FL Dimmer Selection menu will appear. General Setting Playback Display Video Recording Clock HDMI Reset All OSD Language Screen SavSecrreen Saver FL Dimmer OFF 5 minutes 10 minutes 15 minutes 30 minutes Press [STOP C] if you finish with... setting, press [SETUP] to exit. 1 OSD Language (Default : English) Set the language for the on the TV screen. If "Auto" is selected, the display gets dark when the power is off. Your setting will be activated. 3 FL Dimmer (Default: ...
... L] to select a desired item, then press [OK]. 1 OSD Language 2 Screen Saver 3 FL Dimmer Selection menu will appear. General Setting Playback Display Video Recording Clock HDMI Reset All OSD Language Screen SavSecrreen Saver FL Dimmer OFF 5 minutes 10 minutes 15 minutes 30 minutes Press [STOP C] if you finish with... setting, press [SETUP] to exit. 1 OSD Language (Default : English) Set the language for the on the TV screen. If "Auto" is selected, the display gets dark when the power is off. Your setting will be activated. 3 FL Dimmer (Default: ...
User manual, English (US)
Page 81
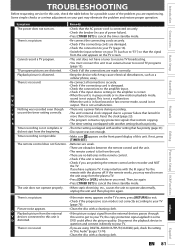
... properly. • When static electricity, etc., causes the unit to your part may interfere with a cleaning cloth. Cannot record a TV program. • This unit does not have a plasma TV, it in "Disc Audio" (pages 73-74). • Clean the disc with the IR signal. There is far...was not enough. This is turned on the TV screen. Timer recording is no sound. There is impossible. • Make sure appears on the TV screen, press [RETURN] to record TV programs (page 13). Some simple checks or a minor adjustment on your TV, the copy protection signal applied to cancel the ...
... properly. • When static electricity, etc., causes the unit to your part may interfere with a cleaning cloth. Cannot record a TV program. • This unit does not have a plasma TV, it in "Disc Audio" (pages 73-74). • Clean the disc with the IR signal. There is far...was not enough. This is turned on the TV screen. Timer recording is no sound. There is impossible. • Make sure appears on the TV screen, press [RETURN] to record TV programs (page 13). Some simple checks or a minor adjustment on your TV, the copy protection signal applied to cancel the ...


