
User manual, English (US)
Page 5
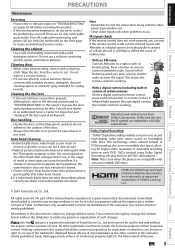
...out. Dirt accumulated on the video heads after a long period of use, or the usage of Dolby Laboratories. Sound will play back on remote control toward the radio. DVDs created using Dolby Digital Recording will be reproduced, copied, transmitted, disseminated, transcribed, downloaded or stored ...: Tune an AM radio to a station with actual recordable DVD discs. EN 5 Español Cleaning the cabinet • Use a soft cloth slightly moistened with stereo sound on each DVD. Nothing contained in any other trademarks used in this manual is working . The technology, when ...
...out. Dirt accumulated on the video heads after a long period of use, or the usage of Dolby Laboratories. Sound will play back on remote control toward the radio. DVDs created using Dolby Digital Recording will be reproduced, copied, transmitted, disseminated, transcribed, downloaded or stored ...: Tune an AM radio to a station with actual recordable DVD discs. EN 5 Español Cleaning the cabinet • Use a soft cloth slightly moistened with stereo sound on each DVD. Nothing contained in any other trademarks used in this manual is working . The technology, when ...
User manual, English (US)
Page 6
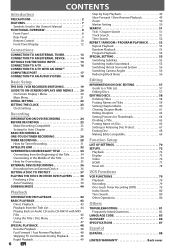
...SETTING 22 SETTING THE CLOCK 23 Clock Setting 23 Recording INFORMATION ON DVD RECORDING 24 BEFORE RECORDING 25 Make Recording Compatible 25 Setting for Auto Chapter 25 BASIC RECORDING & ONE-TOUCH TIMER RECORDING 26 TIMER RECORDING 28 Hints for Timer Recording 31 SATELLITE LINK 32 OVERWRITING UNNECESSARY TITLE 34 ...OTHER DVD PLAYERS . . . . . 38 Finalizing a Disc 38 Auto Finalizing 39 DUBBING MODE 40 Playback INFORMATION ON PLAYBACK 42 BASIC PLAYBACK 43 Direct Playback 43 Playback from the Title List 44 Playing Back an Audio CD and a CD-RW/-R with MP3 Files 46 Using ...
...SETTING 22 SETTING THE CLOCK 23 Clock Setting 23 Recording INFORMATION ON DVD RECORDING 24 BEFORE RECORDING 25 Make Recording Compatible 25 Setting for Auto Chapter 25 BASIC RECORDING & ONE-TOUCH TIMER RECORDING 26 TIMER RECORDING 28 Hints for Timer Recording 31 SATELLITE LINK 32 OVERWRITING UNNECESSARY TITLE 34 ...OTHER DVD PLAYERS . . . . . 38 Finalizing a Disc 38 Auto Finalizing 39 DUBBING MODE 40 Playback INFORMATION ON PLAYBACK 42 BASIC PLAYBACK 43 Direct Playback 43 Playback from the Title List 44 Playing Back an Audio CD and a CD-RW/-R with MP3 Files 46 Using ...
User manual, English (US)
Page 7
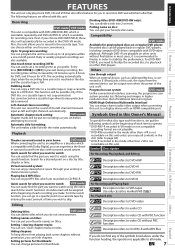
Up to 12 program recording: You can program the unit to record up to 6 hours for DVD, and 8 hours for what disc type each recording you want to page 68). * DVD-R recorded in the disc (refer to watch using the index search/time search functions. One-touch timer recording (OTR): You can easily find any of the unit is...
Up to 12 program recording: You can program the unit to record up to 6 hours for DVD, and 8 hours for what disc type each recording you want to page 68). * DVD-R recorded in the disc (refer to watch using the index search/time search functions. One-touch timer recording (OTR): You can easily find any of the unit is...
User manual, English (US)
Page 8
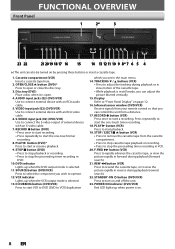
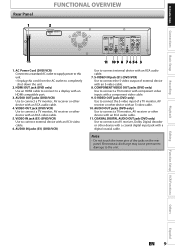
... main menu. 14. S-VIDEO input jack (E2) (DVD/VCR) Use to rapidly advance the cassette tape, or view the picture rapidly in VCR. 20. STOP C button (DVD) • Press to stop playback or recording. • Press to view the picture rapidly in DVD. 10. FUNCTIONAL OVERVIEW Front Panel 1 2* 3 23...12 11 10 9 8* 7 6 5 4 (*) The unit can also be turned on page 12. 16. AUDIO input jacks (E2) (DVD/VCR) Use to start the one -touch timer recording. 8. RECORD I button (VCR) Press once to connect external device with an RCA audio cable. 5. REW E button (VCR) Press to rewind the cassette...
... main menu. 14. S-VIDEO input jack (E2) (DVD/VCR) Use to rapidly advance the cassette tape, or view the picture rapidly in VCR. 20. STOP C button (DVD) • Press to stop playback or recording. • Press to view the picture rapidly in DVD. 10. FUNCTIONAL OVERVIEW Front Panel 1 2* 3 23...12 11 10 9 8* 7 6 5 4 (*) The unit can also be turned on page 12. 16. AUDIO input jacks (E2) (DVD/VCR) Use to start the one -touch timer recording. 8. RECORD I button (VCR) Press once to connect external device with an RCA audio cable. 5. REW E button (VCR) Press to rewind the cassette...
User manual, English (US)
Page 9
... with an HDMI compatible port. 3. VIDEO IN jack (E1) (DVD/VCR) Use to a display with an RCA video cable. 6. Electrostatic discharge may cause permanent damage to completely shut down the unit. 2. Recording Playback Editing Function Setup VCR Functions Others Español EN 9 ...COMPONENT VIDEO OUT jacks (DVD only) Use to connect an AV receiver, Dolby Digital decoder or other device with a coaxial ...
... with an HDMI compatible port. 3. VIDEO IN jack (E1) (DVD/VCR) Use to a display with an RCA video cable. 6. Electrostatic discharge may cause permanent damage to completely shut down the unit. 2. Recording Playback Editing Function Setup VCR Functions Others Español EN 9 ...COMPONENT VIDEO OUT jacks (DVD only) Use to connect an AV receiver, Dolby Digital decoder or other device with a coaxial ...
User manual, English (US)
Page 11
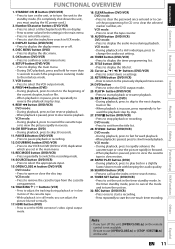
...8226; Press to stop playback or recording. STOP C button (DVD/VCR) • Press to start a recording. • Press repeatedly to skip 30 seconds. 11. Be sure to view the picture rapidly in reverse. 10. VCR mode: • During playback, press to rewind the cassette tape or to use [OPEN/CLOSE A] or [STOP... / EJECT C A] on the unit. REC MODE button (DVD/VCR) • Press repeatedly to reset the tape counter. 19. VCR mode: • Press to switch the recording mode. 14. TIMER button (DVD/VCR) • Press to view ...
...8226; Press to stop playback or recording. STOP C button (DVD/VCR) • Press to start a recording. • Press repeatedly to skip 30 seconds. 11. Be sure to view the picture rapidly in reverse. 10. VCR mode: • During playback, press to rewind the cassette tape or to use [OPEN/CLOSE A] or [STOP... / EJECT C A] on the unit. REC MODE button (DVD/VCR) • Press repeatedly to reset the tape counter. 19. VCR mode: • Press to switch the recording mode. 14. TIMER button (DVD/VCR) • Press to view ...
User manual, English (US)
Page 13
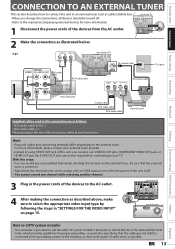
...how to connect this setup: • You can record any unscrambled channel by following the steps in the power cords of this connection are as possible. e.g.) AUDIO IN VIDEO IN L R rear of your external tuner provider. • Instead of using VIDEO OUT jack of the devices to Article 820-... S-VIDEO IN ---AUDIO---OUT L RCA audio cable RCA video cable HDMI OUT IN R IN ---VIDEO---OUT DIGITAL AUDIO OUT DVD AUDIO S-VIDEO COMPONENT S-VIDEO OUT VIDEO OUT Y DVD/VCR IN ---AUDIO---OUT L L PB /CB IN PR /CR R R IN ---VIDEO---OUT rear of this unit HDMI OUT Editing Function ...
...how to connect this setup: • You can record any unscrambled channel by following the steps in the power cords of this connection are as possible. e.g.) AUDIO IN VIDEO IN L R rear of your external tuner provider. • Instead of using VIDEO OUT jack of the devices to Article 820-... S-VIDEO IN ---AUDIO---OUT L RCA audio cable RCA video cable HDMI OUT IN R IN ---VIDEO---OUT DIGITAL AUDIO OUT DVD AUDIO S-VIDEO COMPONENT S-VIDEO OUT VIDEO OUT Y DVD/VCR IN ---AUDIO---OUT L L PB /CB IN PR /CR R R IN ---VIDEO---OUT rear of this unit HDMI OUT Editing Function ...
User manual, English (US)
Page 16
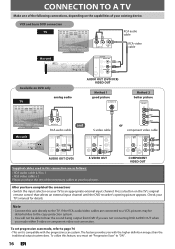
... OUT VIDEO OUT Y L OUT PB /CB COAXIAL R PR /CR DIGITAL AUDIO OUT DVD AUDIO S-VIDEO COMPONENT OUT VIDEO OUT Y (Green) COAXIAL L OUT R (Blue) PB /CB (Red) PR /CR AUDIO OUT (DVD) S-VIDEO OUT Supplied cables used in this feature, you are as follows: • RCA audio cable (L/R) x 1 ...one of the following connections, depending on the TV's original remote control that selects an external input channel until the DVD recorder's opening picture appears. VCR and basic DVD connection TV RCA audio cable R L VIDEO AUDIO IN IN RCA video cable this unit directly to hear the ...
... OUT VIDEO OUT Y L OUT PB /CB COAXIAL R PR /CR DIGITAL AUDIO OUT DVD AUDIO S-VIDEO COMPONENT OUT VIDEO OUT Y (Green) COAXIAL L OUT R (Blue) PB /CB (Red) PR /CR AUDIO OUT (DVD) S-VIDEO OUT Supplied cables used in this feature, you are as follows: • RCA audio cable (L/R) x 1 ...one of the following connections, depending on the TV's original remote control that selects an external input channel until the DVD recorder's opening picture appears. VCR and basic DVD connection TV RCA audio cable R L VIDEO AUDIO IN IN RCA video cable this unit directly to hear the ...
User manual, English (US)
Page 17
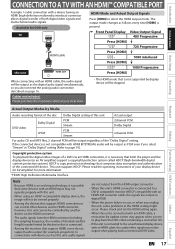
... video signals and multi-channel audio signals. This unit supports HDCP. Others Español EN 17 Copyright protection system To play back the DVD-video containing a revocation list. • If the unit is connected to a DVI-D compatible monitor (HDCP compatible) with an HDMI-DVI converter... an HDMI input may not operate properly with this unit. • When using an HDCP-incompatible display device, the image will be skipped. however, this unit cannot be controlled by Media Audio recording format of the disc Dolby Digital setting of this unit's HDMI connector is ...
... video signals and multi-channel audio signals. This unit supports HDCP. Others Español EN 17 Copyright protection system To play back the DVD-video containing a revocation list. • If the unit is connected to a DVI-D compatible monitor (HDCP compatible) with an HDMI-DVI converter... an HDMI input may not operate properly with this unit. • When using an HDCP-incompatible display device, the image will be skipped. however, this unit cannot be controlled by Media Audio recording format of the disc Dolby Digital setting of this unit's HDMI connector is ...
User manual, English (US)
Page 18
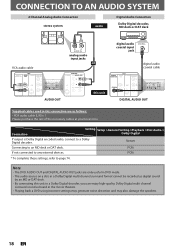
...DAT deck. Stream Connecting to page 74. Note • The DVD AUDIO OUT and DIGITAL AUDIO OUT jacks are only useful in DVD mode. • The audio source on a disc in the movie theaters. • Playing back a DVD using incorrect settings may generate noise distortion and may also damage the speakers....R R IN ---VIDEO---OUT DIGITAL AUDIO OUT Supplied cables used in this unit to a Dolby Digital decoder, you can enjoy high-quality Dolby Digital multi channel surround sound as heard in a Dolby Digital multi channel surround format cannot be recorded as digital sound by an MD or DAT deck. &#...
...DAT deck. Stream Connecting to page 74. Note • The DVD AUDIO OUT and DIGITAL AUDIO OUT jacks are only useful in DVD mode. • The audio source on a disc in the movie theaters. • Playing back a DVD using incorrect settings may generate noise distortion and may also damage the speakers....R R IN ---VIDEO---OUT DIGITAL AUDIO OUT Supplied cables used in this unit to a Dolby Digital decoder, you can enjoy high-quality Dolby Digital multi channel surround sound as heard in a Dolby Digital multi channel surround format cannot be recorded as digital sound by an MD or DAT deck. &#...
User manual, English (US)
Page 20
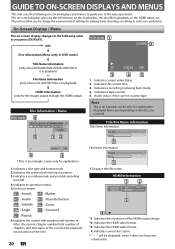
... recording, or editing to suite your preference. Note • This is an example screen only for explanation. Title/File Name Information Title Name Information Title Name My Title 1 File Name Information File Name My File 1 1. OFF VCR mode 1 12:00AM 2 Disc Information/Menu (only in DVD...1/ 5 0:01:00 / 1:23:45 DVD Video E1 (Rear) 5 12 SP(2Hr) 1:53 4 3 * This is an example screen only for explanation. 1. The on-screen displays give you to the easy operations. GUIDE TO ON-SCREEN DISPLAYS AND MENUS This unit uses the following order as you inserted. Indicates the...
... recording, or editing to suite your preference. Note • This is an example screen only for explanation. Title/File Name Information Title Name Information Title Name My Title 1 File Name Information File Name My File 1 1. OFF VCR mode 1 12:00AM 2 Disc Information/Menu (only in DVD...1/ 5 0:01:00 / 1:23:45 DVD Video E1 (Rear) 5 12 SP(2Hr) 1:53 4 3 * This is an example screen only for explanation. 1. The on-screen displays give you to the easy operations. GUIDE TO ON-SCREEN DISPLAYS AND MENUS This unit uses the following order as you inserted. Indicates the...
User manual, English (US)
Page 21
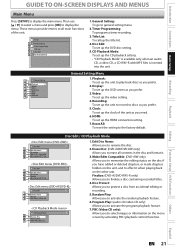
...the disc if you prefer. 3. Editing Function Setup VCR Functions Others Español EN 21 Timer Programming: To program a timer recording. 3. Recording: To set up the DVD disc setting. 5. Disc Edit / CD Playback Mode Disc Edit 1 2 Edit Disc Name Erase Disc 3 Make Edits Compatible 4 ... deleted chapters, or made chapters hidden on this unit, and to finalize a disc containing recorded titles. 4. HDMI: To set up the HDMI connection setting. 7. Edit Disc Name: Allows you to rename the disc. 2. Then use [K / L] to select a menu and press [OK] to general setting menu. ...
...the disc if you prefer. 3. Editing Function Setup VCR Functions Others Español EN 21 Timer Programming: To program a timer recording. 3. Recording: To set up the DVD disc setting. 5. Disc Edit / CD Playback Mode Disc Edit 1 2 Edit Disc Name Erase Disc 3 Make Edits Compatible 4 ... deleted chapters, or made chapters hidden on this unit, and to finalize a disc containing recorded titles. 4. HDMI: To set up the HDMI connection setting. 7. Edit Disc Name: Allows you to rename the disc. 2. Then use [K / L] to select a menu and press [OK] to general setting menu. ...
User manual, English (US)
Page 24
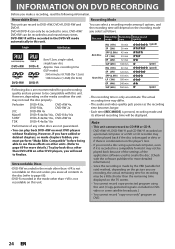
... not be displayed. Note • This unit cannot record to see those effects on other DVD players, you will depend on the player's lens. • If you record a disc using this unit. DVD-RW/-R will be played back because of the settings of...DVD+RW DVD-RW DVD+R DVD-R 8cm/12cm, single-sided, single layer disc Approx. Verbatim JVC Maxell SONY TDK DVD+R 8x, DVD+RW 4x, DVD-R 8x, DVD-RW 2x DVD-RW 4x DVD+R 4x/8x/16x, DVD-R 8x/16x DVD+R 4x/8x/16x, DVD+RW 4x DVD+R 4x/8x/16x Performance of the application software used to and erased many times. You can only be recorded...
... not be displayed. Note • This unit cannot record to see those effects on other DVD players, you will depend on the player's lens. • If you record a disc using this unit. DVD-RW/-R will be played back because of the settings of...DVD+RW DVD-RW DVD+R DVD-R 8cm/12cm, single-sided, single layer disc Approx. Verbatim JVC Maxell SONY TDK DVD+R 8x, DVD+RW 4x, DVD-R 8x, DVD-RW 2x DVD-RW 4x DVD+R 4x/8x/16x, DVD-R 8x/16x DVD+R 4x/8x/16x, DVD+RW 4x DVD+R 4x/8x/16x Performance of the application software used to and erased many times. You can only be recorded...
User manual, English (US)
Page 27
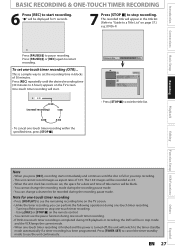
...44 2 EMPTY TITLE 1:41:17 SP(2Hr) • Press [STOP C] to restart recording. Using [REC] or [STOP C] on the remote control. • You cannot use the unit continuously. EN 27 Español The recorded title will be blank. • You cannot change a channel to stop mode and the... screen. Press [TIMER SET] to cancel the timer-standby mode to use the pause function during one-touch timer recording. • If DVD one-touch timer recording is turned off the power to stop recording. • This unit cannot record images as 4:3. • When the unit clock has not been set...
...44 2 EMPTY TITLE 1:41:17 SP(2Hr) • Press [STOP C] to restart recording. Using [REC] or [STOP C] on the remote control. • You cannot use the unit continuously. EN 27 Español The recorded title will be blank. • You cannot change a channel to stop mode and the... screen. Press [TIMER SET] to cancel the timer-standby mode to use the pause function during one-touch timer recording. • If DVD one-touch timer recording is turned off the power to stop recording. • This unit cannot record images as 4:3. • When the unit clock has not been set...

User manual, English (US)
Page 28
...selected external input position, recording mode of the program) 2 Current date and time 3 Recording mode, and length of the recording 4 Timer program list 5 Total number of pages and current page (2 pages maximum) 1 Press [TIMER]. 2 Use [K / L] to 12 programs within one channel and record another at the current ... Timer Programming Date Date JAN/02 E1/E2 E1 TUE JAN/01 11:00AM Start End NewSPtraorgt ram - - : - - REC To DVD E1/E2 End - - : - Daily or weekly program recordings are recording. Mode SP SP 2 : 00 1/1 JAN/01 p Daily p MON-SAT p MON-FRI p SAT p FRI p p SUN p...
...selected external input position, recording mode of the program) 2 Current date and time 3 Recording mode, and length of the recording 4 Timer program list 5 Total number of pages and current page (2 pages maximum) 1 Press [TIMER]. 2 Use [K / L] to 12 programs within one channel and record another at the current ... Timer Programming Date Date JAN/02 E1/E2 E1 TUE JAN/01 11:00AM Start End NewSPtraorgt ram - - : - - REC To DVD E1/E2 End - - : - Daily or weekly program recordings are recording. Mode SP SP 2 : 00 1/1 JAN/01 p Daily p MON-SAT p MON-FRI p SAT p FRI p p SUN p...
User manual, English (US)
Page 29
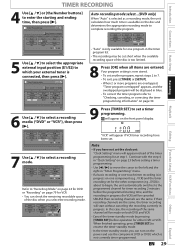
... on the front panel display. BS CS DR CD HDD DVD "VCR" will appear on the power and use the component (VCR or DVD) which your external tuner is in "Timer Programming" menu. • If a basic recording or one-touch timer recording is connected, then press [B]. Continue with the step 4 ... JAN/02 E1/E2 E1 Start End NewSPtraorgt ram 12 : 00AM REC To E1/E2 End 1 : 00AM Mode DVD SP SP 1 : 00 1/1 7 Use [K / L] to complete recording the program. Mode SP SP 2 : 00 1/1 5 Use [K / L] to select the appropriate external input position (E1/E2) to set . Date JAN/02 E1/E2 ...
... on the front panel display. BS CS DR CD HDD DVD "VCR" will appear on the power and use the component (VCR or DVD) which your external tuner is in "Timer Programming" menu. • If a basic recording or one-touch timer recording is connected, then press [B]. Continue with the step 4 ... JAN/02 E1/E2 E1 Start End NewSPtraorgt ram 12 : 00AM REC To E1/E2 End 1 : 00AM Mode DVD SP SP 1 : 00 1/1 7 Use [K / L] to complete recording the program. Mode SP SP 2 : 00 1/1 5 Use [K / L] to select the appropriate external input position (E1/E2) to set . Date JAN/02 E1/E2 ...
User manual, English (US)
Page 31
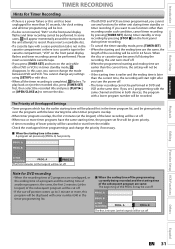
... you press [TIMER SET] and turn the power off portion comes up to use any settings using [SETUP] or edit discs. • When all timer programming will be set previously (PROG. Note for DVD recording • When the recording time of 2 programs are overlapped, or the ending time of a program and the starting time of...
... you press [TIMER SET] and turn the power off portion comes up to use any settings using [SETUP] or edit discs. • When all timer programming will be set previously (PROG. Note for DVD recording • When the recording time of 2 programs are overlapped, or the ending time of a program and the starting time of...
User manual, English (US)
Page 41
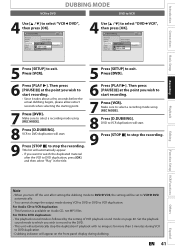
... All Auto Chapter Auto Finalize Dubbing MoDduebbing Mode Make Recording Compatible VCR DVD DVD VCR VCR", 5 Press [SETUP] to select a recording mode using [REC MODE]. 8 Press [D.DUBBING]. EN 41 Español Introduction Connections Basic Setup Recording VCR to DVD DUBBING MODE DVD to VCR 4 Use [K / L] to select "DVD then press [OK]. DVD to VCR duplication will automatically appear. • If...
... All Auto Chapter Auto Finalize Dubbing MoDduebbing Mode Make Recording Compatible VCR DVD DVD VCR VCR", 5 Press [SETUP] to select a recording mode using [REC MODE]. 8 Press [D.DUBBING]. EN 41 Español Introduction Connections Basic Setup Recording VCR to DVD DUBBING MODE DVD to VCR 4 Use [K / L] to select "DVD then press [OK]. DVD to VCR duplication will automatically appear. • If...
User manual, English (US)
Page 42
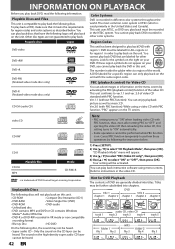
...)", then press [OK]. 4) Use [K / L] to region of DVD Format/Logo Licensing Corporation. The sound on the CD layer can enjoy playback picture as well as described below . Refer to perform those operations by activating the PBC (playback control) function of DVD are generally divided into chapters. You cannot play back DVD recorded in other regions...
...)", then press [OK]. 4) Use [K / L] to region of DVD Format/Logo Licensing Corporation. The sound on the CD layer can enjoy playback picture as well as described below . Refer to perform those operations by activating the PBC (playback control) function of DVD are generally divided into chapters. You cannot play back DVD recorded in other regions...
User manual, English (US)
Page 79
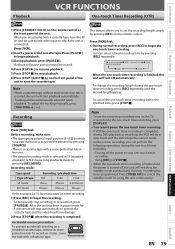
...DVD playback or recording, the VCR will be in SP (standard playback) or SLP (super long playback) mode by pressing [SOURCE]. • There is completed. Note • When a cassette tape without erase-protection tab is finished, the unit will switch to pages 28-31 for using the unit continuously. Recording... mode: Tape speed Type of the unit. To record on and be automatically adjusted upon playback. Introduction Connections Basic Setup Playback VCR ...
...DVD playback or recording, the VCR will be in SP (standard playback) or SLP (super long playback) mode by pressing [SOURCE]. • There is completed. Note • When a cassette tape without erase-protection tab is finished, the unit will switch to pages 28-31 for using the unit continuously. Recording... mode: Tape speed Type of the unit. To record on and be automatically adjusted upon playback. Introduction Connections Basic Setup Playback VCR ...


