

User manual, English (US)
Page 1
.... Editing Function Setup VCR Functions Others Español READ YOUR QUICK GUIDE AND/OR OWNER'S MANUAL FIRST FOR QUICK TIPS THAT MAKE USING YOUR MAGNAVOX PRODUCT MORE ENJOYABLE. Introduction Connections Basic Setup Recording Playback Owner's Manual ZV427MG9 DIGITAL VIDEO DISC RECORDER & VIDEO CASSETTE RECORDER THANK YOU FOR CHOOSING...
.... Editing Function Setup VCR Functions Others Español READ YOUR QUICK GUIDE AND/OR OWNER'S MANUAL FIRST FOR QUICK TIPS THAT MAKE USING YOUR MAGNAVOX PRODUCT MORE ENJOYABLE. Introduction Connections Basic Setup Recording Playback Owner's Manual ZV427MG9 DIGITAL VIDEO DISC RECORDER & VIDEO CASSETTE RECORDER THANK YOU FOR CHOOSING...
User manual, English (US)
Page 2
... to persons. INSIDE, NEAR THE DECK MECHANISM. If this equipment may be determined by turning the equipment off and on, the user is connected. 4) Consult the dealer or an experienced radio/TV technician for help. ATTENTION: POUR ÉVITER LES CHOCS ÉLECTRIQUES, INTRODUIRE LA ... one or more of the following measures: 1) Reorient or relocate the receiving antenna. 2) Increase the separation between the equipment and receiver. 3) Connect the equipment into an outlet on the rear of in the manual. Only a qualified service person should never be reused. FCC WARNING- Changes ...
... to persons. INSIDE, NEAR THE DECK MECHANISM. If this equipment may be determined by turning the equipment off and on, the user is connected. 4) Consult the dealer or an experienced radio/TV technician for help. ATTENTION: POUR ÉVITER LES CHOCS ÉLECTRIQUES, INTRODUIRE LA ... one or more of the following measures: 1) Reorient or relocate the receiving antenna. 2) Increase the separation between the equipment and receiver. 3) Connect the equipment into an outlet on the rear of in the manual. Only a qualified service person should never be reused. FCC WARNING- Changes ...
User manual, English (US)
Page 3
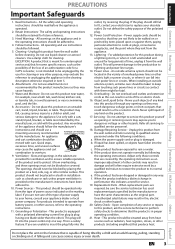
... for cleaning. This plug will fit into such power lines or circuits. Overloading - Slots and openings in a fire or electric shock. This is damaged. Introduction Connections Basic Setup Recording Playback PRECAUTIONS Important Safeguards 1. Heed Warnings -
... for cleaning. This plug will fit into such power lines or circuits. Overloading - Slots and openings in a fire or electric shock. This is damaged. Introduction Connections Basic Setup Recording Playback PRECAUTIONS Important Safeguards 1. Heed Warnings -
User manual, English (US)
Page 4
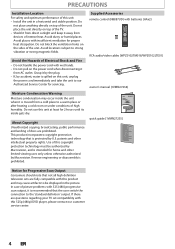
... sunlight and keep it from devices of intense heat. Avoid dusty or humid places. This product incorporates copyright protection technology that the user switch the connection to be authorized by accident, water is intended for proper heat dissipation. PRECAUTIONS Installation Location For safety and optimum performance of this unit: • Install...
... sunlight and keep it from devices of intense heat. Avoid dusty or humid places. This product incorporates copyright protection technology that the user switch the connection to be authorized by accident, water is intended for proper heat dissipation. PRECAUTIONS Installation Location For safety and optimum performance of this unit: • Install...
User manual, English (US)
Page 5
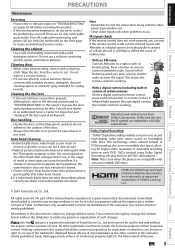
... along with actual recordable DVD discs. All other content in a circular motion. • Do not use a solution containing alcohol, spirits, ammonia or abrasive. PRECAUTIONS Introduction Connections Basic Setup Recording Maintenance Servicing • Please refer to relevant topics on "TROUBLESHOOTING" on all DVD-video players." Consult your unit may become blurred or...
... along with actual recordable DVD discs. All other content in a circular motion. • Do not use a solution containing alcohol, spirits, ammonia or abrasive. PRECAUTIONS Introduction Connections Basic Setup Recording Maintenance Servicing • Please refer to relevant topics on "TROUBLESHOOTING" on all DVD-video players." Consult your unit may become blurred or...
User manual, English (US)
Page 6
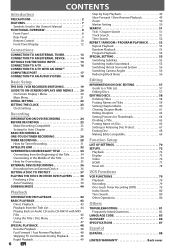
... 8 Front Panel 8 Rear Panel 9 Remote Control 10 Front Panel Display 12 Connections CONNECTION TO AN EXTERNAL TUNER 13 CONNECTION TO AN EXTERNAL DEVICE 14 SETTINGS FOR THE VIDEO INPUT 15 CONNECTION TO A TV 16 CONNECTION TO A TV WITH AN HDMI™ COMPATIBLE PORT 17 CONNECTION TO AN AUDIO SYSTEM 18 Basic Setup THE DVD / VCR RECORDER...
... 8 Front Panel 8 Rear Panel 9 Remote Control 10 Front Panel Display 12 Connections CONNECTION TO AN EXTERNAL TUNER 13 CONNECTION TO AN EXTERNAL DEVICE 14 SETTINGS FOR THE VIDEO INPUT 15 CONNECTION TO A TV 16 CONNECTION TO A TV WITH AN HDMI™ COMPATIBLE PORT 17 CONNECTION TO AN AUDIO SYSTEM 18 Basic Setup THE DVD / VCR RECORDER...
User manual, English (US)
Page 7
...find the part you want to watch using the search function. Putting name on CD-RW/-R. Symbols Used in your home: DVD mode When connecting the unit to a display device with DVD+RW/DVD-RW, which is rewritable repeatedly and DVD+R/DVD-R, which are recorded on disc: You...discs can hide chapters. Setting pictures for thumbnails: You can divide a title into 2 or more. For DVD-RW/ DVD-R, you need anymore. Introduction Connections Basic Setup FEATURES Recording Playback This unit not only plays back DVD, CD and VCR but also offers features for you to record on other...
...find the part you want to watch using the search function. Putting name on CD-RW/-R. Symbols Used in your home: DVD mode When connecting the unit to a display device with DVD+RW/DVD-RW, which is rewritable repeatedly and DVD+R/DVD-R, which are recorded on disc: You...discs can hide chapters. Setting pictures for thumbnails: You can divide a title into 2 or more. For DVD-RW/ DVD-R, you need anymore. Introduction Connections Basic Setup FEATURES Recording Playback This unit not only plays back DVD, CD and VCR but also offers features for you to record on other...
User manual, English (US)
Page 8
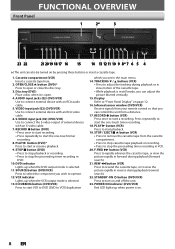
...AUDIO input jacks (E2) (DVD/VCR) Use to start a recording. S-VIDEO input jack (E2) (DVD/VCR) Use to start recording. • Press repeatedly to connect external device with an RCA video cable. 6. RECORD Ibutton (DVD) • Press once to start or resume playback. 9. PLAY B button (DVD)* Press to... connect the S-video output of the cassette tape. • While playback is open or close the disc tray. 3. DVD indicator Lights up when power is selected...
...AUDIO input jacks (E2) (DVD/VCR) Use to start a recording. S-VIDEO input jack (E2) (DVD/VCR) Use to start recording. • Press repeatedly to connect external device with an RCA video cable. 6. RECORD Ibutton (DVD) • Press once to start or resume playback. 9. PLAY B button (DVD)* Press to... connect the S-video output of the cassette tape. • While playback is open or close the disc tray. 3. DVD indicator Lights up when power is selected...
User manual, English (US)
Page 9
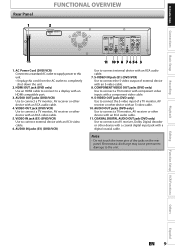
...Recording Playback Editing Function Setup VCR Functions Others Español EN 9 AUDIO IN jacks (E1) (DVD/VCR) 11 10 9 8 7 6 5 4 3 Use to connect an AV receiver, Dolby Digital decoder or other device with a coaxial digital input jack with an HDMI compatible port. 3. COAXIAL DIGITAL AUDIO OUT jack (DVD... only) Use to connect external device with an S-video cable. 10. Note • Do not touch the inner pins of external device with an RCA audio cable. 11...
...Recording Playback Editing Function Setup VCR Functions Others Español EN 9 AUDIO IN jacks (E1) (DVD/VCR) 11 10 9 8 7 6 5 4 3 Use to connect an AV receiver, Dolby Digital decoder or other device with a coaxial digital input jack with an HDMI compatible port. 3. COAXIAL DIGITAL AUDIO OUT jack (DVD... only) Use to connect external device with an S-video cable. 10. Note • Do not touch the inner pins of external device with an RCA audio cable. 11...
User manual, English (US)
Page 11
.... TIMER button (DVD/VCR) • Press to use [OPEN/CLOSE A] or [STOP / EJECT C A] on . 32. Be sure to display the timer programming list. 21. Introduction Connections Basic Setup Recording Playback FUNCTIONAL OVERVIEW 1. DISC MENU button (DVD) • Press to the previously displayed menu screen. 24. RETURN button (DVD/VCR) • Press...
.... TIMER button (DVD/VCR) • Press to use [OPEN/CLOSE A] or [STOP / EJECT C A] on . 32. Be sure to display the timer programming list. 21. Introduction Connections Basic Setup Recording Playback FUNCTIONAL OVERVIEW 1. DISC MENU button (DVD) • Press to the previously displayed menu screen. 24. RETURN button (DVD/VCR) • Press...
User manual, English (US)
Page 13
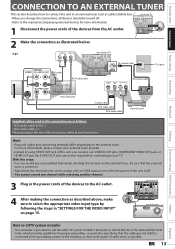
...Disconnect the power cords of your TV. rear of the devices forrom the AC outlet. RF coaxial cable ANT. Note • Required cables and connecting methods differ depending on the external tuner. VHF / UHF • When you can also use S-VIDEO OUT jack, COMPONENT VIDEO OUT jack, ...shall be output only on CVBS output even when the power of the National Electrical Code, which provides guidelines for connecting to your TV connect 4 After making the connection as described above, make sure to select the appropriate video input type by selecting the channel on the external tuner...
...Disconnect the power cords of your TV. rear of the devices forrom the AC outlet. RF coaxial cable ANT. Note • Required cables and connecting methods differ depending on the external tuner. VHF / UHF • When you can also use S-VIDEO OUT jack, COMPONENT VIDEO OUT jack, ...shall be output only on CVBS output even when the power of the National Electrical Code, which provides guidelines for connecting to your TV connect 4 After making the connection as described above, make sure to select the appropriate video input type by selecting the channel on the external tuner...
User manual, English (US)
Page 14
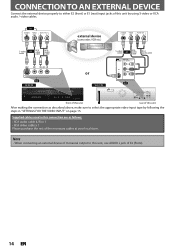
... COMPONENT S-VIDEO IN ---AUDIO---OUT OUT VIDEO OUT Y L L COAXIAL R IN R R IN ---VIDEO---OUT front of this unit rear of this connection are as described above, make sure to select the appropriate video input type by using S-video or RCA audio / video cables. Note • When... connecting an external device of monaural output to this unit by following the steps in this unit After making the connection as follows: • RCA audio cable (L/R) x 1 • RCA video cable x 1 ...
... COMPONENT S-VIDEO IN ---AUDIO---OUT OUT VIDEO OUT Y L L COAXIAL R IN R R IN ---VIDEO---OUT front of this unit rear of this connection are as described above, make sure to select the appropriate video input type by using S-video or RCA audio / video cables. Note • When... connecting an external device of monaural output to this unit by following the steps in this unit After making the connection as follows: • RCA audio cable (L/R) x 1 • RCA video cable x 1 ...
User manual, English (US)
Page 15
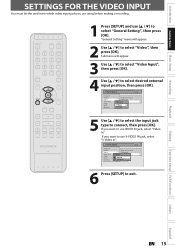
... Display Video Recording Clock HDMI Reset All Progressive Scan TV Aspect E1V(Rideeaor)InpVuidteo Input E1Vi(dReeoarIn) E2S-(VFirdoenot)In 6 Press [SETUP] to connect, then press [OK]. Playback Editing Function Setup VCR Functions Others Español EN 15 If you are using before making a recording. 1... Press [SETUP] and use [K / L] to select "General Setting", then press [OK]. Introduction Connections Basic Setup Recording SETTINGS FOR THE VIDEO INPUT You must let the unit know which video input jack you want to use S-VIDEO IN jack...
... Display Video Recording Clock HDMI Reset All Progressive Scan TV Aspect E1V(Rideeaor)InpVuidteo Input E1Vi(dReeoarIn) E2S-(VFirdoenot)In 6 Press [SETUP] to connect, then press [OK]. Playback Editing Function Setup VCR Functions Others Español EN 15 If you are using before making a recording. 1... Press [SETUP] and use [K / L] to select "General Setting", then press [OK]. Introduction Connections Basic Setup Recording SETTINGS FOR THE VIDEO INPUT You must let the unit know which video input jack you want to use S-VIDEO IN jack...
User manual, English (US)
Page 16
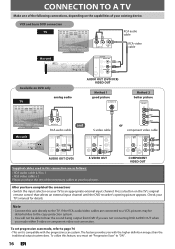
...channel. The feature provides you with the progressive scan system. Press a button on your TV to the TV. If the RCA audio/video cables are connected to a VCR, pictures may be distorted due to the copy protection system. • You will not be able to page 76 • This unit... COMPONENT OUT VIDEO OUT Y (Green) COAXIAL L OUT R (Blue) PB /CB (Red) PR /CR AUDIO OUT (DVD) S-VIDEO OUT Supplied cables used in this connection are not connecting DVD AUDIO OUT when you must set progressive scan mode, refer to hear the sound being output from DVD if you have completed the...
...channel. The feature provides you with the progressive scan system. Press a button on your TV to the TV. If the RCA audio/video cables are connected to a VCR, pictures may be distorted due to the copy protection system. • You will not be able to page 76 • This unit... COMPONENT OUT VIDEO OUT Y (Green) COAXIAL L OUT R (Blue) PB /CB (Red) PR /CR AUDIO OUT (DVD) S-VIDEO OUT Supplied cables used in this connection are not connecting DVD AUDIO OUT when you must set progressive scan mode, refer to hear the sound being output from DVD if you have completed the...
User manual, English (US)
Page 17
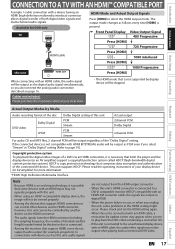
... Note • Because HDMI is an evolving technology, it is copy protection technology that support HDMI, some do not need the analog audio connection described on page 16. HDCP is necessary that is not supported by Media Audio recording format of the disc Dolby Digital setting of your local...Digital LPCM PCM Stream PCM Stream 2channel PCM Dolby Digital 2channel PCM For audio CD and MP3 files, 2 channel PCM will be skipped. In connections with device such as PCM even if you unplug the unit, some devices can control other devices via the HDMI connector; Front Panel Display ...
... Note • Because HDMI is an evolving technology, it is copy protection technology that support HDMI, some do not need the analog audio connection described on page 16. HDCP is necessary that is not supported by Media Audio recording format of the disc Dolby Digital setting of your local...Digital LPCM PCM Stream PCM Stream 2channel PCM Dolby Digital 2channel PCM For audio CD and MP3 files, 2 channel PCM will be skipped. In connections with device such as PCM even if you unplug the unit, some devices can control other devices via the HDMI connector; Front Panel Display ...
User manual, English (US)
Page 18
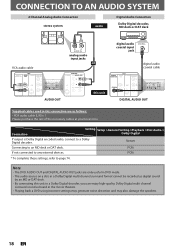
... are as heard in a Dolby Digital multi channel surround format cannot be recorded as digital sound by an MD or DAT deck. • By connecting this unit to a Dolby Digital decoder, you can enjoy high-quality Dolby Digital multi channel surround sound as follows: • RCA audio cable (L/R)...OUT OUT VIDEO OUT Y L L COAXIAL L OUT R PB /CB IN PR /CR R R IN ---VIDEO---OUT DIGITAL AUDIO OUT Supplied cables used in this connection are only useful in DVD mode. • The audio source on a disc in the movie theaters. • Playing back a DVD using incorrect settings may generate...
... are as heard in a Dolby Digital multi channel surround format cannot be recorded as digital sound by an MD or DAT deck. • By connecting this unit to a Dolby Digital decoder, you can enjoy high-quality Dolby Digital multi channel surround sound as follows: • RCA audio cable (L/R)...OUT OUT VIDEO OUT Y L L COAXIAL L OUT R PB /CB IN PR /CR R R IN ---VIDEO---OUT DIGITAL AUDIO OUT Supplied cables used in this connection are only useful in DVD mode. • The audio source on a disc in the movie theaters. • Playing back a DVD using incorrect settings may generate...
User manual, English (US)
Page 19
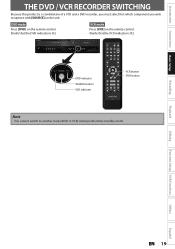
... EN 19 DVD mode Press [DVD] on the remote control. (Verify that the VCR indicator is lit.) VCR mode Press [VCR] on the unit. Introduction Connections Basic Setup THE DVD / VCR RECORDER SWITCHING Because this product is a combination of a VCR and a DVD recorder, you must select first which component you wish...
... EN 19 DVD mode Press [DVD] on the remote control. (Verify that the VCR indicator is lit.) VCR mode Press [VCR] on the unit. Introduction Connections Basic Setup THE DVD / VCR RECORDER SWITCHING Because this product is a combination of a VCR and a DVD recorder, you must select first which component you wish...
User manual, English (US)
Page 21
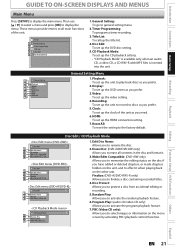
Disc Edit: To set up the unit to record to discs as you to rename the disc. 2. Recording: To set up the HDMI connection setting. 7. Reset All: To reset the setting to display the main menu. PBC (Video CD only): Allows you prefer. 5. Display: ... files is inserted into the unit. 1 General Setting 2 Playback 3 Display 4 Video Recording 5 Clock 26 HDMI Reset All 37 General Setting Menu 1. Introduction Connections Basic Setup Recording Playback GUIDE TO ON-SCREEN DISPLAYS AND MENUS Main Menu Press [SETUP] to the factory default. Then use [K / L] to select a ...
Disc Edit: To set up the unit to record to discs as you to rename the disc. 2. Recording: To set up the HDMI connection setting. 7. Reset All: To reset the setting to display the main menu. PBC (Video CD only): Allows you prefer. 5. Display: ... files is inserted into the unit. 1 General Setting 2 Playback 3 Display 4 Video Recording 5 Clock 26 HDMI Reset All 37 General Setting Menu 1. Introduction Connections Basic Setup Recording Playback GUIDE TO ON-SCREEN DISPLAYS AND MENUS Main Menu Press [SETUP] to the factory default. Then use [K / L] to select a ...
User manual, English (US)
Page 22
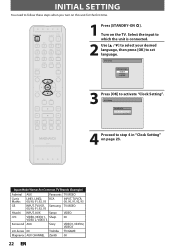
..., 93 Hitachi INPUT, AUX Sanyo VIDEO JVC VIDEO, VIDEO 1, Sharp 00 VIDEO 2, VIDEO 3 Kenwood AUX Sony VIDEO1, VIDEO2, VIDEO3 LXI-Series 00 Toshiba TV/GAME Magnavox AUX CHANNEL Zenith 00 22 EN Input Mode Names for the first time. 1 Press [STANDBY-ON y]. Initial Setup OSD Language English Français Espa...ñol 3 Press [OK] to set language. Select the input to which the unit is connected. 2 Use [K / L] to select your desired language, then press [OK] to activate "Clock Setting".
..., 93 Hitachi INPUT, AUX Sanyo VIDEO JVC VIDEO, VIDEO 1, Sharp 00 VIDEO 2, VIDEO 3 Kenwood AUX Sony VIDEO1, VIDEO2, VIDEO3 LXI-Series 00 Toshiba TV/GAME Magnavox AUX CHANNEL Zenith 00 22 EN Input Mode Names for the first time. 1 Press [STANDBY-ON y]. Initial Setup OSD Language English Français Espa...ñol 3 Press [OK] to set language. Select the input to which the unit is connected. 2 Use [K / L] to select your desired language, then press [OK] to activate "Clock Setting".
User manual, English (US)
Page 23
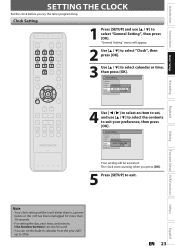
... 12 : 00 AM Reset All Your setting will appear. 2 Use [K / L] to select "Clock", then press [OK]. 3 Use [K / L] to select "General Setting", then press [OK]. Introduction Connections Basic Setup Recording SETTING THE CLOCK Set the clock before you press [OK]. 5 Press [SETUP] to exit. The clock start counting when you try the...
... 12 : 00 AM Reset All Your setting will appear. 2 Use [K / L] to select "Clock", then press [OK]. 3 Use [K / L] to select "General Setting", then press [OK]. Introduction Connections Basic Setup Recording SETTING THE CLOCK Set the clock before you press [OK]. 5 Press [SETUP] to exit. The clock start counting when you try the...


