
User manual, English (US)
Page 1
IF YOU HAVE READ YOUR INSTRUCTIONS AND STILL NEED ASSISTANCE, YOU MAY ACCESS OUR ONLINE HELP AT HTTP://WWW.MAGNAVOX.COM/SUPPORT OR CALL 1-800-605-8610 WHILE WITH YOUR PRODUCT. NEED HELP FAST? INSTRUCCIONES EN ESPAÑOL INCLUIDAS. © ...READ YOUR QUICK GUIDE AND/OR OWNER'S MANUAL FIRST FOR QUICK TIPS THAT MAKE USING YOUR MAGNAVOX PRODUCT MORE ENJOYABLE. Introduction Connections Basic Setup Recording Playback Owner's Manual ZV427MG9 DIGITAL VIDEO DISC RECORDER & VIDEO CASSETTE RECORDER THANK YOU FOR CHOOSING MAGNAVOX. Editing Function Setup VCR Functions Others Español
IF YOU HAVE READ YOUR INSTRUCTIONS AND STILL NEED ASSISTANCE, YOU MAY ACCESS OUR ONLINE HELP AT HTTP://WWW.MAGNAVOX.COM/SUPPORT OR CALL 1-800-605-8610 WHILE WITH YOUR PRODUCT. NEED HELP FAST? INSTRUCCIONES EN ESPAÑOL INCLUIDAS. © ...READ YOUR QUICK GUIDE AND/OR OWNER'S MANUAL FIRST FOR QUICK TIPS THAT MAKE USING YOUR MAGNAVOX PRODUCT MORE ENJOYABLE. Introduction Connections Basic Setup Recording Playback Owner's Manual ZV427MG9 DIGITAL VIDEO DISC RECORDER & VIDEO CASSETTE RECORDER THANK YOU FOR CHOOSING MAGNAVOX. Editing Function Setup VCR Functions Others Español
User manual, English (US)
Page 2
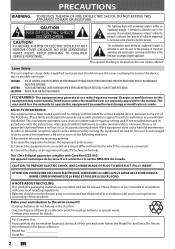
NO USER SERVICEABLE PARTS INSIDE. Only a qualified service person should never be of sufficient magnitude to comply with the limits for future reference. FCC WARNING- The user could lose the authority to persons. RADIO-TV INTERFERENCE This equipment has been tested and found to constitute a risk of important operating and maintenance (servicing) instructions in a residential installation. These limits are designed to Part 15 of the cabinet. This equipment generates, uses, and can dispose of them at the back of this unit and enter below the Model No. For Customer Use: ...
NO USER SERVICEABLE PARTS INSIDE. Only a qualified service person should never be of sufficient magnitude to comply with the limits for future reference. FCC WARNING- The user could lose the authority to persons. RADIO-TV INTERFERENCE This equipment has been tested and found to constitute a risk of important operating and maintenance (servicing) instructions in a residential installation. These limits are designed to Part 15 of the cabinet. This equipment generates, uses, and can dispose of them at the back of this unit and enter below the Model No. For Customer Use: ...
User manual, English (US)
Page 3
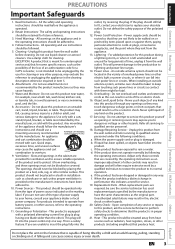
The safety and operating instructions should not be placed in a built-in any kind on the marking label. Follow Instructions - Use a damp cloth for service. 19. Attachments - Do not use attachments not recommended by the manufacturer or have the same characteristics as they are required, be unplugged by a child and an adult leaning, pulling, standing or climbing on an unstable cart, stand, tripod, bracket, or table. Ventilation - This product should be operated only from the type of any way. This product should not be situated away from overheating, and these ...
The safety and operating instructions should not be placed in a built-in any kind on the marking label. Follow Instructions - Use a damp cloth for service. 19. Attachments - Do not use attachments not recommended by the manufacturer or have the same characteristics as they are required, be unplugged by a child and an adult leaning, pulling, standing or climbing on an unstable cart, stand, tripod, bracket, or table. Ventilation - This product should be operated only from the type of any way. This product should not be situated away from overheating, and these ...
User manual, English (US)
Page 4
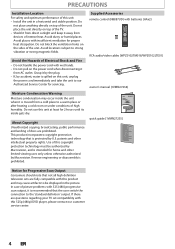
Avoid dusty or humid places. Moisture Condensation Warning Moisture condensation may cause artifacts to be authorized by U.S. Do not use this unit: • Install the unit in the picture. Supplied Accessories remote control (NB887UD) with this unit, unplug the power cord immediately and take the unit to our Authorized Service Center for servicing. This product incorporates copyright protection technology that not all high definition television sets are fully compatible with batteries (AAx2) RCA audio/video cables (WPZ0102TM018/WPZ0102LTE01) owner's manual (1VMN27234) quick ...
Avoid dusty or humid places. Moisture Condensation Warning Moisture condensation may cause artifacts to be authorized by U.S. Do not use this unit: • Install the unit in the picture. Supplied Accessories remote control (NB887UD) with this unit, unplug the power cord immediately and take the unit to our Authorized Service Center for servicing. This product incorporates copyright protection technology that not all high definition television sets are fully compatible with batteries (AAx2) RCA audio/video cables (WPZ0102TM018/WPZ0102LTE01) owner's manual (1VMN27234) quick ...
User manual, English (US)
Page 5
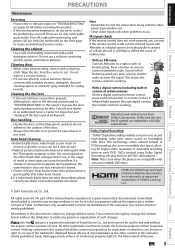
Do not use , or the usage of the trademarks displayed herein. Disc handling • Handle the discs so that fingerprints and dust do not try to correct the problem by implication or otherwise, any license or right to use any of rental or worn tapes can see a clear picture. • Playback picture may need to be cleaned. 1. If a video head cleaner does not solve the problem, please consult your local Audio/Video store and purchase a good quality VHS video head cleaner. 2. Note • Remember to read the instructions along with the video head cleaner before returning the ...
Do not use , or the usage of the trademarks displayed herein. Disc handling • Handle the discs so that fingerprints and dust do not try to correct the problem by implication or otherwise, any license or right to use any of rental or worn tapes can see a clear picture. • Playback picture may need to be cleaned. 1. If a video head cleaner does not solve the problem, please consult your local Audio/Video store and purchase a good quality VHS video head cleaner. 2. Note • Remember to read the instructions along with the video head cleaner before returning the ...
User manual, English (US)
Page 6
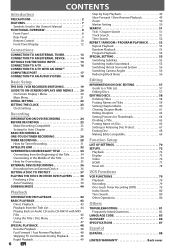
CONTENTS Introduction PRECAUTIONS 2 FEATURES 7 Symbols Used in this Owner's Manual 7 FUNCTIONAL OVERVIEW 8 Front Panel 8 Rear Panel 9 Remote Control 10 Front Panel Display 12 Connections CONNECTION TO AN EXTERNAL TUNER 13 CONNECTION TO AN EXTERNAL DEVICE 14 SETTINGS FOR THE VIDEO INPUT 15 CONNECTION TO A TV 16 CONNECTION TO A TV WITH AN HDMI™ COMPATIBLE PORT 17 CONNECTION TO AN AUDIO SYSTEM 18 Basic Setup THE DVD / VCR RECORDER SWITCHING 19 GUIDE TO ON-SCREEN DISPLAYS AND MENUS . . . . 20 On-Screen Display / Menu 20 Main Menu 21 INITIAL SETTING 22 SETTING THE CLOCK 23...
CONTENTS Introduction PRECAUTIONS 2 FEATURES 7 Symbols Used in this Owner's Manual 7 FUNCTIONAL OVERVIEW 8 Front Panel 8 Rear Panel 9 Remote Control 10 Front Panel Display 12 Connections CONNECTION TO AN EXTERNAL TUNER 13 CONNECTION TO AN EXTERNAL DEVICE 14 SETTINGS FOR THE VIDEO INPUT 15 CONNECTION TO A TV 16 CONNECTION TO A TV WITH AN HDMI™ COMPATIBLE PORT 17 CONNECTION TO AN AUDIO SYSTEM 18 Basic Setup THE DVD / VCR RECORDER SWITCHING 19 GUIDE TO ON-SCREEN DISPLAYS AND MENUS . . . . 20 On-Screen Display / Menu 20 Main Menu 21 INITIAL SETTING 22 SETTING THE CLOCK 23...
User manual, English (US)
Page 7
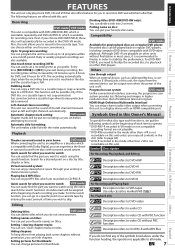
Introduction Connections Basic Setup FEATURES Recording Playback This unit not only plays back DVD, CD and VCR but also offers features for you to record on DVD and edit them after that of each recording you make. Even if you set a recording time as you choose DVD-RW/DVD-R, these discs will be recorded in the mode other than +VR is applicable to the cassette tape. Daily or weekly program recordings are offered with Dolby Digital, you do not need to finalize the recorded discs to play back on titles. Automatic chapter mark setting: DVD mode Chapter marks will be put...
Introduction Connections Basic Setup FEATURES Recording Playback This unit not only plays back DVD, CD and VCR but also offers features for you to record on DVD and edit them after that of each recording you make. Even if you set a recording time as you choose DVD-RW/DVD-R, these discs will be recorded in the mode other than +VR is applicable to the cassette tape. Daily or weekly program recordings are offered with Dolby Digital, you do not need to finalize the recorded discs to play back on titles. Automatic chapter mark setting: DVD mode Chapter marks will be put...
User manual, English (US)
Page 8
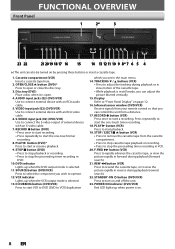
AUDIO input jacks (E2) (DVD/VCR) Use to start the one -touch timer recording. 8. RECORD Ibutton (DVD) • Press once to start recording. • Press repeatedly to connect external device with an RCA video cable. 6. Infrared sensor window (DVD/VCR) Receive signals from your remote control so that you set in the main menu. 14. STANDBY-ON y button (DVD/VCR) Press to start playback. 19. POWER ON indicator (DVD/VCR) Red LED lights up when the DVD output mode is selected. 11. PLAY B button (DVD)* Press to turn on by pressing these buttons or insert a cassette tape. 1. ...
AUDIO input jacks (E2) (DVD/VCR) Use to start the one -touch timer recording. 8. RECORD Ibutton (DVD) • Press once to start recording. • Press repeatedly to connect external device with an RCA video cable. 6. Infrared sensor window (DVD/VCR) Receive signals from your remote control so that you set in the main menu. 14. STANDBY-ON y button (DVD/VCR) Press to start playback. 19. POWER ON indicator (DVD/VCR) Red LED lights up when the DVD output mode is selected. 11. PLAY B button (DVD)* Press to turn on by pressing these buttons or insert a cassette tape. 1. ...
User manual, English (US)
Page 9
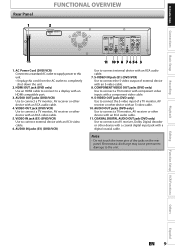
VIDEO OUT jack (DVD/VCR) Use to connect a TV monitor with component video inputs with an RCA video cable. 5. COMPONENT VIDEO OUT jacks (DVD only) Use to connect a TV monitor, AV receiver or other device with a component video cable. 9. AUDIO OUT jacks (DVD only) Use to a display with an RCA audio cable. 11. Note • Do not touch the inner pins of external device with a digital coaxial cable. Recording Playback Editing Function Setup VCR Functions Others Español EN 9 Introduction Connections Basic Setup Rear Panel 1 FUNCTIONAL OVERVIEW 2 HDMI OUT DIGITAL AUDIO OUT...
VIDEO OUT jack (DVD/VCR) Use to connect a TV monitor with component video inputs with an RCA video cable. 5. COMPONENT VIDEO OUT jacks (DVD only) Use to connect a TV monitor, AV receiver or other device with a component video cable. 9. AUDIO OUT jacks (DVD only) Use to a display with an RCA audio cable. 11. Note • Do not touch the inner pins of external device with a digital coaxial cable. Recording Playback Editing Function Setup VCR Functions Others Español EN 9 Introduction Connections Basic Setup Rear Panel 1 FUNCTIONAL OVERVIEW 2 HDMI OUT DIGITAL AUDIO OUT...
User manual, English (US)
Page 10
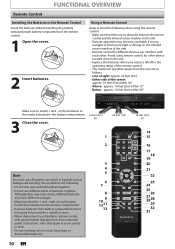
FUNCTIONAL OVERVIEW Remote Control Installing the Batteries in the Remote Control Install the batteries (AAx2) matching the polarity indicated inside battery compartment of batteries together. Please observe the following when using remote control for other device located close to the marks indicated in hazards such as follows. - Although they may look similar, different batteries may become unreliable if strong sunlight or fluorescent light is not going to match + and - Using a Remote Control Keep in mind the following : • Do not mix new and old batteries together. &#...
FUNCTIONAL OVERVIEW Remote Control Installing the Batteries in the Remote Control Install the batteries (AAx2) matching the polarity indicated inside battery compartment of batteries together. Please observe the following when using remote control for other device located close to the marks indicated in hazards such as follows. - Although they may look similar, different batteries may become unreliable if strong sunlight or fluorescent light is not going to match + and - Using a Remote Control Keep in mind the following : • Do not mix new and old batteries together. &#...
User manual, English (US)
Page 11
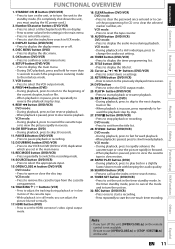
DISPLAY button (DVD/VCR) • Press to display the audio menu during playback or in slow motion of the cassette tape. • While playback is in still mode, you can adjust the picture blurred vertically. 17. CM SKIP button (DVD) • During playback, press to select the appropriate input. 15. SOURCE button (DVD/VCR) • Press to skip 30 seconds. 11. VCR mode: • Press to pause playback or recording. 12. AUDIO button (DVD/VCR) DVD mode: • Press to display the display menu on . 32. In the timer standby mode, press to cancel the mode and to turn the unit...
DISPLAY button (DVD/VCR) • Press to display the audio menu during playback or in slow motion of the cassette tape. • While playback is in still mode, you can adjust the picture blurred vertically. 17. CM SKIP button (DVD) • During playback, press to select the appropriate input. 15. SOURCE button (DVD/VCR) • Press to skip 30 seconds. 11. VCR mode: • Press to pause playback or recording. 12. AUDIO button (DVD/VCR) DVD mode: • Press to display the display menu on . 32. In the timer standby mode, press to cancel the mode and to turn the unit...
User manual, English (US)
Page 12
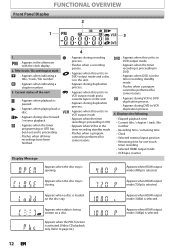
Appears when a disc is in the timer recording standby mode. : Flashes when a program cannot be performed for some reasons. DVD : Appears when this unit is in DVD output mode. : Appears when the timer recording is proceeding in the timer recording standby mode. : Flashes when a program cannot be performed for one-touch timer recording • Selected HDMI output mode • VCR tape counter Display Message Appears when the disc tray is activated. (Video CD playback only. Appears when the PBC function is opening. FUNCTIONAL OVERVIEW Front Panel Display 2 1 PM BS CS DR...
Appears when a disc is in the timer recording standby mode. : Flashes when a program cannot be performed for some reasons. DVD : Appears when this unit is in DVD output mode. : Appears when the timer recording is proceeding in the timer recording standby mode. : Flashes when a program cannot be performed for one-touch timer recording • Selected HDMI output mode • VCR tape counter Display Message Appears when the disc tray is activated. (Video CD playback only. Appears when the PBC function is opening. FUNCTIONAL OVERVIEW Front Panel Display 2 1 PM BS CS DR...
User manual, English (US)
Page 13
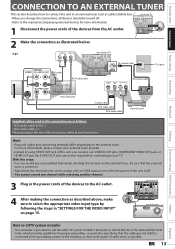
RF coaxial cable ANT. e.g.) AUDIO IN VIDEO IN L R rear of your TV DVD/VCR S-VIDEO IN ---AUDIO---OUT L RCA audio cable RCA video cable HDMI OUT IN R IN ---VIDEO---OUT DIGITAL AUDIO OUT DVD AUDIO S-VIDEO COMPONENT S-VIDEO OUT VIDEO OUT Y DVD/VCR IN ---AUDIO---OUT L L PB /CB IN PR /CR R R IN ---VIDEO---OUT rear of this unit, you change the connections, all devices should banetentnuarned off . • You cannot record one channel while watching another channel. 3 Plug in this connection are as cable/satellite box. For more information. 2 Disconnect 1 Disconnect ...
RF coaxial cable ANT. e.g.) AUDIO IN VIDEO IN L R rear of your TV DVD/VCR S-VIDEO IN ---AUDIO---OUT L RCA audio cable RCA video cable HDMI OUT IN R IN ---VIDEO---OUT DIGITAL AUDIO OUT DVD AUDIO S-VIDEO COMPONENT S-VIDEO OUT VIDEO OUT Y DVD/VCR IN ---AUDIO---OUT L L PB /CB IN PR /CR R R IN ---VIDEO---OUT rear of this unit, you change the connections, all devices should banetentnuarned off . • You cannot record one channel while watching another channel. 3 Plug in this connection are as cable/satellite box. For more information. 2 Disconnect 1 Disconnect ...
User manual, English (US)
Page 14
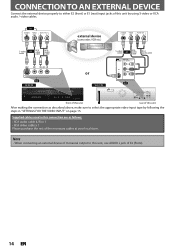
Supplied cables used in this connection are as described above, make sure to select the appropriate video input type by using S-video or RCA audio / video cables. Note • When connecting an external device of monaural output to either E2 (front) or E1 (rear) input jacks of this unit by following the steps in "SETTINGS FOR THE VIDEO INPUT" on page 15. CONNECTION TO AN EXTERNAL DEVICE Connect the external device properly to this unit, use AUDIO L jack of E2 (Front). 14 EN or S-VIDEO VIDEO OUT OUT AUDIO OUT R L external device (camcorder, VCR etc.) S-VIDEO VIDEO OUT OUT...
Supplied cables used in this connection are as described above, make sure to select the appropriate video input type by using S-video or RCA audio / video cables. Note • When connecting an external device of monaural output to either E2 (front) or E1 (rear) input jacks of this unit by following the steps in "SETTINGS FOR THE VIDEO INPUT" on page 15. CONNECTION TO AN EXTERNAL DEVICE Connect the external device properly to this unit, use AUDIO L jack of E2 (Front). 14 EN or S-VIDEO VIDEO OUT OUT AUDIO OUT R L external device (camcorder, VCR etc.) S-VIDEO VIDEO OUT OUT...
User manual, English (US)
Page 15
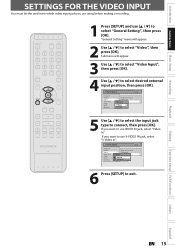
Submenu will appear. 2 Use [K / L] to select "Video", then press [OK]. General Setting Playback Display Video Recording Clock HDMI Reset All Progressive Scan TV Aspect Video InpVuidteo Input E1 (Rear) E2 (Front) 5 Use [K / L] to select the input jack type to use VIDEO IN jack, select "Video In". If you want to exit. If you want to connect, then press [OK]. General Setting Playback Display Video Recording Clock HDMI Reset All Progressive Scan TV Aspect E1V(Rideeaor)InpVuidteo Input E1Vi(dReeoarIn) E2S-(VFirdoenot)In 6 Press [SETUP] to use S-VIDEO IN jack, select "S-Video In". ...
Submenu will appear. 2 Use [K / L] to select "Video", then press [OK]. General Setting Playback Display Video Recording Clock HDMI Reset All Progressive Scan TV Aspect Video InpVuidteo Input E1 (Rear) E2 (Front) 5 Use [K / L] to select the input jack type to use VIDEO IN jack, select "Video In". If you want to exit. If you want to connect, then press [OK]. General Setting Playback Display Video Recording Clock HDMI Reset All Progressive Scan TV Aspect E1V(Rideeaor)InpVuidteo Input E1Vi(dReeoarIn) E2S-(VFirdoenot)In 6 Press [SETUP] to use S-VIDEO IN jack, select "S-Video In". ...
User manual, English (US)
Page 16
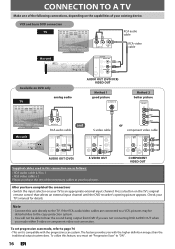
VCR and basic DVD connection TV RCA audio cable R L VIDEO AUDIO IN IN RCA video cable this unit HDMI OUT DIGITAL AUDIO OUT DVD DVD/VCR AUDIO S-VIDEO COMPONENT S-VIDEO IN ---AUDIO---OUT OUT VIDEO OUT Y L L COAXIAL L OUT R PB /CB IN PR /CR R R IN ---VIDEO---OUT DVD/VCR S-VIDEO IN ---AUDIO---OUT L L IN R R IN ---VIDEO---OUT Available on DVD only analog audio TV AUDIO OUT (DVD/VCR) VIDEO OUT Method 1 good picture S-VIDEO IN Method 2 better picture COMPONENT VIDEO IN Y (Green) PB/CB (Blue) R L AUDIO IN RCA audio cable and S-video cable PR/CR (Red) or ...
VCR and basic DVD connection TV RCA audio cable R L VIDEO AUDIO IN IN RCA video cable this unit HDMI OUT DIGITAL AUDIO OUT DVD DVD/VCR AUDIO S-VIDEO COMPONENT S-VIDEO IN ---AUDIO---OUT OUT VIDEO OUT Y L L COAXIAL L OUT R PB /CB IN PR /CR R R IN ---VIDEO---OUT DVD/VCR S-VIDEO IN ---AUDIO---OUT L L IN R R IN ---VIDEO---OUT Available on DVD only analog audio TV AUDIO OUT (DVD/VCR) VIDEO OUT Method 1 good picture S-VIDEO IN Method 2 better picture COMPONENT VIDEO IN Y (Green) PB/CB (Blue) R L AUDIO IN RCA audio cable and S-video cable PR/CR (Red) or ...
User manual, English (US)
Page 17
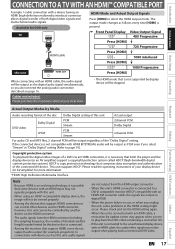
Recording Playback Editing Function Setup VCR Functions Actual Output Modes by Media Audio recording format of the disc Dolby Digital setting of this unit Actual output DVD-video Dolby Digital LPCM PCM Stream PCM Stream 2channel PCM Dolby Digital 2channel PCM For audio CD and MP3 files, 2 channel PCM will be controlled by another device via the HDMI connector. • The audio signals from the HDMI output connector. • When this unit's HDMI connector is not compatible with an HDMI-DVI converter cable, the signals are not output from the HDMI connector (including the ...
Recording Playback Editing Function Setup VCR Functions Actual Output Modes by Media Audio recording format of the disc Dolby Digital setting of this unit Actual output DVD-video Dolby Digital LPCM PCM Stream PCM Stream 2channel PCM Dolby Digital 2channel PCM For audio CD and MP3 files, 2 channel PCM will be controlled by another device via the HDMI connector. • The audio signals from the HDMI output connector. • When this unit's HDMI connector is not compatible with an HDMI-DVI converter cable, the signals are not output from the HDMI connector (including the ...
User manual, English (US)
Page 18
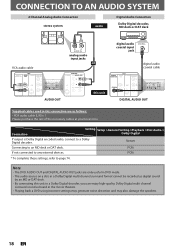
PCM * To complete these settings, refer to a Dolby Digital decoder. Note • The DVD AUDIO OUT and DIGITAL AUDIO OUT jacks are only useful in DVD mode. • The audio source on a disc in a Dolby Digital multi channel surround format cannot be recorded as digital sound by an MD or DAT deck. • By connecting this connection are as heard in this unit to a Dolby Digital decoder, you can enjoy high-quality Dolby Digital multi channel surround sound as follows: • RCA audio cable (L/R) x 1 Please purchase the rest of the necessary cables at your local store. ...
PCM * To complete these settings, refer to a Dolby Digital decoder. Note • The DVD AUDIO OUT and DIGITAL AUDIO OUT jacks are only useful in DVD mode. • The audio source on a disc in a Dolby Digital multi channel surround format cannot be recorded as digital sound by an MD or DAT deck. • By connecting this connection are as heard in this unit to a Dolby Digital decoder, you can enjoy high-quality Dolby Digital multi channel surround sound as follows: • RCA audio cable (L/R) x 1 Please purchase the rest of the necessary cables at your local store. ...
User manual, English (US)
Page 19
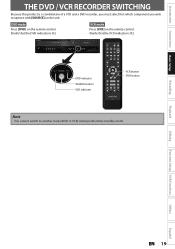
Introduction Connections Basic Setup THE DVD / VCR RECORDER SWITCHING Because this product is lit.) DVD indicator SOURCE button VCR indicator VCR button DVD button Note • You cannot switch to operate with [SOURCE] on the unit. DVD mode Press [DVD] on the remote control. (Verify that the DVD indicator is lit.) VCR mode Press [VCR] on the remote control. (Verify that the VCR indicator is a combination of a VCR and a DVD recorder, you must select first which component you wish to another mode (DVD or VCR) during in the timer-standby mode. Recording Playback Editing Function ...
Introduction Connections Basic Setup THE DVD / VCR RECORDER SWITCHING Because this product is lit.) DVD indicator SOURCE button VCR indicator VCR button DVD button Note • You cannot switch to operate with [SOURCE] on the unit. DVD mode Press [DVD] on the remote control. (Verify that the DVD indicator is lit.) VCR mode Press [VCR] on the remote control. (Verify that the VCR indicator is a combination of a VCR and a DVD recorder, you must select first which component you wish to another mode (DVD or VCR) during in the timer-standby mode. Recording Playback Editing Function ...
User manual, English (US)
Page 20
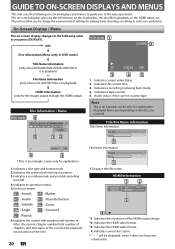
On-Screen Display / Menu The on-screen display changes in the following on-screen displays and menus to guide you to the easy operations. Indicates a recording mode and possible recording time left. 4. Indicates a tape counter. 5. Indicates a disc type and format mode. 2. Indicates the current time. 3. Note • This is an example screen only for explanation. 1. The menus allow you to suite your preference. Indicates the current title number/total number of titles, the current chapter number/total number of chapters, and time lapse of the current title playback/ total...
On-Screen Display / Menu The on-screen display changes in the following on-screen displays and menus to guide you to the easy operations. Indicates a recording mode and possible recording time left. 4. Indicates a tape counter. 5. Indicates a disc type and format mode. 2. Indicates the current time. 3. Note • This is an example screen only for explanation. 1. The menus allow you to suite your preference. Indicates the current title number/total number of titles, the current chapter number/total number of chapters, and time lapse of the current title playback/ total...
