
User manual, English (US)
Page 1
... 1-800-605-8610 WHILE WITH YOUR PRODUCT. INSTRUCCIONES EN ESPAÑOL INCLUIDAS. © 2011 Funai Electric Co., Ltd. Introduction Connections Basic Setup Recording Playback Owner's Manual H2160MW9 HDD & DVD PLAYER / RECORDER WITH DIGITAL TUNER THANK YOU FOR CHOOSING MAGNAVOX. READ YOUR QUICK GUIDE AND/OR OWNER'S MANUAL FIRST FOR QUICK TIPS THAT MAKE USING YOUR...
... 1-800-605-8610 WHILE WITH YOUR PRODUCT. INSTRUCCIONES EN ESPAÑOL INCLUIDAS. © 2011 Funai Electric Co., Ltd. Introduction Connections Basic Setup Recording Playback Owner's Manual H2160MW9 HDD & DVD PLAYER / RECORDER WITH DIGITAL TUNER THANK YOU FOR CHOOSING MAGNAVOX. READ YOUR QUICK GUIDE AND/OR OWNER'S MANUAL FIRST FOR QUICK TIPS THAT MAKE USING YOUR...
User manual, English (US)
Page 6
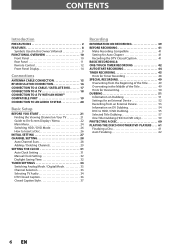
...Setup BEFORE YOU START 21 Finding the Viewing Channel on Your TV 21 Guide to On-Screen Display / Menu 22 Main Menu 24 Switching HDD / DVD Mode 26 How to Insert a Disc 26 INITIAL SETTING 27 CHANNEL SETTING 28 Auto Channel Scan 28 Adding / Deleting Channels 29 SETTING THE... on Dubbing 51 Settings for an External Device 52 Recording from an External Device 53 Information on DV Dubbing 54 DVC to HDD / DVD Dubbing 55 Selected Title Dubbing 57 One Title Dubbing (HDD to DVD only 59 PROTECTING A DISC 60 PLAYING THE DISCS ON OTHER DVD PLAYERS . . . . 61 Finalizing a Disc 61 Auto ...
...Setup BEFORE YOU START 21 Finding the Viewing Channel on Your TV 21 Guide to On-Screen Display / Menu 22 Main Menu 24 Switching HDD / DVD Mode 26 How to Insert a Disc 26 INITIAL SETTING 27 CHANNEL SETTING 28 Auto Channel Scan 28 Adding / Deleting Channels 29 SETTING THE... on Dubbing 51 Settings for an External Device 52 Recording from an External Device 53 Information on DV Dubbing 54 DVC to HDD / DVD Dubbing 55 Selected Title Dubbing 57 One Title Dubbing (HDD to DVD only 59 PROTECTING A DISC 60 PLAYING THE DISCS ON OTHER DVD PLAYERS . . . . 61 Finalizing a Disc 61 Auto ...
User manual, English (US)
Page 8
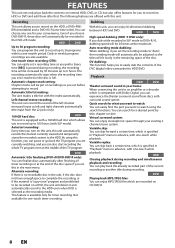
... marks will automatically be put on recordings as you can enjoy bi-directional dubbing between HDD and DVD. Alternate recording: If there is no recordable disc in advance, with surround sound system. HDD DVD High speed dubbing (HDD ➔ DVD only): If you to record up to 180 hours (with this...search functions. FEATURES This unit not only plays back the contents on internal HDD, DVD, or CD, but also offers features for you to record on the HDD, a DVD+RW/- Recording This unit allows you to record on CD-RW/-R. 8 EN This feature is specified in "Playback" menu ...
... marks will automatically be put on recordings as you can enjoy bi-directional dubbing between HDD and DVD. Alternate recording: If there is no recordable disc in advance, with surround sound system. HDD DVD High speed dubbing (HDD ➔ DVD only): If you to record up to 180 hours (with this...search functions. FEATURES This unit not only plays back the contents on internal HDD, DVD, or CD, but also offers features for you to record on the HDD, a DVD+RW/- Recording This unit allows you to record on CD-RW/-R. 8 EN This feature is specified in "Playback" menu ...

User manual, English (US)
Page 9
... page 95). * DVD-R recorded in the mode other DVD players. HDMI (High-Definition Multimedia Interface) You can enjoy clearer audio/video output when connecting this unit. Symbol Description For Recording, Playing Back, and Editing Description refers to HDD Description refers to DVD+RW Description refers to DVD+R Description refers to DVD-RW Description refers to DVD-R For Playback only...
... page 95). * DVD-R recorded in the mode other DVD players. HDMI (High-Definition Multimedia Interface) You can enjoy clearer audio/video output when connecting this unit. Symbol Description For Recording, Playing Back, and Editing Description refers to HDD Description refers to DVD+RW Description refers to DVD+R Description refers to DVD-RW Description refers to DVD-R For Playback only...

User manual, English (US)
Page 14
... Appears when the channel is in DVD mode. 5. Displays the following • Elapsed playback time • Current title / chapter / track / file number • Recording time / remaining time • Clock • Channel number • Remaining time for one-touch timer recording • Selected HDMI output mode ...and is in this unit. HDD : Appears when the unit is being recorded on the disc tray. Appears when data is in the afternoon with the clock display. 2. FUNCTIONAL OVERVIEW Front Panel Display 23 1 PM DTV BS CS DR CD VCR 4 DB HDD DVD 5 1. Appears when HDMI...
... Appears when the channel is in DVD mode. 5. Displays the following • Elapsed playback time • Current title / chapter / track / file number • Recording time / remaining time • Clock • Channel number • Remaining time for one-touch timer recording • Selected HDMI output mode ...and is in this unit. HDD : Appears when the unit is being recorded on the disc tray. Appears when data is in the afternoon with the clock display. 2. FUNCTIONAL OVERVIEW Front Panel Display 23 1 PM DTV BS CS DR CD VCR 4 DB HDD DVD 5 1. Appears when HDMI...

User manual, English (US)
Page 15
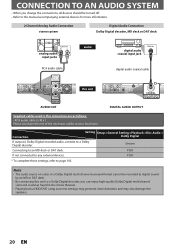
... RF coaxial cable IN OUT This connection is for tuner pass through only. Channel scanning is for TV loop through the RF is not possible. HDD/DVD playback through only ANTENNA RF coaxial cable VIDEO VIDEO IN OUT L L R IN R AUDIO IN (L1) S-VIDEO AUDIO OUT rear of this unit VIDEO ...device, please unplug the RF coaxial cable from antenna input jack of this unit and your TV to the AC outlet. Introduction Connections Basic Setup Recording ANTENNA CABLE CONNECTION This section describes how to connect your unit to an antenna, cable box, etc. 1 Disconnect the power cord of your...
... RF coaxial cable IN OUT This connection is for tuner pass through only. Channel scanning is for TV loop through the RF is not possible. HDD/DVD playback through only ANTENNA RF coaxial cable VIDEO VIDEO IN OUT L L R IN R AUDIO IN (L1) S-VIDEO AUDIO OUT rear of this unit VIDEO ...device, please unplug the RF coaxial cable from antenna input jack of this unit and your TV to the AC outlet. Introduction Connections Basic Setup Recording ANTENNA CABLE CONNECTION This section describes how to connect your unit to an antenna, cable box, etc. 1 Disconnect the power cord of your...
User manual, English (US)
Page 20
...Digital multi channel surround format cannot be turned off. • Refer to a Dolby Digital decoder, you change the connections, all devices should be recorded as digital sound by an MD or DAT deck. • By connecting this unit to the manual accompanying external devices for more information. 2... OUTPUT PCM/BITSTREAM DIGITAL AUDIO OUTPUT Supplied cables used in this connection are as heard in the movie theaters. • Playing back a HDD/DVD using incorrect settings may generate noise distortion and may also damage the speakers. 20 EN CONNECTION TO AN AUDIO SYSTEM • When you...
...Digital multi channel surround format cannot be turned off. • Refer to a Dolby Digital decoder, you change the connections, all devices should be recorded as digital sound by an MD or DAT deck. • By connecting this unit to the manual accompanying external devices for more information. 2... OUTPUT PCM/BITSTREAM DIGITAL AUDIO OUTPUT Supplied cables used in this connection are as heard in the movie theaters. • Playing back a HDD/DVD using incorrect settings may generate noise distortion and may also damage the speakers. 20 EN CONNECTION TO AN AUDIO SYSTEM • When you...
User manual, English (US)
Page 21
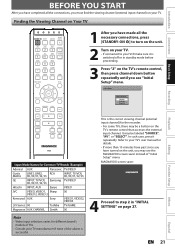
...EN 21 Others Español Initial Setup OSD Language English Français Español Basic Setup Recording Playback Editing Function Setup RAPID PLAY D.DUBBING TIMER HDD DVD REC MODE REC Input Mode Names for Common TV Brands (Example) Admiral AUX Panasonic TV/VIDEO Curtis LINE1...INPUT, AUX Sanyo VIDEO JVC VIDEO, VIDEO 1, Sharp 00 VIDEO 2, VIDEO 3 Kenwood AUX Sony VIDEO1, VIDEO2, VIDEO3 LXI-Series 00 Toshiba TV/GAME Magnavox AUX CHANNEL Zenith 00 This is successful. It may be labeled "SOURCE", "AV", or "SELECT". Refer to step 2 in standby mode before proceeding...
...EN 21 Others Español Initial Setup OSD Language English Français Español Basic Setup Recording Playback Editing Function Setup RAPID PLAY D.DUBBING TIMER HDD DVD REC MODE REC Input Mode Names for Common TV Brands (Example) Admiral AUX Panasonic TV/VIDEO Curtis LINE1...INPUT, AUX Sanyo VIDEO JVC VIDEO, VIDEO 1, Sharp 00 VIDEO 2, VIDEO 3 Kenwood AUX Sony VIDEO1, VIDEO2, VIDEO3 LXI-Series 00 Toshiba TV/GAME Magnavox AUX CHANNEL Zenith 00 This is successful. It may be labeled "SOURCE", "AV", or "SELECT". Refer to step 2 in standby mode before proceeding...

User manual, English (US)
Page 22
... the autostart recording 7. Broadcast station 7. Program rating Note • When the program guide is displayed when the audio language cannot be acquired, or the acquired languages are playing back) DTV Program Guide 1 5 PROGRAM TITLE NAME 123.45 2 WLIW-DT 6 3 90 INFORMATION-1 TV-PG ENGLISH 7 4 INFORMATION-2 INFORMATION-3 INFORMATION-4 8 INFORMATION-5 INFORMATION-6 HDD / DVD Information/Menu...
... the autostart recording 7. Broadcast station 7. Program rating Note • When the program guide is displayed when the audio language cannot be acquired, or the acquired languages are playing back) DTV Program Guide 1 5 PROGRAM TITLE NAME 123.45 2 WLIW-DT 6 3 90 INFORMATION-1 TV-PG ENGLISH 7 4 INFORMATION-2 INFORMATION-3 INFORMATION-4 8 INFORMATION-5 INFORMATION-6 HDD / DVD Information/Menu...

User manual, English (US)
Page 23
... explanation. Displayed items may differ from the actual recordable time as this unit employs the variable bit rate encoding system which varies the recording (storage) amount of data in use . : HDD : DVD MP3 Tag Information Indicates artist/track information •...selected external input channel. 3. Introduction Connections Basic Setup Recording BEFORE YOU START HDD / DVD Information / Menu 6 7 1/ 5 1/ 5 0:01:00 / 1:23:45 DVD Video CH 10 Title/File Name Information Title Name Information Title Name My Title 5 12 DVD SP(2Hr) 1h53m File Name Information File Name My ...
... explanation. Displayed items may differ from the actual recordable time as this unit employs the variable bit rate encoding system which varies the recording (storage) amount of data in use . : HDD : DVD MP3 Tag Information Indicates artist/track information •...selected external input channel. 3. Introduction Connections Basic Setup Recording BEFORE YOU START HDD / DVD Information / Menu 6 7 1/ 5 1/ 5 0:01:00 / 1:23:45 DVD Video CH 10 Title/File Name Information Title Name Information Title Name My Title 5 12 DVD SP(2Hr) 1h53m File Name Information File Name My ...

User manual, English (US)
Page 25
...Delete All Unprotected Titles Dubbing 111 HDD DVD 122 DVD HDD 1. Erase Disc: (DVD+RW/DVD-RW only) Allows you to erase all contents in the HDD title list. 11.HDD DVD: Allows you to dub from HDD to DVD. 12.DVD HDD: Allows you to dub from accidental editing or recording. 5. Delete All Titles: Allows... you to delete all titles, including the protected titles, in the HDD title list. 10.Delete ...
...Delete All Unprotected Titles Dubbing 111 HDD DVD 122 DVD HDD 1. Erase Disc: (DVD+RW/DVD-RW only) Allows you to erase all contents in the HDD title list. 11.HDD DVD: Allows you to dub from HDD to DVD. 12.DVD HDD: Allows you to dub from accidental editing or recording. 5. Delete All Titles: Allows... you to delete all titles, including the protected titles, in the HDD title list. 10.Delete ...

User manual, English (US)
Page 26
..., the unit automatically starts to format. • If titles have been recorded on the disc tray with its label side facing up. Press [STOP C] to activate the DVD component. BEFORE YOU START Switching HDD / DVD Mode Because this unit is displayed. Press [DVD] to exit the title list. 26 EN Align the disc to the... disc. To eject the disc: Press [OPEN/CLOSE A] to open the disc tray. 2) Place the disc on the disc, the title list is a combination of HDD and DVD recorder, you must first select which component (output mode) you wish to activate the...
..., the unit automatically starts to format. • If titles have been recorded on the disc tray with its label side facing up. Press [STOP C] to activate the DVD component. BEFORE YOU START Switching HDD / DVD Mode Because this unit is displayed. Press [DVD] to exit the title list. 26 EN Align the disc to the... disc. To eject the disc: Press [OPEN/CLOSE A] to open the disc tray. 2) Place the disc on the disc, the title list is a combination of HDD and DVD recorder, you must first select which component (output mode) you wish to activate the...

User manual, English (US)
Page 27
Introduction Connections Basic Setup Recording INITIAL SETTING You need to "ANTENNA IN" jack. Initial Setup Channel Preset Make sure the antenna is available in your area, follow these steps when ... GHI JKL MNO CHANNEL PQRS TUV WXYZ SPACE CLEAR SETUP AUDIO REPEAT HDMI DISC MENU TITLE OK DISPLAY RETURN V.REPLAY V.SKIP RAPID PLAY D.DUBBING TIMER HDD DVD REC MODE REC 1 Follow the procedure in analog CATV are automatically scanned and memorized. Antenna Cable (Analog) Cable (Analog / Digital) The unit will be memorized...
Introduction Connections Basic Setup Recording INITIAL SETTING You need to "ANTENNA IN" jack. Initial Setup Channel Preset Make sure the antenna is available in your area, follow these steps when ... GHI JKL MNO CHANNEL PQRS TUV WXYZ SPACE CLEAR SETUP AUDIO REPEAT HDMI DISC MENU TITLE OK DISPLAY RETURN V.REPLAY V.SKIP RAPID PLAY D.DUBBING TIMER HDD DVD REC MODE REC 1 Follow the procedure in analog CATV are automatically scanned and memorized. Antenna Cable (Analog) Cable (Analog / Digital) The unit will be memorized...
User manual, English (US)
Page 29
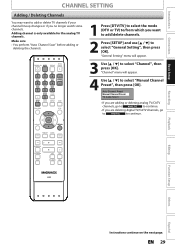
... "Channel", then press [OK]. "Channel" menu will appear. 3 Use [K / L] to select "Manual Channel Preset", then press [OK]. V.REPLAY V.SKIP RAPID PLAY D.DUBBING TIMER HDD DVD REC MODE REC Recording Playback Editing Function Setup Others Español Instructions continue on the next page. EN 29 OPEN/ STANDBY-ON DTV/TV SOURCE CLOSE .@/: ABC...
... "Channel", then press [OK]. "Channel" menu will appear. 3 Use [K / L] to select "Manual Channel Preset", then press [OK]. V.REPLAY V.SKIP RAPID PLAY D.DUBBING TIMER HDD DVD REC MODE REC Recording Playback Editing Function Setup Others Español Instructions continue on the next page. EN 29 OPEN/ STANDBY-ON DTV/TV SOURCE CLOSE .@/: ABC...

User manual, English (US)
Page 31
...If not, follow "Auto Clock Setting" below . 1 Select "Manual" at 12:00 a.m. / p.m. "General Setting" menu will appear. RAPID PLAY D.DUBBING TIMER HDD DVD REC MODE REC If the unit chooses an incorrect PBS channel, set the PBS channel manually by referring to a PBS station. Español EN.../satellite box, select the local PBS station on page 32. CH 1 3 Press [SETUP] and turn off . Introduction Connections Basic Setup Recording SETTING THE CLOCK Set the clock before you connect the antenna/cable signal and plug in your PBS channel number, then press [OK]. Playback...
...If not, follow "Auto Clock Setting" below . 1 Select "Manual" at 12:00 a.m. / p.m. "General Setting" menu will appear. RAPID PLAY D.DUBBING TIMER HDD DVD REC MODE REC If the unit chooses an incorrect PBS channel, set the PBS channel manually by referring to a PBS station. Español EN.../satellite box, select the local PBS station on page 32. CH 1 3 Press [SETUP] and turn off . Introduction Connections Basic Setup Recording SETTING THE CLOCK Set the clock before you connect the antenna/cable signal and plug in your PBS channel number, then press [OK]. Playback...

User manual, English (US)
Page 34
... Other 3/3 • Available languages differ depending on the broadcast. • The language information display will automatically disappear. • When you record digital TV broadcasting, the audio language you press [AUDIO], selected language will be displayed on the broadcast, pressing [AUDIO] does not display ... V.SKIP • When you have selected will be switched. RAPID PLAY D.DUBBING TIMER HDD DVD REC MODE REC Note • You cannot change the audio language for the timer recording of digital TV broadcasting. • Pressing [AUDIO] does not control external device audio...
... Other 3/3 • Available languages differ depending on the broadcast. • The language information display will automatically disappear. • When you record digital TV broadcasting, the audio language you press [AUDIO], selected language will be displayed on the broadcast, pressing [AUDIO] does not display ... V.SKIP • When you have selected will be switched. RAPID PLAY D.DUBBING TIMER HDD DVD REC MODE REC Note • You cannot change the audio language for the timer recording of digital TV broadcasting. • Pressing [AUDIO] does not control external device audio...

User manual, English (US)
Page 35
...[OK]. Refer to the following table to exit. TV Audio Select Stereo SAP Stereo: Outputs main-audio. Recording Playback Editing Function Setup Others Note on recording analog TV audio • When you record an analog TV program available in "General Setting" menu beforehand. "Channel" menu will appear. 2 Use ... JKL MNO CHANNEL PQRS TUV WXYZ SPACE CLEAR SETUP AUDIO REPEAT HDMI DISC MENU TITLE OK DISPLAY RETURN V.REPLAY V.SKIP RAPID PLAY D.DUBBING TIMER HDD DVD REC MODE REC 1 Press [SETUP] and use [K / L] to select either "Stereo" or "SAP" in second audio or stereo, ...
...[OK]. Refer to the following table to exit. TV Audio Select Stereo SAP Stereo: Outputs main-audio. Recording Playback Editing Function Setup Others Note on recording analog TV audio • When you record an analog TV program available in "General Setting" menu beforehand. "Channel" menu will appear. 2 Use ... JKL MNO CHANNEL PQRS TUV WXYZ SPACE CLEAR SETUP AUDIO REPEAT HDMI DISC MENU TITLE OK DISPLAY RETURN V.REPLAY V.SKIP RAPID PLAY D.DUBBING TIMER HDD DVD REC MODE REC 1 Press [SETUP] and use [K / L] to select either "Stereo" or "SAP" in second audio or stereo, ...

User manual, English (US)
Page 36
... JKL MNO CHANNEL PQRS TUV WXYZ SPACE CLEAR SETUP AUDIO REPEAT HDMI DISC MENU TITLE OK DISPLAY RETURN V.REPLAY V.SKIP RAPID PLAY D.DUBBING TIMER HDD DVD REC MODE REC 1 Press [SETUP] and use [K / L] to select "Caption Service", then press [OK]. OSD Language Screen Saver FL... closed caption, then press [OK]. Use this menu to the desired DTV closed captions called DTV CC. This is the default. DTV CC Caption Service Recording 5 Use [K / L] to change the settings for DTV CC. "General Setting" menu will appear. 2 Use [K / L] to select "Display", then press [OK]. 3 Use...
... JKL MNO CHANNEL PQRS TUV WXYZ SPACE CLEAR SETUP AUDIO REPEAT HDMI DISC MENU TITLE OK DISPLAY RETURN V.REPLAY V.SKIP RAPID PLAY D.DUBBING TIMER HDD DVD REC MODE REC 1 Press [SETUP] and use [K / L] to select "Caption Service", then press [OK]. OSD Language Screen Saver FL... closed caption, then press [OK]. Use this menu to the desired DTV closed captions called DTV CC. This is the default. DTV CC Caption Service Recording 5 Use [K / L] to change the settings for DTV CC. "General Setting" menu will appear. 2 Use [K / L] to select "Display", then press [OK]. 3 Use...

User manual, English (US)
Page 37
... GHI JKL MNO CHANNEL PQRS TUV WXYZ SPACE CLEAR SETUP AUDIO REPEAT HDMI DISC MENU TITLE OK DISPLAY RETURN V.REPLAY V.SKIP RAPID PLAY D.DUBBING TIMER HDD DVD REC MODE REC 1 Press [SETUP] and use [K / L] to select "User Setting", then press [OK]. OSD Language Screen Saver FL Dimmer DTV CC CC Style V-Chip... SETTINGS Digital TV Digital TV can also change the style of its closed caption such as font, color or size, etc. User Setting ON OFF Recording Playback Editing Function Setup Others Español Instructions continue on the next page.
... GHI JKL MNO CHANNEL PQRS TUV WXYZ SPACE CLEAR SETUP AUDIO REPEAT HDMI DISC MENU TITLE OK DISPLAY RETURN V.REPLAY V.SKIP RAPID PLAY D.DUBBING TIMER HDD DVD REC MODE REC 1 Press [SETUP] and use [K / L] to select "User Setting", then press [OK]. OSD Language Screen Saver FL Dimmer DTV CC CC Style V-Chip... SETTINGS Digital TV Digital TV can also change the style of its closed caption such as font, color or size, etc. User Setting ON OFF Recording Playback Editing Function Setup Others Español Instructions continue on the next page.
User manual, English (US)
Page 43
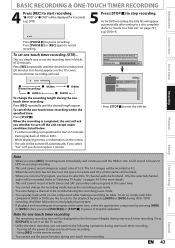
... a simple way to set one -touch timer recording. During playback of 16:9. Introduction Connections Basic Setup BASIC RECORDING & ONE-TOUCH TIMER RECORDING 4 Press [REC] to start in 5 minutes. - One-touch timer recording will be recorded as aspect ratio of HDD or DVD. - Using [REC] on the front panel display during HDD / DVD recording. Writing to Disc 90% 1 SP(2Hr) NOV...
... a simple way to set one -touch timer recording. During playback of 16:9. Introduction Connections Basic Setup BASIC RECORDING & ONE-TOUCH TIMER RECORDING 4 Press [REC] to start in 5 minutes. - One-touch timer recording will be recorded as aspect ratio of HDD or DVD. - Using [REC] on the front panel display during HDD / DVD recording. Writing to Disc 90% 1 SP(2Hr) NOV...


