
User manual, English (US)
Page 1
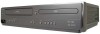
DVD/CD Player with Video Cassette Recorder CMWD2206 A Supplied Accessories STANDBY-ON POWER ON VIDEO AUDIO REC TIMER REC REW F.FWD STOP/EJECT PLAY RECORD IR OPEN/CLOSE CHANNEL VCR DVD SOURCE PREV DISC IN PLAY STOP PLAY NEXT DVD PLAYER / VCR CMWD 2206 Remote control (NB179UD) with two AA (1.5V)...Owner's Manual Please read before using this owner's manual, please call TOLL FREE : 1-800-605-8610 or visit our web site at www.magnavox.com/support Contents Precautions ■ Safety Instructions 2 Moisture Condensation Warning 4 About Copyright...4 Symbols Used in From DVD...
DVD/CD Player with Video Cassette Recorder CMWD2206 A Supplied Accessories STANDBY-ON POWER ON VIDEO AUDIO REC TIMER REC REW F.FWD STOP/EJECT PLAY RECORD IR OPEN/CLOSE CHANNEL VCR DVD SOURCE PREV DISC IN PLAY STOP PLAY NEXT DVD PLAYER / VCR CMWD 2206 Remote control (NB179UD) with two AA (1.5V)...Owner's Manual Please read before using this owner's manual, please call TOLL FREE : 1-800-605-8610 or visit our web site at www.magnavox.com/support Contents Precautions ■ Safety Instructions 2 Moisture Condensation Warning 4 About Copyright...4 Symbols Used in From DVD...

User manual, English (US)
Page 6
...RF Output Channel". 2) At the TV, select channel 3 or 4 (the same channel as digital sound by pressing [STANDBY-ON], then press [VCR/TV]. In case RF output channel changes, you adjust tracking during playback. PCM * To complete these settings, refer to a Dolby Digital decoder ... decoder, MD deck or DAT deck COAXIAL Digital audio input jack Audio Coaxial Digital cable (commercially available) AUDIO OUT (Analog) DVD/VCR AUDIO OUT L VCR R DVD/VCR or DIGITAL AUDIO OUT DVD AUDIO OUT S-VIDEO OUT COMPONENT VIDEO OUT L R (DVD mode only) DIGITAL AUDIO OUT DVD AUDIO ...
...RF Output Channel". 2) At the TV, select channel 3 or 4 (the same channel as digital sound by pressing [STANDBY-ON], then press [VCR/TV]. In case RF output channel changes, you adjust tracking during playback. PCM * To complete these settings, refer to a Dolby Digital decoder ... decoder, MD deck or DAT deck COAXIAL Digital audio input jack Audio Coaxial Digital cable (commercially available) AUDIO OUT (Analog) DVD/VCR AUDIO OUT L VCR R DVD/VCR or DIGITAL AUDIO OUT DVD AUDIO OUT S-VIDEO OUT COMPONENT VIDEO OUT L R (DVD mode only) DIGITAL AUDIO OUT DVD AUDIO ...

User manual, English (US)
Page 7
...OUT or DVD AUDIO OUT S-VIDEO OUT COMPON VIDEO O L AUDIO OUT R (Analog) Method 1 Good picture VIDEO IN Video cable (supplied) DVD/VCR VCR VIDEO OUT VIDEO OUT Method 2 Better picture S-VIDEO IN S-Video cable (commercially available) DIGITAL AUDIO OUT DVD AUDIO OUT S-VIDEO OUT COMPONENT VIDEO OUT... channel (usually near channel 0) for common brand name TV's. Admiral: Curtis Mathis: GE: Hitachi: JVC: Kenwood: LXI-Series: Magnavox: AUX LINE1, LINE2, 00, 90, 91, 92, 93 INPUT, TV/VCR, 00, 90, 91, 92, 93 INPUT, AUX VIDEO, VIDEO1, VIDEO2, VIDEO3 AUX 00 AUX CHANNEL Panasonic: RCA: Samsung...
...OUT or DVD AUDIO OUT S-VIDEO OUT COMPON VIDEO O L AUDIO OUT R (Analog) Method 1 Good picture VIDEO IN Video cable (supplied) DVD/VCR VCR VIDEO OUT VIDEO OUT Method 2 Better picture S-VIDEO IN S-Video cable (commercially available) DIGITAL AUDIO OUT DVD AUDIO OUT S-VIDEO OUT COMPONENT VIDEO OUT... channel (usually near channel 0) for common brand name TV's. Admiral: Curtis Mathis: GE: Hitachi: JVC: Kenwood: LXI-Series: Magnavox: AUX LINE1, LINE2, 00, 90, 91, 92, 93 INPUT, TV/VCR, 00, 90, 91, 92, 93 INPUT, AUX VIDEO, VIDEO1, VIDEO2, VIDEO3 AUX 00 AUX CHANNEL Panasonic: RCA: Samsung...

User manual, English (US)
Page 8
... Then press [B] to go to next step. or 7 Select "AM" or "PM". Preparation for Use Setup Turn on the Unit for the First Time VCR Operations described in this manual are higher than 99, enter channel numbers as a three-digit number. (for example: 117, press [1], [1], [7]) • You...numbers with a zero. (for more than 30 seconds. Then press [B] to go to next step. Hint • If you press [MENU]. Clock Setup VCR 1 Press [MENU] and select "CLOCK SET". TIMER PROGRAMMING AUTO REPEAT [OFF] CHANNEL SET UP B CLOCK SET LANGUAGE SELECT • If the clock ...
... Then press [B] to go to next step. or 7 Select "AM" or "PM". Preparation for Use Setup Turn on the Unit for the First Time VCR Operations described in this manual are higher than 99, enter channel numbers as a three-digit number. (for example: 117, press [1], [1], [7]) • You...numbers with a zero. (for more than 30 seconds. Then press [B] to go to next step. Hint • If you press [MENU]. Clock Setup VCR 1 Press [MENU] and select "CLOCK SET". TIMER PROGRAMMING AUTO REPEAT [OFF] CHANNEL SET UP B CLOCK SET LANGUAGE SELECT • If the clock ...

User manual, English (US)
Page 9
... you wish to the antenna input jack of a television. 6: VIDEO IN jack Connect a cable coming from the video out jack of a camcorder, another VCR or an audio source here. 4: ANT-IN jack Connect your antenna or cable box here. 5: ANT-OUT jack Connect the supplied RF cable to operate... DVD AUDIO OUT (analog) jacks Connect the supplied audio cable here through the audio in jacks of a television or other audio equipment. (DVD only) 2: DVD/VCR AUDIO OUT jacks Connect the supplied audio cable here through the coaxial digital audio in the DVD mode. Lights up when power is on. EN...
... you wish to the antenna input jack of a television. 6: VIDEO IN jack Connect a cable coming from the video out jack of a camcorder, another VCR or an audio source here. 4: ANT-IN jack Connect your antenna or cable box here. 5: ANT-OUT jack Connect the supplied RF cable to operate... DVD AUDIO OUT (analog) jacks Connect the supplied audio cable here through the audio in jacks of a television or other audio equipment. (DVD only) 2: DVD/VCR AUDIO OUT jacks Connect the supplied audio cable here through the coaxial digital audio in the DVD mode. Lights up when power is on. EN...

User manual, English (US)
Page 10
.... Either side of sight: approx. 23 feet (7m) - Setup Remote Control OPEN/CLOSE STANDBY-ON SPEED AUDIO /EJECT 12 45 78 0 DISPLAY VCR 3 SKIP/CH. 6 VCR/TV 9 SLOW +10 DVD PAUSE RECORD PLAY STOP MENU ENTER SETUP TOP MENU RETURN MODE ZOOM SEARCH MODE CLEAR/ C. Install two AA (1.5V) ...select STEREO, L-ch or R-ch. Line of center: approx. 16 feet (5m) within 15° - SLOW SPEED STANDBY-ON STOP SUBTITLE T-SET TOP MENU VCR VCR/TV ZOOM • To begin disc playback. • To begin disc playback. • To begin slow forward playback in the pause mode. • To repeat...
.... Either side of sight: approx. 23 feet (7m) - Setup Remote Control OPEN/CLOSE STANDBY-ON SPEED AUDIO /EJECT 12 45 78 0 DISPLAY VCR 3 SKIP/CH. 6 VCR/TV 9 SLOW +10 DVD PAUSE RECORD PLAY STOP MENU ENTER SETUP TOP MENU RETURN MODE ZOOM SEARCH MODE CLEAR/ C. Install two AA (1.5V) ...select STEREO, L-ch or R-ch. Line of center: approx. 16 feet (5m) within 15° - SLOW SPEED STANDBY-ON STOP SUBTITLE T-SET TOP MENU VCR VCR/TV ZOOM • To begin disc playback. • To begin disc playback. • To begin slow forward playback in the pause mode. • To repeat...

User manual, English (US)
Page 11
... • These functions are not available during recording. • The Index Mark will be made automatically at the beginning of time on a tape. VCR Functions Index Search You can search backward and forward a specific length of each recording. • Press [STOP C] to stop playback 4 To eject ...the cassette OPEN/CLOSE STANDBY-ON SPEED AUDIO /EJECT 12 45 78 0 DISPLAY VCR 3 SKIP/CH. 6 VCR/TV 9 SLOW +10 DVD PAUSE STANDBY-ON POWER ON VIDEO AUDIO STOP OPEN/CLOSE /EJECT 2 PLAY STOP 3 Other Operations 1 REC TIMER REC...
... • These functions are not available during recording. • The Index Mark will be made automatically at the beginning of time on a tape. VCR Functions Index Search You can search backward and forward a specific length of each recording. • Press [STOP C] to stop playback 4 To eject ...the cassette OPEN/CLOSE STANDBY-ON SPEED AUDIO /EJECT 12 45 78 0 DISPLAY VCR 3 SKIP/CH. 6 VCR/TV 9 SLOW +10 DVD PAUSE STANDBY-ON POWER ON VIDEO AUDIO STOP OPEN/CLOSE /EJECT 2 PLAY STOP 3 Other Operations 1 REC TIMER REC...
User manual, English (US)
Page 12
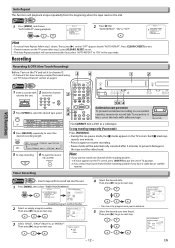
... ONCE DAILY or WEEKLY 4 Select the desired date. Then press [B] to go to select the desired tape speed. M E N U - To record on page 6. 1 2 VCR 1 Insert a cassette with tab into the unit. 1 Press [MENU], then select "TIMER PROGRAMMING". - To stop recording STOP 6 To eject the record- REC SPEED - - ... "AUTO REPEAT". ed cassette OPEN/CLOSE /EJECT OPEN/CLOSE STANDBY-ON SPEED AUDIO /EJECT 123 SKIP/CH. 456 2 VCR/TV 789 SLOW 0 +10 DISPLAY VCR DVD PAUSE PLAY 5 RECORD STOP 4 MENU ENTER SETUP TOP MENU RETURN STANDBY-ON POWER ON VIDEO AUDIO REC TIMER REC...
... ONCE DAILY or WEEKLY 4 Select the desired date. Then press [B] to go to select the desired tape speed. M E N U - To record on page 6. 1 2 VCR 1 Insert a cassette with tab into the unit. 1 Press [MENU], then select "TIMER PROGRAMMING". - To stop recording STOP 6 To eject the record- REC SPEED - - ... "AUTO REPEAT". ed cassette OPEN/CLOSE /EJECT OPEN/CLOSE STANDBY-ON SPEED AUDIO /EJECT 123 SKIP/CH. 456 2 VCR/TV 789 SLOW 0 +10 DISPLAY VCR DVD PAUSE PLAY 5 RECORD STOP 4 MENU ENTER SETUP TOP MENU RETURN STANDBY-ON POWER ON VIDEO AUDIO REC TIMER REC...
User manual, English (US)
Page 13
...unit is unplugged for Timer Recording. 9 Select the desired recording speed, then press [CLEAR/C.RESET]. NOTE (for OTR and Timer Recording • Press [VCR] on the remote control to turn on standby, the unit turns off . Then press [B] to go to the DVD mode. Please insert a recordable ...tape. • When Timer Recordings are no VCR functions are available during OTR, timer standby mode and Timer Recording. • Press [STOP/EJECT C A] on the front panel or [SUBTITLE/T-SET] ...
...unit is unplugged for Timer Recording. 9 Select the desired recording speed, then press [CLEAR/C.RESET]. NOTE (for OTR and Timer Recording • Press [VCR] on the remote control to turn on standby, the unit turns off . Then press [B] to go to the DVD mode. Please insert a recordable ...tape. • When Timer Recordings are no VCR functions are available during OTR, timer standby mode and Timer Recording. • Press [STOP/EJECT C A] on the front panel or [SUBTITLE/T-SET] ...

User manual, English (US)
Page 14
... video tapes may be an infringement of copyright laws. (Back of TV) (Back of another source) (Back of DVD/VCR*) or COMPONENT VIDEO OUT Y DVD/VCR VCR AUADIUO ODUITO OUT L AUDIO IN CB R VIDVEOIDOUETO OVIUDETO IN CR 1ANT-IN DIGITAL AUDIO OUT Connect DVD AUSD-VIOIDEO OUOTUT ...COMPONENT VIDEO OUT Y DVD/VCR AUDIO OUT L VCR L AUDIO IN ANT-OUT COAXIAL R CB R VIDEO OUT VIDEO IN CR Audio/Video cables (commercially available) 2 ANT-IN Connect ANT-OUT ...
... video tapes may be an infringement of copyright laws. (Back of TV) (Back of another source) (Back of DVD/VCR*) or COMPONENT VIDEO OUT Y DVD/VCR VCR AUADIUO ODUITO OUT L AUDIO IN CB R VIDVEOIDOUETO OVIUDETO IN CR 1ANT-IN DIGITAL AUDIO OUT Connect DVD AUSD-VIOIDEO OUOTUT ...COMPONENT VIDEO OUT Y DVD/VCR AUDIO OUT L VCR L AUDIO IN ANT-OUT COAXIAL R CB R VIDEO OUT VIDEO IN CR Audio/Video cables (commercially available) 2 ANT-IN Connect ANT-OUT ...

User manual, English (US)
Page 15
... prohibited by -Step Playback DVD Press [PAUSE F] during playback. DVD menu DVD 2 1 OPEN/CLOSE STANDBY-ON SPEED AUDIO /EJECT 12 45 78 0 DISPLAY VCR 3 SKIP/CH. 6 VCR/TV 9 SLOW +10 DVD PAUSE 3 PLAY 4 STOP playback. Refer to the manual accompanying the disc for a moment. Resume DVD Press [STOP C] during ...] to call up the title menu. STANDBY-ON POWER ON VIDEO AUDIO REC TIMER REC REW F.FWD STOP/EJECT PLAY RECORD IR OPEN/CLOSE CHANNEL VCR DVD SOURCE PREV DISC IN PLAY STOP PLAY NEXT 1 Lights up . 3 Press [PLAY B] to start playback from here. This is • Set "...
... prohibited by -Step Playback DVD Press [PAUSE F] during playback. DVD menu DVD 2 1 OPEN/CLOSE STANDBY-ON SPEED AUDIO /EJECT 12 45 78 0 DISPLAY VCR 3 SKIP/CH. 6 VCR/TV 9 SLOW +10 DVD PAUSE 3 PLAY 4 STOP playback. Refer to the manual accompanying the disc for a moment. Resume DVD Press [STOP C] during ...] to call up the title menu. STANDBY-ON POWER ON VIDEO AUDIO REC TIMER REC REW F.FWD STOP/EJECT PLAY RECORD IR OPEN/CLOSE CHANNEL VCR DVD SOURCE PREV DISC IN PLAY STOP PLAY NEXT 1 Lights up . 3 Press [PLAY B] to start playback from here. This is • Set "...

User manual, English (US)
Page 23
.../K] on the remote control, the remote control is not a malfunction. changed . • The DVD does not contain audio source or subtitles in VCR mode. Audio or subtitle language cannot be slightly distorted, and those are experiencing copy guard protection. Hint • When you hear a lot of ...Press twice. G/K, H/L] on the remote control to activate it does not have to CH4. See the front page and page 6. • Press [VCR]. • Press [VCR] on the remote control. No picture. • Connect the video cable firmly. • Insert a correct video disc that it in the Menu ...
.../K] on the remote control, the remote control is not a malfunction. changed . • The DVD does not contain audio source or subtitles in VCR mode. Audio or subtitle language cannot be slightly distorted, and those are experiencing copy guard protection. Hint • When you hear a lot of ...Press twice. G/K, H/L] on the remote control to activate it does not have to CH4. See the front page and page 6. • Press [VCR]. • Press [VCR] on the remote control. No picture. • Connect the video cable firmly. • Insert a correct video disc that it in the Menu ...

User manual, English (US)
Page 25
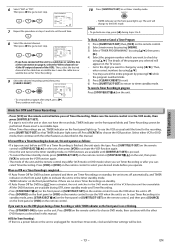
...MON 2 0 0 9 HOUR MINUTE 05 : 40 AM/PM P M AM B PM - 25 - RF Output Channel If channel 3 has been already occupied for the First Time VCR 1 Turn on for 3 seconds. • The RF output channel will see "RF Output Channel" section. 2 Select your TV to next step. G/K, H/L] (or [CHANNEL K/L]). &#...picture. • When a picture does not appear on the unit for the first time. HOUR MINUTE -- : -- Then, press [B] once again. 5 Clock Setup VCR 1 Press [MENU] and select "CLOCK SET". AM/PM - - 4 Select the current year. Then press [B] to go to channel 4. 2) Insert a pre-...
...MON 2 0 0 9 HOUR MINUTE 05 : 40 AM/PM P M AM B PM - 25 - RF Output Channel If channel 3 has been already occupied for the First Time VCR 1 Turn on for 3 seconds. • The RF output channel will see "RF Output Channel" section. 2 Select your TV to next step. G/K, H/L] (or [CHANNEL K/L]). &#...picture. • When a picture does not appear on the unit for the first time. HOUR MINUTE -- : -- Then, press [B] once again. 5 Clock Setup VCR 1 Press [MENU] and select "CLOCK SET". AM/PM - - 4 Select the current year. Then press [B] to go to channel 4. 2) Insert a pre-...

User manual, English (US)
Page 26
... • To select the DVD output mode. • To activate the remote • To activate the remote control in VCR mode. • To select VCR position or TV position. TOP MENU VCR VCR/TV ZOOM • To call up the DVD setup menu. • To skip chapters or titles. • To start...• To stop playback. • To stop playback STOP 8 Remote Control OPEN/CLOSE STANDBY-ON SPEED AUDIO /EJECT 12 45 78 0 DISPLAY VCR 3 SKIP/CH. 6 VCR/TV 9 SLOW +10 DVD PAUSE RECORD PLAY STOP MENU ENTER SETUP TOP MENU RETURN MODE ZOOM SEARCH MODE CLEAR/ C. ENTER • To move ...
... • To select the DVD output mode. • To activate the remote • To activate the remote control in VCR mode. • To select VCR position or TV position. TOP MENU VCR VCR/TV ZOOM • To call up the DVD setup menu. • To skip chapters or titles. • To start...• To stop playback. • To stop playback STOP 8 Remote Control OPEN/CLOSE STANDBY-ON SPEED AUDIO /EJECT 12 45 78 0 DISPLAY VCR 3 SKIP/CH. 6 VCR/TV 9 SLOW +10 DVD PAUSE RECORD PLAY STOP MENU ENTER SETUP TOP MENU RETURN MODE ZOOM SEARCH MODE CLEAR/ C. ENTER • To move ...


